
- SAP Community
- Products and Technology
- Product Lifecycle Management
- PLM Blogs by SAP
- Use SAP Cloud Platform Integration for Mediated In...
Product Lifecycle Management Blogs by SAP
Dive into product lifecycle management news, learn about digitalizing PLM for the digital supply chain, and stay informed with product updates from SAP.
Turn on suggestions
Auto-suggest helps you quickly narrow down your search results by suggesting possible matches as you type.
Showing results for
Advisor
Options
- Subscribe to RSS Feed
- Mark as New
- Mark as Read
- Bookmark
- Subscribe
- Printer Friendly Page
- Report Inappropriate Content
02-05-2021
2:41 PM
Introduction
Direct connection is used for the standard integration between SAP S/4HANA Cloud and SAP Digital Manufacturing Cloud (DMC) by default, which means there is no message transformation or protocol adaption.
However, we may need to transform the message content sometimes in order to meet special requirements. For example, custom product type is supported in SAP S/4HANA Cloud, but is not supported in DMC, so a custom product type (e.g. the value "ZFHM") must be converted to a standard product type (e.g. the value "FHMI") supported by DMC when the product master data is being replicated from SAP S/4HANA Cloud to DMC. Mediated integration is required in such scenarios.
This blog post describes how to use SAP Cloud Platform Integration (CPI) to achieve the mediated integration.
Step 1: Preparation - Get DMC SOAP Web Service Information
Log on the SAP S/4HANA Cloud tenant. Go to the “Communication Arrangements” application.
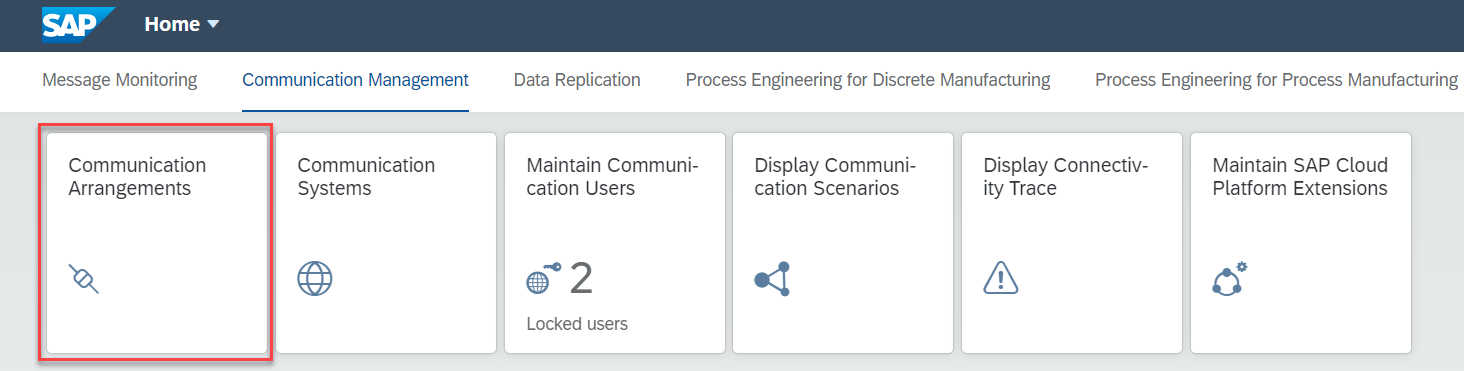
Find the communication arrangement for the scenario “SAP_COM_0009” (product integration) which is used as an example in this tutorial.

Open this communication arrangement. Scroll down to the section “Outbound Communication”. Note down the user name for logging on DMC.

Scroll down to the section “Outbound Services” >> Interface “Product Master - Replicate from SAP S/4HANA Cloud to Client”. Note down its service URL.

The service URL follows the convention: https://<xxx>-dme-integration-ms.cfapps.<xxx>:443/ws?X-Identity-Zone-Subdomain=<xxx>&tenantid=<xxx>;.
Click the link “Download WSDL” to download the WSDL file of this SOAP web service. This WSDL file is needed later when the CPI integration flow is developed.

Step 2: Develop CPI Integration Contents
Go to the “Design” view of the CPI tenant: https://<cpi_tenant_host>/itspaces/shell/design.
Step 2.1 Create Integration Package
Create a new integration package as a container for all relevant artifacts.

Fill the required information of the integration package and save it.

Step 2.2 Create Value Mapping
Go to the “Artifacts” tab page of the integration package. Choose “Add” >> “Value Mapping”.

Fill the required information of the value mapping and save it.

Open this newly created value mapping artifact, and switch to edit mode. Add one row of agency and identifier.

Enter the following information:
- Source agency: S4HANA
- Source identifier: Product Type
- Target agency: DMC
- Target identifier: Product Type

Add the values in the table below. In the column “S4HANA, Product Type”, enter the custom product types available on SAP S/4HANA Cloud. In the column “DMC, Product Type”, enter the standard product types available on DMC.

Note: Below is the list of standard product types available on DMC.
| Type ID | Description |
| KMAT | Configurable |
| FERT | Finished |
| MAT | General |
| NLAG | Non-stock |
| UNBW | Non-valuated |
| HIBE | Operating supplies |
| VERP | Packaging |
| LEIH | Returnable packaging |
| HALB | Semi-finished product |
| DIEN | Service |
| SERV | Services |
| SWNV | Software non-valuated |
| ERSA | Spare parts |
| HAWA | Trading goods |
| ROH | Raw |
| CSTM | Custom |
| PIPE | Pipeline |
| FHMI | PRT |
Step 2.3 Create Integration Flow
Go to the “Artifacts” tab page of the integration package. Choose “Add” >> “Integration Flow”.

Fill the required information of the integration flow and save it.

Open this newly created integration flow, and switch to edit mode. Enter meaningful names for the sender system and the receiver system.


Select the sender system. Click the arrow icon next to it and drop the connection on the start event.

Select the SOAP adapter type and the message protocol “SOAP 1.x” in the popup window.

In the integration flow editor, select the arrow which represents the SOAP sender channel. In the “Properties” section at the bottom, enter an address on the “Connection” tab page. This value will be used as the suffix of the inbound endpoint URL for this integration flow. Keep the default value for all other SOAP adapter properties.

Select the end event. Click the arrow icon next to it and drop the connection on the receiver system. Then Select the SOAP adapter type and the message protocol “SOAP 1.x” in the popup window.

In the integration flow editor, select the arrow which represents the SOAP receiver channel. In the “Properties” section at the bottom, configure the address and credential on the “Connection” tab page. Keep the default values for all other properties.
In the “Address” field, enter “{{DMC_SOAP_WS_ENDPOINT}}” to externalize it.

Click on the “Address” field to define a default value for the externalized parameter DMC_SOAP_WS_ENDPOINT. The default value is actually not significant, because the parameter will be configured with a different value before the integration flow is deployed in different environments.


In the “Authentication” field, choose “Basic” from the dropdown list. In the “Credential Name” field, enter “{{DMC_SOAP_WS_CREDENTIAL}}” to externalize it.

Click on the “Credential Name” field to define a default value for the externalized parameter DMC_SOAP_WS_CREDENTIAL. The default value is actually not significant, because the parameter will be configured with a different value before the integration flow is deployed in different environments.

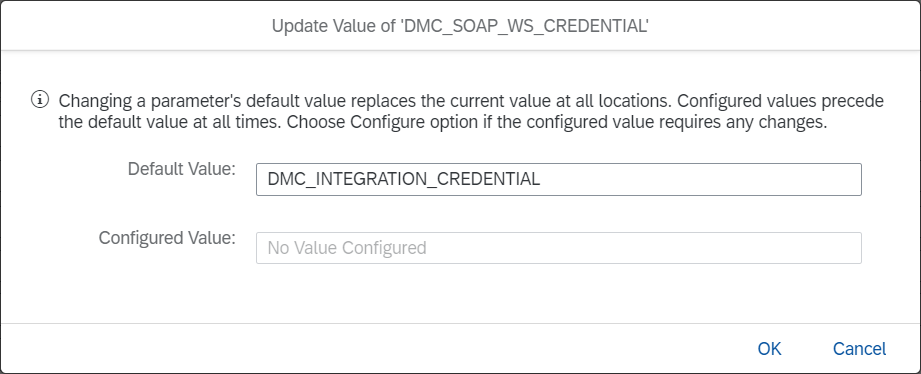
Note: The two externalized parameters DMC_SOAP_WS_ENDPOINT and DMC_SOAP_WS_CREDENTIAL will be configured before the integration flow is deployed in different environments.
Now we need to add a message mapping step in the integration flow. In the toolbox, click on the “Mapping” category and select “Message Mapping”.

Place the message mapping step on the arrow between the sender system and the receiver system.

Enter a meaningful name for this message mapping step.

Click on the "Add" icon near the message mapping step to create a new message mapping program.


In the message mapping editor, click “Add source message” to add the message type used by the sender system (i.e. SAP S/4HANA Cloud).

Choose “Upload from File System” to upload the WSDL file which was downloaded from SAP S/4HANA Cloud earlier in the step 1.

As the result, the structure of the SOAP message body is displayed as a tree.

Click “Add target message” to add the message type used by the receiver system (i.e. DMC). It is the same as the source message type.

Select the root nodes of the source message type and the target message type. Then click the second button in the toolbar to map fields with the identical names automatically.

The result looks like below.

We need to override the mapping of the field “ProductTypeCode”. In the searching area, enter the field name “ProductTypeCode” to locate the field in the tree. And then click the link between the source field and the target field to display the mapping definition in the bottom area.

Delete the direct connection in the mapping editor.

In the “Functions” library at the left of the editor, choose “Conversions” >> “valueMapping”.
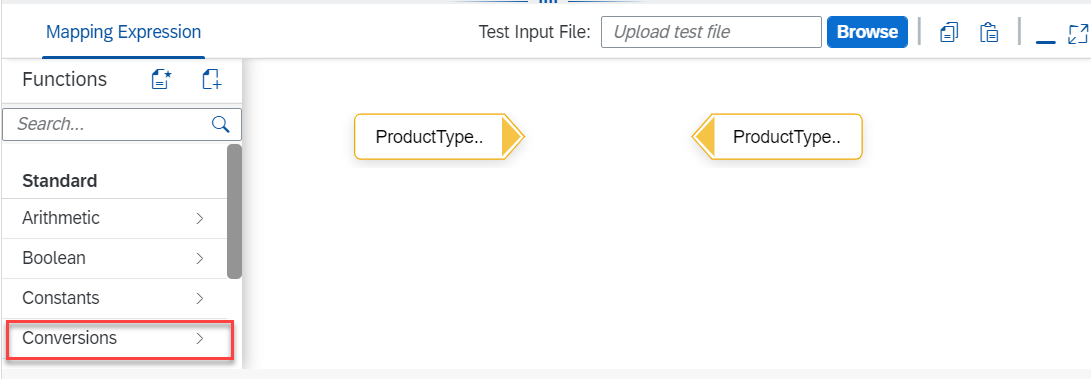

Place the value mapping function in the editor and complete the connections like below.

Click “Advanced” button on the value mapping function to define its parameters.

The source agency, source identifier, target agency, and target identifier entered here must be the same as the ones defined in the value mapping artifact in the previous step 2.2, which may look like below.

Save the mapping and exit the mapping editor.
The development of the integration flow is completed.
Step 3: Deploy CPI Integration Contents
Step 3.1: Create and Deploy User Credential
Go to the “Monitoring” view of the CPI tenant: https://<cpi_tenant_host>/itspaces/shell/monitoring.
Select the “Security Material” application.

Click on “Create” >> “User Credentials”.

Enter the user name and password for logging on DMC. Then deploy it on the tenant.


Step 3.2: Configure and Deploy Value Mapping
Open the integration package, select the value mapping artifact, and choose “Configure”.

In the configuration view, you can add/delete/change values. After the configuration is finished, deploy the artifact.

Step 3.3: Configure and Deploy Integration Flow
Open the integration package, select the integration flow, and choose “Configure”.

Configure the SOAP receiver channel. In the “Address” field, enter the DMC SOAP web service endpoint URL which was obtained in the step 1. In the “Credential Name” field, enter the name of the user credential which was created and deployed in the step 3.1. After the configuration is finished, deploy the integration flow.

We need to note down the endpoint URL of this integration flow because its host name and path need to be entered in the communication configuration in SAP S/4HANA Cloud later. Go to the “Monitoring” view. Navigate to the “Manage Integration Content” section and select the tile “All”.

In the left pane, select the integration flow. In the right pane, go to the “Endpoints” tab page and note down the endpoint URL.

Step 4: Configure Communication in SAP S/4HANA Cloud
Step 4.1: Create Communication System
Log on the SAP S/4HANA Cloud tenant. Go to the “Communication System” application.

Create a new communication system for the CPI tenant. Maintain the tenant host in the “Host Name” field.

In the communication system, you also need to maintain the user and password for logging on the CPI tenant. Ensure the user has the role “ESBMessaging.send” in the CPI tenant. For more information about authorization, refer to SAP Note 2543001 - How to grant access to CPI tenant.
Step 4.2: Create Communication Arrangement
Create a new communication arrangement for the scenario “SAP_COM_0009” (product integration) which is used as an example in this tutorial. Select the communication system which was created for the CPI tenant in the previous step.

Scroll down to the section “Outbound Communication”. Select the user for logging on CPI tenant.

Scroll down to the section “Outbound Services” >> Interface “Product Master - Replicate from SAP S/4HANA Cloud to Client”. Maintain the path of the integration flow endpoint URL, and other additional properties relevant to this interface.

From now on, you should use this communication arrangement for replicating product master data from SAP S/4HANA Cloud to DMC.
Monitor Message Processing Status in CPI
Go to the “Monitoring” view of the CPI tenant: https://<cpi_tenant_host>/itspaces/shell/monitoring.
Navigate to the “Monitor Message Processing” section and select the tile “All Integration Flows”.

Filter the messages by the integration flow name. Then you can see all messages of this integration flow and their statuses.

Summary
With SAP Cloud Platform Integration you can implement mediated integration between SAP S/4HANA Cloud and SAP Digital Manufacturing Cloud. The example introduced in this blog post can be easily adapted to your specific business needs.
- SAP Managed Tags:
- SAP Digital Manufacturing,
- SAP S/4HANA Public Cloud
Labels:
You must be a registered user to add a comment. If you've already registered, sign in. Otherwise, register and sign in.
Labels in this area
Related Content
- Top SAP PLM Sessions You Cannot Miss at SAP Sapphire Orlando 2024! in Product Lifecycle Management Blogs by SAP
- How to use Digital Manufacturing MDOs within Custom Plugins – Example: Where Used Report in Product Lifecycle Management Blogs by SAP
- SAP DM - Qualification Management and Certification Management in Product Lifecycle Management Q&A
- DMC SAP Build Workzone Integration in Product Lifecycle Management Q&A
- Meet PLM experts from SAP at Hannover Messe 2024 in Product Lifecycle Management Blogs by SAP