
- SAP Community
- Products and Technology
- Technology
- Technology Blogs by SAP
- SAP S/4HANA for advanced compliance reporting, Bra...
Technology Blogs by SAP
Learn how to extend and personalize SAP applications. Follow the SAP technology blog for insights into SAP BTP, ABAP, SAP Analytics Cloud, SAP HANA, and more.
Turn on suggestions
Auto-suggest helps you quickly narrow down your search results by suggesting possible matches as you type.
Showing results for
former_member71
Explorer
Options
- Subscribe to RSS Feed
- Mark as New
- Mark as Read
- Bookmark
- Subscribe
- Printer Friendly Page
- Report Inappropriate Content
02-01-2021
8:51 AM
(Scroll down for the English version, which is proudly presented by the SAP Translation Portal)

É comum precisar estender ou modificar a maneira como o ACR Brazil Option calcula os impostos para atender àquela regra de negócio específica do seu estado, município ou negócio.
Na versão do TDF ADD-on, os clientes e parceiros podem estender ou customizar o TDF criando suas próprias calculation views consumindo as views do pacote sap.glo.tmflocbr.ctr (Central Tax Repository).
No ACR Brazil Option On-premise, o princípio de integração é o mesmo. Há, porém, a diferença da utilização do container HDI.
Neste blogpost, vamos apresentar um exemplo de como você pode estender ou customizar o ACR Brazil Option utilizando as calculation views. Caso você já tenha feito customizações no TDF ADD-on, também vamos mostrar como você pode migar as suas calculation views clássicas para o ACR Brazil Option. Se este for o seu caso avance para a sessão Migração de customizações do TDF Add-on para o ACR Brazil Option.
Vamos começar:
1. Pré-requisitos para realizar as configurações a seguir:
- Prepare o seu ambiente de desenvolvimento instalando o WebIDE For Hana, a SAP Note “2569651 - Configure your ABAP Development System for Development of HDI Objects” contém as informações necessárias.
- Caso você esteja em releases inferiores às listadas a seguir, instale a SAP Note 3012503 - [S/4HANA ACR Brazil Option] Note 33: Support for Custom Logical HDI Container.
- SAP S/4HANA 2020 SP02.
- SAP S/4HANA 1909 SP04.
- SAP S/4HANA 1809 SP06.
2. Criação de seu HDI container
- Acesse a transação SCTS_AMHC
- Preencha o nome do seu container e clique em Create
- Prefira um nome curto, pois o nome do container é concatenado ao nome da calculation view e o nome de exibição dos objetos na transport request do Abap é limitado a 44 caracteres. Caso o nome ultrapasse esse limite, ele será transformado em um código hash. Isso não é um problema, mas dificulta a identificação do objeto que está sendo transportado.
- Abap namespaces, como por exemplo /TMF/, são suportados a partir das releases:
- ABAP Platform 2020 (aka 7.55) SP00
- ABAP Platform 1909 (aka 7.54) SP01
- ABAP Platform 1809 (aka 7.53) SP04
- AS ABAP 7.52 SP06

- Preencha as informações do seu container conforme a imagem abaixo:

- Clique em Check e Activate.
- Escolha o pacote no qual o container será salvo.
- Executando esses passos, agora você tem um container que terá acesso através de synonyms ao container do ACR Brazil Option e ao schema lógico SAP_ABAP (onde estão as tabelas standard do S/4HANA).
3. Criação de seu HDI Namespace
- Abra o Abap Development Tools (ADT).
- Navegue até o pacote onde será criado o HDI Namespace.
- Clique com o botão direito do mouse em New -> Other Abap Repository Object.
- No filtro, digite HDI Namespace.
- Clique em HDI Namespace.
- O pop-up a seguir abrirá.

- Informe o namespace no campo “name”. O namespace segue a convenção de domínio da empresa invertido (ex: “com.mycompany”). Dica: escolha um namespace curto em função da limitação de 44 caracteres da request do Abap. O namespace diferencia maiúsculas e minúsculas. Desse modo, digite, preferencialmente, o nome usando apenas letras minúsculas.
- Informe no campo “Container Name” o nome do container que você criou no passo 2.
- Em “Namespace Configuration”, marque a opção “Append subfolders in namespace generation (compatibility mode for importing migration results from SAP HANA Repository)”.
- Clique em Finish.
- Após criar o seu HDI Namespace, clique no botão Open in Web IDE.

- Agora no Web IDE você pode desenvolver as suas calculation views.
4. Consumo das SAP HANA calculation views do ACR Brazil Option
Vamos criar uma calculation view de exemplo apenas para demonstrar como consumir a tabela J_1BNFDOC do S/4HANA e a view NF_DOCUMENTO_ITEM_IMPOSTO do ACR Brasil Option.
Mas, antes de criar a calculation view, é necessário criar um arquivo de synonyms, que nos dará acesso a tabelas e views do nosso container.
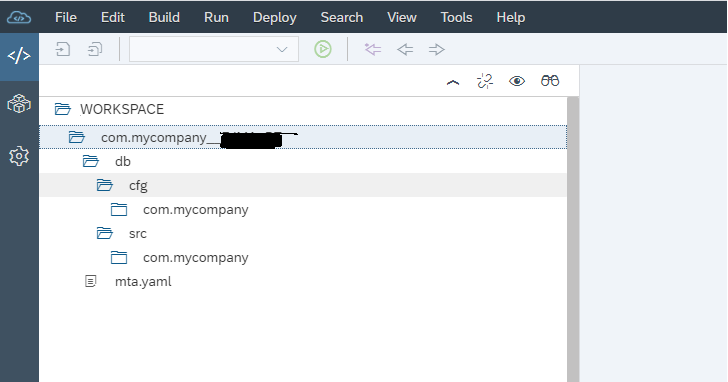
- Clique com o botão direito na pasta com.mycompany.
- No menu pop-up, selecione New -> File.
- Digite o nome do arquivo SAPTMF_RT.hdbsynonym.
- Feche o editor gráfico do synonym. Você pode usar a interface gráfica do Synonym Editor também, mas tenha certeza de estar usando uma versão recente do WebIDE (estamos usando neste blogpost a versão SAP Web IDE for HANA 2 SPS 04 Patch 9 (Build 4.4.22 )). Versões antigas podem gerar um JSON com parâmetros que não funcionam para o HDI container gerenciado pelo ABAP. Então, depois de usar a interface gráfica, abra o arquivo usando o Code Editor e certifique-se de que o texto JSON gerado pelo Synonym Editor está igual ao JSON mostrado a seguir.

- Clique com o botão direito no arquivo SAPTMF_RT.hdbsynonym e selecione a opção Open Code Editor.

- Cole o texto JSON abaixo.
{

    "com.mycompany::NF_DOCUMENTO_ITEM_IMPOSTO": {

        "target": {

            "logical_schema": "SAPTMF_RT",

            "object": "sap.glo.tmflocbr.ctr::NF_DOCUMENTO_ITEM_IMPOSTO"

        }

    }

}- Salve o arquivo.
- Repita o mesmo processo para criar um novo arquivo de synonym, mas com o nome de SAP_ABAP.hdbsynonym.
- Cole o conteúdo abaixo:
{

    "com.mycompany::/TMF/D_NF_DOC": {

        "target": {

            "logical_schema": "SAP_ABAP",

            "object": "/TMF/D_NF_DOC"

        }

    },

    "com.mycompany::J_1BNFDOC": {

        "target": {

            "logical_schema": "SAP_ABAP",

            "object": "J_1BNFDOC"

        }

    }

}- Salve o arquivo. O nome do arquivo de synonym é livre. O importante é que ele tenha a extensão .hdbsynonym. Você também pode ter apenas um arquivo de synonym no seu projeto. Vamos, ainda assim, seguir a convenção de ter um arquivo de synonym para cada container ou schema externo.
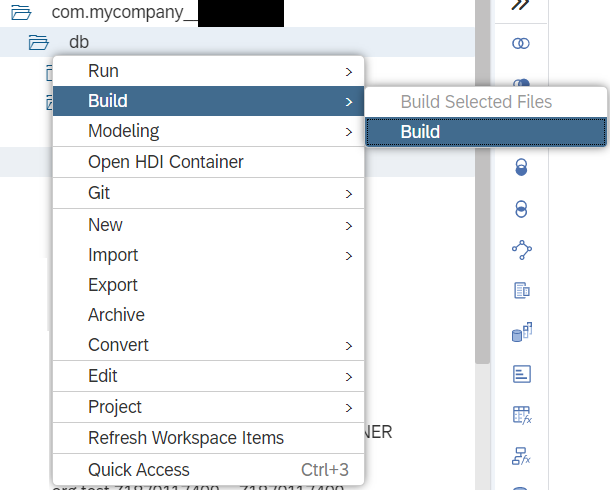
- Agora, clique com o botão direito na pasta DB e selecione Build -> Build. O build é similar ao processo de ativação de uma view no Hana Studio. Caso você clique com o botão direito, por engano, no nome do projeto e selecione a opção Build -> Build, o build não ativará as views, mas empacotará o projeto em um arquivo .mtar (arquivo para fazer deploy do projeto em outros ambientes).

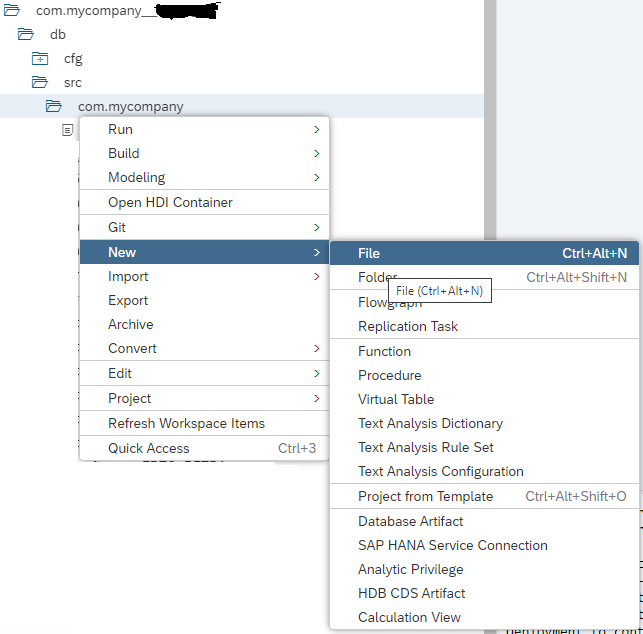
- Clique com o botão direito na pasta my.mycompany e selecione a opção New -> Calculation View.

- Preencha o nome e o tipo de view que deseja criar (veja o exemplo abaixo).
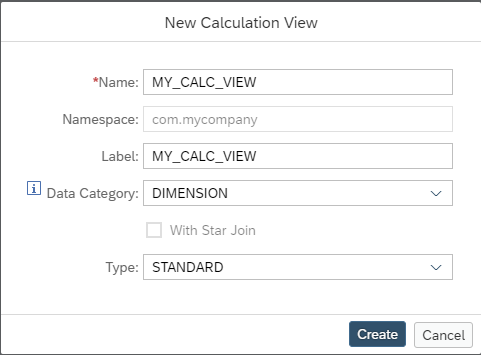
- Clique em Create.
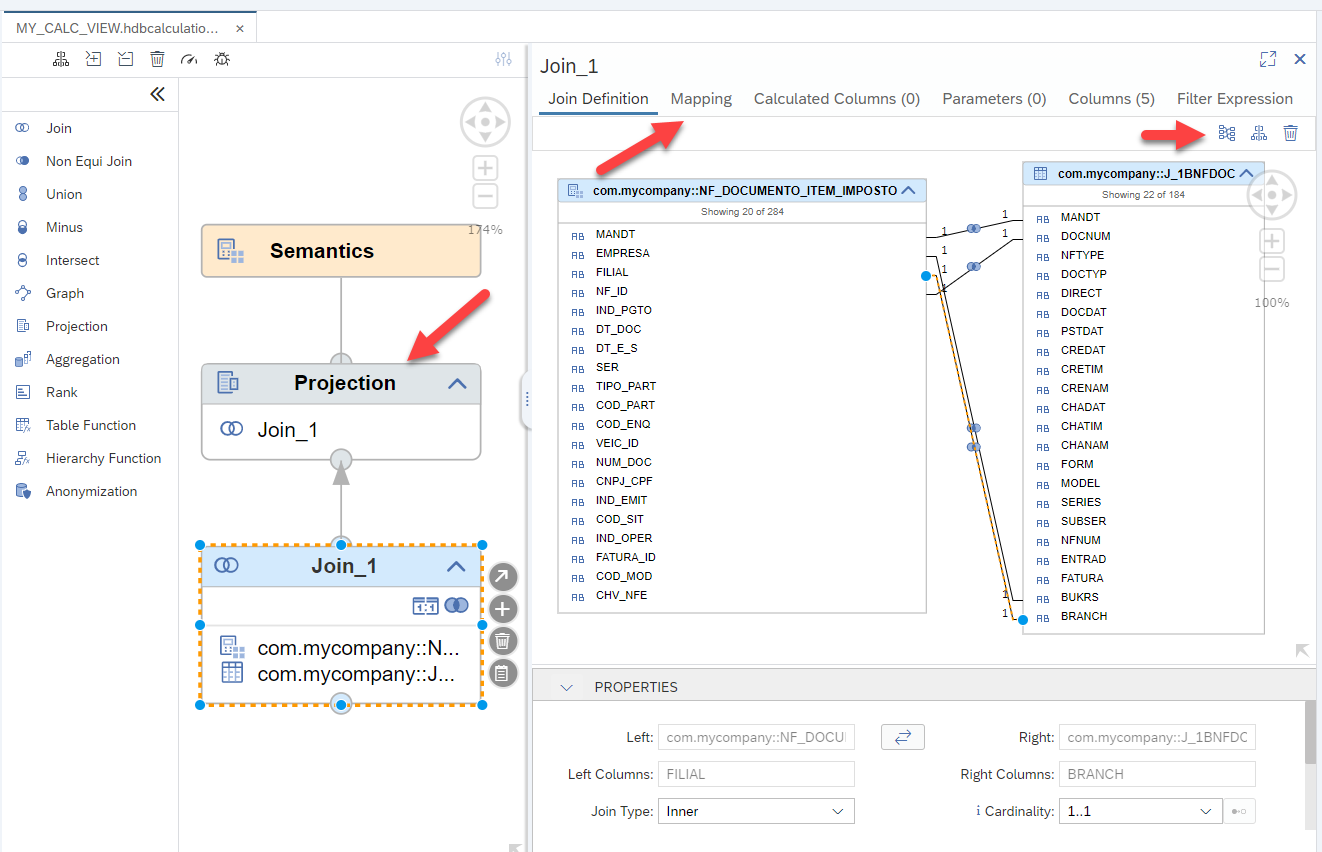
- Na calculation view, arraste um nodo de Join e, em seguida, clique no ícone +.

- Selecione o container SAPTMF_RT.

- No campo de pesquisa, digite o nome da view NF_DOCUMENTO_ITEM_IMPOSTO.
- Selecione a view com o nome sap.glo.tmflocbr.ctr::NF_DOCUMENTO_ITEM_IMPOSTO com a coluna Synonym preenchida.

- Clique em Finish.
- Clique novamente no ícone + do nodo Join_1.
- Selecione o schema lógico SAP_ABAP.

- No campo de pesquisa, digite o nome J_1BNFDOC.
- Selecione a tabela J_1BNFDOC que tenha a coluna Synonym preenchida.

- Clique em Finish
- Agora, para finalizar, apenas selecione alguns campos para o Join. Depois, propague alguns campos até o Semantics.
- Agora, clique com o botão direito na view e selecione Build -> Build Selected Files.

- Após o Build, para teste, você pode executar um data preview para visualizar os dados de saída da view.
5. Configurando a tabela de customizing /TMF/D_VIEW_VERS
Agora, é necessário informar ao ACR Brazil Options quais são as suas views customizadas. Para isso, você precisa preencher o nome da sua view e o nome do seu container na tabela /TMF/D_VIEW_VERS.
- Abra a transação SM30.
- No campo Table/View, digite /TMF/D_VIEW_VERS.
- Clique em Maintain.
- Para o nosso exemplo, vamos alterar o registro 0000 do EFD.

- No campo View Name, altere o nome da view sap.glotmflocbr.efd:EFD_0000 para com.mycompany::MY_CALC_VIEW.

- Informe o nome lógico do seu container /TMF/HDI.

- Salve as suas alterações.
- Quando o registro 0000 for chamado, a sua view será executada ao invés da view padrão do ACR Brazil Option.
Migração de customizações do TDF Add-on para o ACR Brazil Option
Se você já possuía customizações no TDF ADD-on e quer migrar a sua customização para o ACR Brazil Option, siga os passos abaixo:
- Caso você possua Attribute views, Script views ou Classical XML-Based analytics privileges no seu projeto, será necessário converter esses artefatos para Graphical Calculation Views, já que o HDI não suporta esses tipos de artefatos. Acesse o tutorial Tutorial: Migrating SAP HANA Repository-based Developments Used in ABAP to HTA for HDI e execute os passos descritos no item 5 - Optional: Migrate specific objects.
- O XML da calculation view do HDI é um pouco diferente do XML de uma calculation view clássica, pois alguns tipos de dados foram reformulados. Então, a segunda etapa é utilizar a ferramenta de migração xs-migration tool para converter as suas calculation views antigas para o formato novo do HDI.
- Você precisará de um usuário com as permissões abaixo no seu banco de dados HANA. Vamos chamar esse usuário de MIGRATION_USER.
Source System
- Object Privileges:
- SYNONYMS : SELECT
- GET_OBJECT_DEFINITION : EXECUTE
- TABLE_COLUMNS : SELECT
- TABLES : SELECT
- OBJECT_DEPENDENCIES : SELECT
- M_SCHEMA_MAPPING : SELECT
- ACTIVE_CONTENT_TEXT : SELECT
- ACTIVE_CONTENT_TEXT_CONTENT : SELECT
- ACTIVE_OBJECT_TEXT : SELECT
- ACTIVE_OBJECT_TEXT_CONTENT : SELECT
- M_DATABASE : SELECT
- GRANTED_PRIVILEGES : SELECT
- GRANTED_ROLES : SELECT
- PROCEDURES : SELECT
- OBJECTS : SELECT
- CATALOG_OBJECTS_CREATED_BY_REPOSITORY_ACTIVATIONS : SELECT
- REPOSITORY_REST : EXECUTE
- ACTIVE_TAGS : SELECT
- CDS_ANNOTATION_VALUE : SELECT
- CDS_ARTIFACT : SELECT
- System Privileges:
- CATALOG READ
- Package Privileges:
- For all packages in migrated DU: REPO.READ
- Object Privileges:
Source/Parse System
- GET_OBJECTS_IN_DDL_STATEMENT : EXECUTE
- Baixe o XS Advanced Migration Assistant (xs-migration) no link ou abra o site SAP Software Download Center, clique em SUPPORT PACKAGES AND PATCHES e, depois, procure por XSAC MIGRATION (Você precisa ter permissão para baixar o arquivo).
- Extraia o arquivo ZIP baixado.
- Navegue até a pasta xs-migration e renomeie o arquivo .env-template para .env.
- Utilize a credencial do seu MIGRATION_USER no arquivo .env .
HANA_HOST=<YOUR_HANA_HOST_NAME>
HANA_SQL_PORT=<YOUR_SQL_PORT>
HANA_USER=MIGRATION_USER
HANA_PASSWD=SENHA do MIGRATION_USER
HANA_CERTIFICATE=<OPTIONAL>
- A sua SQL_PORT pode ser encontrada na aba de Landscape no Hana Studio, conforme a imagem abaixo.

- Ainda na pasta xs-migration, crie um arquivo chamado mapping.json contendo o seguinte json:
[{

    "schemaName": "<SCHEMA_CREATED_FOR_TDF>",

    "synonymSubpath": "",

    "logicalSchemaName": "SAP_ABAP"

}, {

    "schemaName": "<SCHEMA_CREATED_FOR_ECC_TABLES>",

    "synonymSubpath": "",

    "logicalSchemaName": "ECC_SAP_ABAP"

}, {

    "schemaName": "SYS",

    "synonymSubpath": "",

    "logicalSchemaName": "SYS"

}, {

    "schemaName": "_SYS_BI",

    "synonymSubpath": "",

    "logicalSchemaName": "_SYS_BI"

}]- Substitua <SCHEMA_CREATED_FOR_TDF> pelo nome do seu schema que contém as tabelas shadows do TDF.
- Substitua <SCHEMA_CREATED_FOR_ECC_TABLES> pelo nome do seu schema que contém as tabelas do ECC ou S/4HANA replicadas via SLT (geralmente, esse schema é chamado de SAP_ECC).
- Se você tem o TDF ADD-on com SLT, você pode observar que existem dois schemas: um contendo as tabelas replicadas do ECC ou S/4HANA e outro com as tabelas shadows do TDF. Já no ACR Brazil Option, as tabelas do TDF e S/4HANA ficam no mesmo schema lógico chamado SAP_ABAP. Esse arquivo mapping.json mapeia os schemas físicos que as views consomem no TDF ADD-on para o schema lógico que as views passaram a consumir no ACR Brazil Option. Se as tabelas do TDF estão no mesmo schema lógico das tabelas do S/4HANA, por que o logicalSchemaName é ECC_SAP_ABAP em vez de SAP_ABAP? A resposta é simples. A ferramenta de migração, no momento em que esse blogpost foi escrito, suporta apenas o relacionamento de um schema físico para um schema lógico. Nos passos a seguir, vamos substituir ECC_SAP_ABAP por SAP_ABAP no arquivo de synonym gerado.
- Abra o Command Prompt na pasta xs-migration.
- Exemplo de comando de migração:
xs-migration --packages glo.tmflocbr --zip --hta --synonym-target-provider mapping.json --overwrite-root-namespace sap.glo.tmflocbr --integrated-synonymtargets - A estrutura de pacotes do Repositório SAP HANA foi traduzida em namespace no HDI. O namespace tem a finalidade de manter a compatibilidade do repositório antigo com o container HDI.
- O parâmetro ––packages exibe os pacotes que você deseja migrar.
- Por padrão, o root-namespace é o nome do pacote onde o primeiro objeto foi encontrado. Utilizaremos o parâmetro ––overwrite-root-namespace para sobrescrever o nome padrão do root-namespace. O nome do root-namespace (exemplo: “com.mycompany”) deve ser o mesmo que o informado no nome do HDI Namespace, passo 3.
- Existirão dois possíveis cenários no TDF ADD-on:
- No primeiro cenário, as suas views estarão dentro do pacote sap.glo.tmflocbr (por exemplo, sap.glo.tmflocbr.myview). Neste caso, você pode usar o comando da seguinte forma:
xs-migration --packages glo.tmflocbr.myview, sap.glo.tmflocbr.mysecondviews --zip --hta --synonym-target-provider mapping.json --overwrite-root-namespace com.mycompany --integrated-synonymtargets
- No segundo cenário, as suas views estarão fora do pacote sap.glo.tmflocbr, ou seja, você terá um pacote root independente (por exemplo, “com.mycompany”) com sub pacotes (por exemplo, “com.mycompany.ecd”, “com.mycompany.efd” e etc.). Neste caso, você pode executar o comando da seguinte forma:
xs-migration --packages com.mycompany --zip --hta --synonym-target-provider mapping.json --overwrite-root-namespace com.mycompany --integrated-synonymtargets
- Execute o comando de acordo com o seu cenário.
- Verifique se a migração foi concluída com sucesso.
- Você também pode acessar o relatório de migração gerado. Ele se encontra no caminho especificado pelo campo Report URL.
- No primeiro cenário, as suas views estarão dentro do pacote sap.glo.tmflocbr (por exemplo, sap.glo.tmflocbr.myview). Neste caso, você pode usar o comando da seguinte forma:

Depois de migrar suas calculation views com sucesso, execute os passos descritos nas seguintes sesões:
- Pré-requisitos para realizar as configurações a seguir
- Criação de seu HDI container
- Criação de seu HDI Namespace
Agora que você configurou o seu ambiente de desenvolvimento do WebIDE for HANA, criou o seu HDI Container e o HDI Namespace, vamos importar as suas calculation views convertidas para o WebIDE.
- Abra o WebIDE.
- Clique com o botão direito na pasta DB e selecione Import -> File or Project.

- Clique em Browse... e selecione o arquivo zip gerado pela ferramenta de migração e clique em OK.

- Depois de importar os arquivos, abra o arquivo de synonym ECC_SAP_ABAP.hdpsynonym clicando em Open Code Editor.

- Agora, utilize o atalho Ctrl + H para abrir a ferramenta Replace e substitua todos os nomes ECC_SAP_ABAP por SAP_ABAP.

- Clique em Replace All, para substituir todos as ocorrências de ECC_SAP_ABAP para SAP_ABAP.

- Clique com o botão direito na pasta DB e depois no menu Build -> Build.
- Depois de construir o HDI Container com sucesso, execute Configurando a tabela de customizing /TMF/D_VIEW_VERS, descrito no passo 5.
Neste blog post vimos, como:
- Criar um HDI container
- Criar um HDI namespace
- Desenvolver suas calculation views consumindo as tabelas do S/4HANA e as views do ACR Brazil Option
- Migrar as suas views do TDF Add-On para o ACR Brazil Option
Gostaríamos muito de saber o seu feedback. Deixe seu comentário abaixo caso tenha alguma dúvida ou sugestão para um próximo post.
Além dos comentários, você pode entrar em contato conosco através da plataforma Customer Influence. Lá, você pode propor ideias para melhorar nosso produto, votar em outras ideias já lançadas e acompanhar ideias em implementação.
Siga a tag Advanced Compliance Reporting aqui na SAP Community para ficar ligado nas últimas notícias sobre o S/4HANA ACR Brazil Option.
Até a próxima,
Jovani Alves
Time de desenvolvimento do ACR
SAP S/4HANA for advanced compliance reporting, Brazil option:
How to extend or customize On-premise using HDI SAP HANA calculation views
It is common to have to extend or modify the way ACR Brazil Option calculates taxes to meet that specific business rule of your state, municipality, or business.
In TDF Add-on version, customers and partners can extend or customize TDF by creating their own calculation views and consuming the views from the sap.glo.tmflocbr.ctr (Central Tax Repository) package.
In ACR Brazil Option On-premise, the integration principle is the same. There is, however, a difference in the use of the HDI container.
In this blogpost, we will present an example of how you can extend or customize ACR Brazil Option using calculation views. If you have already done customizations in TDF Add-on, we will also show you how you can migrate your classic calculation views to ACR Brazil Option. If this is your case, skip to the Migrating TDF Add-on Customizations to ACR Brazil Option session.
Let’s get started:
1. Prerequisites for making the following settings:
- Prepare your development environment by installing WebIDE For Hana, SAP Note “2569651 - Configure your ABAP Development System for Development of HDI Objects” contains the required information.
- If you are in releases lower than the ones listed below, install SAP Note 3012503 - [S/4HANA ACR Brazil Option] Note 32: Corrections to SPED Reports.
- ABAP Platform 2020 SP02
- ABAP Platform 1909 SP04
- ABAP Platform 1809 SP06
- If you are in releases lower than the ones listed below, install SAP Note 3012503 - [S/4HANA ACR Brazil Option] Note 32: Corrections to SPED Reports.
2. Creating your HDI container
- Access transaction SCTS_AMHC
- Fill in the name of your container and click on Create
- Prefer a short name because the container name is concatenated to the calculation view name and the display name of the objects in the ABAP transport request is limited to 44 characters. If the name exceeds this limit, it will be transformed into a hash code. This is not a problem but makes it difficult to identify the object being transported.
- Abap namespaces, like /TMF/, are supported as of releases:
- ABAP Platform 2020 (aka 7.55) SP00
- ABAP Platform 1909 (aka 7.54) SP01
- ABAP Platform 1809 (aka 7.53) SP04
- AS ABAP 7.52 SP06
- Fill in with your container information according to the image below:
- Click on Check and Activate.
- Choose the package in which the container will be saved.
- By executing these steps, you now have a container that will have access through synonyms to the ACR Brazil Option container and to the logical schema SAP_ABAP (where are the S/4HANA standard tables).
3. Creating your HDI Namespace
- Open the Abap Development Tools (ADT).
- Browse to the package where your HDI Namespace will be created.
- Right click on New -> Other Abap Repository Object.
- In the filter box, type HDI Namespace.
- Click on HDI Namespace.
- The following pop-up window will appear.
- Enter the namespace in the “name” field. The namespace follows the domain convention of the inverted company (e.g. “com.mycompany”). Hint: Choose a short namespace due to the 44-character limitation of the Abap request. Namespace is case-sensitive. In this way, type the name in lowercase letters.
- Inform the name of the container you created on step 2 in the “Container Name” field.
- On “Namespace Configuration”, select the “Append subfolders in namespace generation (compatibility mode for importing migration results from SAP HANA Repository)” option.
- Click on Finish.
- After creating your HDI Namespace, click on the Open in Web IDE button.
- Now you can develop your calculation views on the Web IDE.
4. Consumption of the SAP HANA calculation views of ACR Brazil Option
Let’s create an example calculation view only to demonstrate how to consume table J_1BNFDOC from S/4HANA and the NF_DOCUMENTO_ITEM_IMPOSTO view from ACR Brazil Option.
However, before creating the calculation view, it is necessary to create a synonyms file, which will grant access to the tables and views of our container.
- Right click on the com.mycompany.
- In the pop-up menu, select New -> File.
- Type the file name SAPTMF_RT.hdbsynonym.
- Close the synonym graphic editor. You can also use the graphical interface of the Synonym Editor. Be sure, however, to use a recent version of the WebIDE (in this blogpost we are using version SAP Web IDE for HANA 2 SPS 04 Patch 9 (Build 4.4.22)). Older versions can generate a JSON with parameters that do not work for the ABAP-managed HDI container. Then, after using the graphical interface, open the file using the Code Editor and make sure the JSON text generated by the Synonym Editor is the same as the JSON shown below.
- Right click on the SAPTMF_RT.hdbsynonym file and select the Open Code Editor option.
- Paste the JSON text below.
{

    "com.mycompany::NF_DOCUMENTO_ITEM_IMPOSTO": {

        "target": {

            "logical_schema": "SAPTMF_RT",

            "object": "sap.glo.tmflocbr.ctr::NF_DOCUMENTO_ITEM_IMPOSTO"

        }

    }

}- Save the file.
- Repeat the same process to create a new synonym file with the name SAP_ABAP.hdbsynonym.
- Paste the content below:
{

    "com.mycompany::/TMF/D_NF_DOC": {

        "target": {

            "logical_schema": "SAP_ABAP",

            "object": "/TMF/D_NF_DOC"

        }

    },

    "com.mycompany::J_1BNFDOC": {

        "target": {

            "logical_schema": "SAP_ABAP",

            "object": "J_1BNFDOC"

        }

    }

}- Save the file. The name of the synonym file is at your discretion. It only needs to have the .hdbsynonym extension. You can also have only one synonym file in your project. Still, let’s follow the convention of having one synonym file for every container or external schema.
- Now, right click on the DB folder and select Build -> Build. Build is like the activation process of a view in Hana Studio. If you right click by mistake in the name of the project and select the Build -> Build option, it will not activate the views, but will pack the project in an .mtar file (file used to deploy the project in other environments).
- Right click on the my.mycompany folder and select the New -> Calculation View option.
- Fill in the name and type of view you wish to create (see the example below).
- Click on Create.
- In the calculation view, drag a Join node and, then, click on the + icon.
- Select the SAPTMF_RT container.
- In the search field, type in the name of the NF_DOCUMENTO_ITEM_IMPOSTO view.
- Select the view named sap.glo.tmflocbr.ctr::NF_DOCUMENTO_ITEM_IMPOSTO with the Synonym column filled in.
- Click on Finish.
- Click on the + icon of the Join_1 node again.
- Select the SAP_ABAP logical schema.
- In the search field, type in the name J_1BNFDOC.
- Select the J_1BNFDOC table with the Synonym column filled in.
- Click on Finish
- Now, in order to finish, select some fields for the Join. Then, propagate some fields to Semantics.
- After that, right click on the view and select Build -> Build Selected Files.
- After the test Build, you can run a data preview to visualize the output data from the view.
5. Configuring the /TMF/D_VIEW_VERS customizing table
Now, it is necessary to inform ACR Brazil Options which are your customized views. You need to fill in the name of your view and the name of your container on the /TMF/D_VIEW_VERS table to do it.
- Open transaction SM30.
- On the Table/View field, type /TMF/D_VIEW_VERS.
- Click on Maintain.
- For our example, let’s change register 0000 from EFD.
- On the View Name field, change the name of the sap.glotmflocbr.efd:EFD_0000 view to com.mycompany::MY_CALC_VIEW.
- Inform the logical name of your /TMF/HDI container.
- Save your changes.
- When register 0000 is called, your view will be executed instead of the standard view of ACR Brazil Option.
Migration of TDF Add-on Customizations to ACR Brazil Option
If you already had customizations in the TDF Add-on and intend to migrate your customization to ACR Brazil Option, follow the steps below:
- If you have Attribute views, Script views or Classical XML-Based analytics privileges in your project, it will be necessary to convert these artifacts to Graphical Calculation Views, as HDI does not have support for this type of artifacts. Access the Tutorial: Migrating SAP HANA Repository-based Developments Used in ABAP to HTA for HDI tutorial and carry out the steps described on item 5 - Optional: Migrate specific objects.
- The HDI calculation view XML is a little different from the XML of the classical calculation view, since some data types were changed. The second step, then, is to use the xs-migration tool to convert your old calculation views to the new HDI format.
- You will need a user with the permissions below in your SAP HANA database. Let’s call this user MIGRATION_USER.
Source System
- Object Privileges:
- SYNONYMS : SELECT
- GET_OBJECT_DEFINITION : EXECUTE
- TABLE_COLUMNS : SELECT
- TABLES : SELECT
- OBJECT_DEPENDENCIES : SELECT
- M_SCHEMA_MAPPING : SELECT
- ACTIVE_CONTENT_TEXT : SELECT
- ACTIVE_CONTENT_TEXT_CONTENT : SELECT
- ACTIVE_OBJECT_TEXT : SELECT
- ACTIVE_OBJECT_TEXT_CONTENT : SELECT
- M_DATABASE : SELECT
- GRANTED_PRIVILEGES : SELECT
- GRANTED_ROLES : SELECT
- PROCEDURES : SELECT
- OBJECTS : SELECT
- CATALOG_OBJECTS_CREATED_BY_REPOSITORY_ACTIVATIONS : SELECT
- REPOSITORY_REST : EXECUTE
- ACTIVE_TAGS : SELECT
- CDS_ANNOTATION_VALUE : SELECT
- CDS_ARTIFACT : SELECT
- System Privileges:
- CATALOG READ
- Package Privileges:
- For all packages in migrated DU: REPO.READ
- Object Privileges:
Source/Parse System
- GET_OBJECTS_IN_DDL_STATEMENT : EXECUTE
- Download XS Advanced Migration Assistant (xs-migration) here or from the SAP Software Download Center, click on SUPPORT PACKAGES AND PATCHES and, then, look for XSAC MIGRATION 1. (You will need authorization download the tool)
- Extract the downloaded ZIP file.
- Browse to the xs-migration folder and rename the .env-template file to .env.
- Use the credential of your MIGRATION_USER on the .env file.
HANA_HOST=<YOUR_HANA_HOST_NAME>
HANA_SQL_PORT=<YOUR_SQL_PORT>
HANA_USER=MIGRATION_USER
HANA_PASSWD=SENHA do MIGRATION_USER
HANA_CERTIFICATE=<OPTIONAL>
- Your SQL_PORT can be found on the Landscape tab of Hana Studio, as shown in the image below.
- Still in the xs-migration folder, create a file named mapping.json with the following json text:
[{

    "schemaName": "<SCHEMA_CREATED_FOR_TDF>",

    "synonymSubpath": "",

    "logicalSchemaName": "SAP_ABAP"

}, {

    "schemaName": "<SCHEMA_CREATED_FOR_ECC_TABLES>",

    "synonymSubpath": "",

    "logicalSchemaName": "ECC_SAP_ABAP"

}, {

    "schemaName": "SYS",

    "synonymSubpath": "",

    "logicalSchemaName": "SYS"

}, {

    "schemaName": "_SYS_BI",

    "synonymSubpath": "",

    "logicalSchemaName": "_SYS_BI"

}]- Replace <SCHEMA_CREATED_FOR_TDF> with the name of your schema that contains the TDF shadow tables.
- Replace <SCHEMA_CREATED_FOR_ECC_TABLES> with the name of your schema that contains the tables from ECC or S/4HANA replicated via SLT (this schema is normally called SAP_ECC).
- If you have the TDF Add-on with SLT, you will see that there are two schemas: one contains the ECC or S/4HANA replicated tables while the other has the shadow tables from TDF. In ACR Brazil Option, however, the tables from TDF and S/4HANA are in the same logical schema called SAP_ABAP. This mapping.json maps the physical schemas the views consume in TDF Add-on to the logical schema the views started to consume in ACR Brazil Option. If the TDF tables are in the same logical schema of the S/4HANA tables, why is the logicalSchemaName named ECC_SAP_ABAP instead of SAP_ABAP? Simply put, the migration tool, in the moment this blogpost is being written, only supports the relationship of a physical and a logical schema. In the following steps, we will replace ECC_SAP_ABAP by SAP_ABAP in the generated synonym file.
- Open the Command Prompt in the xs-migration folder.
- Analyze this example of a migration command:
xs-migration --packages glo.tmflocbr --zip --hta --synonym-target-provider mapping.json --overwrite-root-namespace sap.glo.tmflocbr --integrated-synonymtargets - The package structure of the SAP HANA Repository has been translated to a namespace in HDI. The namespace’s purpose is to keep the compatibility of the old repository with the HDI container.
- The ––packages parameter shows the packages you wish to migrate.
By default, root-namespace is the name of the package where the first object is found. We will use the ––overwrite-root-namespace parameter to overwrite the standard name of root-namespace. The name of the root-namespace (e.g.: “com.mycompany”) has to be the same as the one informed in the name of the HDI Namespace, on step 3.
- There will be two possible scenarios for the TDF Add-on:
- In the first scenario, your views will be in the sap.glo.tmflocbr package (e.g.: sap.glo.tmflocbr.myview). In this case, you can use the command as follows:
xs-migration --packages glo.tmflocbr.myview, sap.glo.tmflocbr.mysecondviews --zip --hta --synonym-target-provider mapping.json --overwrite-root-namespace com.mycompany --integrated-synonymtargets
- In the second scenario, your views will be out of the sap.glo.tmflocbr package. In other words, you will have an independent root package (e.g.: “com.mycompany”) with sub-packages (e.g.: “com.mycompany.ecd”, “com.mycompany.efd”, etc.). In this case, you can execute the command as follows:
xs-migration --packages com.mycompany --zip --hta --synonym-target-provider mapping.json --overwrite-root-namespace com.mycompany --integrated-synonymtargets
- Execute the command according to your scenario.
- Verify if the migration was successfully concluded.
- You can also access the generated migration report. You will find it in the specified path in the Report URL field.
- In the first scenario, your views will be in the sap.glo.tmflocbr package (e.g.: sap.glo.tmflocbr.myview). In this case, you can use the command as follows:
After successfully migrating your calculation views, follow steps below:
- Prerequisites for making the following settings
- Creating your HDI container
- Creating your HDI namespace
Now that you configured your WebIDE for HANA development environment, created your HDI Container and the HDI Namespace, let’s import your calculation views converted to WebIDE.
- Open WebIDE.
- Right click on the DB folder and select Import -> File or Project.
- Click on Browse..., select the zip file generated by the migration tool and click on OK.
- After importing the files, open the ECC_SAP_ABAP.hdpsynonym synonym file by clicking on the Open Code Editor.
- Now, use the Ctrl + H shortcut to open the Replace tool, and replace all the ECC_SAP_ABAP names with SAP_ABAP.
- Click on Replace All to replace all the occurrences of ECC_SAP_ABAP with SAP_ABAP.
- Right click on the DB folder and, then, on the Build -> Build menu.
- After successfully building the HDI Container, execute Configuring the /TMF/D_VIEW_VERS customizing table, as described on step 5.
In this blog post you learn how:
- Create an HDI container
- Create an HDI namespace
- Develop your calculation views consuming the S/4HANA tables and the ACR Brazil Option views
- Migrate your views from TDF Add-On to ACR Brazil Option
We would love to have your feedback. Leave your comment below should you have should you have any question or suggestion for an upcoming post.
Apart from the comment section, you can also get in touch with us through the Customer Influence platform, where you can propose ideas to improve our product, vote on previously released ideas and follow those ideas being currently implemented.
Follow the Advanced Compliance Reporting tag here at the SAP Community to keep updated with the latest news on SAP S/4HANA ACR Brazil Option.
Best regards,
Jovani Alves
ACR Development Team
- SAP Managed Tags:
- SAP Document and Reporting Compliance
Labels:
5 Comments
You must be a registered user to add a comment. If you've already registered, sign in. Otherwise, register and sign in.
Labels in this area
-
ABAP CDS Views - CDC (Change Data Capture)
2 -
AI
1 -
Analyze Workload Data
1 -
BTP
1 -
Business and IT Integration
2 -
Business application stu
1 -
Business Technology Platform
1 -
Business Trends
1,661 -
Business Trends
91 -
CAP
1 -
cf
1 -
Cloud Foundry
1 -
Confluent
1 -
Customer COE Basics and Fundamentals
1 -
Customer COE Latest and Greatest
3 -
Customer Data Browser app
1 -
Data Analysis Tool
1 -
data migration
1 -
data transfer
1 -
Datasphere
2 -
Event Information
1,400 -
Event Information
66 -
Expert
1 -
Expert Insights
178 -
Expert Insights
293 -
General
1 -
Google cloud
1 -
Google Next'24
1 -
Kafka
1 -
Life at SAP
784 -
Life at SAP
12 -
Migrate your Data App
1 -
MTA
1 -
Network Performance Analysis
1 -
NodeJS
1 -
PDF
1 -
POC
1 -
Product Updates
4,577 -
Product Updates
340 -
Replication Flow
1 -
RisewithSAP
1 -
SAP BTP
1 -
SAP BTP Cloud Foundry
1 -
SAP Cloud ALM
1 -
SAP Cloud Application Programming Model
1 -
SAP Datasphere
2 -
SAP S4HANA Cloud
1 -
SAP S4HANA Migration Cockpit
1 -
Technology Updates
6,886 -
Technology Updates
416 -
Workload Fluctuations
1
Top kudoed authors
| User | Count |
|---|---|
| 30 | |
| 23 | |
| 10 | |
| 7 | |
| 6 | |
| 6 | |
| 5 | |
| 5 | |
| 5 | |
| 4 |