
- SAP Community
- Products and Technology
- Technology
- Technology Blogs by SAP
- DOCKERS FOR ABSOLUTE BEGINNERS – PART -3
Technology Blogs by SAP
Learn how to extend and personalize SAP applications. Follow the SAP technology blog for insights into SAP BTP, ABAP, SAP Analytics Cloud, SAP HANA, and more.
Turn on suggestions
Auto-suggest helps you quickly narrow down your search results by suggesting possible matches as you type.
Showing results for
skugan_venkates
Explorer
Options
- Subscribe to RSS Feed
- Mark as New
- Mark as Read
- Bookmark
- Subscribe
- Printer Friendly Page
- Report Inappropriate Content
12-31-2020
4:55 AM
Welcome to the PART – 3 of this series. Time to get our hands dirty with the System setup and practice with Docker containers. Thanks to my colleague ujwaliyer for helping me out in co-authoring this series. In case, if you had missed out on Part – 1 and Part – 2 please follow the links accordingly.
Without wasting much time we will get in to the setup details.
Docker Installation
Dockers can be installed on the following platforms
Mac Installation URL:
https://store.docker.com/editions/community/docker-ce-desktop-mac
The above-mentioned link will basically download docker tool box for Mac. It will install docker compose, docker software and other components of docker. Just sit back and relax 😊 nothing else is required from your side.
Linux Distribution (Ubuntu)
The installation on ubuntu is quite simple. In this post, we will be using Ubuntu version so that you can get a full picture. Our docker would be up and ready once few commands are executed. Let us open a new terminal now to connect to my ubuntu machine and from there onwards we will install docker.
Docker is now set in the virtual machine (in case if you do it in local machine, then it should be setup properly in the local machine, steps are the same)
Docker container lifecycle
This is the entire lifecycle of the docker. If you have worked on Github, then it is very similar. Whenever you must start working on a codebase, you have to pull the codebase from the central repository and push it back to the central repository. Central repository is the place where it holds all the code base for your org. Similarly, in Docker, we have Docker hub. Docker hub would contain all the container images that are open source images that are present. For ex: you could run a container on Ubuntu, Cent OS, Alpine etc.. all these are present in docker hub. What you download from dockerhub is the image of a container. First of all pull all these images from the docker hub to your local docker engine. When you run the image, it becomes a container. You can also stop a container. You can also delete a container. This is a summary of how what happens inside a docker. And there is more to it, we will see as we move along in the session.
Now, we have understood the following
Common docker operations – which is a must for learning basics of dockers.
Let us perform some common docker operations in our docker system that we had installed.
This will download the container image from docker hub automatically. We have just pulled the image. Now, we must run the container. For us to verify the image has been pulled from the system or not, we use the following command
Notice the size of the image is just 86.3MB. If it had been a direct Ubuntu OS it would have been around 1.5-2GB. Now, we have to run the image
Command to run the image
Command Line breakdown
-it -> means make the container interactive so that you can pass on certain commands for the containers
-d -> run it as a background job so that it keeps running until you explicitly stop
To view all the running containers, we pass on the following command,
Now we need to work with the containers. How do we execute commands within the containers? For that we use docker exec command. Apply docker ps command and check for running containers. Note down their ID.

Please note
We have logged in to the container. We are logged in as root within the container. This is the environment where the developers will be working. For example: if I must update the container, I will use apt-get update. This would be completely independent of what we were doing outside the container.
For example: Give the following command
Because the sudo library is not installed in the container. Only the bare minimum libraries are available and nothing else will be available. That is why sudo doesn’t even exist.
To come out of the container, just type “exit” and we will come out of the container. But mind that container will still be running. If I do a docker ps, it will show me the list of containers that are running.
If we want to stop a container,
We can also kill a container (where stop doesn’t work - Force kill) we can use the below command,
Please note
The image will be removed only from your local system (VM in our case) where docker is running. This will not remove the image from the repository.
These are some of the basic common docker operations that we do in day – day life. Now we would have got a taste of what docker is, why and where it is used.
Now that we are done with the basic Docker commands, we will proceed with the creation of docker hub account
Create a docker hub account
Similar to Github, if you want to push your own personal images to the central repository we can do it using docker hub. If you have created your own container, you can push it to docker hub, you can pull it from docker hub anytime and wherever you want. In case, if you want to share the images with others also , you can push it to docker hub and other people can pull it from there
We will do now some changes to the container and save it.
we again go back to where our machine where docker was installed. Please execute the below command to directly download the ubuntu image (from docker repo) and start the container.
Run the following command to check whether the container is active eor not
It is time to log in to the container. We will log in to the container using bash shell (cause it is an ubuntu based system) and hence we are using bash. Please execute the following command
Now that we have successfully logged on to the container, you can see all the directories that are present inside the container . Just do a “ls” command and you can check the directories present inside the container.
Trivia:
You type “Exit” and come out of the container and do a “ls” you will see different list of directories. Why? Because it is the VM’s directories and you have exited the container.
We will try to create a new directly inside the container. Execute the below given command
Again, do a ls command to check whether the directory created is there or not
Quick recap:
We will try to delete the container and run the ubuntu image again and see whether the directory that we created is available or not. Command to delete the container is
Our container is running. We have 2 options to delete the container either STOP and DELETE or FORCE DELETE. Use the following command to forcefully remove the container or else we must stop and then delete the container
Now that the container has been deleted successfully we will try to run the image again using the following command
We will log on to the container again using the following
Give the command “ls” and check whether the directory is there or not.
These changes whatever we did was within the container and did not propagate to the images. If we want our changes to be reflected ie., whenever we delete and pull the image, the changes are to be reflected. We have to save the changes to a container. Now the command that we execute is
Run the following command
now you should be able to see 2 images. One is Ubuntu and another one is “Mynewimage”
Using the previous commands, you can run the image and start the container. You can log on to the container using the newly created image and check whether the directory “App” that we had created is available or not.
//Trivia:
Now in case if there are more containers, we do not need to perform the remove command by giving out the individual container ID, we can use the below given command
Simple end – end scenario to demonstrate entire docker lifecycle management
The scenario that will be done is listed below
Execute the following commands sequentially in the Virtual machine
Type the above command “Exit” to exit the container.
Now we have saved a new image locally to the virtual machine.
notice the size of the newly created image is increased because we have installed HTTPD server. To avoid confusion, we will remove all the running containers and create a new container from the newly created image.
now we have to run the newly created image
We are mapping port 82 of my host operating system to the port of the container (which is 80 for apache server)
Basically what happens is we have installed HTTPD server not on the VM but on a container. We are able to reach the port using the mapping that we had provided
PUSHING IT TO DOCKER HUB
You would like to share this new image with the world you can sign up for an account on https://hub.docker.com/. After verifying your e-mail you are ready to go and upload your first docker image.
Username: Skugan <Please enter your username used for signing up>
Password: <Please enter your password>
A good choice for a tag is something that will help you understand what this container should be used in conjunction with, or what it represents. It could be anything but meaningful so that others can understand while they try to pull your image from docker hub.
Conclusion
Now we have understood a simple end – end docker life cycle management like how to create an image, run the image, delete/stop/start the container, save changes to the container and push it to docker hub.
Hope you had a great learnt learning in understanding the basics of containers, why it is used, where it is used and how it can be used with simple exercises. Now there might be lot of questions again coming to your mind after getting familiar with container?.
If you are getting some of the questions mentioned above then CONGRATULATIONS, you have understood the concepts very well.
We will try to post another series of blogs explaining about DockerFile for automation, Kubernetes (container orchestration), Public Cloud vendors Containers and Kubernetes Management as well. Till then I would suggest you install dockers and start practicing by creating images and try to publish it in your docker hub repository. See you all soon with a new set of blogs. Thanks! Happy Learning!!
Without wasting much time we will get in to the setup details.
Docker Installation
Dockers can be installed on the following platforms
- Installation on Mac
- Installation on Windows
- Installation Ubuntu

Mac Installation URL:
https://store.docker.com/editions/community/docker-ce-desktop-mac
The above-mentioned link will basically download docker tool box for Mac. It will install docker compose, docker software and other components of docker. Just sit back and relax 😊 nothing else is required from your side.
Linux Distribution (Ubuntu)
The installation on ubuntu is quite simple. In this post, we will be using Ubuntu version so that you can get a full picture. Our docker would be up and ready once few commands are executed. Let us open a new terminal now to connect to my ubuntu machine and from there onwards we will install docker.
- You can either install Docker on your local laptop or you can spin up a new virtual machine from AWS, Azure or GCP and install docker there (for simplicity purpose, just treat your VM as your local laptop or an individual server box). For our post, we have spinned up a new virtual machine from Azure. And we will be using that to configure our docker.
- Please refer to the link on how to create a new virtual machine in Azure.
- Once you log on to the Virtual machine. Enter the following commands in sequence
- sudo apt-get update (Retrieves what package can be installed and what updates are to be done for the currently installed package)

- sudo apt-get install docker.io (This will install all the packages required for the docker to be installed on your virtual machine)

- sudo docker version (or docker --version) (To check whether docker has been installed correctly or not and also the version of the docker that is installed)
Docker is now set in the virtual machine (in case if you do it in local machine, then it should be setup properly in the local machine, steps are the same)
Docker container lifecycle
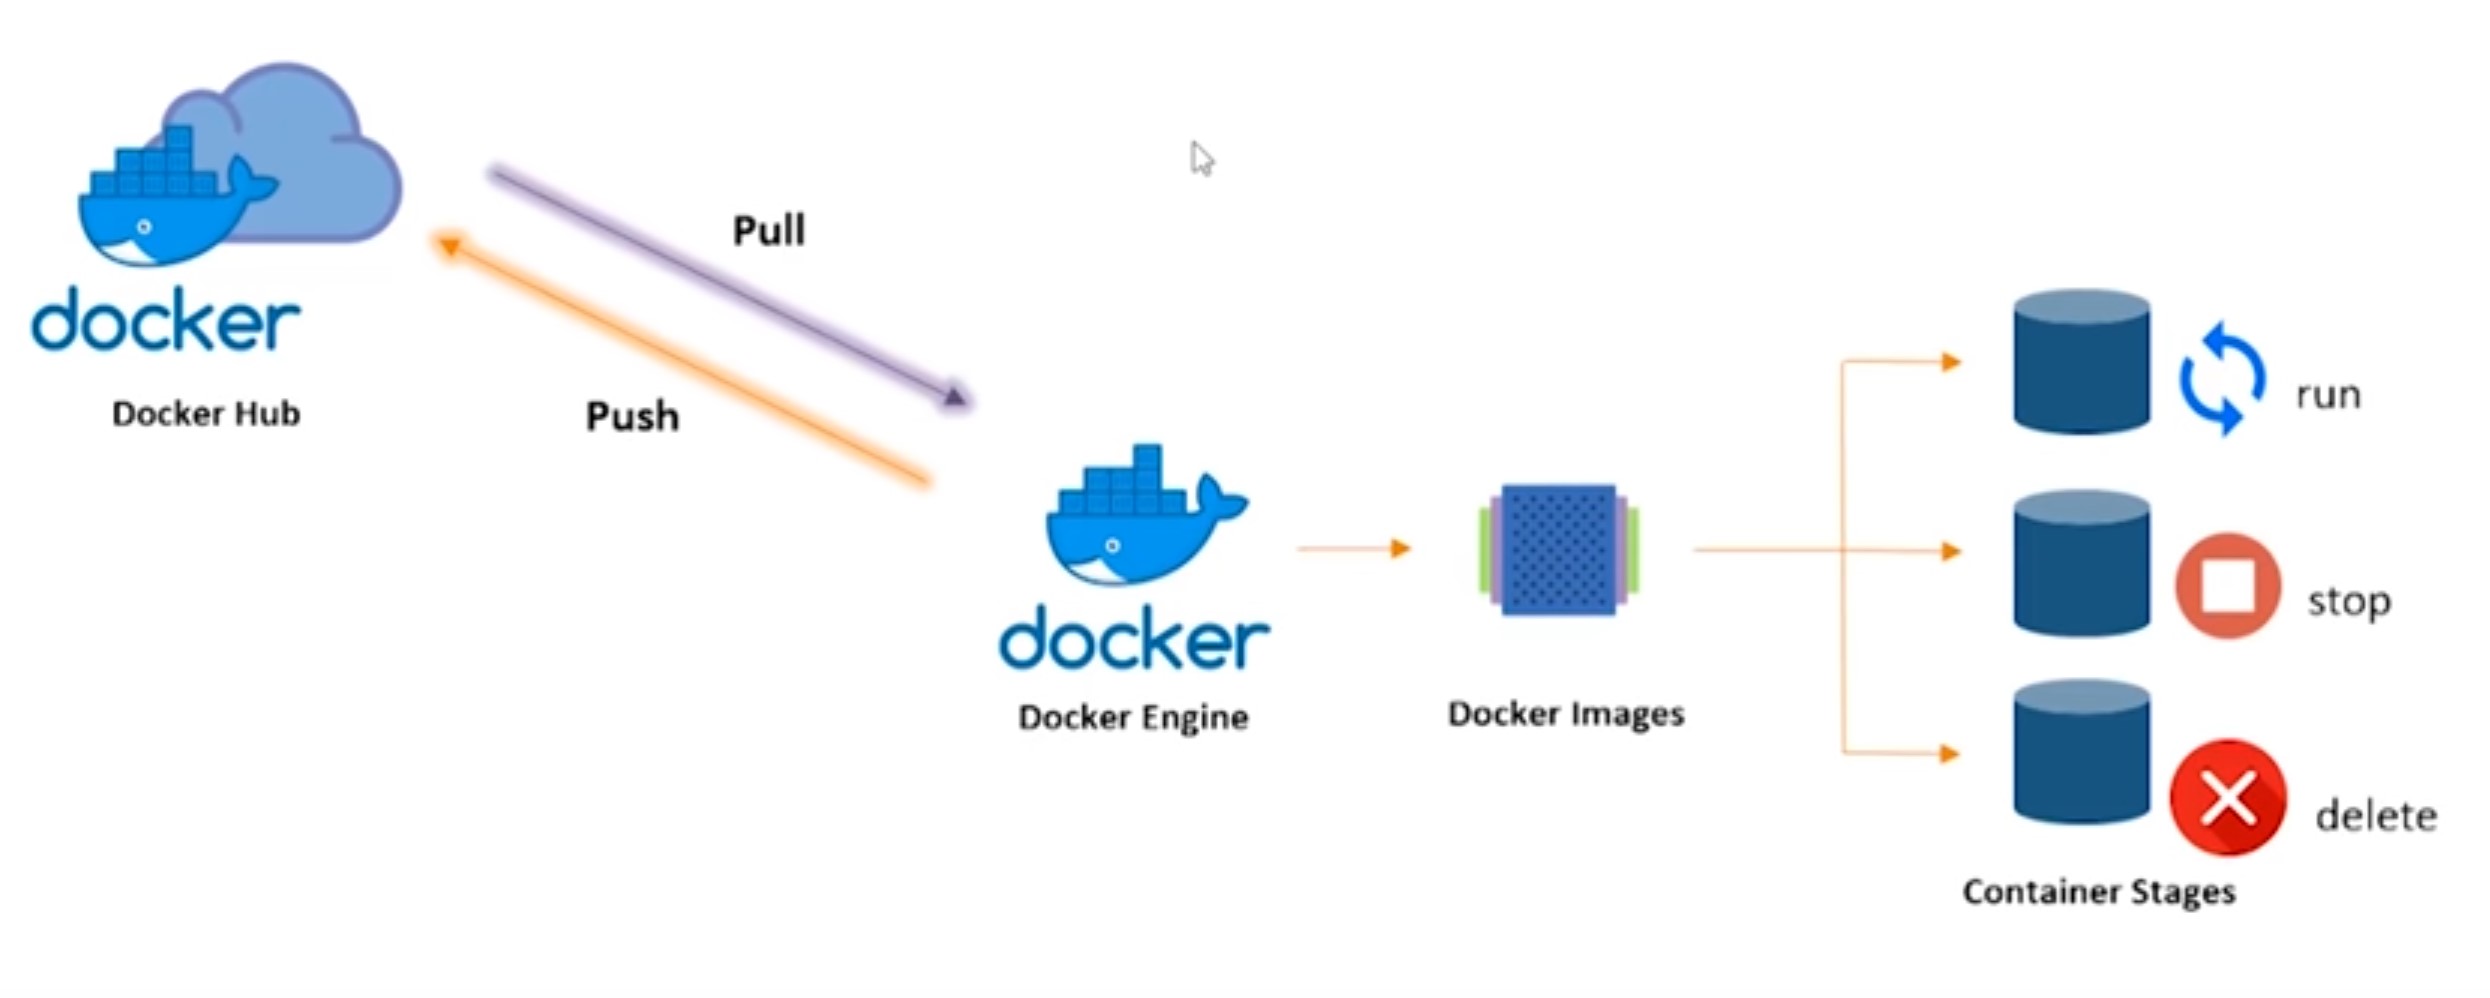 Image Credits: Medium
This is the entire lifecycle of the docker. If you have worked on Github, then it is very similar. Whenever you must start working on a codebase, you have to pull the codebase from the central repository and push it back to the central repository. Central repository is the place where it holds all the code base for your org. Similarly, in Docker, we have Docker hub. Docker hub would contain all the container images that are open source images that are present. For ex: you could run a container on Ubuntu, Cent OS, Alpine etc.. all these are present in docker hub. What you download from dockerhub is the image of a container. First of all pull all these images from the docker hub to your local docker engine. When you run the image, it becomes a container. You can also stop a container. You can also delete a container. This is a summary of how what happens inside a docker. And there is more to it, we will see as we move along in the session.
Now, we have understood the following
- What is a container
- What is docker
- What is a container image
- Lifecycle of docker containers
Common docker operations – which is a must for learning basics of dockers.
Let us perform some common docker operations in our docker system that we had installed.
- Docker --version
- Docker pull <Image_Name> (To Pull the image from docker hub)
- sudo docker pull ubuntu

This will download the container image from docker hub automatically. We have just pulled the image. Now, we must run the container. For us to verify the image has been pulled from the system or not, we use the following command
- sudo docker Images

Notice the size of the image is just 86.3MB. If it had been a direct Ubuntu OS it would have been around 1.5-2GB. Now, we have to run the image
Command to run the image
- sudo docker run -it -d ubuntu

Command Line breakdown
-it -> means make the container interactive so that you can pass on certain commands for the containers
-d -> run it as a background job so that it keeps running until you explicitly stop
To view all the running containers, we pass on the following command,
- sudo docker ps (Displays the list of ACTIVE containers)

- sudo docker ps -a (This will give you the list of all the containers (even the ones which are stopped)
Now we need to work with the containers. How do we execute commands within the containers? For that we use docker exec command. Apply docker ps command and check for running containers. Note down their ID.
- sudo docker exec -it <Container id> bash
- sudo docker exec -it 2165a9cd2dd5 bash (our container ID is 2165a9cd2dd5)
Please note
We have logged in to the container. We are logged in as root within the container. This is the environment where the developers will be working. For example: if I must update the container, I will use apt-get update. This would be completely independent of what we were doing outside the container.
For example: Give the following command
- sudo docker ps

The sudo command itself is not found? Why? Can anyone thin why SUDO is not found?
Because the sudo library is not installed in the container. Only the bare minimum libraries are available and nothing else will be available. That is why sudo doesn’t even exist.
To come out of the container, just type “exit” and we will come out of the container. But mind that container will still be running. If I do a docker ps, it will show me the list of containers that are running.
If we want to stop a container,
- sudo docker stop <container id>
We can also kill a container (where stop doesn’t work - Force kill) we can use the below command,
- Docker kill <containerid>
- Docker rm used to remove the containers from the system
- sudo docker rm <containerid>
Now what we have to do if we have to remove a docker Image from the system?
- Docker rmi <imageid>
Please note
The image will be removed only from your local system (VM in our case) where docker is running. This will not remove the image from the repository.
These are some of the basic common docker operations that we do in day – day life. Now we would have got a taste of what docker is, why and where it is used.
Now that we are done with the basic Docker commands, we will proceed with the creation of docker hub account
Create a docker hub account
Similar to Github, if you want to push your own personal images to the central repository we can do it using docker hub. If you have created your own container, you can push it to docker hub, you can pull it from docker hub anytime and wherever you want. In case, if you want to share the images with others also , you can push it to docker hub and other people can pull it from there
- Go to docker.com
- Give the following details
- DockerID
- E-Mail (personal email will suffice)
- Password
- Your Docker Hub account is created
We will do now some changes to the container and save it.
we again go back to where our machine where docker was installed. Please execute the below command to directly download the ubuntu image (from docker repo) and start the container.
- sudo docker run -ti -d ubuntu à (Basically this will directly download and run the container image)

Run the following command to check whether the container is active eor not
- sudo docker ps

It is time to log in to the container. We will log in to the container using bash shell (cause it is an ubuntu based system) and hence we are using bash. Please execute the following command
- sudo docker exec -it <containerid> bash
Now that we have successfully logged on to the container, you can see all the directories that are present inside the container . Just do a “ls” command and you can check the directories present inside the container.
Trivia:
You type “Exit” and come out of the container and do a “ls” you will see different list of directories. Why? Because it is the VM’s directories and you have exited the container.
We will try to create a new directly inside the container. Execute the below given command
- mkdir app
Again, do a ls command to check whether the directory created is there or not
Quick recap:
- We have created a container
- Logged inside the container and
- Created a directory called “App” inside the container.
We will try to delete the container and run the ubuntu image again and see whether the directory that we created is available or not. Command to delete the container is
- sudo docker ps (get the container id)

Our container is running. We have 2 options to delete the container either STOP and DELETE or FORCE DELETE. Use the following command to forcefully remove the container or else we must stop and then delete the container
- sudo docker rm -f <containerid>
- sudo docker rm -f e09dfe878eca
Now that the container has been deleted successfully we will try to run the image again using the following command
- sudo docker run -it -d ubuntu
We will log on to the container again using the following
- docker exec -it <containerid>
- docker exec -it e09dfe878eca

Give the command “ls” and check whether the directory is there or not.
How to save the changes? So that even when we delete the container and rebuild the image, this will be retained?
These changes whatever we did was within the container and did not propagate to the images. If we want our changes to be reflected ie., whenever we delete and pull the image, the changes are to be reflected. We have to save the changes to a container. Now the command that we execute is
- docker commit <container id> <name for new image>
- docker commit e09dfe878eca mynewimage
Run the following command
- docker images
now you should be able to see 2 images. One is Ubuntu and another one is “Mynewimage”
Using the previous commands, you can run the image and start the container. You can log on to the container using the newly created image and check whether the directory “App” that we had created is available or not.
//Trivia:
Now in case if there are more containers, we do not need to perform the remove command by giving out the individual container ID, we can use the below given command
- sudo docker rm -f $(sudo docker ps -a -q) --> to remove all the containers
Simple end – end scenario to demonstrate entire docker lifecycle management
The scenario that will be done is listed below
- Download the ubuntu image
- Run the container
- Log on to the container
- Install Apache (HTTPD) server in the container
- Save the changes
- Try to access the APACHE SERVER from Internet.
- Upload the image docker hub

Credits – Medium.com
Execute the following commands sequentially in the Virtual machine
- sudo docker run -it -d ubuntu
- docker ps
- sudo exec -it <Container id> bash
- apt-get update
- apt-get install apache2 (Install Apache server)
- service apache2 status (checking the status of Apache server)
- service apache 2 start (To start the apache server if it is in STOP status)
- service apache2 status (Check the status again)
- exit
Type the above command “Exit” to exit the container.
- sudo docker commit [CONTAINER_ID] [new_image_name]
Now we have saved a new image locally to the virtual machine.
- sudo docker images (Check for your newly created image)
notice the size of the newly created image is increased because we have installed HTTPD server. To avoid confusion, we will remove all the running containers and create a new container from the newly created image.
- sudo docker rm -f container id (remove all the running containers)
now we have to run the newly created image
- sudo docker run -it -d -p 82:80 <ImageID>
We are mapping port 82 of my host operating system to the port of the container (which is 80 for apache server)

Then we have to give the public IP:82 and check the browser. For example. If the public IP of the VM is 21.90.89.132, then we give https://21.90.89.132:82 . Please ensure access to the port 82 and 80 is not blocked on VM either container
Basically what happens is we have installed HTTPD server not on the VM but on a container. We are able to reach the port using the mapping that we had provided
- sudo docker stop <containerid>
PUSHING IT TO DOCKER HUB
You would like to share this new image with the world you can sign up for an account on https://hub.docker.com/. After verifying your e-mail you are ready to go and upload your first docker image.
- Log in on https://hub.docker.com/
- Click on Create Repository.
- Choose a name (e.g. MyNewRepo) and a description for your repository and click Create.
Username: Skugan <Please enter your username used for signing up>
Password: <Please enter your password>
- Log in to the docker hub from command line
- docker login --username=yourhubusername --email=youremail@company.com
- Check your newly created Image ID
- docker images (note down the Image ID)
- Tag your image (push it to docker hub)
- docker tag bb38976d03cf yourhubusername/ MyNewRepo:ApacheServerDockerhub
A good choice for a tag is something that will help you understand what this container should be used in conjunction with, or what it represents. It could be anything but meaningful so that others can understand while they try to pull your image from docker hub.
- Go to the docker hub and log in and check the image.
- Other users can user docker pull command to pull your image form docker hub (if the image is public)
Conclusion
Now we have understood a simple end – end docker life cycle management like how to create an image, run the image, delete/stop/start the container, save changes to the container and push it to docker hub.
Hope you had a great learnt learning in understanding the basics of containers, why it is used, where it is used and how it can be used with simple exercises. Now there might be lot of questions again coming to your mind after getting familiar with container?.
- Instead of manually getting inside the container and doing the necessary changes, can I automate it?
- If I have over 100 containers, how can I manage it?
- Handling each and every container is difficult what about monitoring them?
- How the containers differ from local execution to containers available in AWS, Azure, GCP etc.,
If you are getting some of the questions mentioned above then CONGRATULATIONS, you have understood the concepts very well.
We will try to post another series of blogs explaining about DockerFile for automation, Kubernetes (container orchestration), Public Cloud vendors Containers and Kubernetes Management as well. Till then I would suggest you install dockers and start practicing by creating images and try to publish it in your docker hub repository. See you all soon with a new set of blogs. Thanks! Happy Learning!!
- SAP Managed Tags:
- SAP Data Intelligence
Labels:
3 Comments
You must be a registered user to add a comment. If you've already registered, sign in. Otherwise, register and sign in.
Labels in this area
-
ABAP CDS Views - CDC (Change Data Capture)
2 -
AI
1 -
Analyze Workload Data
1 -
BTP
1 -
Business and IT Integration
2 -
Business application stu
1 -
Business Technology Platform
1 -
Business Trends
1,661 -
Business Trends
87 -
CAP
1 -
cf
1 -
Cloud Foundry
1 -
Confluent
1 -
Customer COE Basics and Fundamentals
1 -
Customer COE Latest and Greatest
3 -
Customer Data Browser app
1 -
Data Analysis Tool
1 -
data migration
1 -
data transfer
1 -
Datasphere
2 -
Event Information
1,400 -
Event Information
64 -
Expert
1 -
Expert Insights
178 -
Expert Insights
273 -
General
1 -
Google cloud
1 -
Google Next'24
1 -
Kafka
1 -
Life at SAP
784 -
Life at SAP
11 -
Migrate your Data App
1 -
MTA
1 -
Network Performance Analysis
1 -
NodeJS
1 -
PDF
1 -
POC
1 -
Product Updates
4,577 -
Product Updates
326 -
Replication Flow
1 -
RisewithSAP
1 -
SAP BTP
1 -
SAP BTP Cloud Foundry
1 -
SAP Cloud ALM
1 -
SAP Cloud Application Programming Model
1 -
SAP Datasphere
2 -
SAP S4HANA Cloud
1 -
SAP S4HANA Migration Cockpit
1 -
Technology Updates
6,886 -
Technology Updates
403 -
Workload Fluctuations
1
Related Content
- The 5 steps to consume Amazon Bedrock and Azure OpenAI Generative AI services from SAP BTP using SAP AI Core in Technology Blogs by Members
- Fiori Elements: Using Custom code and their extension in Technology Blogs by Members
- How To be Cloud Ready (SAP BTP ABAP Model) in Technology Blogs by Members
- SAP HANA Cloud Document Store - When Would I Use A Document Store? in Technology Blogs by SAP
- The right starting point in Technology Q&A
Top kudoed authors
| User | Count |
|---|---|
| 12 | |
| 10 | |
| 10 | |
| 7 | |
| 7 | |
| 7 | |
| 6 | |
| 6 | |
| 5 | |
| 4 |