
- SAP Community
- Products and Technology
- CRM and Customer Experience
- CRM and CX Blogs by Members
- Segmentation using Attributes in SAP CRM
CRM and CX Blogs by Members
Find insights on SAP customer relationship management and customer experience products in blog posts from community members. Post your own perspective today!
Turn on suggestions
Auto-suggest helps you quickly narrow down your search results by suggesting possible matches as you type.
Showing results for
sapblogger789
Explorer
Options
- Subscribe to RSS Feed
- Mark as New
- Mark as Read
- Bookmark
- Subscribe
- Printer Friendly Page
- Report Inappropriate Content
12-27-2020
7:21 AM
Introduction:
In this Blog , we will see how to do Segmentation in SAP CRM using Attributes.
Also, to help Technical Consultants, I have explained about the BADI that can be used in Segmentation for any Custom requirement and steps to trigger the BADI.
Please note:
I have considered example of Flash Graphical Modeler in this Blog. The underlying concept remains the same for Flash Graphical Modeler / Java Applet Modeler.
Steps to Create Marketing Attributes and Assign them to Business Partners and do Segmentation:
Some of the Prerequisite for FLEX Segmentation Modeler:
In TCode SICF below services must be Active:
In TCode SFW5 the below Business Function must be Active:
For Technical Consultants:
Detailed Steps:
Click on ‘Assign Data Source’ button and Assign the Data Source to the Attribute list from the Popup as per below screen.
Check the Checkbox and double click to select the values for the Filter.
Please Note: Check the checkbox in screen above for the attribute to appear in Web UI.
Click Save.
Click on Create Assignment button and give the Attribute Set name.
Now press Enter the Attribute appear on the screen as below.
Double click on the Att. Description and from the Pop up select the values for the attribute.
Click on Save button.
In TCode ‘BP’ you can see the attributes assigned to the Business Partner as per below screenshot.
In similar way, assign the attributes and values to other Business Partners also.
Sample BP Considered 116.
There are no Marketing Attributes for the Business Partner as per below screenshot prior to assignment in TCode CRMD_PROF_BP.
Post assignment of Attributes Set to the BP the values appear in the Marketing Attributes tab as per below:
The assignment of Business Partners to the attribute values are as below:
Some of the Prerequisite for FLEX Segmentation Modeler:
In TCode SICF below services must be Active:
In TCode SFW5 the below Business Function must be Active:
TCode SICF:
In similar way, the other services FLEX_SEG_UI, SEGAS_SEG_HV, CRM_MKTHV_FLEX must be Active.
Also, in TCode SFW5 the Business Function CRM_MKT_HVS must be Active:
Now let us do Segmentation of the Business Partners in Web UI.
We can find the Attribute List and values as per below screenshot:
Now drag the Value and drop it on the Right hand side.
Now Right Click and we can select ‘Count’ to count the Business Partners having that Attribute Value.
Now Right Click and Define the Target Group.
Now Right Click and Generate the Target Group.
Click Yes in the Pop Up to Save changes.
Click OK in the Pop Up to Schedule the Job to build the Target Group.
In sm37 we can see the Job as below:
Now click on the Target Group to see the Target group.
Scenario 2:
Segment the Business Partners having Value 1 and Value 2:
Drag Value 1 and Drop on right side:
Now Drag value 2 and drop on Value 1.
Right Click and Count.
Now Define the Target Group.
Now select the Target Group and Generate it.
Click on Yes to save in the Pop up and Click Ok to Generate the Job as below:
Click on the Target Group to display the members in the Target Group.
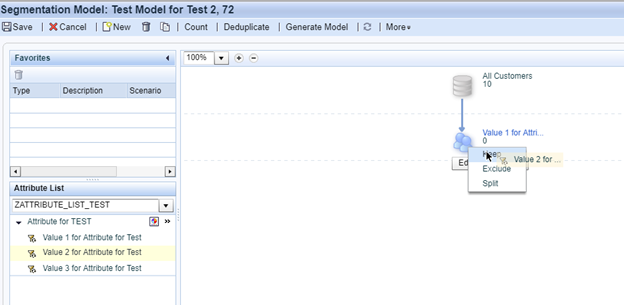
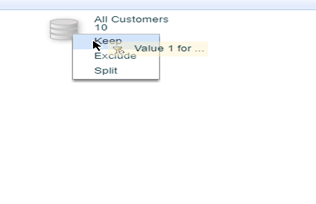
Scenario 3:
Now let us build Target group for Business Partners having Attribute Values as below:
Scenario 3(a): Build a Target Group for Business Partners having Attribute Value 1.
Based on above, Number of Business Partners in Target Group having Attribute Value 1 is 7.
Scenario 3(b): Build a Target Group for Business Partners having Attribute Value 1 AND Attribute 2 Value.
Number of Business Partners in Target Group having Attribute Value 1 and having Attribute Value 2 is 5.
Now Define the Target Group and Generate the Target Group.
Below is the Target Group that shows the Business Partners that have Value 1 and Value 2.
Scenario 3(c): Build a Target Group for Business Partners having Attribute Value 1 AND NOT Attribute 2 Value.
Now do the Count.
Now Define Target Group and Generate the Target Group and display the Target group.
Below is the Target group of Business Partners that have Value 1 and NOT Value 2.
Scenario 3(d): Build a Target Group for Business Partners having Attribute Value 1 AND NOT Attribute 2 Value & Build a Target Group for Business Partners having Attribute Value 1 AND Attribute 2 Value.
Now do the Count.
Now Define Target Group and Generate the Target Group.
For Technical Consultants:
In below steps, I have considered a scenario where Channel has only ‘Open Channel’ Option.
For the Badi to get triggered from the Program ‘CRM_MKTTG_PROC_TRANS_BATCH’ the Communication Channel must be passed as ‘08’ in the Event Handler EH_ONEXPORT of the Component/View SEGFPR_STC/VSMain.
Conclusion:
This Blog gives step by step procedure to do Segmentation Using Flash Modeler Approach in SAP CRM. The underlying concept of Segmentation remains the same for Flash Graphical Modeler / Java Applet Modeler.
Also, the BADI that can be used in Segmentation for any Custom requirement and steps to trigger the BADI will also help Technical Consultants.
In this Blog , we will see how to do Segmentation in SAP CRM using Attributes.
Also, to help Technical Consultants, I have explained about the BADI that can be used in Segmentation for any Custom requirement and steps to trigger the BADI.
Please note:
I have considered example of Flash Graphical Modeler in this Blog. The underlying concept remains the same for Flash Graphical Modeler / Java Applet Modeler.
Steps to Create Marketing Attributes and Assign them to Business Partners and do Segmentation:
- Create the attributes ( TCode CRMD_PROF_CHAR )
- Assign the Attribute to the Attribute Set ( TCode CRMD_PROF_TEMPL )
- Assign Attribute Set to Data Source ( TCode CRMD_MKTDS )
- Assign Data Source to Attribute List( TCode CRMD_MKTDS )
- Assign the Attribute Set to the Business Partner ( TCode CRMD_PROF_BP )
Some of the Prerequisite for FLEX Segmentation Modeler:
In TCode SICF below services must be Active:
- SEGED_HV
- FLEX_SEG_UI
- SEGAS_SEG_HV
- CRM_MKTHV_FLEX
In TCode SFW5 the below Business Function must be Active:
- CRM_MKT_HVS
For Technical Consultants:
- One of the useful Badi is CRM_MKT_EXP_CAMP_DAT_BADI, Method EXPORT_CAMPAIGN_DATA. The steps to trigger the Badi in Segmentation have also been explained in this Blog.
Detailed Steps:
- Create the attributes (TCode CRMD_PROF_CHAR) and save it.


- Assign the Attribute to the Attribute Set (TCode CRMD_PROF_TEMPL) and Save it:


- Assign Attribute Set to Data Source (TCode CRMD_MKTDS) and save it.


- Assign Data Source to Attribute List( TCode CRMD_MKTDS )
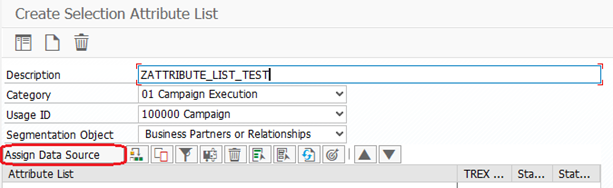
Click on ‘Assign Data Source’ button and Assign the Data Source to the Attribute list from the Popup as per below screen.

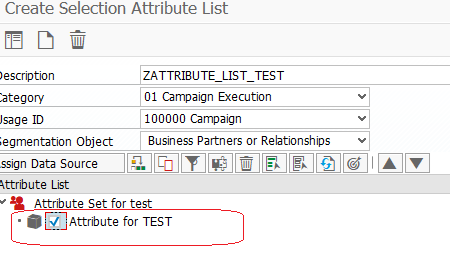
Check the Checkbox and double click to select the values for the Filter.
Please Note: Check the checkbox in screen above for the attribute to appear in Web UI.


Click Save.

- Assign the Attribute Set to the Business Partner ( TCode CRMD_PROF_BP )


Click on Create Assignment button and give the Attribute Set name.

Now press Enter the Attribute appear on the screen as below.

Double click on the Att. Description and from the Pop up select the values for the attribute.

Click on Save button.
In TCode ‘BP’ you can see the attributes assigned to the Business Partner as per below screenshot.

In similar way, assign the attributes and values to other Business Partners also.
Sample BP Considered 116.
There are no Marketing Attributes for the Business Partner as per below screenshot prior to assignment in TCode CRMD_PROF_BP.

Post assignment of Attributes Set to the BP the values appear in the Marketing Attributes tab as per below:

The assignment of Business Partners to the attribute values are as below:

Some of the Prerequisite for FLEX Segmentation Modeler:
In TCode SICF below services must be Active:
- SEGED_HV
- FLEX_SEG_UI
- SEGAS_SEG_HV
- CRM_MKTHV_FLEX
In TCode SFW5 the below Business Function must be Active:
- CRM_MKT_HVS
TCode SICF:


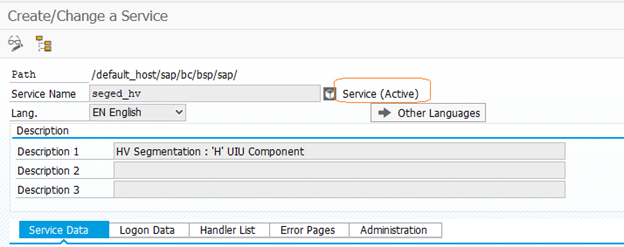
In similar way, the other services FLEX_SEG_UI, SEGAS_SEG_HV, CRM_MKTHV_FLEX must be Active.
Also, in TCode SFW5 the Business Function CRM_MKT_HVS must be Active:


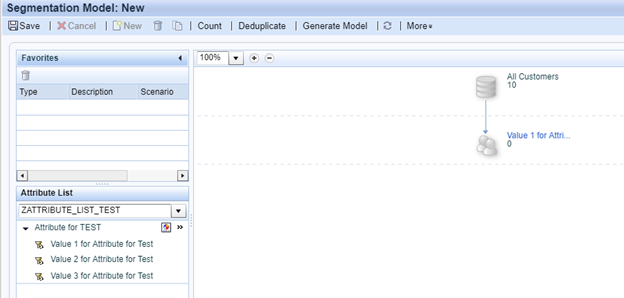
Now let us do Segmentation of the Business Partners in Web UI.


We can find the Attribute List and values as per below screenshot:

Now drag the Value and drop it on the Right hand side.

Now Right Click and we can select ‘Count’ to count the Business Partners having that Attribute Value.


Now Right Click and Define the Target Group.

Now Right Click and Generate the Target Group.

Click Yes in the Pop Up to Save changes.

Click OK in the Pop Up to Schedule the Job to build the Target Group.


In sm37 we can see the Job as below:

Now click on the Target Group to see the Target group.


Scenario 2:
Segment the Business Partners having Value 1 and Value 2:

Drag Value 1 and Drop on right side:

Now Drag value 2 and drop on Value 1.

Right Click and Count.


Now Define the Target Group.

Now select the Target Group and Generate it.

Click on Yes to save in the Pop up and Click Ok to Generate the Job as below:


Click on the Target Group to display the members in the Target Group.

Scenario 3:
Now let us build Target group for Business Partners having Attribute Values as below:

Scenario 3(a): Build a Target Group for Business Partners having Attribute Value 1.
Based on above, Number of Business Partners in Target Group having Attribute Value 1 is 7.


Scenario 3(b): Build a Target Group for Business Partners having Attribute Value 1 AND Attribute 2 Value.
Number of Business Partners in Target Group having Attribute Value 1 and having Attribute Value 2 is 5.


Now Define the Target Group and Generate the Target Group.

Below is the Target Group that shows the Business Partners that have Value 1 and Value 2.

Scenario 3(c): Build a Target Group for Business Partners having Attribute Value 1 AND NOT Attribute 2 Value.


Now do the Count.

Now Define Target Group and Generate the Target Group and display the Target group.
Below is the Target group of Business Partners that have Value 1 and NOT Value 2.

Scenario 3(d): Build a Target Group for Business Partners having Attribute Value 1 AND NOT Attribute 2 Value & Build a Target Group for Business Partners having Attribute Value 1 AND Attribute 2 Value.


Now do the Count.

Now Define Target Group and Generate the Target Group.


For Technical Consultants:
In below steps, I have considered a scenario where Channel has only ‘Open Channel’ Option.
- Useful Badi is CRM_MKT_EXP_CAMP_DAT_BADI, Method EXPORT_CAMPAIGN_DATA.
- Some of the useful Function Modules are CRM_MKTTG_PF_READ, CRM_MKTTG_TG_READ, CRM_MKTTG_PF_CREATE_SEL_PACKS.
- On clicking ‘Export to Channel’ button, Badi that can used for manipulating the Target Group data is CRM_MKT_EXP_CAMP_DAT_BADI, Method EXPORT_CAMPAIGN_DATA. This Badi is getting triggered from a Program CRM_MKTTG_PROC_TRANS_BATCH.
- For the Badi to get triggered from the Program the Communication Channel must be passed as ‘08’ in the Event Handler EH_ONEXPORT of the Component/View SEGFPR_STC/VSMain.
- Also, to default the Channel value to ‘Open Channel’ coding can be done in method GET_V_CHANNEL of Context Node ‘GENERAL’ in Component / View SEGFPR_STC/General. Also, using Role Config Key, necessary configurations can be done in Configuration tab to remove the fields Sender and checkbox Generate Bus. Act. in Component / View SEGFPR_STC/VSMain.


For the Badi to get triggered from the Program ‘CRM_MKTTG_PROC_TRANS_BATCH’ the Communication Channel must be passed as ‘08’ in the Event Handler EH_ONEXPORT of the Component/View SEGFPR_STC/VSMain.


Conclusion:
This Blog gives step by step procedure to do Segmentation Using Flash Modeler Approach in SAP CRM. The underlying concept of Segmentation remains the same for Flash Graphical Modeler / Java Applet Modeler.
Also, the BADI that can be used in Segmentation for any Custom requirement and steps to trigger the BADI will also help Technical Consultants.
- SAP Managed Tags:
- CRM WebClient UI
You must be a registered user to add a comment. If you've already registered, sign in. Otherwise, register and sign in.
Labels in this area
-
ABAP
1 -
API Rules
1 -
c4c
1 -
CAP development
1 -
clean-core
1 -
CRM
1 -
Custom Key Metrics
1 -
Customer Data
1 -
Determination
1 -
Determinations
1 -
Introduction
1 -
KYMA
1 -
Kyma Functions
1 -
open SAP
1 -
RAP development
1 -
Sales and Service Cloud Version 2
1 -
Sales Cloud
1 -
Sales Cloud v2
1 -
SAP
1 -
SAP Community
1 -
SAP CPQ
1 -
SAP CRM Web UI
1 -
SAP Customer Data Cloud
1 -
SAP Customer Experience
1 -
SAP CX
1 -
SAP CX extensions
1 -
SAP Integration Suite
1 -
SAP Sales Cloud v2
1 -
SAP Service Cloud v2
1 -
SAP Service Cloud Version 2
1 -
Service and Social ticket configuration
1 -
Service Cloud v2
1 -
side-by-side extensions
1 -
Ticket configuration in SAP C4C
1 -
Validation
1 -
Validations
1
Related Content
- Media collection not editable in SmartEdit in CRM and CX Questions
- Utility Product Integration Layer (UPIL) in S/4HANA Utilities for Customer Engagement – Part 1 in CRM and CX Blogs by Members
- Valuelist as a Feature Descriptor Type in SAP Commerce in CRM and CX Questions
- SAP variant configuration and pricing - manual exchange rate for a quote from SAP CPQ in CRM and CX Questions
- What is planned for the 2405 release of SAP Variant Configuration and Pricing? in CRM and CX Blogs by SAP