
- SAP Community
- Products and Technology
- Technology
- Technology Blogs by SAP
- Xtending Business Application Studio : 3 of 3
Technology Blogs by SAP
Learn how to extend and personalize SAP applications. Follow the SAP technology blog for insights into SAP BTP, ABAP, SAP Analytics Cloud, SAP HANA, and more.
Turn on suggestions
Auto-suggest helps you quickly narrow down your search results by suggesting possible matches as you type.
Showing results for
Product and Topic Expert
Options
- Subscribe to RSS Feed
- Mark as New
- Mark as Read
- Bookmark
- Subscribe
- Printer Friendly Page
- Report Inappropriate Content
12-12-2020
12:34 AM
Since we've installed the Python extension in part 2, let's make use of it.
Business Application Studio(BAS) doesn't have python installed in its base Dev Space, so we'll have to install it ourselves. As mentioned in part 1, we could build a Debian 10 system, install the buildchain, grab the source code, compile it, and transplant it into our Dev Space. We would need to do this for every version of python we wanted to use in BAS. If we assume that our goal is to build up an application that will be eventually deployed to SAP Cloud Platform Cloud Foundry, then we should install a version of python that exists there so that we can be sure of compatibility.
If this is your intention, make sure BAS is connected to your account, you are logged in and have a org and space selected, and then run the following in the terminal.
You should get a link that looks like this.
https://github.com/cloudfoundry/python-buildpack/releases/tag/v1.7.24
Browse to that location and scroll down to see the versions of python that are currently on Cloud Foundry. I see at the time of this blog post that 3.9.0 is the most recent.
Now it's always nice to build things for yourselves, but to speed this blog post along I'm going to cheat and download a version of python that I've already built and tested. Open a terminal and follow these steps.
Start a new terminal window.
Check that python reports it's version correctly
You should get this.
Now at the command prompt, type in the following.
You're now in the python interpreter. You can see the prompt has changed to ">>>". Python is waiting for you to give it something to process.
Type in this and hit the return key.
Python has printed out "Hello world" and is now patiently waiting for the next line of code. In order to exit from the interpreter and return to the command line you'll need to quit.
Exercise the Extension :
Up till now, we've proven that python is running and we can use it on the command line, but that's not super useful for a project of any size. Let's make a folder for a few python project files and see what else the python extension can do for us. From the terminal in the /home/user/projects folder, do the following.
Now it should show up in Project Explorer. Right click and create a new file called hello.py.
Add the following line to the file and save it.
Now do back to the terminal and invoke python with the file.
You can also right-click on the file name in the explorer and select the Run Python File in Terminal to accomplish the same thing.
The real beauty of the python plugin is it's ability to support debugging. First let's make our hello.py file slightly more complicated. Add these two lines above the print line already there.
Also, click on the space to the left of the line 2 indicator. You should see a red dot like this.
This is setting a breakpoint on line 2 so that the debugger will stop executing when it reaches that line. If we switch into debugging mode and expand the BREAKPOINTS section, we should see a line for our newly set breakpoint. If you click on the drop down next to the gear icon you'll see we haven't created any runtime configurations yet. Select Add Configuration...
This will open the launch.json file and give you a dropdown of options. Pick Python.
Then select Python File. The other options are for more advanced debugging configurations.
Notice that it fills in the details of the configuration in the launch.json file. Save it.
Click the little green arrow and notice that when the debugger starts up the bottom bar turns orange and the execution is stopped at the breakpoint. Now the debugger control buttons are active.
At this point you can do all the debugger functions like step through the code line by line, step into functions, and inspect variables. Expand the VARIABLES -> Locals section and see that the value of the who variable is 'world'.
Click the button with the curved arrow(step over) to execute the current line. Notice that the value of the who variable is now 'You'.
You can even change a variable on the fly. Right click on the who variable and select "Set Value".
Now change it to 'Me' and click OK.
Notice that the current value of who is 'Me'.
Click the continue button and notice that the result in the output ended up being "Hello Me!".
So far we've demonstrated the core functionality expected in any programming language. I didn't get into the syntax checking, code completion, etc. but you can check out the extension docs for details on those features. The python extension also provides really nice Jupyter Notebook features.
Start by creating an empty hello.ipynb file in the my_python folder.
If needed the extension will load the jupyter kernels.
You may see a bunch of messages like these pop up. You can safely close them for now.
If you want to prevent these messages from popping up, you can open the preferences and look for "ports exclude" and add the port range and save the file.
In the hello.ipynb windows, you'll see the jupyter notebook interface. Click on the plus icon to create at least three cells.
Now in each cell, under the controls, paste each of the lines from our hello.py file.
In jupyter notebooks, you execute each line on it's own by clicking on the green arrow next to it. As the line is executed, any output is displayed below and a execution number appears in the brackets to the left where a [-] show that the line hasn't been executed yet.
Since the first cell only assigned a variable, there is no output yet. However you can inspect the current state of the variables by pressing this icon.
If you click the green arrow on the second cell to execute it...
You can see the value of the who variable has changed.
Finally when we execute the third cell, we get some output since it's a print statement.
The nice thing about jupyter notebooks is that you can add cells that only contain markdown that don't affect the execution of the code, but allow for inline documentation and a handy way to link to external resources. You can add cell by clicking the plus to the left of existing cells and the up and down arrows to change the sequence. Then click the M icon to change it into markdown mode and add your comments.
When a markdown cell is "executed", the result of the markdown is rendered. Here I used asterix to denote bold. When you're happy with your python code you can export it using the converter icon.
When first clicked on it, I got an error message in the Python log window. Looks like I'm missing the nbconvert module. Just use pip to install it!
Now when I convert the notebook to a regular python script a new window is created and all the markdown is turned into comments.
From the extension docs... https://github.com/microsoft/vscode-python
For more information you can:
Learn more about the rich features of the Python extension:
I've just skimmed the surface of what can be done with debugging and jupyter notebooks. It's nice to be able to extend the tooling for your needs in a meaningful way. Now most seasoned python developers should feel right at home in Business Application Studio.
Let me know if you have and questions or issues by leaving me a question below or better yet, asking it on the SAP community.
-Andrew
Business Application Studio(BAS) doesn't have python installed in its base Dev Space, so we'll have to install it ourselves. As mentioned in part 1, we could build a Debian 10 system, install the buildchain, grab the source code, compile it, and transplant it into our Dev Space. We would need to do this for every version of python we wanted to use in BAS. If we assume that our goal is to build up an application that will be eventually deployed to SAP Cloud Platform Cloud Foundry, then we should install a version of python that exists there so that we can be sure of compatibility.
If this is your intention, make sure BAS is connected to your account, you are logged in and have a org and space selected, and then run the following in the terminal.
ver=$(cf buildpacks | grep python | cut -d '-' -f 4 | cut -d '.' -f 1-3) ; echo ; echo "Browse to this page for python versions available in this buildpack." ; echo ; echo "https://github.com/cloudfoundry/python-buildpack/releases/tag/$ver" ; echoYou should get a link that looks like this.
https://github.com/cloudfoundry/python-buildpack/releases/tag/v1.7.24
Browse to that location and scroll down to see the versions of python that are currently on Cloud Foundry. I see at the time of this blog post that 3.9.0 is the most recent.

Wrangling the python:
Shortcut: See post 4 of 3 for and even easier way to install Python!
Now it's always nice to build things for yourselves, but to speed this blog post along I'm going to cheat and download a version of python that I've already built and tested. Open a terminal and follow these steps.
cd ~


curl -s -LO https://raw.githubusercontent.com/SAP-samples/hana-python-securestore/master/tools/bas_install_pytho... -o /home/user/bas_install_python.sh


/bin/bash /home/user/bas_install_python.sh


exit
Start a new terminal window.
Check that python reports it's version correctly
python -VYou should get this.

Now at the command prompt, type in the following.
python
You're now in the python interpreter. You can see the prompt has changed to ">>>". Python is waiting for you to give it something to process.

Type in this and hit the return key.
print("Hello world")
Python has printed out "Hello world" and is now patiently waiting for the next line of code. In order to exit from the interpreter and return to the command line you'll need to quit.
quit()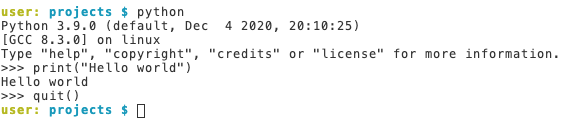
Exercise the Extension :
Up till now, we've proven that python is running and we can use it on the command line, but that's not super useful for a project of any size. Let's make a folder for a few python project files and see what else the python extension can do for us. From the terminal in the /home/user/projects folder, do the following.
mkdir my_python
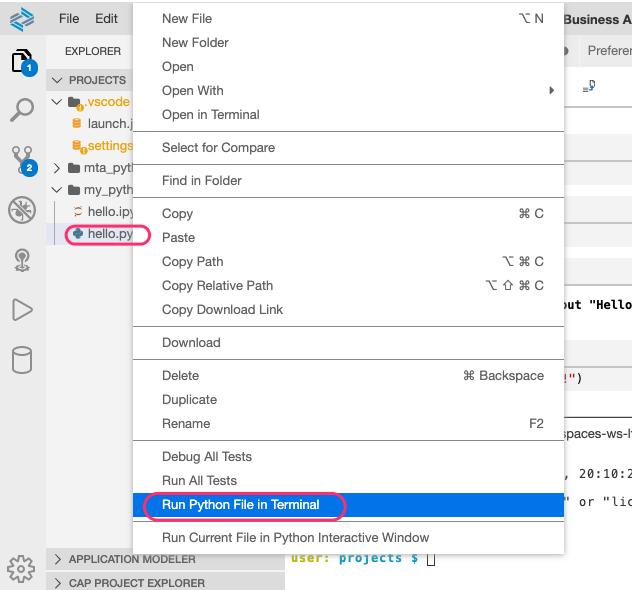
Now it should show up in Project Explorer. Right click and create a new file called hello.py.

Add the following line to the file and save it.
print("Hello world!")
Now do back to the terminal and invoke python with the file.
python hello.py
You can also right-click on the file name in the explorer and select the Run Python File in Terminal to accomplish the same thing.
Rolling up our sleeves:
The real beauty of the python plugin is it's ability to support debugging. First let's make our hello.py file slightly more complicated. Add these two lines above the print line already there.
who = "world"

who = "You"
Also, click on the space to the left of the line 2 indicator. You should see a red dot like this.

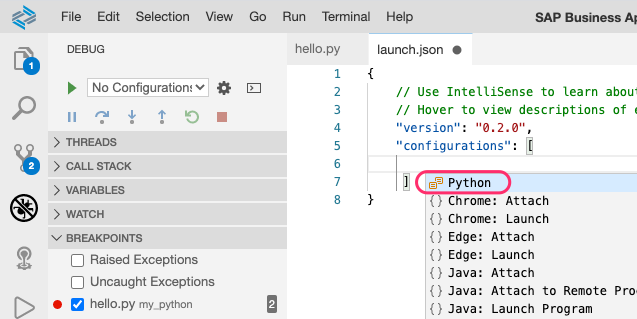
This is setting a breakpoint on line 2 so that the debugger will stop executing when it reaches that line. If we switch into debugging mode and expand the BREAKPOINTS section, we should see a line for our newly set breakpoint. If you click on the drop down next to the gear icon you'll see we haven't created any runtime configurations yet. Select Add Configuration...

This will open the launch.json file and give you a dropdown of options. Pick Python.
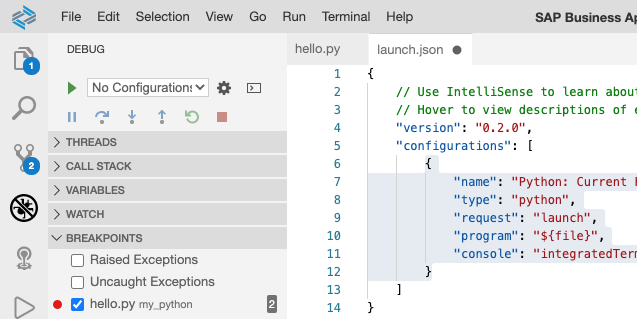
Then select Python File. The other options are for more advanced debugging configurations.

Notice that it fills in the details of the configuration in the launch.json file. Save it.
Click the little green arrow and notice that when the debugger starts up the bottom bar turns orange and the execution is stopped at the breakpoint. Now the debugger control buttons are active.

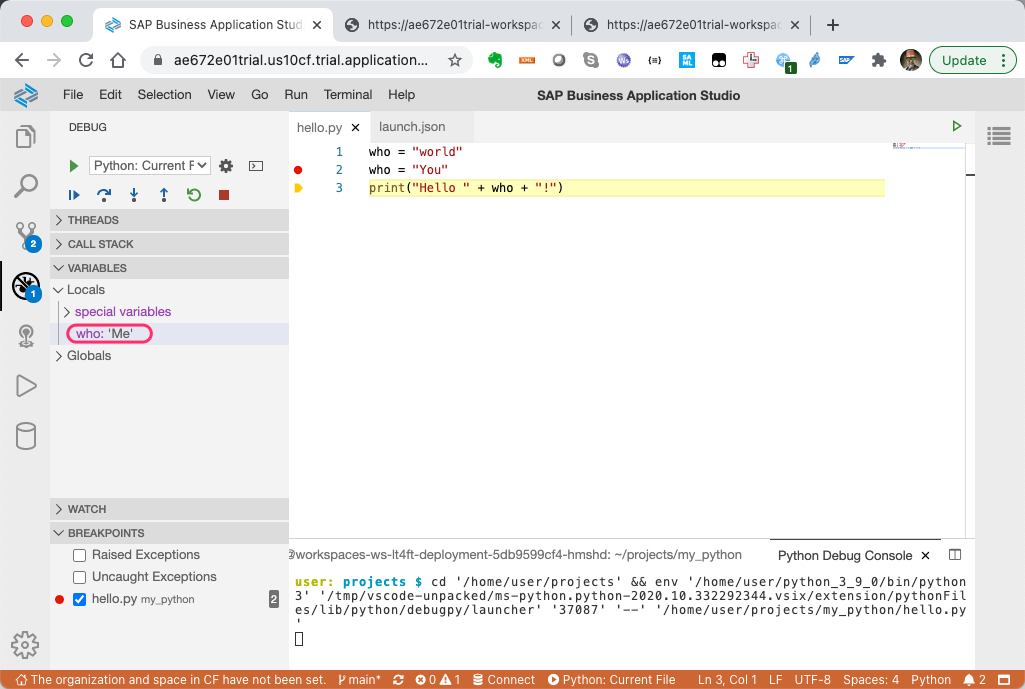
At this point you can do all the debugger functions like step through the code line by line, step into functions, and inspect variables. Expand the VARIABLES -> Locals section and see that the value of the who variable is 'world'.

Click the button with the curved arrow(step over) to execute the current line. Notice that the value of the who variable is now 'You'.

You can even change a variable on the fly. Right click on the who variable and select "Set Value".

Now change it to 'Me' and click OK.

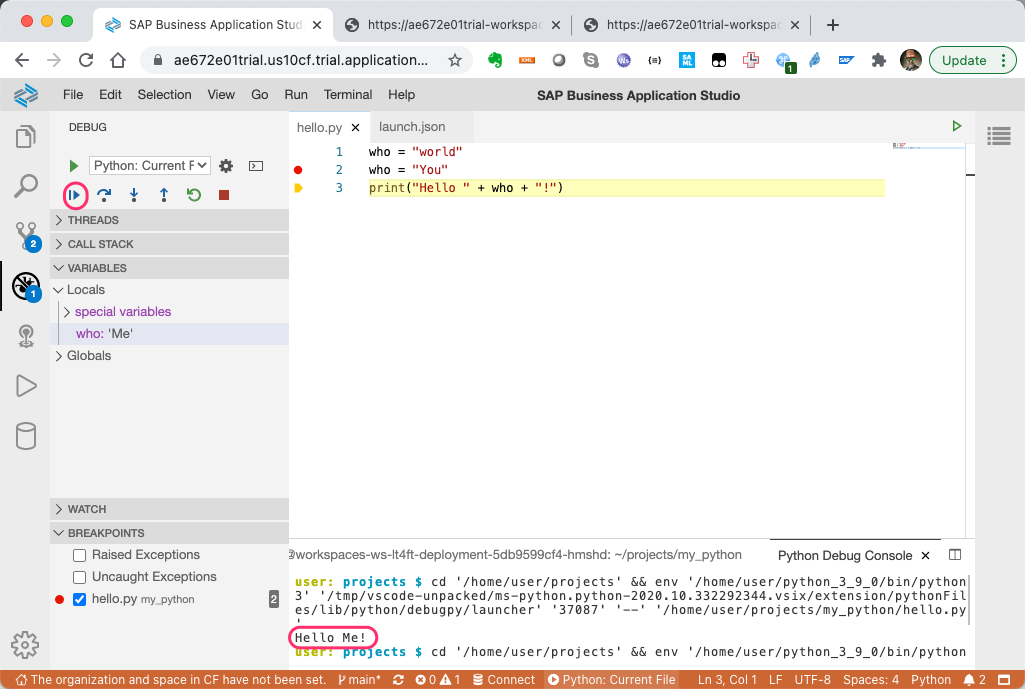
Notice that the current value of who is 'Me'.
Click the continue button and notice that the result in the output ended up being "Hello Me!".
To Jupyter and Beyond! :
So far we've demonstrated the core functionality expected in any programming language. I didn't get into the syntax checking, code completion, etc. but you can check out the extension docs for details on those features. The python extension also provides really nice Jupyter Notebook features.
Start by creating an empty hello.ipynb file in the my_python folder.

If needed the extension will load the jupyter kernels.

You may see a bunch of messages like these pop up. You can safely close them for now.

If you want to prevent these messages from popping up, you can open the preferences and look for "ports exclude" and add the port range and save the file.


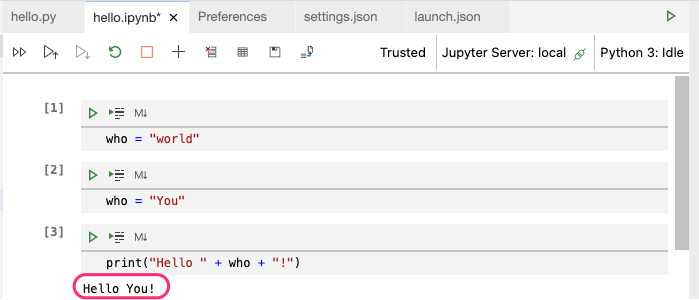
In the hello.ipynb windows, you'll see the jupyter notebook interface. Click on the plus icon to create at least three cells.

Now in each cell, under the controls, paste each of the lines from our hello.py file.

In jupyter notebooks, you execute each line on it's own by clicking on the green arrow next to it. As the line is executed, any output is displayed below and a execution number appears in the brackets to the left where a [-] show that the line hasn't been executed yet.

Since the first cell only assigned a variable, there is no output yet. However you can inspect the current state of the variables by pressing this icon.

If you click the green arrow on the second cell to execute it...

You can see the value of the who variable has changed.

Finally when we execute the third cell, we get some output since it's a print statement.
The nice thing about jupyter notebooks is that you can add cells that only contain markdown that don't affect the execution of the code, but allow for inline documentation and a handy way to link to external resources. You can add cell by clicking the plus to the left of existing cells and the up and down arrows to change the sequence. Then click the M icon to change it into markdown mode and add your comments.

When a markdown cell is "executed", the result of the markdown is rendered. Here I used asterix to denote bold. When you're happy with your python code you can export it using the converter icon.

When first clicked on it, I got an error message in the Python log window. Looks like I'm missing the nbconvert module. Just use pip to install it!

pip install nbconvertNow when I convert the notebook to a regular python script a new window is created and all the markdown is turned into comments.

From the extension docs... https://github.com/microsoft/vscode-python
For more information you can:
- Follow our Python tutorial with step-by-step instructions for building a simple app.
- Check out the Python documentation on the VS Code site for general information about using the extension.
- Check out the Jupyter Notebook documentation on the VS Code site for information about using Jupyter Notebooks in VS Code.
Feature details
Learn more about the rich features of the Python extension:
- IntelliSense: Edit your code with auto-completion, code navigation, syntax checking and more
- Linting: Get additional code analysis with Pylint, Flake8 and more
- Code formatting: Format your code with black, autopep or yapf
- Debugging: Debug your Python scripts, web apps, remote or multi-threaded processes
- Testing: Run and debug tests through the Test Explorer with unittest, pytest or nose
- Jupyter Notebooks: Create and edit Jupyter Notebooks, add and run code cells, render plots, visualize variables through the variable explorer, visualize dataframes with the data viewer, and more
- Environments: Automatically activate and switch between virtualenv, venv, pipenv, conda and pyenv environments
- Refactoring: Restructure your Python code with variable extraction, method extraction and import sorting
I've just skimmed the surface of what can be done with debugging and jupyter notebooks. It's nice to be able to extend the tooling for your needs in a meaningful way. Now most seasoned python developers should feel right at home in Business Application Studio.
Let me know if you have and questions or issues by leaving me a question below or better yet, asking it on the SAP community.
-Andrew
| Partners: If you have a question, click here to ask it in the SAP Community . Be sure to tag it with Partnership and leave your company name in the question so that we can better assist you. |
- SAP Managed Tags:
- SAP Business Application Studio,
- Python
Labels:
3 Comments
You must be a registered user to add a comment. If you've already registered, sign in. Otherwise, register and sign in.
Labels in this area
-
ABAP CDS Views - CDC (Change Data Capture)
2 -
AI
1 -
Analyze Workload Data
1 -
BTP
1 -
Business and IT Integration
2 -
Business application stu
1 -
Business Technology Platform
1 -
Business Trends
1,661 -
Business Trends
87 -
CAP
1 -
cf
1 -
Cloud Foundry
1 -
Confluent
1 -
Customer COE Basics and Fundamentals
1 -
Customer COE Latest and Greatest
3 -
Customer Data Browser app
1 -
Data Analysis Tool
1 -
data migration
1 -
data transfer
1 -
Datasphere
2 -
Event Information
1,400 -
Event Information
64 -
Expert
1 -
Expert Insights
178 -
Expert Insights
273 -
General
1 -
Google cloud
1 -
Google Next'24
1 -
Kafka
1 -
Life at SAP
784 -
Life at SAP
11 -
Migrate your Data App
1 -
MTA
1 -
Network Performance Analysis
1 -
NodeJS
1 -
PDF
1 -
POC
1 -
Product Updates
4,577 -
Product Updates
324 -
Replication Flow
1 -
RisewithSAP
1 -
SAP BTP
1 -
SAP BTP Cloud Foundry
1 -
SAP Cloud ALM
1 -
SAP Cloud Application Programming Model
1 -
SAP Datasphere
2 -
SAP S4HANA Cloud
1 -
SAP S4HANA Migration Cockpit
1 -
Technology Updates
6,886 -
Technology Updates
401 -
Workload Fluctuations
1
Related Content
- Capture Your Own Workload Statistics in the ABAP Environment in the Cloud in Technology Blogs by SAP
- 10+ ways to reshape your SAP landscape with SAP BTP - Blog 4 Interview in Technology Blogs by SAP
- 10+ ways to reshape your SAP landscape with SAP Business Technology Platform – Blog 4 in Technology Blogs by SAP
- Top Picks: Innovations Highlights from SAP Business Technology Platform (Q1/2024) in Technology Blogs by SAP
- BTP Apps, F4 Help and Personal Value Lists in Technology Q&A
Top kudoed authors
| User | Count |
|---|---|
| 11 | |
| 10 | |
| 9 | |
| 9 | |
| 7 | |
| 7 | |
| 7 | |
| 6 | |
| 6 | |
| 5 |