
- SAP Community
- Products and Technology
- Technology
- Technology Blogs by SAP
- First Java Cap Application
Technology Blogs by SAP
Learn how to extend and personalize SAP applications. Follow the SAP technology blog for insights into SAP BTP, ABAP, SAP Analytics Cloud, SAP HANA, and more.
Turn on suggestions
Auto-suggest helps you quickly narrow down your search results by suggesting possible matches as you type.
Showing results for
bruce_wang3
Explorer
Options
- Subscribe to RSS Feed
- Mark as New
- Mark as Read
- Bookmark
- Subscribe
- Printer Friendly Page
- Report Inappropriate Content
12-08-2020
10:03 AM
Setting Up Local Development
Install Java & Maven & Node.js
Install the cds-dk
npm i -g @sap/cds-dkInstall the VSCode & Plugin
VSCode Pluging : Java Extension Pack


VSCode Pluging : Language support for Java ™ for Visual Studio Code


VSCode Pluging: SAP Cloud Platform core data services plug-in for Visual Studio Code


VSCode Pluging: vscode-sqlite


VSCode Pluging: Debugger for Java
Verify the Setup
java --version

mvn -version

node -version
Create First Cap Application
Step1: Generate initial java project
Enter your java project workspace in terminal, and run below command to create initial java project
mvn -B archetype:generate \

-DarchetypeArtifactId=cds-services-archetype \

-DarchetypeGroupId=com.sap.cds \

-DarchetypeVersion=RELEASE \

-DgroupId=com.sap.cap \

-DartifactId=products-service \

-Dpackage=com.sap.cap.productsservice
After run success, the initial project will be generated in your folder. Regarding the case, the folder named products-service

Step2: Check project in VSCode
Drag the project folder into VSCode, the project structure looks like below picture
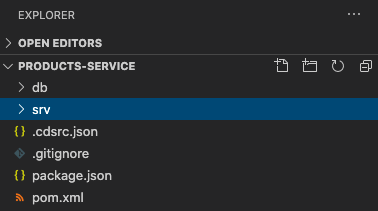
- The project is named
products-service - The
dbfolder stores database-related artifacts - The
srvfolder stores your Java application
Step3: Create first CDS service
- In srv folder root, create a file, named as admin-service.cds
- Add following service definition to the file.
It means define a service AdminService contains domain model Products
service AdminService {

    entity Products {

        key ID : Integer;

        title  : String(111);

        descr  : String(1111);

    }

}
Step4: Compile model definition
In VSCode, open a terminal window and run below command to compile project
mvn clean installAfter running this command, some files are generated and added to the
srv/src/main/resources/edmx folder. This is the default path, where CAP Java runtime looks for the model definitions.Step5: Run application locally
The created project is based on spring boot, then you could run the application with below command in terminal.
After run success, the application will be started at default port 8080
mvn clean spring-boot:run
Step6: Inspect running result
Open the link in chrome: http://localhost:8080

Create java class for custom event handler
- Create the Java package, by creating a new folder called
handlersundersrv/src/main/java/com/sap/cap/productsservice
- Create the Java class file
AdminService.javain the createdhandlersfolder, with the following content
 package com.sap.cap.productsservice.handlers;


 import java.util.HashMap;

 import java.util.Map;


 import org.springframework.stereotype.Component;


 import com.sap.cds.services.cds.CdsCreateEventContext;

 import com.sap.cds.services.cds.CdsReadEventContext;

 import com.sap.cds.services.cds.CdsService;

 import com.sap.cds.services.handler.EventHandler;

 import com.sap.cds.services.handler.annotations.On;

 import com.sap.cds.services.handler.annotations.ServiceName;


 @Component

 @ServiceName("AdminService")

 public class AdminService implements EventHandler {


     private Map<Object, Map<String, Object>> products = new HashMap<>();


     @On(event = CdsService.EVENT_CREATE, entity = "AdminService.Products")

     public void onCreate(CdsCreateEventContext context) {

         context.getCqn().entries().forEach(e -> products.put(e.get("ID"), e));

         context.setResult(context.getCqn().entries());

     }


     @On(event = CdsService.EVENT_READ, entity = "AdminService.Products")

     public void onRead(CdsReadEventContext context) {

         context.setResult(products.values());

     }


 }
This class now handles the
READ and CREATE events that target the Products entity of the AdminService.- The
READoperation just returns all entities kept in memory. - The
CREATEevent extracts the payload from the CQN representation and stores it in memory.
CDS Query Notation (CQN) is the common language in CAP to run queries against services. It can be used to talk to the services defined by your model, but also remote services, such as the database.
The event handler uses the following APIs, which are available for service providers in CAP Java:
- Event handler classes have to implement the marker interface
EventHandlerand register themselves as Spring Beans (@Component). The marker interface is important, because it enables the CAP Java runtime to identify these classes among all Spring Beans. - Event handler methods are registered with
@On,@Before, or@Afterannotations. Every event, such as an entity creation, runs through these three phases. Each phase has a slightly different semantic. You’ll learn more about these semantics in the subsequent tutorial. - The annotation
@ServiceNamespecifies the default service name all event handler methods apply to. Here this isAdminService, as this was also the name when defining the service in the CDS model. - Event handler methods get an event-specific event context parameter, which provides access to the input parameters of the event and the ability to set the result. For example, let’s look at the
CdsCreateEventContext contextparameter. The event we’re extending is theCREATEevent. The type of the context variable is specific to this extendedCREATEevent. TheonCreatemethod returnsvoid, as the result is set by running:context.setResult(…).
Restart the application
Before running the command, make sure the application already stopped, otherwise there is an error of port 8080 was used
mvn clean spring-boot: runTest create product
open a new terminal to run curl like below
curl -X POST http://localhost:8080/odata/v4/AdminService/Products \

-H "Content-Type: application/json" \

-d '{"ID": 42, "title": "My Tutorial Product", "descr": "You are doing an awesome job!"}'
Read data from products entity page

Debug in VSCode
We also could start the application with vscode
- stop the running application first with ctrl+c
- select the run in vscode to create a vscode running configuration
- You could click the run button to run application, then you could set break point in your java code

Change the project as a Reusable Service
Step1: Define the domain model
Previously, we defined a service which contains a cds entity. Normally when modeling with CDS the best practice is to separate services from the domain model
Therefore, we will define the complete domain model in the db folder
- Go to your db folder and create a file named schema.cds
- Add the following code to the file
    namespace sap.capire.products;


    using { Currency, cuid, managed, sap.common.CodeList } from '@sap/cds/common';


    entity Products : cuid, managed {

        title    : localized String(111);

        descr    : localized String(1111);

        stock    : Integer;

        price    : Decimal(9,2);

        currency : Currency;

        category : Association to Categories;

    }


    entity Categories : CodeList {

        key ID   : Integer;

        parent   : Association to Categories;

        children : Composition of many Categories on children.parent = $self;

    }
Step2: Understand keywords
The file means to create two domain model: Products, Categories with CDS Definition Language (CDL)
It also imports various common definitions from the
@Sap/cds/common package (a globally available reuse package):CurrencycuidmanagedCodeList
The localized Keyword
The
localized keyword can be used to mark elements, which require translation. The ability to store translations for different languages and to store a default fallback translation is automatically handled by CDS for you. You will see this in action in more detail in the next tutorial.Associations and Compositions
Associations and compositions can be used to define relationships between entities. They often allow you to define these relationships without explicitly working with foreign keys.
While associations define a rather loose coupling between the entities, compositions define a containment relationship. Compositions can also be thought of as defining deep structures. You can perform
deep inserts and upserts along these structures.In your domain model, the
Categories entities define a parent and children element. This enables a hierarchy of categories. The children of a category are modelled as a composition. A category with all of its children defines a deep nested structure. Deleting a category would automatically delete all of its children. However, the parent of a category is modelled as an association. Deleting a category obviously shouldn’t delete its parent.The cuid and managed Aspects
Both
cuid and managed are aspects. Aspects extend an entity with additional elements. The cuid aspect adds a key element ID of type UUID to the entity.The
managed aspect adds four additional elements to the entity. These capture the time of the creation and last update of the entity, and the user, which performed the creation and last update.The CodeList Aspect and the Currency Type
CodeLists can be used to store global, translatable definitions based on codes, such as currencies, countries, or languages. Especially for UIs, a CodeList can be useful to provide a value help for certain input fields.The
Currency definition is a type. It defines an association to a Currencies entity. The Currencies entity is based on ISO 4217 and uses three-letter alpha codes as keys such as EUR or USD and provides the possibility to store the corresponding currency symbol such as € or $.Step3: Rewrite the AdminService
Previously we defined a simple service, called
AdminService, which directly defined the entity Products. As you now have defined the Products entity in your domain model, the AdminService just needs to expose it. In addition, you defined the Categories entity, which should also be part of your service.- Go to srv folder and open the admin-service.cds file
- Replace the content with the following code
using { sap.capire.products as db } from '../db/schema';


service AdminService {

    entity Products   as projection on db.Products;

    entity Categories as projection on db.Categories;

}
Step4: Deploy domain model to sqlite
First, install SQLite to project, in VSCode open a terminal to run below command
npm install --save-dev sqlite3To initialize the database with the defined domain model, execute the following command in the terminal
cds deploy --to sqliteAfter run successfully, there is a sqlite.db file generated in your project folder
Step5: Connect to sqlite within VSCode
open VSCode with your keyborad F1, select SQLite: open database, next select your project sqlite db
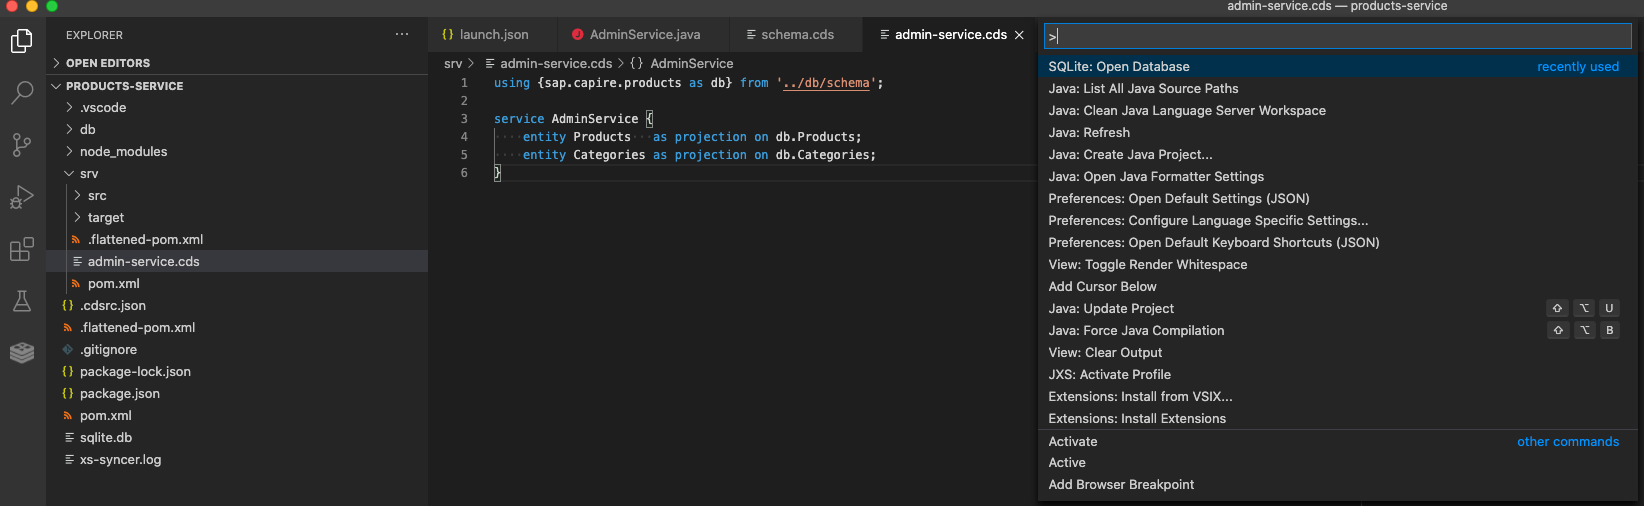
check deployed content in sqlitedb

Step5: Configure CAP application to use SQLite database
Go to
srv/src/main/resources, locate, and open the application.yaml file. This file was created when you initialized the application.At the end of the file, add below content, replace /Users/{youruser}/Documents/workspace to your actual folder path
---

spring:

  profiles: sqlite

  datasource:

    url: "jdbc:sqlite:/Users/{youruser}/Documents/workspace/products-service/sqlite.db"

    driver-class-name: org.sqlite.JDBC

    initialization-mode: never

    hikari:

      maximum-pool-size: 1
Step6: Use CAP's generic persistence handling
The CAP Java SDK has a Persistence Service that provides out-of-the-box capabilities to store and retrieve entities from a database. Therefore, no custom coding is required for this. The entities defined in your
AdminService will be automatically served via OData and you can just delete the AdminService.java file that was created earlier.Delete the
AdminService.java file in the handlers folder.Step 7: Run and test your application
Run with memory database with below command
mvn spring-boot:runRun with SQLite database with below command
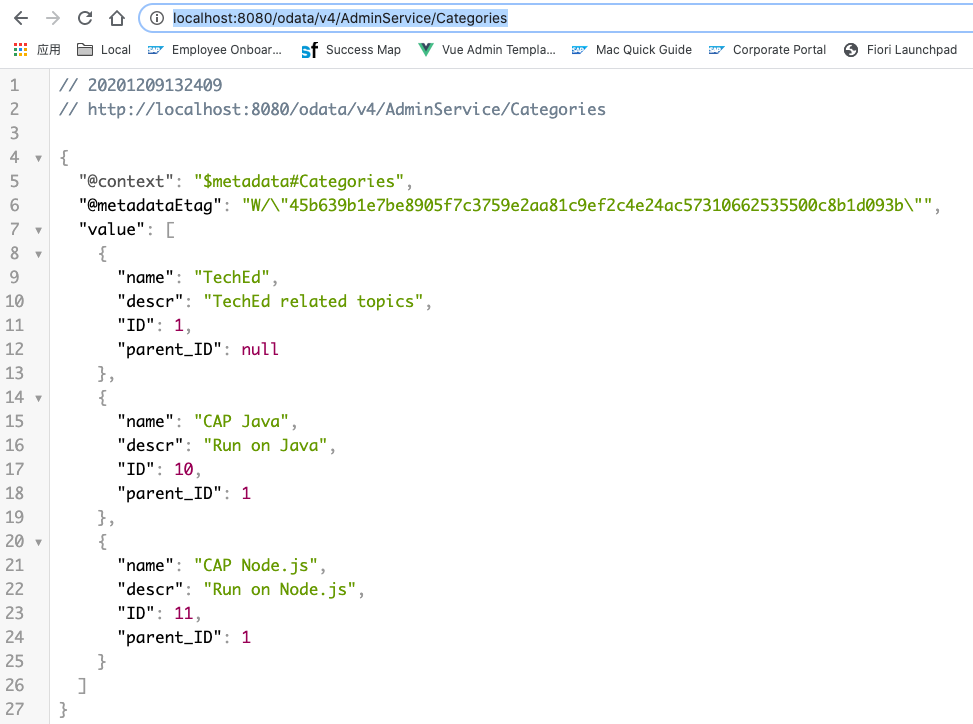
mvn spring-boot:run -Dspring-boot.run.profiles=sqliteIn terminal, run below curl to insert categories
curl -X POST http://localhost:8080/odata/v4/AdminService/Categories \

-H "Content-Type: application/json" \

-d '{"ID": 1, "name": "TechEd", "descr": "TechEd related topics", "children": [{"ID": 10, "name": "CAP Java", "descr": "Run on Java"}, {"ID": 11, "name": "CAP Node.js", "descr": "Run on Node.js"}]}'
Check inserted data via browser with the URL:
http://localhost:8080/odata/v4/AdminService/Categories
Step 7: Set up for reuse
The reuse of models can be achieved by publishing NPM modules with the models and defining dependencies to these NPM modules in other applications. There are a two steps we need to perform to prepare the
products-service application for reuse.- The name of the
products-servicereuse module, should be@Sap/capire-products

- To make it easier to reuse the module, an
index.cdsfile can be added to theproducts-service. This ensures a better decoupling from other applications.
Create a new fileindex.cdsin the~/projects/products-servicefolder and place the following content inside this file
using from './db/schema';

using from './srv/admin-service';- SAP Managed Tags:
- SAP Cloud Application Programming Model
Labels:
3 Comments
You must be a registered user to add a comment. If you've already registered, sign in. Otherwise, register and sign in.
Labels in this area
-
ABAP CDS Views - CDC (Change Data Capture)
2 -
AI
1 -
Analyze Workload Data
1 -
BTP
1 -
Business and IT Integration
2 -
Business application stu
1 -
Business Technology Platform
1 -
Business Trends
1,661 -
Business Trends
87 -
CAP
1 -
cf
1 -
Cloud Foundry
1 -
Confluent
1 -
Customer COE Basics and Fundamentals
1 -
Customer COE Latest and Greatest
3 -
Customer Data Browser app
1 -
Data Analysis Tool
1 -
data migration
1 -
data transfer
1 -
Datasphere
2 -
Event Information
1,400 -
Event Information
64 -
Expert
1 -
Expert Insights
178 -
Expert Insights
273 -
General
1 -
Google cloud
1 -
Google Next'24
1 -
Kafka
1 -
Life at SAP
784 -
Life at SAP
11 -
Migrate your Data App
1 -
MTA
1 -
Network Performance Analysis
1 -
NodeJS
1 -
PDF
1 -
POC
1 -
Product Updates
4,577 -
Product Updates
324 -
Replication Flow
1 -
RisewithSAP
1 -
SAP BTP
1 -
SAP BTP Cloud Foundry
1 -
SAP Cloud ALM
1 -
SAP Cloud Application Programming Model
1 -
SAP Datasphere
2 -
SAP S4HANA Cloud
1 -
SAP S4HANA Migration Cockpit
1 -
Technology Updates
6,886 -
Technology Updates
402 -
Workload Fluctuations
1
Related Content
- Formatted JSON Field in RAP Application in Technology Q&A
- How to add dynamically formcell or button table in SectionedTable0 of Current(Main) MDK Page in Technology Q&A
- Capture Your Own Workload Statistics in the ABAP Environment in the Cloud in Technology Blogs by SAP
- Consolidation Extension for SAP Analytics Cloud – Automated Eliminations and Adjustments (part 1) in Technology Blogs by Members
- Dynamic URL's in Build Process Automation in Technology Q&A
Top kudoed authors
| User | Count |
|---|---|
| 12 | |
| 9 | |
| 8 | |
| 7 | |
| 7 | |
| 6 | |
| 6 | |
| 6 | |
| 6 | |
| 4 |