
- SAP Community
- Products and Technology
- Technology
- Technology Blogs by SAP
- How to deploy an Eclipse Dirigible private Docker ...
Technology Blogs by SAP
Learn how to extend and personalize SAP applications. Follow the SAP technology blog for insights into SAP BTP, ABAP, SAP Analytics Cloud, SAP HANA, and more.
Turn on suggestions
Auto-suggest helps you quickly narrow down your search results by suggesting possible matches as you type.
Showing results for
former_member18
Explorer
Options
- Subscribe to RSS Feed
- Mark as New
- Mark as Read
- Bookmark
- Subscribe
- Printer Friendly Page
- Report Inappropriate Content
11-20-2020
3:05 PM
Overview
Eclipse Dirigible is an open-source cloud development platform that provides capabilities for end-to-end development processes from database modeling and management, through RESTful services using server-side JavaScript, to pattern-based user interface generation, role-based security, external services integration, testing, debugging, operations and monitoring.
Some of the unique features include:
- In-System development
- Low-Code/No-Code development
- Modeling and Generation from templates
- In-App extensibility
- Enterprise JavaScript APIs
- Web IDE
The platform aims to unify open-source business services by providing software developers with a convenient set of tools for building, running, and operating business applications in the Cloud. Dirigible is also part of the Eclipse Cloud Development top-level project.
Setup
Starting with Eclipse Dirigible 5.0, there are built-in integrations with the SAP Cloud Platform Cloud Foundry and Kyma environments. To deploy Eclipse Dirigible on either one of these environments, you need to use a Docker image. While deploying the publicly available Dirigible Docker images is quite straightforward, there could be some cases where you might need to deploy a Docker image form a private Docker repository instead. Here are some of the cases:
- Creating a proprietary extension to the Dirigible Web IDE
- Using a new engine that supports custom Dirigible Runtime artifacts
- Deploying an application developed with Dirigible on production
In any of these cases, building a Docker image and pushing it to a private Docker repository, seems reasonable.
In this tutorial, I'm going to show you how to deploy an Eclipse Dirigible based Docker image from a private Docker repository. During the tutorial I'm going to use the Docker Hub "one private" repository policy from the "Free for Individuals" plan.
As a prerequisite, you need a Docker Hub registration. If you already have a Docker Hub registration, or you are going to use another private Docker repository, then skip this section.
- Go to https://hub.docker.com
- Create a new registration.
- Log on to your account.
 (Docker Hub)
Next, we are going to create a new Private repository:
- Go to the Repositories tab.
- Click the Create Repository button.
- Name the repository (e.g. my-repository).
- Add a repository description (this is optional).
- Switch the visibility from Public to Private.
- Create the repository.

(Creating a new Docker Hub repository)
Once the private Docker repository is created, then it's time to push the Docker image to it:
- Build your Docker image:
docker build -t my-repository .
- Tag the Docker image:
docker tag my-repository <your-docker-hub-user>/my-repository
- Push the image to the private Docker repository:
docker push <your-docker-hub-user>/my-repository
- Check if the Docker image was successfully pushed:
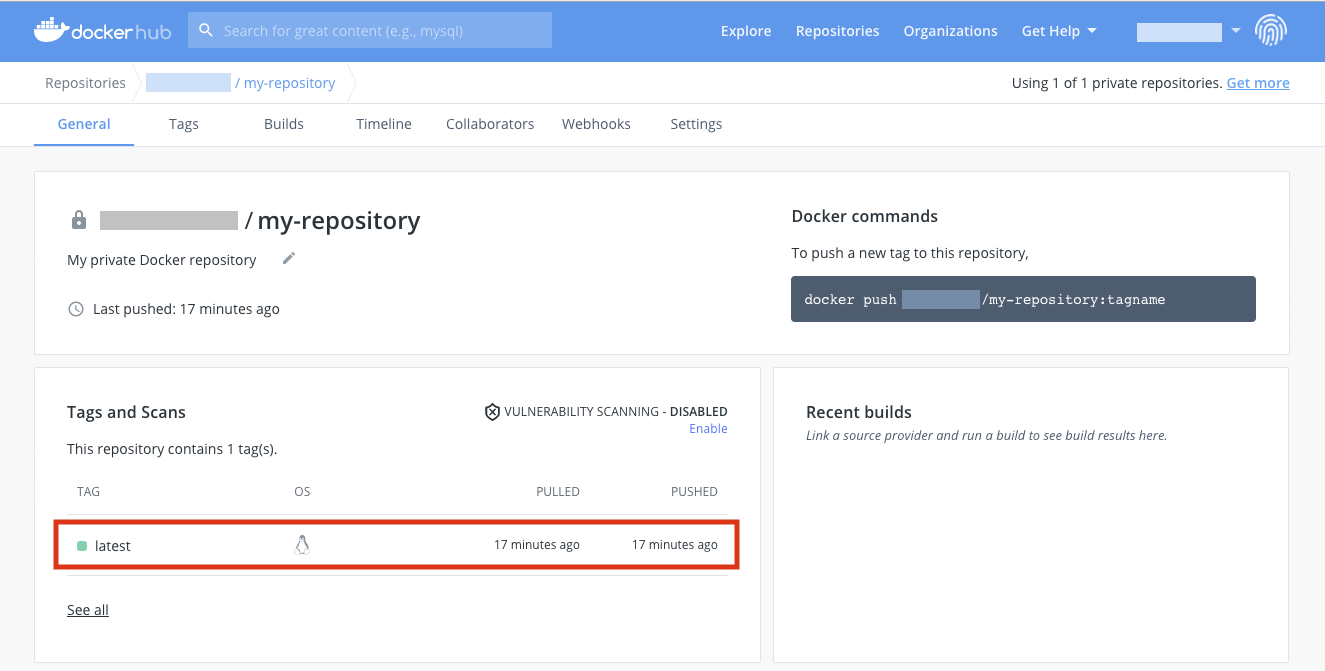
(Docker Image Tags)
Now it's time to log on to the SAP Cloud Platform Cloud Foundry environment subaccount from the Cloud Foundry CLI:
- Install the Cloud Foundry CLI. You can either get the latest release from the official release page or use your package manager.
- Log on to the SAP Cloud Platform Cockpit and copy the Org Name and the API Endpoint:

- Set the Cloud Foundry CLI API endpoint:
cf api https://api.cf.eu10.hana.ondemand.com
- Log on to your subaccount:
cf login
The next step is to deploy the Docker image in the SAP Cloud Platform Cloud Foundry environment via the Cloud Foundry CLI:
- Execute the cf push command to create a new application:
CF_DOCKER_PASSWORD=<docker-hub-password> \
cf push <application-name> \
--docker-image=<docker-hub-username>/my-repository \
--docker-username=<docker-hub-username> \
--hostname <application-name>-<org-name> \
-m 2G -k 2G
- <docker-hub-password> - your Docker Hub password
- <application-name> - the application name
- <docker-hub-username> - your Docker Hub username
- <org-name> - the Org Name from the SAP Cloud Platform Cockpit
- Bind an Authorization & Trust Management (XSUAA) service instance to the application:
- Navigate to your subaccount from the SAP Cloud Platform Cockpit.
- Create a new service instance (if you already have one, skip this step):
- Go to Services -> Service Marketplace.
- Search for the Authorization & Trust Management service.
- Click the Create Instance button.
- Set the Service Plan to application.
- Name the service instance (e.g. my-xsuaa).
- Go to the Next page.
- Provide a JSON configuration for the service instance like this one:
{
"xsappname": "my-xsuaa",
"tenant-mode": "shared",
"scopes": [
{
"name": "$XSAPPNAME.Developer",
"description": "Developer scope"
},
{
"name": "$XSAPPNAME.Operator",
"description": "Operator scope"
}
],
"role-templates": [
{
"name": "Developer",
"description": "Developer related roles",
"scope-references": [
"$XSAPPNAME.Developer"
]
},
{
"name": "Operator",
"description": "Operator related roles",
"scope-references": [
"$XSAPPNAME.Operator"
]
}
],
"role-collections": [
{
"name": "dirigible",
"description": "Dirigible Developer",
"role-template-references": [
"$XSAPPNAME.Developer",
"$XSAPPNAME.Operator"
]
}
]
}
- Click the Create Instance button.
- Bind the XSUAA service instance to your application:
- Go to the Services -> Service Instances tab.
- Select your XSUAA service instance (e.g. my-xsuaa).
- From the "More" option, select Bind Application.
- Find your application and click the Create button.
- Assign the required roles:
- Go to Security -> Trust Configuration.
- Open the trust configuration (e.g. sap.default).
- Find for your user ID and assign the required roles.
- For more detailed explanation of the service binding process and the trust configuration steps, visit this blog post.
- Bind any additional services, if needed.
- You can refer to the following blog post on binding the PostgreSQL service.
- Restart the application.
- Access the application:

Related Resources
- How to deploy Eclipse Dirigible in the SAP Cloud Platform Cloud Foundry environment
- Eclipse Dirigible – Building a Docker Image for Your Application
- How to deploy Eclipse Dirigible private Docker image in the SAP Cloud Platform Cloud Foundry environ...
- How to deploy Eclipse Dirigible in the SAP Cloud Platform Kyma environment
Notes
Next, you can visit the Samples section to master some of the basic Eclipse Dirigible functionalities, explore the Enterprise JavaScript APIs, check out the YouTube channel for video content, or simply visit the official site for news and updates.
Labels:
You must be a registered user to add a comment. If you've already registered, sign in. Otherwise, register and sign in.
Labels in this area
-
ABAP CDS Views - CDC (Change Data Capture)
2 -
AI
1 -
Analyze Workload Data
1 -
BTP
1 -
Business and IT Integration
2 -
Business application stu
1 -
Business Technology Platform
1 -
Business Trends
1,661 -
Business Trends
88 -
CAP
1 -
cf
1 -
Cloud Foundry
1 -
Confluent
1 -
Customer COE Basics and Fundamentals
1 -
Customer COE Latest and Greatest
3 -
Customer Data Browser app
1 -
Data Analysis Tool
1 -
data migration
1 -
data transfer
1 -
Datasphere
2 -
Event Information
1,400 -
Event Information
65 -
Expert
1 -
Expert Insights
178 -
Expert Insights
280 -
General
1 -
Google cloud
1 -
Google Next'24
1 -
Kafka
1 -
Life at SAP
784 -
Life at SAP
11 -
Migrate your Data App
1 -
MTA
1 -
Network Performance Analysis
1 -
NodeJS
1 -
PDF
1 -
POC
1 -
Product Updates
4,577 -
Product Updates
330 -
Replication Flow
1 -
RisewithSAP
1 -
SAP BTP
1 -
SAP BTP Cloud Foundry
1 -
SAP Cloud ALM
1 -
SAP Cloud Application Programming Model
1 -
SAP Datasphere
2 -
SAP S4HANA Cloud
1 -
SAP S4HANA Migration Cockpit
1 -
Technology Updates
6,886 -
Technology Updates
408 -
Workload Fluctuations
1
Related Content
- ABAP Cloud Developer Trial 2022 Available Now in Technology Blogs by SAP
- 10+ ways to reshape your SAP landscape with SAP Business Technology Platform – Blog 4 in Technology Blogs by SAP
- Top Picks: Innovations Highlights from SAP Business Technology Platform (Q1/2024) in Technology Blogs by SAP
- Consuming CAPM Application's OData service into SAP Fiori Application in Business Application Studio in Technology Blogs by Members
- CAP LLM Plugin – Empowering Developers for rapid Gen AI-CAP App Development in Technology Blogs by SAP
Top kudoed authors
| User | Count |
|---|---|
| 13 | |
| 11 | |
| 10 | |
| 9 | |
| 9 | |
| 7 | |
| 6 | |
| 5 | |
| 5 | |
| 5 |