
- SAP Community
- Products and Technology
- Technology
- Technology Blogs by SAP
- Using SAP Business Application Studio to build WeC...
Technology Blogs by SAP
Learn how to extend and personalize SAP applications. Follow the SAP technology blog for insights into SAP BTP, ABAP, SAP Analytics Cloud, SAP HANA, and more.
Turn on suggestions
Auto-suggest helps you quickly narrow down your search results by suggesting possible matches as you type.
Showing results for
former_member59
Explorer
Options
- Subscribe to RSS Feed
- Mark as New
- Mark as Read
- Bookmark
- Subscribe
- Printer Friendly Page
- Report Inappropriate Content
11-16-2020
7:50 AM
What is SAP Business Application Studio
SAP Business Application Studio (a.k.a. BAS) is the new generation of SAP Cloud based online development IDE tool (comparing to the SAP WebIDE). It is an SAP Business Technology Platform (SAP BTP) service built in Cloud Foundry offering modern development environment tailored for efficient development of business applications for the SAP Intelligent Enterprise.
You can also see more introduction / documentation here about SAP Business Application Studio.
What is Mobile Micro App
An SAP Mobile Micro App is an application that you can build & deploy to SAP BTP and integrating with 3rd Platform, such as WeChat work.
Now Users are able to create WeChat Work type Micro App in SAP Mobile Services (Cloud Foundry). In such an application, users could receive / push different kinds of messages from WeChat Work client, and build their own business logic in the SAP BTP application. This provides a way to integrate 3rd party platform with SAP systems via SAP Mobile Services.
A basic micro app development flow is like:
- configure your WeChat application in WeChat Work admin page
- configure your micro app configuration in SAP Mobile Services admin page
- write your Cloud Foundry application with real business logic, and you can call any SAP Mobile Services API as you like.
- build/deploy your application to SAP BTP Cloud Foundry, and test
To further simplify the micro app development, SAP provides Mobile Services extension based on SAP WebIDE and SAP Business Application Studio.
Please note that currently Micro App feature is only available in China. The full documentation about Mobile Services Micro App can be found in SAP Help Portal: Configuring Micro Apps
Before start, you should have your WeChat Work admin account and SAP Mobile Services CF account ready, and I assume you have basic knowledge for SAP Mobile Services, Cloud Foundry concept. I strongly recommend you read the following blog before start as it describes some concepts / prerequisite for microapp development: Build your WeChat Work Mobile Micro App With SAP Mobile Services
Building MicroApp using SAP WebIDE
For how to build micro app based on SAP WebIDE, please see the section "Step 3. Create your own business application and Deploy to SAP BTP CF" of this blog.
Building MicroApp using SAP Business Application Studio
BAS Prerequisites
The BAS Microapp extension is part of SAP Mobile Services extension for BAS, and it could help you to develop / deploy microapp application quickly on SAP BTP Cloud Foundry. The official doc for the Microapp extension is here.
Please first add following request parameter when accessing BAS.
extensions=true
e.g. https://your-bas-route-url/index.html?extensions=true
You need to initialize your Business Application Studio Dev space when you access BAS for the first time:
In the BAS homepage, create your own dev space with valid dev space name, then choose the "SAP Mobile Services" application type with following three additional extensions checked in the right part:
- Fiori Application
- Basic UI5 Template
- UI5 Free Style Template
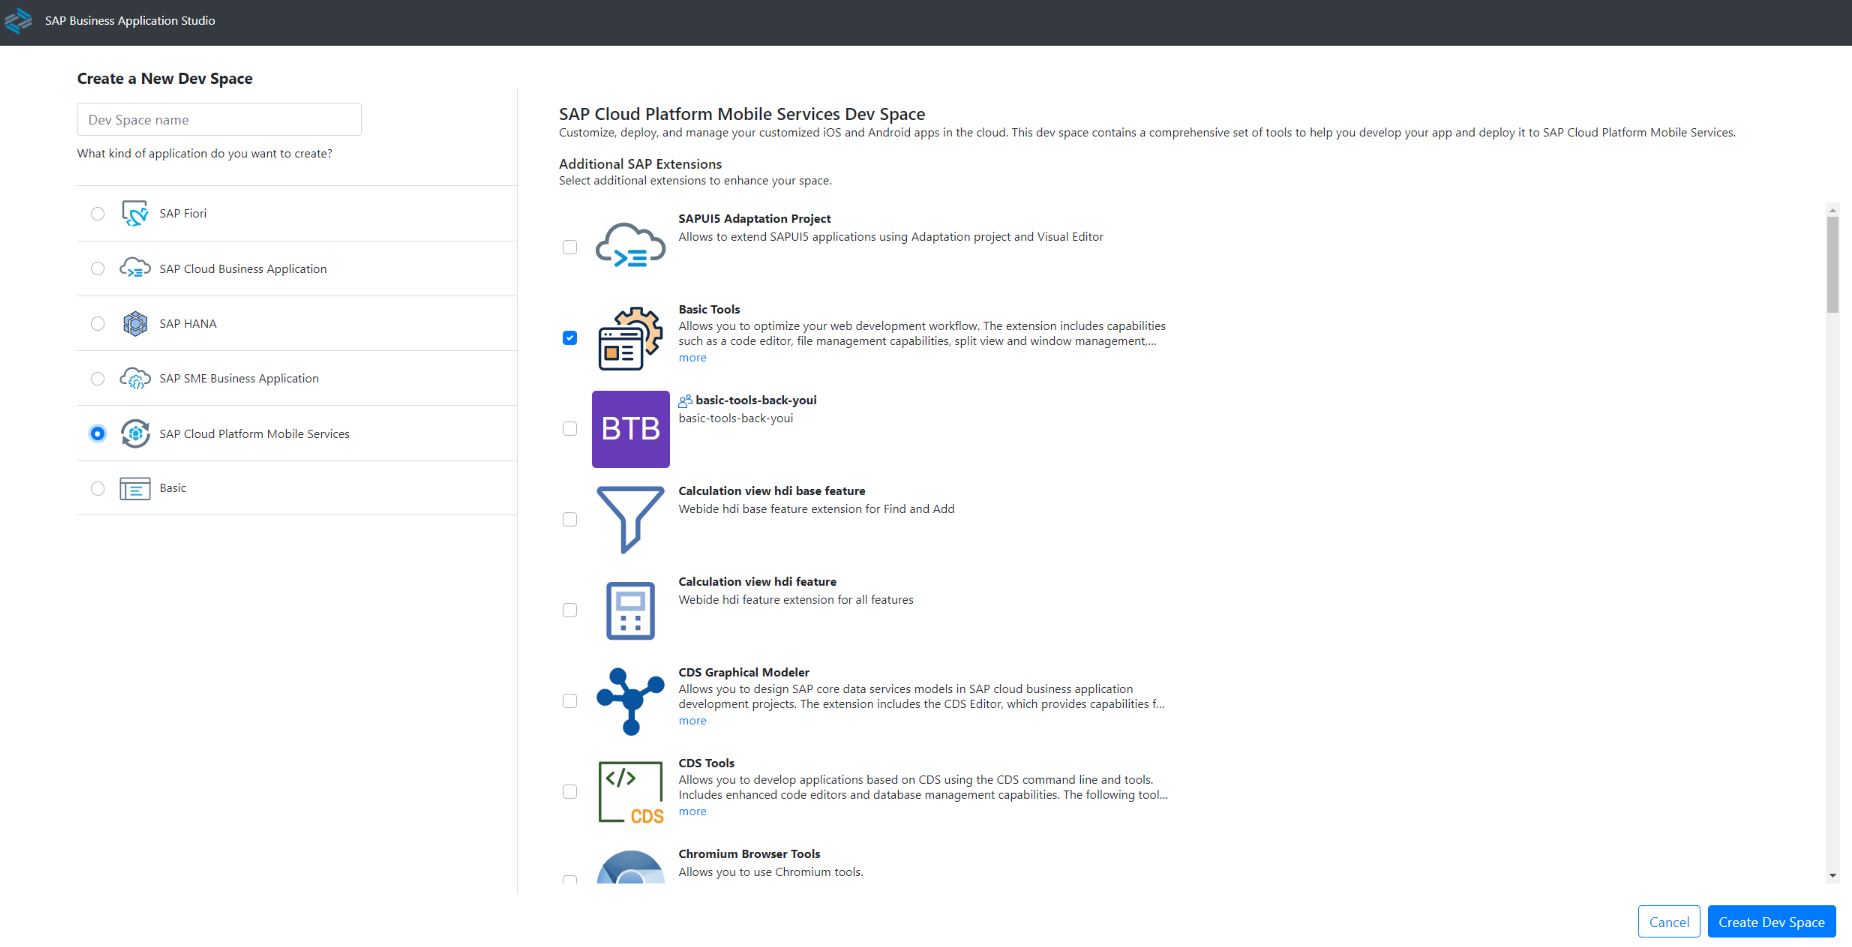
After click the "Create Dev Space" button, please wait until the status of your BAS Dev space is RUNNING. After the space is started, you can go into your dev space, and open your "work space" to "Projects".
One more step you need to perform before creating application is to do cf login/target. In BAS, you can either open the terminal (top toolbar: Terminal -> New Terminal) and use command line mode to login/target to cloud foundry by:
cf login -u <username> -p <password>

cf target -o <your cf organization> -s <your cf space>
Or you can use the BAS CF login/target assistance in bottom-left tab by entering your user/password/cf org/cf space in popup:

Then you're all set for the Business App Studio Micro App development environment.
Create MicroApp MTA project
Similar to the microapp development by using WebIDE extension, you need to do following steps to build/deploy your microapp application:
- create empty MTA project (Multi-Target Applications)
- create Backend modules
- create UI modules
- login/target to cloud foundry environment and deploy the MTA project.
In SAP Business Application Studio, we usually use Yeoman to generate above mentioned projects. you can either use command:
yoto generate in command mode of BAS, or use Yeoman UI generator:
top toolbar -> View section -> Find Command -> enter Yeoman UI Generators and run.

To create MicroApp MTA project,
- Select Micro App Project and then choose Next.
- Select MTA from the drop list and choose Next.
- Provide a valid project name, and choose Next.
- In the Target page, log into your Cloud Foundry account if you have not logged in to cf mentioned in BAS Prerequisites. Make sure you have login / target correct CF environment and then choose Next.
- In the "Create New App" page, you can either select existing Mobile Services application (Please make sure the existing mobile application has correct configuration before using it, e.g. has Micro App service keys generated) or creating a new one with valid application id/name/Corp id/agent id.
For more details about Mobile Service application / App Secret / Token / EncodingAESKey, please see following sections in the WebIDE MicroApp tutorial blog:
- Step 1. Create your WeChat Work App Configuration
- Step 2. Create your Mobile Services Application Configuration
- After clicking "Next", the empty Micro App MTA project will be created:
 There will be 4 files generated in BAS empty MTA project:
- mta.yaml: a blank mta.yaml with id, version, descriptions.
- .mobile.json: include cloud foundry and SAP Mobile Services information.
- microapp.deploy: this is a UI editor file for build, deploy MTA project, and publish microapp application.
- xs-security.json: this is the security configuration file for Cloud Foundry XSUAA instance
For more information about MTA(Multi-Target Applications), please check the doc here.
To build a MicroApp full stack application, we need to create backend app and UI modules. Currently we have 2 user scenarios for examples:
- use Spring Boot project as backend module and use Fiori as UI frontend module
- use OData service generated by Mobile Back-end Tool as backend module and use Fiori as UI frontend module
Building Micro App using Spring Boot backend and Fiori UI frontend
With the Mobile Services MicroApp extension in Business App Studio, you are able to create blank Spring Boot Java project.
Before creating backend project, please firstly open the created MTA project as your workspace by File -> Open workspace -> choose the MTA folder you just created.
Create blank Spring Boot project
Please use the Yeoman UI Generators to create repeat "Micro App Project", in the project type choose Spring Boot instead. And in "Java Root Path" page, enter valid spring boot project information and your MTA project folder as root path:

After click "Next", the blank Spring Boot project will be created (with XSUAA security enabled):
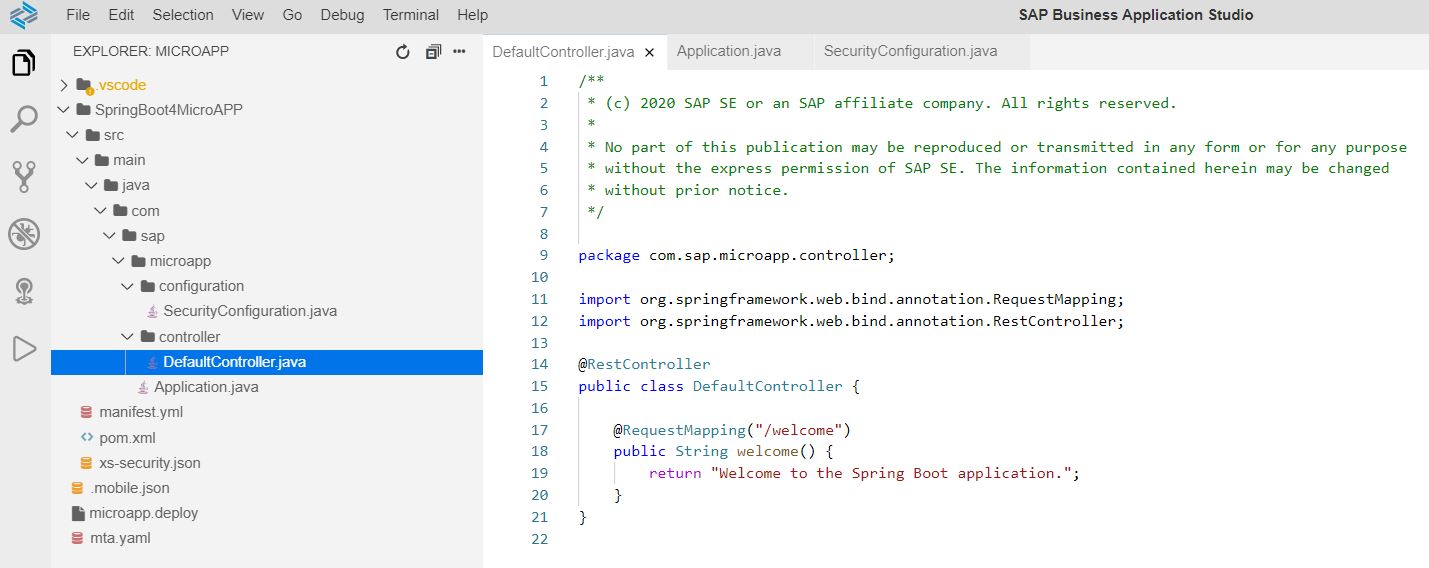
Here we have some default Java files:
- DefaultController: the /welcome controller providing a test API: /welcome
- SecurityConfiguration: the default spring security configuration
- Application: the spring boot application entrance (with @SpringBootApplication)
Add MicroApp Messaging module
The Mobile services MicroApp extension provides a way to inject Java WeChat message handling code snippet.
You can right click on the pom.xml file of the created Spring Boot project, select MicroApp: Add WeChat messaging module, enter your package name for the generated Java code, then the Spring Boot project will be updated with generating several Java files as messaging module to handle the WeChat messaging interaction.
Add your own business logic
Based on the generated messaging module, you are able to create your own business logic with WeChat messaging. How the WeChat messaging works is similar to the SAP WebIDE solution, for example, the WeChat message communication flow is like:

For more details, please see the section "Step 3. Create your own business application and Deploy to SAP BTP CF" of blog about WeChat messaging handling flow and architecture.
If you want to see more WeChat messaging sample code, please check here.
Add SAP Cloud S4 SDK dependencies (Optional)
If you want to use SAP Cloud S4 for building a Micro App, you can use Spring Boot as a mid-tier to interact with SAP backend through SAP S4 Cloud SDK.
The Micro App consumes destination apihub_s4_partners and apihub_sf_workflow through SAP S4 Cloud SDK. To do this, you need to create a destination service instance dest_cf.microapp.wechat.Demo from SAP BTP Cockpit in advance for accessing destinations.
- apihub_s4_partners exposes S4/HANA Cloud Business Partners OData API.
- apihub_sf_workflow allows us to access Pending Workflow items via SuccessFactors OData API.
To add SAP Cloud S4 Dependencies, You need to right-click the Spring Boot project pom.xml file, and select "MicroApp: Add S/4 Hana Dependencies" to update pom.xml:

In the updated pom.xml, there are a few configuration parameters in configuration section that you can adjust, those parameter names are self-explained. E.g. as outputDirectory specified, you can find out generated packages and classes in your Java module => target => generated-sources => lombok folder:
<configuration>

  <inputDirectory>${project.basedir}/edmx</inputDirectory>

  <outputDirectory>${project.build.directory}/generated-sources/lombok</outputDirectory>

  <deleteOutputDirectory>true</deleteOutputDirectory>

  <packageName>com.sap.microapp.vdm</packageName>

  <defaultBasePath>odata/</defaultBasePath>

  <serviceNameMappingFile>${project.basedir}/serviceNameMapppings.properties</serviceNameMappingFile>

</configuration>
To make it work, you'll need to follow some more steps:
- Get the edmx OData metadata files
- import the edmx files to a created "edmx" folder (which is specified by inputDirectory parameters in pom.xml) under Java module
- Generate code from edmx. Run following command under Java module in terminal
mvn compile
The target generated code is under java module target/generated-source/lombok. - Edit mta.yaml and add destination resources to it, i.e. add following resource section to "resources" section of mta.yaml:
- name: s4sf-dest
type: org.cloudfoundry.managed-service
parameters:
service: destination
service-plan: lite
service-name: dest_cf.microapp.wechat.Demo
Then add the resource to the required section, i.e. add following line to "requires" section of your Java module of mta.yaml:
- name: s4sf-dest
Now you are all set for using SAP Cloud S4 SDK in your Java code, you can add your own business logics, e.g. get top 5 partners:
public List<String> getTopPartners() {

		try {

		    final BusinessPartnerService svc = new DefaultBusinessPartnerService().withServicePath("/sap/opu/odata/sap/API_BUSINESS_PARTNER");

			List<BusinessPartner> businessPartners = svc

				.getAllBusinessPartner()

				.select(BusinessPartner.BUSINESS_PARTNER,

	            	BusinessPartner.LAST_NAME,

	                BusinessPartner.FIRST_NAME,

	            	BusinessPartner.BUSINESS_PARTNER_NAME,

	            	BusinessPartner.BUSINESS_PARTNER_FULL_NAME,

	            	BusinessPartner.CUSTOMER)

	            .top(5)

				.execute(new ErpConfigContext("apihub_s4_partners"));

			List<String> partnerFullNames = businessPartners.stream()

            	.map(BusinessPartner::getBusinessPartnerFullName)

            	.collect(Collectors.toList());

            LOG.debug("Top 5 partners: {}", partnerFullNames);

			return partnerFullNames;

	    }

	    catch(Exception ex) {

	    	LOG.error(ex.getMessage(), ex);

	    	return null;

	    }

	}
or get top 5 workflows:
public List<String> getTopWorkflows() {

		try {

		    final ECWorkflowService svc = new DefaultECWorkflowService().withServicePath("/odata/v2/MyPendingWorkflow");

			List<MyPendingWorkflow> myPendingWorkflowList = svc

				.getAllMyPendingWorkflow()

				.select(MyPendingWorkflow.SUBJECT,

	            	MyPendingWorkflow.URL)

	            .top(5)

				.execute(new ErpConfigContext("apihub_sf_workflows"));

			List<String> subjects = myPendingWorkflowList.stream()

            	.map(MyPendingWorkflow::getSubject)

            	.collect(Collectors.toList());

            LOG.debug("Top 5 pending workflows: {}", subjects);

			return subjects;

	    }

	    catch(Exception ex) {

	    	LOG.error(ex.getMessage(), ex);

	    	return null;

	    }

	}
Create Fiori module
Based on Spring Boot backend module, you can add Fiori module provided by SAP as frontend application. Again in the "Yeoman UI Generators", create project with "Micro App Project", and in the "Project Type" page choose SAP Fiori Module instead, then:
- In the "Project Location" page, please select your MTA project. (e.g. by default /home/user/projects/MicroApp)
- In the "Module Name" page, please enter valid module name
- In the "Template Type" page, select the UI template you like, here I select "SAPUI5 application"
- In the "HTML 5 Application Runtime" page, select "Standalone Approuter"
- In the "Authentication" page, please choose "Yes" for "Do you want to add authentication?"
- In the "View Name" page, enter valid view name and choose "No" for "Do you want to add a data service?"
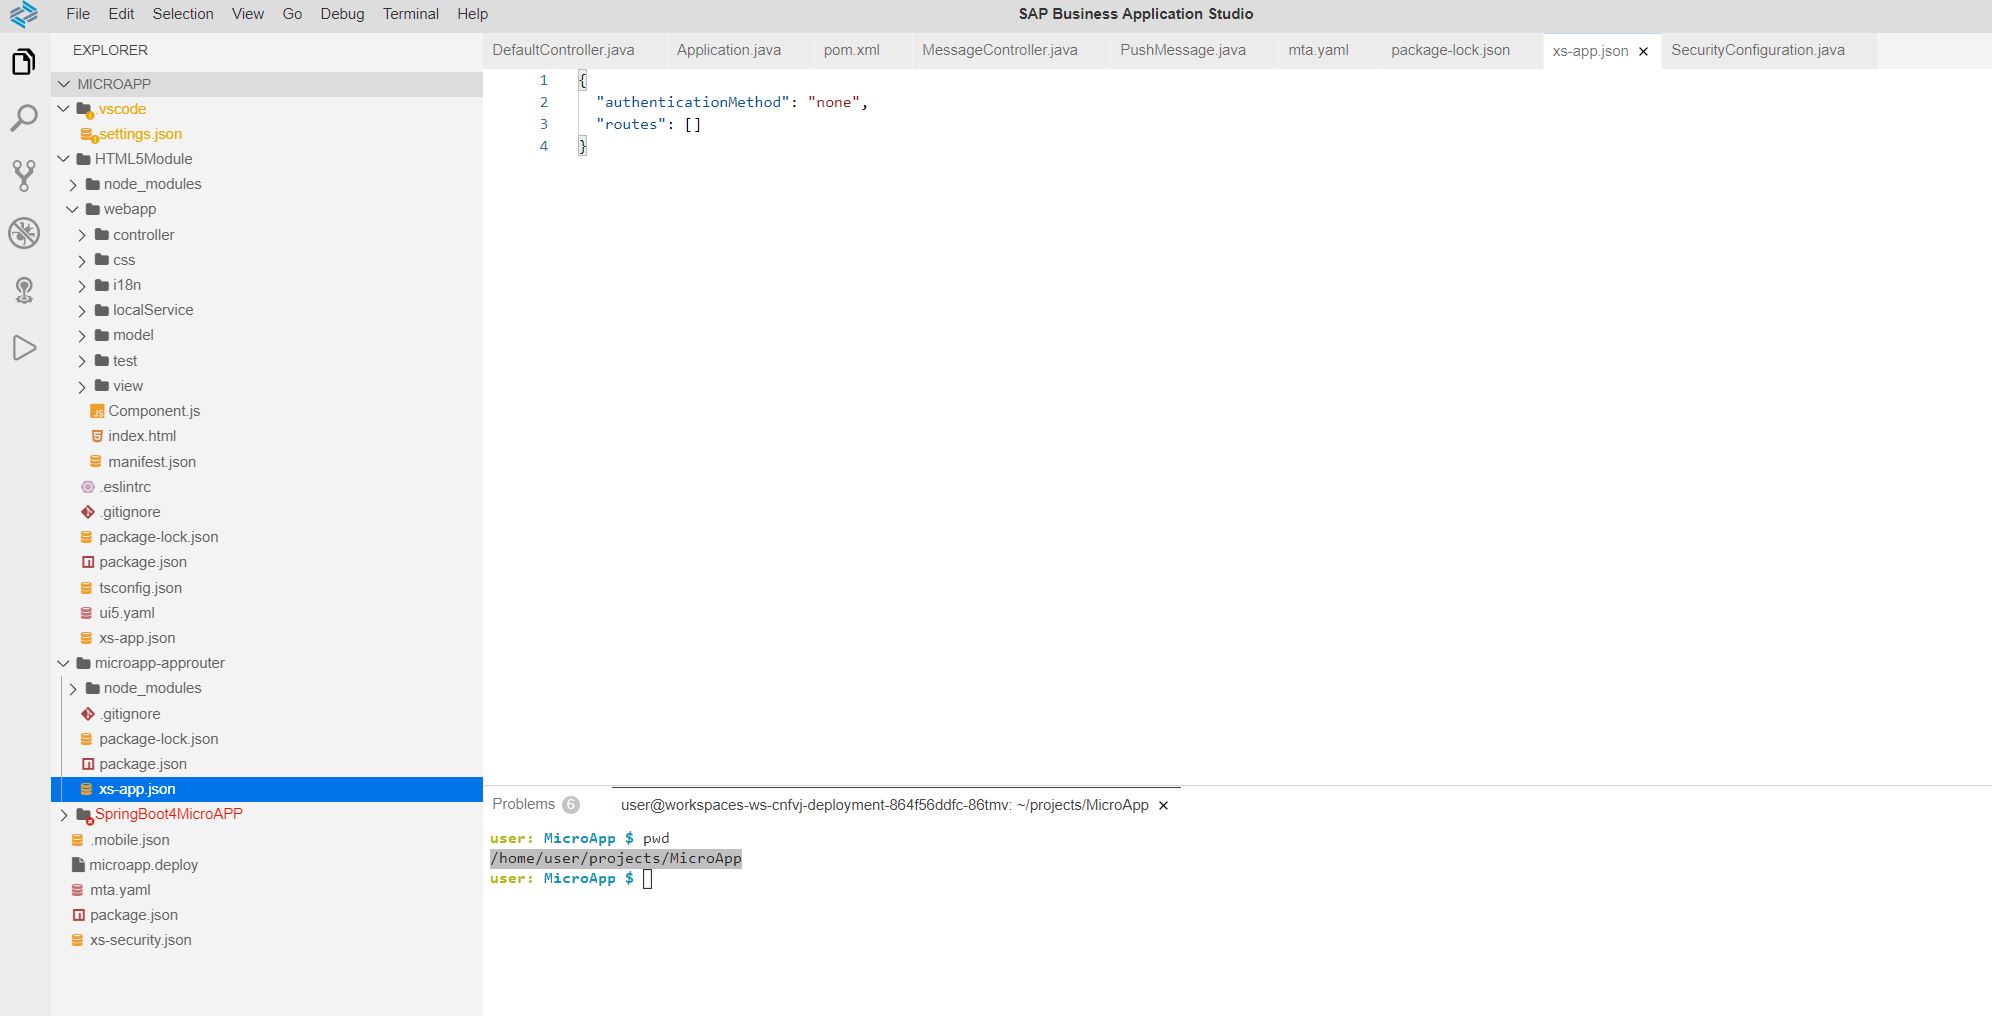
In the created UI Modules, there is one HTML5 Module and one standalone approuter.
Apply Micro App Configuration
After all of the Backend/UI modules are ready, you need to update mta.yaml file. Please right click on the MTA project mta.yaml file, and select Mobile: Apply micro app configuration. Then the mta.yaml, xs-app.json and manifest.json files will be automatically updated.
Now you are ready for building and deploying application, just go ahead and jump to the section "Build and Deploy Micro App".
Building Micro App using Mobile Back-End Tool OData backend and Fiori UI frontend
This section will introduce about how to build a full stack application using Fiori UI as frontend and OData service as backend generated by Mobile Back-End Tool.
Before creating backend project, please firstly open the created MTA project as your workspace by File -> Open workspace -> choose the MTA folder you just created.
Create OData backend using Mobile Backend Tool
Mobile Backend Tool (a.k.a. MBT) is a tool for OData modeling and OData service backend project generating. It creates OData model based on csdl.xml metadata file you provided, and generates the Java project based on the OData csdl.xml file.
See more introduction about MBT in the doc: Mobile Back-End Tools
o use Mobile Back-End Tool to generate OData service project, you need to first prepare a csdl.xml metadata file. You can either upload existing csdl.xml to your created empty MTA project, or use Yeoman to generate empty csdl.xml from scratch:
- run commmand: View -> Find Command -> Run "MBT: New OData CSDL Document"
- choose OData version
- enter valid namespace, namespace alias, csdl.xml file name and so on to generate csdl.xml file
In the generated csdl.xml file, you can use UI to build your Odata model. E.g. right click on the UI to create entity, or right click on the entity to create Property, etc. For example, I created a simple Odata model like this:

After you have uploaded or created csdl.xml file, please follow the below steps to generate OData service project:
- run command: View -> Find Command -> Run "MBT: Create task.json file"
- enter valid application name and application version
- select Spring Boot style
- select In-memory Database
- use default workspace folder
- select "Yes" for "Add MTA support"
- enter valid OData service module name
- Choose your own uploaded / created csdl.xml (e.g. /home/user/projects/MicroAppMBT/test.csdl.xml) in the popup and do not define local server path
Then a task.json file will be created in your work space, and BAS needs to run the task with the created task.json to generate OData service project by: Terminal -> Run Task... -> enter "csdl-to-war-cf" and run.
After the task is finished, the OData service backend project should be generated under your module folder, e.g. srv:

Add MicroApp Messaging module
You can right click on the pom.xml file of the MBT backend project, select MicroApp: Add WeChat messaging module, enter your package name for the generated Java code, then the MBT backend project will be updated with generated MicroApp modules.
Add your own business logic
Based on the generated messaging module, you are able to create your own WeChat messaging business logic. How the WeChat messaging works is similar to the WebIDE solution, see "Step 3. Create your own business application and Deploy to SAP BTP CF" in blog for more details about WeChat messaging handle architecture.
You can also find some messaging sample code here.
Create Fiori module
Just like creating Fiori in Spring Boot project, you can create Fiori for MBT backend project as well. In the "Yeoman UI Generators", create project "Micro App Project", and in the project type choose SAP Fiori Module instead, then:
- In the "Project Location" page, please select your MTA project. (e.g. by default /home/user/projects/MicroAppMBT).
- In the "Module Name" page, please enter valid module name
- In the "Template Type" page, select the UI template you like, here I select "SAP Fiori Worklist Application"
- In the "HTML 5 Application Runtime" page, select "Standalone Approuter"
- In the "Authentication" page, please choose "Yes" for "Do you want to add authentication?"
- In "Application title" page, enter valid application title / description, and choose "Standalone App (optimized for individual deployment)" under "Choose if your app should run in SAP Fiori Launchpad or standalone"
- In "Consume Services", choose "Local" system
- Then in "Metadata File Location", select the csdl.xml you uploaded/created for MBT project, and finally click Next to finish the Fiori module creation
Apply Micro App Configuration
After all of the Backend/UI modules are ready, Please right click the MTA project mta.yaml file, select Mobile: Apply micro app configuration. Then the mta.yaml, xs-app.json and manifest.json files will be updated.
Build and Deploy Micro App
After your Backend module and UI module are both ready, you can build your app and deploy / publish to SAP Mobile Services Cloud Foundry environment. BAS extension provides a quick way to do this - using microapp.deploy UI page.
If you do not want to use that UI page and want to use terminal, you can first go to the MTA folder in terminal, and run following command to build application:
mbt buildWhen the build is finished, run following command to deploy the application in MTA folder (Please note that this deploy process may take several minutes)
cf deploy mta_archives/*.mtarIf you want to use the microapp.deploy UI page for build/deploy your application, the process will be simplified. You can right click on the microapp.deploy file -> Open With -> select open with "Micro App Deploy Editor":

Just checked the All three checkbox in the page:
- Update mta.yaml by application
- Build & Deploy to cloud
- Publish to Mobile Services
And click "OK" to run, you can rebuild the MTA and update whole mta.yaml for the first time. After some time, if you see the process is finished without errors, it means the application is deployed successfully. If the deployment / publish is successful, there should be 2 applications running in your cloud foundry targeted org/space, one is the standalone approuter, the other one is your Java backend service.
Verify the application
You can verify the UI module and Java application in browser by trying the endpoints URLs listed in microapp.deploy UI page:
- For UI module, try to run https://mobile-wechater-microappmbt-approuter.cfapps.sap.hana.ondemand.com/nsHTML5Module-1.0.0/
- For Java module, since we have one test controller mapping "/hello" in applied MicroApp messaging modules, you can try to run this api: https://mobile-wechater-microappmbt-approuter.cfapps.sap.hana.ondemand.com/nsHTML5Module-1.0.0/backe.... If you see "Hello MicroApp.", it means the application is working as expected.
To verify the messaging in WeChat Work, it requires some more steps to configure the WeChat App, for details, please see the section "Step 4. Config and run your WeChat application" in the blog of Building MicroApp using SAP WebIDE.
Feedback & Support
Please contact the following project owner if you have any questions:
jian-dong.pei@sap.com
Labels:
You must be a registered user to add a comment. If you've already registered, sign in. Otherwise, register and sign in.
Labels in this area
-
ABAP CDS Views - CDC (Change Data Capture)
2 -
AI
1 -
Analyze Workload Data
1 -
BTP
1 -
Business and IT Integration
2 -
Business application stu
1 -
Business Technology Platform
1 -
Business Trends
1,658 -
Business Trends
93 -
CAP
1 -
cf
1 -
Cloud Foundry
1 -
Confluent
1 -
Customer COE Basics and Fundamentals
1 -
Customer COE Latest and Greatest
3 -
Customer Data Browser app
1 -
Data Analysis Tool
1 -
data migration
1 -
data transfer
1 -
Datasphere
2 -
Event Information
1,400 -
Event Information
66 -
Expert
1 -
Expert Insights
177 -
Expert Insights
299 -
General
1 -
Google cloud
1 -
Google Next'24
1 -
Kafka
1 -
Life at SAP
780 -
Life at SAP
13 -
Migrate your Data App
1 -
MTA
1 -
Network Performance Analysis
1 -
NodeJS
1 -
PDF
1 -
POC
1 -
Product Updates
4,577 -
Product Updates
345 -
Replication Flow
1 -
RisewithSAP
1 -
SAP BTP
1 -
SAP BTP Cloud Foundry
1 -
SAP Cloud ALM
1 -
SAP Cloud Application Programming Model
1 -
SAP Datasphere
2 -
SAP S4HANA Cloud
1 -
SAP S4HANA Migration Cockpit
1 -
Technology Updates
6,873 -
Technology Updates
427 -
Workload Fluctuations
1
Related Content
- Dealy in updating custom values for Visibility Scenario SAP BUILD AUTOMATION in Technology Q&A
- Expanding Our Horizons: SAP's Build-Out and Datacenter Strategy for SAP Business Technology Platform in Technology Blogs by SAP
- Supporting Multiple API Gateways with SAP API Management – using Azure API Management as example in Technology Blogs by SAP
- SAP Cloud ALM and Identity Authentication Service (IAS) in Technology Blogs by SAP
- using Already availble XSUAA service to another application giving service broker failed error in Technology Q&A
Top kudoed authors
| User | Count |
|---|---|
| 41 | |
| 25 | |
| 17 | |
| 14 | |
| 9 | |
| 7 | |
| 6 | |
| 6 | |
| 6 | |
| 6 |