
- SAP Community
- Products and Technology
- Technology
- Technology Blogs by SAP
- SAP Data Warehouse Cloud & SAP BW (or BW/4HANA) – ...
Technology Blogs by SAP
Learn how to extend and personalize SAP applications. Follow the SAP technology blog for insights into SAP BTP, ABAP, SAP Analytics Cloud, SAP HANA, and more.
Turn on suggestions
Auto-suggest helps you quickly narrow down your search results by suggesting possible matches as you type.
Showing results for
IngoH
Active Contributor
Options
- Subscribe to RSS Feed
- Mark as New
- Mark as Read
- Bookmark
- Subscribe
- Printer Friendly Page
- Report Inappropriate Content
10-29-2020
10:44 PM
In the first part of this blog series we talked about the set of steps we will discuss as well as the components that we will require for the integration of SAP BW 7.5 with SAP Data Warehouse Cloud and the integration of SAP BW/4HANA with SAP Data Warehouse Cloud. This time we will create the connection between SAP Data Warehouse Cloud and SAP BW 7.5.
So we need
In my scenario I am running a SAP BW 7.5 system and it is hosted inside of AWS and I also created a brand new system in AWS for the DP Agent. Technically you could install the DP Agent on the same hardware as the SAP BW system, but by keeping it separate I also have the option to assign dedicated IP numbers as well as the option to size the hardware, in case that is needed.
As mentioned in the previous blog, you can find also the installation details here.
When the installation is finished, I restart the system and then start the DP Agent. In my example, as we are using Windows 2016 as operating system, the DP Agent is also being installed as a service.
We will need to whitelist the IP number for our DP Agent. In my example the DP Agent runs on AWS, so I will whitelist the external as well as the internal IP number.
At this point we have the DP Agent running and we have the IP number configured as part of the whitelisting on SAP Data Warehouse Cloud. As next step we need to configure the DP Agent to basically "talk" to our SAP Data Warehouse Cloud tenant.
At this point of the configuration you can close the screen we had left open from SAP Data Warehouse Cloud.
This basically means, that the DP Agent is running, our configuration has worked (including HANA user and password) and our IP Whitelisting has worked.
So what's left now is to configure the Adapters and then we can establish the connection to our BW 7.5 system.
Now we have everything in place to establish the connection to our BW 7.5 system.
You can use an existing space or create a new Space in SAP Data Warehouse Cloud for this step.
If everything is configured correct and working, the dialog should close and the connection should be listed as part of your Space.
Just to do a quick check now (as we discuss the details in the next blog).
You should see your connection towards your SAP BW system and your should be able to open the details.
In case you would to follow the step by step guidance, you can register for a free SAP Data Warehouse Cloud Trial here.
So we need
- ... to install and configure the DP Agent
- ... ensure we have the IP whitelisted
- ... to setup the connection from SAP Data Warehouse Cloud to SAP BW 7.5
In my scenario I am running a SAP BW 7.5 system and it is hosted inside of AWS and I also created a brand new system in AWS for the DP Agent. Technically you could install the DP Agent on the same hardware as the SAP BW system, but by keeping it separate I also have the option to assign dedicated IP numbers as well as the option to size the hardware, in case that is needed.
SAP Data Provisioning Agent (DP Agent) Installation
As mentioned in the previous blog, you can find also the installation details here.
- Logon to the SAP Support portal to download the software for the DP Agent - https://support.sap.com/en/my-support/software-downloads.html
- Logon with your credentials.
- Go to the option Support Packages & Patches
- Click on Access Downloads
- In the search box at the top enter the search terms HANA DP AGENT.
- Select the entry HANA DP AGENT 2.0 from the search result.
- Ensure you select your operating system. In my example, I am using a Windows Server 2016.
- Download the most recent version of the DP Agent.
- Unzip the downloaded file.
- Before you start the installation, please ensure - for Windows operating system - that these are installed:
- Microsoft Visual C++ 2013 Redistributable x64 -https://support.microsoft.com/en-us/help/3138367/update-for-visual-c-2013-and-visual-c-redistributable-package#:~:text=When%20you%20use%20Microsoft%20Visual%20C++%202013,%20you,redistributable%20package,%20binaries%20for%20non-target%20architectures%20are%20removed.or
- Microsoft Visual C++ 2015 Redistributable x64https://www.microsoft.com/en-us/download/confirmation.aspx?id=52685see also the following SAP Note: https://launchpad.support.sap.com/#/notes/0002916079
- Start the installation of the DP Agent.
- In my example, I am using the folder \usr\sap\dataprovagent as installation folder.

- I am then being asked to provide the details for my DP Agent installation.
- I use the following details:
- Agent Unique Name: DPAGENT02
- I use an administrative user account to start the service
- I leave the rest with the default values.
When the installation is finished, I restart the system and then start the DP Agent. In my example, as we are using Windows 2016 as operating system, the DP Agent is also being installed as a service.
IP Whitelisting
We will need to whitelist the IP number for our DP Agent. In my example the DP Agent runs on AWS, so I will whitelist the external as well as the internal IP number.
- Logon to your SAP Data Warehouse Cloud tenant.
- Navigate to the bottom left and click on Administration.

- Click on the tab IP Whitelisting

- Here you can - as self service - now add the IP numbers that need to be whitelisted.
- Click Add to add the new entry.
- Click Save (top right) to save the changes.
DP Agent Configuration
At this point we have the DP Agent running and we have the IP number configured as part of the whitelisting on SAP Data Warehouse Cloud. As next step we need to configure the DP Agent to basically "talk" to our SAP Data Warehouse Cloud tenant.
- Logon to your SAP Data Warehouse Cloud tenant.
- Navigate to the bottom left and click on Administration.
- Navigate to the tab Data Integration.
- Click the "+" sign to start the configuration for a new DP Agent.
- Enter a name for the new DP Agent.
- Click OK.

- You now received the details as shown above and need to configure your DP Agent with the given details.Please leave this screen open, as you will need the values.
- Navigate to the folder where you installed the DP Agent. In my example: /usr/sap/dataprovagent.
- Open the file dpagentconfig.ini for editing.
- Now enter the details as shown on the screen from the previous steps (with the values from your Data Warehouse Cloud tenant):
- agent.name = Agent Name that you entered, in my example DPAGENT02
- hana.port = HANA Server Port from the previous step
- hana.onCloud = false
- hana.useSSL = true
- hana.server = HANA Server Name from the previous step
- jdbc.enabled = true
- jdbc.host = HANA Server Name from the previous step
- jdbc.port = HANA Server Port from the previous step
- jdbc.encrypt = true
- After the changes we have to re-start the DP Agent.
- For Windows:
- open a command prompt and navigate to the folder for the DP Agent installation
- Navigate to the subfolder /bin
- execute : agentcli.bat --configAgent
- Use the option to Stop the agent.
- afterwards use the option to Start the agent.
- Now we need to configure the User and password.
- Use the Quit option to close the options as part of the command prompt.
- For Windows:
- Enter : agentcli.bat --setSecureProperty
- Use Option 1 to set the HANA XS User Name and enter the value from the field HANA User Name for Agent Messaging
- Use Option 2 to set the HANA XS User Password
- Use the option Quit to close the options.
- Stop and Start the DP Agent again.
At this point of the configuration you can close the screen we had left open from SAP Data Warehouse Cloud.
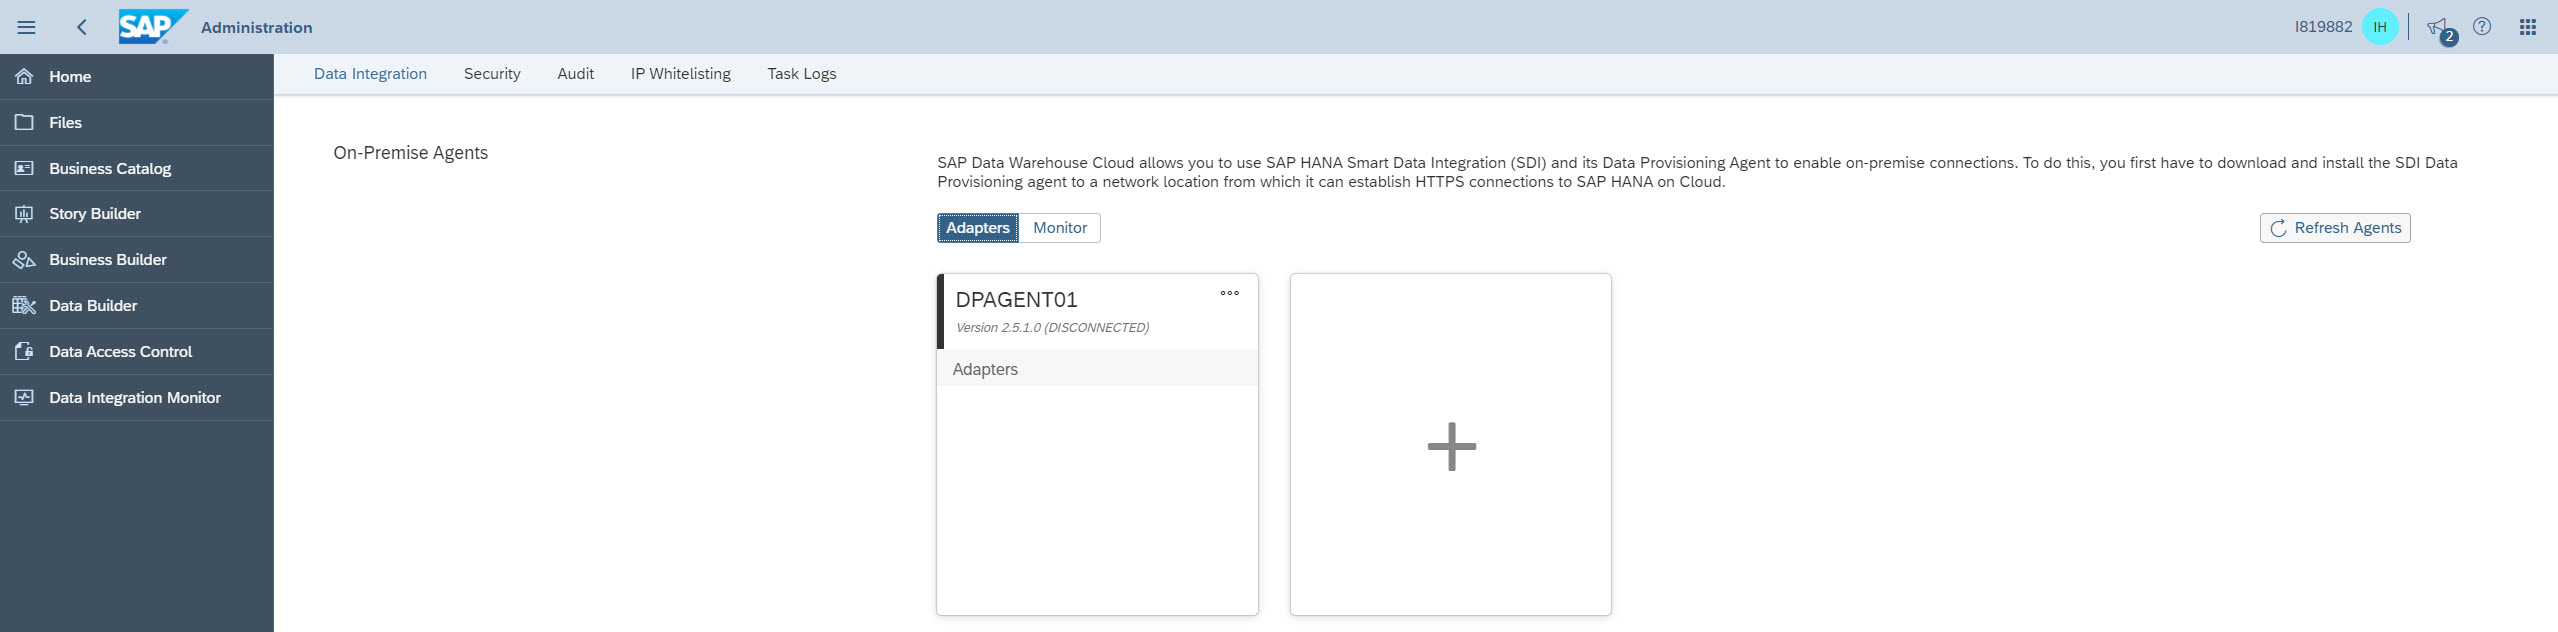
- In SAP Data Warehouse Cloud navigate back to the Administration.
- Click on the tab Data Integration.
- You might have to click Refresh Agents.
- Your agent should show a green status and should be listed as "connected".

This basically means, that the DP Agent is running, our configuration has worked (including HANA user and password) and our IP Whitelisting has worked.
So what's left now is to configure the Adapters and then we can establish the connection to our BW 7.5 system.
- With the DP Agent in front of us, use the Edit option.

- You can then simply enable the Adapters for HANA, and the ABAP Adapter, and the CDI Adapter. For Oracle and Microsoft SQL we would also have to configure the driver libraries (will come to that in another blog).

Now we have everything in place to establish the connection to our BW 7.5 system.
Connection to SAP BW 7.5
You can use an existing space or create a new Space in SAP Data Warehouse Cloud for this step.
- Open the menu Space Management
- Either use an existing Space or create a new Space. In case you decide to create a new Space, please do not forget to add yourself to the list of assigned members.

- Navigate to the Connections area.
- Use the "+" sign to start the process to create a new connection.

- Select the tile "SAP BW" (we will use the BW/4HANA Model Transfer in one of the next blogs as part of this series)

- Enter a Name and a Technical Name.
- Ensure you select your DP Agent from the list.
- Click Next Step

- Now enter the details of your SAP BW system.
- Click Create Connection.
If everything is configured correct and working, the dialog should close and the connection should be listed as part of your Space.
Just to do a quick check now (as we discuss the details in the next blog).
- Navigate to the Data Builder.

- Select the option New Graphical View.
- In the new Graphical View select the option Sources on the left hand side.
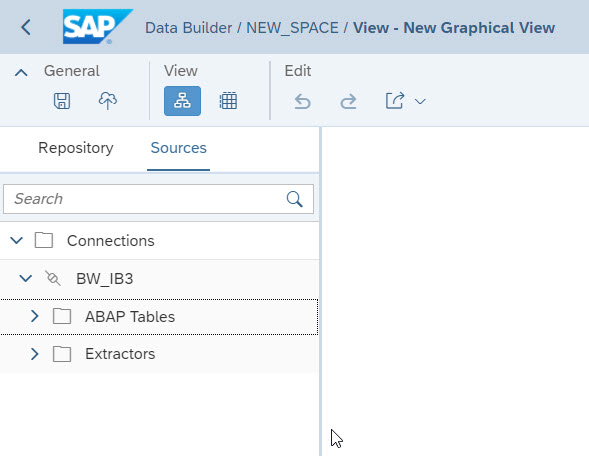
You should see your connection towards your SAP BW system and your should be able to open the details.
In case you would to follow the step by step guidance, you can register for a free SAP Data Warehouse Cloud Trial here.
- SAP Managed Tags:
- SAP Analytics Cloud,
- SAP Datasphere,
- SAP BW/4HANA,
- BW SAP HANA Data Warehousing
Labels:
3 Comments
You must be a registered user to add a comment. If you've already registered, sign in. Otherwise, register and sign in.
Labels in this area
-
ABAP CDS Views - CDC (Change Data Capture)
2 -
AI
1 -
Analyze Workload Data
1 -
BTP
1 -
Business and IT Integration
2 -
Business application stu
1 -
Business Technology Platform
1 -
Business Trends
1,658 -
Business Trends
91 -
CAP
1 -
cf
1 -
Cloud Foundry
1 -
Confluent
1 -
Customer COE Basics and Fundamentals
1 -
Customer COE Latest and Greatest
3 -
Customer Data Browser app
1 -
Data Analysis Tool
1 -
data migration
1 -
data transfer
1 -
Datasphere
2 -
Event Information
1,400 -
Event Information
66 -
Expert
1 -
Expert Insights
177 -
Expert Insights
297 -
General
1 -
Google cloud
1 -
Google Next'24
1 -
Kafka
1 -
Life at SAP
780 -
Life at SAP
13 -
Migrate your Data App
1 -
MTA
1 -
Network Performance Analysis
1 -
NodeJS
1 -
PDF
1 -
POC
1 -
Product Updates
4,577 -
Product Updates
343 -
Replication Flow
1 -
RisewithSAP
1 -
SAP BTP
1 -
SAP BTP Cloud Foundry
1 -
SAP Cloud ALM
1 -
SAP Cloud Application Programming Model
1 -
SAP Datasphere
2 -
SAP S4HANA Cloud
1 -
SAP S4HANA Migration Cockpit
1 -
Technology Updates
6,873 -
Technology Updates
420 -
Workload Fluctuations
1
Related Content
- 体验更丝滑!SAP 分析云 2024.07 版功能更新 in Technology Blogs by SAP
- What’s New in SAP Analytics Cloud Release 2024.08 in Technology Blogs by SAP
- SAP Datapshereでの HANA Cloud, Data Lake の利用方法 in Technology Blogs by SAP
- SAP 分析云 2024.06 版新功能抢先看 in Technology Blogs by SAP
- BW4HANA: How to hide a measure in a query depending on which node of the hierarchy we are in. in Technology Q&A
Top kudoed authors
| User | Count |
|---|---|
| 37 | |
| 25 | |
| 17 | |
| 13 | |
| 7 | |
| 7 | |
| 7 | |
| 6 | |
| 6 | |
| 6 |