
- SAP Community
- Products and Technology
- Technology
- Technology Blogs by SAP
- SAP Cloud Integration – Integration flow simulatio...
Technology Blogs by SAP
Learn how to extend and personalize SAP applications. Follow the SAP technology blog for insights into SAP BTP, ABAP, SAP Analytics Cloud, SAP HANA, and more.
Turn on suggestions
Auto-suggest helps you quickly narrow down your search results by suggesting possible matches as you type.
Showing results for
Advisor
Options
- Subscribe to RSS Feed
- Mark as New
- Mark as Read
- Bookmark
- Subscribe
- Printer Friendly Page
- Report Inappropriate Content
10-26-2020
5:48 AM
Introduction
SAP Cloud Integration October 2020 release (3.30.x/6.6.x) provides an extended feature to simulate an integration flow in the edit mode. This feature is described in the SAP Help Portal ( see Integration Flow Simulation).
In order to know about the existing integration flow simulation feature, how it works, its capability and usage, please refer to this blog.
This blog’s primary focus is to explain the usage of the simulation feature in the edit mode of flow and sharing its benefit.
As we know that, Integration flow simulation feature has been introduced to improve the developer efficiency and productivity by simulating integration flow and detecting the error prior to the deployment of an integration flow.
Earlier, we had introduced the simulation feature in the read mode of an integration flow, it means that during the course of development of flow, the user has to switch from the edit to the read mode to test and validate the integration flow. However, with this increment, user can actually test the integration flow in the edit mode without switching the context. The most important aspect is, there is no need to save the integration flow for running the simulation. It means that the unsaved changes/data/configurations of the integration flow will participate in the simulation and you can experience the instant outcome of your simulated integration flow.
The following sample screenshots provides the detailed usage of simulation in edit mode.
Step # 1 - Open the integration flow and edit the same. Switch on the simulation mode, a simulation toolbar appears.

Image1: Integration flow in the edit mode
Step # 2 - Modify integration flow by adding few flow steps and sender adapter.

Image2: Integration flow with flow steps and Adapter
Step # 3 - Define the start point before content modifier and end point before the Message end event to define the set of flow which you would like to participate in the simulation.

Image3: Define start and end point
Step # 4 - Click the start point, it would open the simulation message input dialog. Provide the input message by uploading the message content file.
Refer the following blogs to know how to upload message and various types of body file
- “Simulation of integration flow with Splitter and Looping process call” from the blog
- “Simulate Integration flow with various types of body files” from the blog
You can also text the input message in the body section of this dialog.
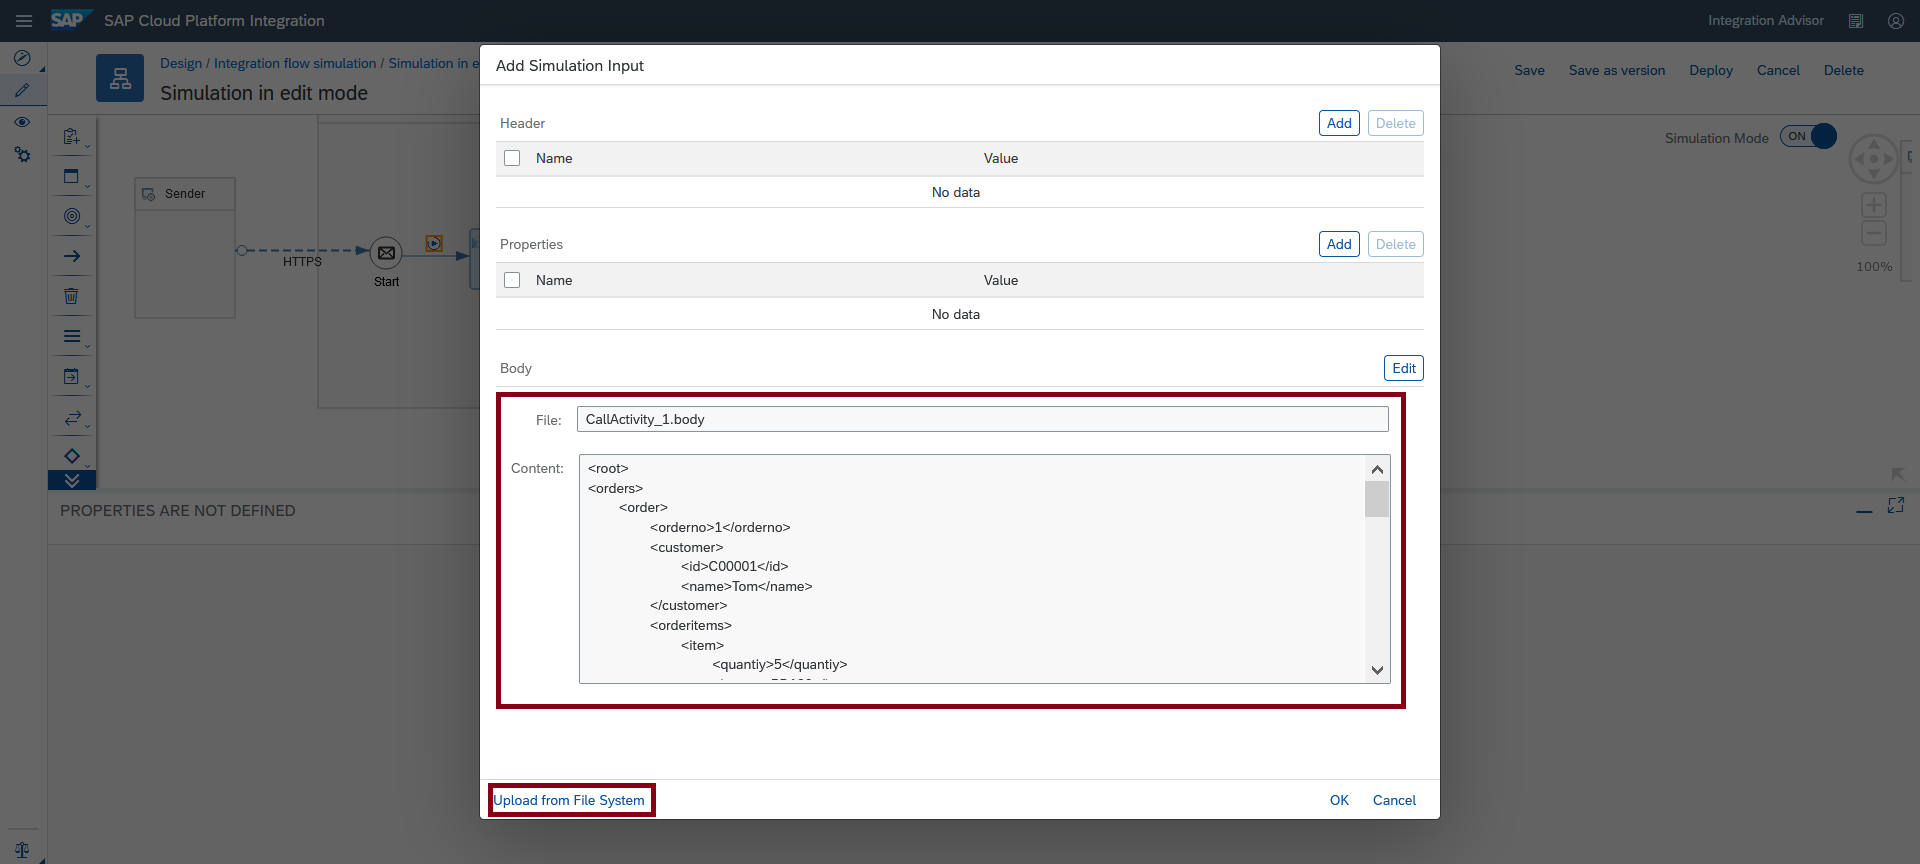
Image4: Provide mock input message
Step # 5 - Click the Run simulation button from the simulation tool bar and validate output.

Image5: Run the simulation
Step # 6 - Integration flow is further modified by adding few more flow steps and adapters. Please note that the integration flow is not saved at this stage.

Image6: Integration flow is modified by adding few more flow steps and adapters
Step # 7 - In order to simulate the anticipated set of steps in the integration flow, ensure to change end point accordingly.

Image7: Change the Endpoint.
Step # 8 - Mock the response from the Receiver Adapter by selecting the adapter and clicking “Add Simulation Response” speed button

Image8: Select the Soap Receiver Adapter and click “Add Simulation Response” speed button.
Step # 9 - Upload the message content as a response through upload capability and click OK button.
You can also input the payload in the body section of this dialog.

Image 9: Upload the message as a response via Upload capability.
Step # 10 - Click the Run simulation button from the Simulation tool bar and experience the output.

Image10: Run the simulation and validate the output.
From the above exercise, it is evident that we could simulate the different subsets of an integration flow without saving and switching the context. This will bring joy of using the simulation feature.
Once you are convinced with the output, you can probably take a decision to save the integration flow and proceed with the next set of actions.
If you want to try out the same scenario in your tenant, please model the integration flow as-is and use the below messages and configurations.
| Mock Input Message | <root> <orders> <order> <orderno>1</orderno> <customer> <id>C00001</id> <name>Tom</name> </customer> <orderitems> <item> <quantiy>5</quantiy> <itemno>PD100</itemno> <description>keyboard</description> </item> <item> <quantiy>9</quantiy> <itemno>PD200</itemno> <description>mouse</description> </item> <item> <quantiy>5</quantiy> <itemno>PD300</itemno> <description>headset</description> </item> </orderitems> </order> <order> <orderno>2</orderno> <customer> <id>C00002</id> <name>Manish</name> </customer> <orderitems> <item> <quantiy>10</quantiy> <itemno>PD200</itemno> <description>mouse</description> </item> <item> <quantiy>5</quantiy> <itemno>PD300</itemno> <description>headset</description> </item> </orderitems> </order> </orders> </root> | Provide the input message in the body section of the simulation input dialog. |
| Mock Response Message | <products> <product> <productno>PD100</productno> <productname>keyboard</productname> </product> <product> <productno>PD200</productno> <productname>mouse</productname> </product> </products> | Provide the response message in the body section of the simulation Response dialog. |
| Content Modifier 1, Content Modifier 2 and Content Modifier 3. | Configure the Message Body | ${in.body} |
| Filter 1 | Configure XPath Expression | //root/orders |
| General Splitter 1 | Configure XPath Expression | //products/product |
Benefits:
- No need to switch the context from Edit to Read mode of integration flow to run the simulation and validate the output.
- In the edit mode, you can simulate an integration flow without saving the data and settings.
- Helps in taking a decision to save the integration flow after verifying the output.
I hope, you can benefit from the increment shared in this blog.
In case of questions/feedback/clarifications, please feel free to comment on this blog.
- SAP Managed Tags:
- Cloud Integration
Labels:
You must be a registered user to add a comment. If you've already registered, sign in. Otherwise, register and sign in.
Labels in this area
-
ABAP CDS Views - CDC (Change Data Capture)
2 -
AI
1 -
Analyze Workload Data
1 -
BTP
1 -
Business and IT Integration
2 -
Business application stu
1 -
Business Technology Platform
1 -
Business Trends
1,658 -
Business Trends
91 -
CAP
1 -
cf
1 -
Cloud Foundry
1 -
Confluent
1 -
Customer COE Basics and Fundamentals
1 -
Customer COE Latest and Greatest
3 -
Customer Data Browser app
1 -
Data Analysis Tool
1 -
data migration
1 -
data transfer
1 -
Datasphere
2 -
Event Information
1,400 -
Event Information
66 -
Expert
1 -
Expert Insights
177 -
Expert Insights
296 -
General
1 -
Google cloud
1 -
Google Next'24
1 -
Kafka
1 -
Life at SAP
780 -
Life at SAP
13 -
Migrate your Data App
1 -
MTA
1 -
Network Performance Analysis
1 -
NodeJS
1 -
PDF
1 -
POC
1 -
Product Updates
4,577 -
Product Updates
342 -
Replication Flow
1 -
RisewithSAP
1 -
SAP BTP
1 -
SAP BTP Cloud Foundry
1 -
SAP Cloud ALM
1 -
SAP Cloud Application Programming Model
1 -
SAP Datasphere
2 -
SAP S4HANA Cloud
1 -
SAP S4HANA Migration Cockpit
1 -
Technology Updates
6,873 -
Technology Updates
420 -
Workload Fluctuations
1
Related Content
- AFIP Integration in CPI/CI in Technology Q&A
- SAP Integration Suite - IDOC to flat file conversion in Technology Q&A
- Consuming SAP with SAP Build Apps - Mobile Apps for iOS and Android in Technology Blogs by SAP
- Configure SAP BTP destination REST API integration - Document information extraction - "AxiosError: in Technology Q&A
- Support for API Business Hub Enterprise in Actions Project in Technology Blogs by SAP
Top kudoed authors
| User | Count |
|---|---|
| 36 | |
| 25 | |
| 17 | |
| 13 | |
| 8 | |
| 7 | |
| 7 | |
| 6 | |
| 6 | |
| 6 |