
- SAP Community
- Products and Technology
- Human Capital Management
- HCM Blogs by Members
- Update Usernames with Integration Centre
Human Capital Management Blogs by Members
Gain valuable knowledge and tips on SAP SuccessFactors and human capital management from member blog posts. Share your HCM insights with a post of your own.
Turn on suggestions
Auto-suggest helps you quickly narrow down your search results by suggesting possible matches as you type.
Showing results for
Huge85
Active Participant
Options
- Subscribe to RSS Feed
- Mark as New
- Mark as Read
- Bookmark
- Subscribe
- Printer Friendly Page
- Report Inappropriate Content
10-21-2020
8:21 AM
Have you ever wished that there was a way to update usernames automatically, only to realise that usernames are not available to the Business Rules Engine?
Today, I am delighted to show you an Integration that I have built to automate updating the username of my instance. The specific use case I have is in a hybrid implementation, where there are many "Rehires with New Employment" performed. In this case, the username for the inactive record needs to be updated so the previous username can be used for the new employment (there are some other follow on activities that necessitate this and integrations to update the username with the Business Email, but not going into all the detail).
So the need is to update inactive users in Employee Profile. If you are not using an API upsert by including the parameter "processInactiveEmployees=true" in your middleware, you are left with the only other option, which is the Integration Centre. The only problem is, the Integration Centre cannot update inactive records. Well, until the H2 2020 Release that is!
With this release, it is possible to create an API Profile and assign the profile in your integration. So to start off with, navigate to the Admin Tool > Manage API Profile Option. Here you can create a new profile, and in my use case, I specifically selected the Process inactive Employees checkbox:
Now that the API Option Profile is created, I can start creating my integration in the Integration Centre. Start off by setting the integration type as SuccessFactors Source and Destination, to allow you to use ODATA v2. I have then also selected that it should be scheduled, as I will then run this periodically to update the username for any terminated employees.
From here, search for and select your starting entity Username (username) in User.
The Integration Centre has a wizard-style interface, allowing you to complete an integration step-by-step. First, you will complete the Options, i.e name of the integration, optional description, and enabling server-side pagination if you are querying large amounts of data to give a performance boost.
Then on to the Configure Fields step. This is where you map your fields to populate, but furthermore, you are also able to set calculated fields and values. In my use case, I want to update the username by prepending it with an "i_". That will be a calculated column. There are three additional fields that I must map since they are required fields, namely, userId, gender, and status. For these three, I simply map the fields to be populated with the existing values:
The Operation is set to Update/Merge, which updates only the fields provided and leaves other field values intact. With the H2 2020 Release, it brings in a new field, API Option Profile ID, which is where you capture the API Option ID created in the initial step.
Now on to the Username field. As mentioned, instead of mapping this field, we will create a calculated field.
My calculation I set to IF/THEN/ELSE to ensure that only the username of inactive employees is updated and that active employees' username remains the same.
You can check the Calculation Trace to see if this yields the desired results. Once you close the calculation, you are able to preview the records and your results should look a little something like this:
Employees with a status of "t" (active) has the result of the username remaining unchanged, while employees with a status of "f" (inactive) are prepended with i_.
Now proceed to the Filter and Sort step, and set the following:
As I will be scheduling this integration to run periodically, it is necessary to specify a time-based filter. In my case, I specify that only records that have been modified or are effective since the last run time will be included in the next integration run.
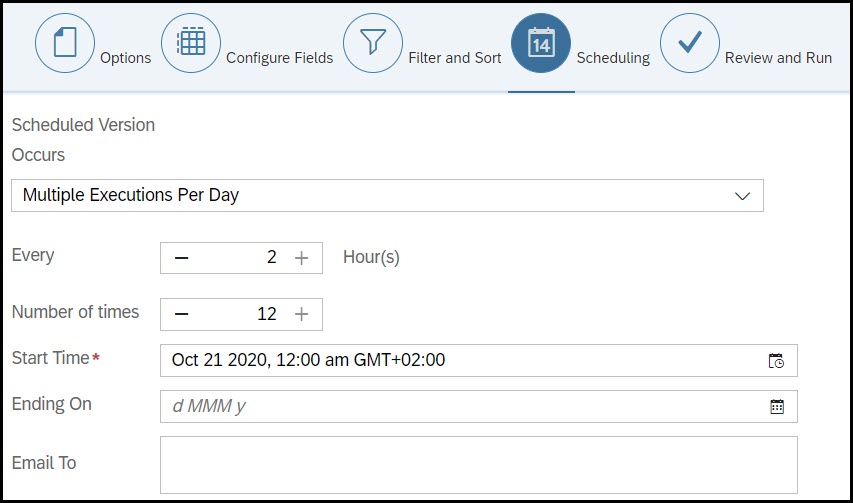
Now move to the Scheduling step, where you can set the frequency of the integration. Also courtesy of H2 2020 Release, you can now set the maximum number of executions to 12 and specify the interval of hours.
Lastly, you are ready to Review and Run. Here you can trigger a one-time run, and set the recurring schedule.
Your integration will now run at the intervals set, and update the usernames of terminated employees.
This method can be modified to suit your needs, perhaps create a new username for new hires. It is a very flexible method of updating information in your instance.
THR81 Practice Exam - 80 Questions PLUS 70 Bonus Questions
Today, I am delighted to show you an Integration that I have built to automate updating the username of my instance. The specific use case I have is in a hybrid implementation, where there are many "Rehires with New Employment" performed. In this case, the username for the inactive record needs to be updated so the previous username can be used for the new employment (there are some other follow on activities that necessitate this and integrations to update the username with the Business Email, but not going into all the detail).
So the need is to update inactive users in Employee Profile. If you are not using an API upsert by including the parameter "processInactiveEmployees=true" in your middleware, you are left with the only other option, which is the Integration Centre. The only problem is, the Integration Centre cannot update inactive records. Well, until the H2 2020 Release that is!
With this release, it is possible to create an API Profile and assign the profile in your integration. So to start off with, navigate to the Admin Tool > Manage API Profile Option. Here you can create a new profile, and in my use case, I specifically selected the Process inactive Employees checkbox:

API Option Profile Settings
Now that the API Option Profile is created, I can start creating my integration in the Integration Centre. Start off by setting the integration type as SuccessFactors Source and Destination, to allow you to use ODATA v2. I have then also selected that it should be scheduled, as I will then run this periodically to update the username for any terminated employees.

Integration Type selection
From here, search for and select your starting entity Username (username) in User.
The Integration Centre has a wizard-style interface, allowing you to complete an integration step-by-step. First, you will complete the Options, i.e name of the integration, optional description, and enabling server-side pagination if you are querying large amounts of data to give a performance boost.

IC: Options
Then on to the Configure Fields step. This is where you map your fields to populate, but furthermore, you are also able to set calculated fields and values. In my use case, I want to update the username by prepending it with an "i_". That will be a calculated column. There are three additional fields that I must map since they are required fields, namely, userId, gender, and status. For these three, I simply map the fields to be populated with the existing values:

Field Mappings
The Operation is set to Update/Merge, which updates only the fields provided and leaves other field values intact. With the H2 2020 Release, it brings in a new field, API Option Profile ID, which is where you capture the API Option ID created in the initial step.
Now on to the Username field. As mentioned, instead of mapping this field, we will create a calculated field.

Add calculation
My calculation I set to IF/THEN/ELSE to ensure that only the username of inactive employees is updated and that active employees' username remains the same.

Username Calculation
You can check the Calculation Trace to see if this yields the desired results. Once you close the calculation, you are able to preview the records and your results should look a little something like this:

Preview of Results
Employees with a status of "t" (active) has the result of the username remaining unchanged, while employees with a status of "f" (inactive) are prepended with i_.
Now proceed to the Filter and Sort step, and set the following:
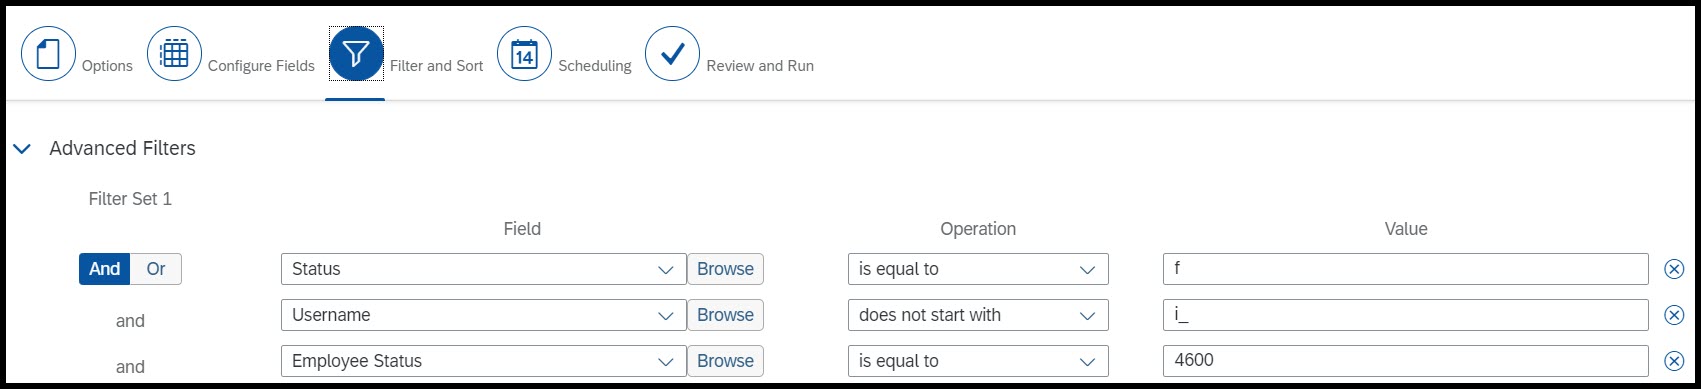
Advanced Filters
- Use the Status in User field, and set the filter equal to "f" (inactive), since you do not require to update username for active employees.
- Additionally, exclude usernames that start with "i_". This will ensure that you do not end up updating inactive users with each schedule that could lead to "i_i_i_i_ENeal".
- Lastly, I have also included Employee Status from EmpJob (Job Information) and set it as equal to 4600 (in my instance), the optionID for Employee Status "Terminated". This will ensure again that only when someone is terminated, they will be included in the integration update.

Time-Based Filters
As I will be scheduling this integration to run periodically, it is necessary to specify a time-based filter. In my case, I specify that only records that have been modified or are effective since the last run time will be included in the next integration run.
Now move to the Scheduling step, where you can set the frequency of the integration. Also courtesy of H2 2020 Release, you can now set the maximum number of executions to 12 and specify the interval of hours.
Scheduling
Lastly, you are ready to Review and Run. Here you can trigger a one-time run, and set the recurring schedule.
Your integration will now run at the intervals set, and update the usernames of terminated employees.
This method can be modified to suit your needs, perhaps create a new username for new hires. It is a very flexible method of updating information in your instance.
THR81 Practice Exam - 80 Questions PLUS 70 Bonus Questions
2 Comments
You must be a registered user to add a comment. If you've already registered, sign in. Otherwise, register and sign in.
Labels in this area
-
1H 2024 Product Release
5 -
2H 2023 Product Release
1 -
ACCRUAL TRANSFER
1 -
Advanced Workflow
1 -
Anonymization
1 -
BTP
1 -
Business Rules
1 -
Canvas Report
1 -
Career Development
1 -
Certificate-Based Authentication
1 -
Cloud Platform Integration
1 -
Compensation
1 -
Compensation Information Management
1 -
Compensation Management
1 -
Compliance
2 -
Content
1 -
Conversational AI
2 -
Custom Data Collection
1 -
custom portlet
1 -
Data & Analytics
1 -
Data Integration
1 -
Dayforce
1 -
deep link
1 -
deeplink
1 -
Delimiting Pay Components
1 -
Deprecation
1 -
Employee Central
1 -
Employee Central Global Benefits
1 -
Employee Central Payroll
1 -
employee profile
1 -
Employee Rehires
1 -
external terminal
1 -
external time events
1 -
Generative AI
2 -
Getting Started
1 -
Global Benefits
1 -
Guidelines
1 -
H2 2023
1 -
HR
2 -
HR Data Management
1 -
HR Transformation
1 -
ilx
1 -
Incentive Management Setup (Configuration)
1 -
Integration Center
2 -
Integration Suite
1 -
internal mobility
1 -
Introduction
1 -
learning
3 -
LMS
2 -
LXP
1 -
Massively MDF attachments download
1 -
Mentoring
1 -
Metadata Framework
1 -
Middleware Solutions
1 -
OCN
1 -
OData APIs
1 -
ONB USA Compliance
1 -
Onboarding
2 -
Opportunity Marketplace
1 -
Pay Component Management
1 -
Platform
1 -
portlet
1 -
POSTMAN
1 -
Predictive AI
2 -
Recruiting
1 -
recurring payments
1 -
Role Based Permissions (RBP)
2 -
SAP CPI (Cloud Platform Integration)
1 -
SAP HCM (Human Capital Management)
2 -
SAP HR Solutions
2 -
SAP Integrations
1 -
SAP release
1 -
SAP successfactors
5 -
SAP SuccessFactors Customer Community
1 -
SAP SuccessFactors OData API
1 -
SAP Workzone
1 -
SAP-PAYROLL
1 -
skills
1 -
Skills Management
1 -
sso deeplink
1 -
Stories in People Analytics
3 -
Story Report
1 -
SuccessFactors
2 -
SuccessFactors Employee central home page customization.
1 -
successfactors onboarding i9
1 -
Table Report
1 -
talent
1 -
Talent Intelligence Hub
2 -
talents
1 -
Tax
1 -
Tax Integration
1 -
Time Accounts
1 -
Workflows
1 -
XML Rules
1
Related Content
- Parental Leave Ireland Solution Proposal in SuccessFactors Time Management in Human Capital Management Blogs by SAP
- Auto-Update to be recruited position field from No to Yes for contingent workers in Human Capital Management Q&A
- Rooms Booking Solution on SuccessFactors in Human Capital Management Blogs by Members
- SuccessFactors Outbound Integrations using Intelligent Services Centre (ISC) and Integration Centre (IC) – Part 2 in Human Capital Management Blogs by Members
- SuccessFactors Outbound Integrations using Intelligent Services Centre (ISC) and Integration Centre (IC) – Part 1 in Human Capital Management Blogs by Members
Top kudoed authors
| User | Count |
|---|---|
| 10 | |
| 5 | |
| 4 | |
| 4 | |
| 4 | |
| 2 | |
| 1 | |
| 1 | |
| 1 | |
| 1 |