
- SAP Community
- Products and Technology
- Technology
- Technology Blogs by SAP
- Deploy ChatBot to your Android App.
Technology Blogs by SAP
Learn how to extend and personalize SAP applications. Follow the SAP technology blog for insights into SAP BTP, ABAP, SAP Analytics Cloud, SAP HANA, and more.
Turn on suggestions
Auto-suggest helps you quickly narrow down your search results by suggesting possible matches as you type.
Showing results for
sanju_joseph
Participant
Options
- Subscribe to RSS Feed
- Mark as New
- Mark as Read
- Bookmark
- Subscribe
- Printer Friendly Page
- Report Inappropriate Content
10-05-2020
5:10 PM
Can we think of having Conversational AI that is standalone, The Use Case pretty much require this to open on a Mobile Device irrespective of whether it's Android or an iOS. The blog is my attempt to provide steps on how to launch the SAP Conversational AI on Android App, I will cover the iOS stuff probably in my next blog.
Well you don’t need to have an expertise in mobile development and the steps provided here are straightforward so that even the non-mobile developer can deploy this easily and fast.
Before I go ahead and explain the steps, here is the Architecture of SAP Conversational AI. Please pay special attention to WebChat as that is what i am going to cover down below.
Prerequisite:
Install the latest version of Android Studio and Android Studio Virtual Device.
Here are the steps that demonstrate on how to load WebChat Content in an Android Webview.
Well you don’t need to have an expertise in mobile development and the steps provided here are straightforward so that even the non-mobile developer can deploy this easily and fast.
Before I go ahead and explain the steps, here is the Architecture of SAP Conversational AI. Please pay special attention to WebChat as that is what i am going to cover down below.

Architecture
Prerequisite:
Install the latest version of Android Studio and Android Studio Virtual Device.
Here are the steps that demonstrate on how to load WebChat Content in an Android Webview.
- On the Connect tab of your bot, activate the Webchat.

- Configure details like color, title of the button, bot picture, user picture, and so on.
- Copy the WebChat Script to your web page, let's create a simple html page that contain your webchat script, note this is just for testing and to see if the chat is working correctly. We may have to copy this script and deploy it somewhere in the android WebView that is explained in the subsequent steps.
- Create a new project in Android Studio, go to File ⇒ New Project and fill all required details to create a new project.
A) Choose Empty Activity.
B) Name: Some Meaningful name
C) Package Name: Don’t Change
D) Save Location: This should point to AndroidStudioProject folder, don’t change this until you prefer to store your project somewhere else.
E) Language: Java
F) Minimum SDK: I have used Marshmallow API 23, Probably you can try with something latest and if some APIs are deprecated then try replacing this with
the latest one, Though there is an option to override this and continue to use the deprecated APIs.
- Deploy the html code in folder app->src->main->assets->www-> “your .html file” ( Note: First i have created the folder ‘www’ inside the assets folder via an option New->Directory and then have created the .html page inside this via an option New->file).


 Add your script here
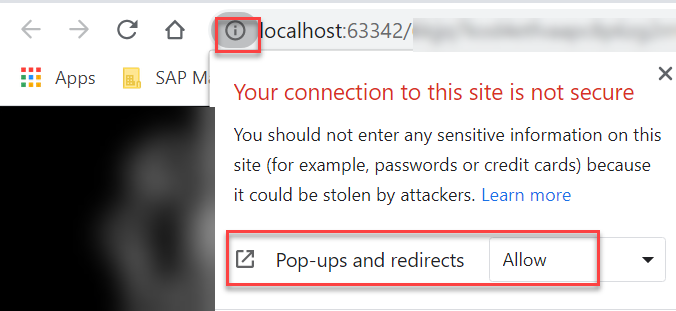
- Next is open the .html file in the chrome Browser and to see if this is opening the chatbot correctly.( Sometime there is a popup blocker that can block the application to launch, you may then need to disable this).
Right click on your .html file and open in browser->chrome.If you encounter any error here, probably you may need to enable popup and redirect.
- Add the following code to Location: app->src->main->res->layout->activity_main.xml
In the below script, we have taken web view to show html content.
<?xml version="1.0" encoding="utf-8"?>
<LinearLayout xmlns:android = "http://schemas.android.com/apk/res/android"
xmlns:app = "http://schemas.android.com/apk/res-auto"
xmlns:tools = "http://schemas.android.com/tools"
android:layout_width = "match_parent"
android:gravity = "center"
android:layout_height = "match_parent"
tools:context = ".MainActivity"
android:orientation = "vertical">
<WebView
android:id = "@+id/web_view"
android:layout_width = "match_parent"
android:layout_height = "match_parent" />
</LinearLayout>
- Add the following code to Location:app->src->java->(folder)->MainActivity.java
web_view.loadUrl : is pointing to location where .html file is located, note that the folder name is android_asset , however the actual location is named as an assets with one additional 's' at the end, which is ok, as it still can find the location.
package com.example.myapplication;


import androidx.appcompat.app.AppCompatActivity;

import android.app.ProgressDialog;

import android.os.Bundle;

import android.webkit.WebChromeClient;

import android.webkit.WebView;


public class MainActivity extends AppCompatActivity {

    @Override

    protected void onCreate(Bundle savedInstanceState) {

        super.onCreate(savedInstanceState);

        setContentView(R.layout.activity_main);

        final ProgressDialog progressDialog = new ProgressDialog(this);

        progressDialog.setMessage("Loading Data...");

        progressDialog.setCancelable(false);

        WebView web_view = findViewById(R.id.web_view);

        web_view.loadUrl("file:///android_asset/www/ChatBot.html");

        web_view.setWebChromeClient(new WebChromeClient());

        web_view.getSettings().setSupportMultipleWindows(true);

        web_view.getSettings().setDomStorageEnabled(true);

        web_view.getSettings().setJavaScriptEnabled(true);

        web_view.getSettings().setJavaScriptCanOpenWindowsAutomatically(true);

        web_view.setWebChromeClient(new WebChromeClient() {

            public void onProgressChanged(WebView view, int progress) {

                if (progress < 100) {

                    progressDialog.show();

                }

                if (progress == 100) {

                    progressDialog.dismiss();

                }

            }

        });


    }
Your AndroidManifest.xml should probably look something similar.
Location: app->src->main->AndroidManifest.xml
<?xml version="1.0" encoding="utf-8"?>
<manifest xmlns:android="http://schemas.android.com/apk/res/android"
package="com.example.myapplication">
<application
android:allowBackup="true"
android:usesCleartextTraffic="true"
android:icon="@mipmap/ic_launcher"
android:label="@string/app_name"
android:roundIcon="@mipmap/ic_launcher_round"
android:supportsRtl="true"
android:theme="@style/AppTheme">
<activity android:name=".MainActivity">
<intent-filter>
<action android:name="android.intent.action.MAIN" />
<category android:name="android.intent.category.LAUNCHER" />
</intent-filter>
</activity>
</application>
<uses-permission android:name="android.permission.INTERNET" />
</manifest>
The difference could be on the following code, in case this is missed out, then add this in the script as shown above .
android:usesCleartextTraffic="true"
<uses-permission android:name="android.permission.INTERNET" />
Now we have reached the last step,we can now Execute/Run the Main Activity: you can test the chatbot functionality in the simulation mode. To run the app from android studio, open one of your project's activity files and click Run icon from the toolbar. Select your mobile device as an option which will display the default screen –

The blog showcases open-sourced WebChat to allow the client to customize the web chat and to run this on any website that can be launched from an Android/iOS app.
For more information on SAP Conversational AI WebChat:
webchat
Do share your thoughts in the comments.
Cheers
- On the Connect tab of your bot, activate the Webchat.
- SAP Managed Tags:
- SAP Conversational AI
Labels:
1 Comment
You must be a registered user to add a comment. If you've already registered, sign in. Otherwise, register and sign in.
Labels in this area
-
ABAP CDS Views - CDC (Change Data Capture)
2 -
AI
1 -
Analyze Workload Data
1 -
BTP
1 -
Business and IT Integration
2 -
Business application stu
1 -
Business Technology Platform
1 -
Business Trends
1,658 -
Business Trends
91 -
CAP
1 -
cf
1 -
Cloud Foundry
1 -
Confluent
1 -
Customer COE Basics and Fundamentals
1 -
Customer COE Latest and Greatest
3 -
Customer Data Browser app
1 -
Data Analysis Tool
1 -
data migration
1 -
data transfer
1 -
Datasphere
2 -
Event Information
1,400 -
Event Information
66 -
Expert
1 -
Expert Insights
177 -
Expert Insights
293 -
General
1 -
Google cloud
1 -
Google Next'24
1 -
Kafka
1 -
Life at SAP
780 -
Life at SAP
13 -
Migrate your Data App
1 -
MTA
1 -
Network Performance Analysis
1 -
NodeJS
1 -
PDF
1 -
POC
1 -
Product Updates
4,577 -
Product Updates
340 -
Replication Flow
1 -
RisewithSAP
1 -
SAP BTP
1 -
SAP BTP Cloud Foundry
1 -
SAP Cloud ALM
1 -
SAP Cloud Application Programming Model
1 -
SAP Datasphere
2 -
SAP S4HANA Cloud
1 -
SAP S4HANA Migration Cockpit
1 -
Technology Updates
6,873 -
Technology Updates
417 -
Workload Fluctuations
1
Related Content
- Unleashing AI Magic: Building Full-Stack Apps with SAP Build Code in Technology Blogs by SAP
- Augmenting SAP BTP Use Cases with AI Foundation: A Deep Dive into the Generative AI Hub in Technology Blogs by SAP
- SAP Build Apps + Google Vertex AI API ( Gemini Pro ) + CAP - Get Gemini API inside SAP Build Apps.. in Technology Blogs by Members
- A glimpse at our product strategy for Application Development, Automation and Integration in Technology Blogs by SAP
- Part 4: Deliver real-life use cases with SAP BTP – Returnable Packaging – SAP Build Apps in Technology Blogs by SAP
Top kudoed authors
| User | Count |
|---|---|
| 34 | |
| 25 | |
| 13 | |
| 7 | |
| 7 | |
| 6 | |
| 6 | |
| 6 | |
| 5 | |
| 4 |