.png")
.png")

- SAP Community
- Products and Technology
- Human Capital Management
- HCM Blogs by SAP
- Prototype for HCM KR Year-end Data Upload Service
Human Capital Management Blogs by SAP
Get insider info on HCM solutions for core HR and payroll, time and attendance, talent management, employee experience management, and more in this SAP blog.
Turn on suggestions
Auto-suggest helps you quickly narrow down your search results by suggesting possible matches as you type.
Showing results for
Associate
Options
- Subscribe to RSS Feed
- Mark as New
- Mark as Read
- Bookmark
- Subscribe
- Printer Friendly Page
- Report Inappropriate Content
09-29-2020
7:01 AM
I am Product Owner of South Korea (KR for ease of reading) Development team, Human Capital Management (HCM for ease of reading) of Globalization Services in SAP. This blog post is for SAP partners and customers who want to adopt Year-end Data Upload Service of HCM KR, especially SAP SuccessFactors Employee Central Payroll customers.
Next, I will guide you to create a prototype on SAP Cloud Platform, using the JAVA API provided by KR National Tax Service (NTS for ease of reading), to decrypt the PDF document downloaded from NTS website, then convert it into XML format.
(Please understand that it is just a reference; some features are not included in the sample codes, like security or performance. All development is at your own risk.)
Background
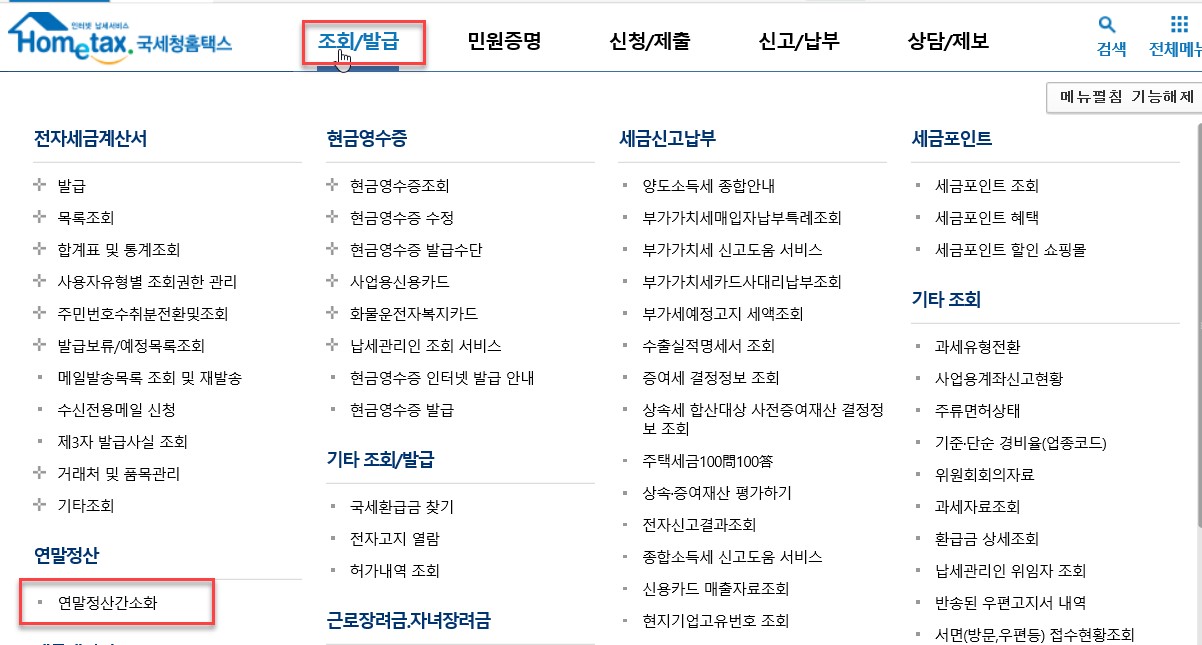
As a KR employee, your year-end income & tax deductions data will be collected by NTS electronically, from banks, schools, hospitals, etc. On the other hand, you can use the self-service provided by NTS to review your data via Hometax (www.hometax.go.kr). You can download your own data as an electronic PDF document from Hometax, which includes your year-end income & tax deductions information applicable to the legal requirements.
The PDF document is encrypted; NTS provides APIs to decrypt and extract the income & tax deductions information from the PDF document into XML format. As SAP customers, you can download these APIs to build web service application. Then you will be able to use this web service application for your employee to upload his/her PDF document, with Year-end income & tax deductions information.
Prerequisite
Development Environment:
- JDK 1.4
- Maven 3.+
- Eclipse with Maven plugins
- Spring Tools 4 for Eclipse
- Access to Cloud Foundry environment
- (Optional) Postman
Knowledge:
- Basic JAVA development
- Basic SAP Cloud Platform deployment experience
(Kindly understand that this development environment is not mandatory but just a reference.)
Application Development
STEP 1: Create a Spring Boot Application
1.1 Create Spring Boot project
Create a new Spring Boot project using Spring Starter project in Eclipse as below:
Select File -> New -> Project... -> Spring Boot -> Spring Starter Project. Specify Group ID, Artifact ID, Name and Description. For the other fields, you could use default values.
For example:

Group ID – com.example
Artifact ID – demo
Name – demo
Description – Demo application for PDF file parsing
(If you are using different name or ID, please also adjust the content accordingly in Step 1.3, 1.4 and 1.5)
1.2 Import NTS JAR
Access https://www.hometax.go.kr/, and navigate to download the API as below:
Unpack NTS API, find JAVA API.
Create a folder ‘lib’ in the root directory, then copy below jar files into this folder:
- bcprov-ext-jdk15-145.jar
- exportFile-2.0.2.jar
- itext-2.1.7.jar
- pdfbox-1.2.1.jar
 (Your downloaded files might have different version names if the NTS updates the API.)
1.3 Edit pom.xml
Delete <properties>, <dependencies> and <build> in pom.xml, then insert the content as below:

pom.xml
Text for copy:
<properties>
    <java.version>1.8</java.version>
</properties>
<dependencies>
    <dependency>
        <groupId>org.springframework.boot</groupId>
        <artifactId>spring-boot-starter-web</artifactId>
    </dependency>
    <dependency>
        <groupId>org.springframework.boot</groupId>
        <artifactId>spring-boot-starter-test</artifactId>
        <scope>test</scope>
        <exclusions>
            <exclusion>
                <groupId>org.junit.vintage</groupId>
                <artifactId>junit-vintage-engine</artifactId>
            </exclusion>
        </exclusions>
    </dependency>
    <dependency>
        <groupId>com.file.parsing</groupId>
        <artifactId>exportFile</artifactId>
        <version>1.0.0</version>
        <scope>system</scope>
        <systemPath>${project.basedir}/lib/exportFile-2.0.2.jar</systemPath>
    </dependency>
    <dependency>
        <groupId>com.file.parsing</groupId>
        <artifactId>itext</artifactId>
        <version>1.0.0</version>
        <scope>system</scope>
        <systemPath>${project.basedir}/lib/itext-2.1.7.jar</systemPath>
    </dependency>
    <dependency>
        <groupId>com.file.parsing</groupId>
        <artifactId>pdfbox</artifactId>
        <version>1.0.0</version>
        <scope>system</scope>
        <systemPath>${project.basedir}/lib/pdfbox-1.2.1.jar</systemPath>
    </dependency>
    <dependency>
        <groupId>com.file.parsing</groupId>
        <artifactId>bcprov-ext</artifactId>
        <version>1.0.0</version>
        <scope>system</scope>
        <systemPath>${project.basedir}/lib/bcprov-ext-jdk15-145.jar</systemPath>
    </dependency>
</dependencies>
<build>
    <plugins>
        <plugin>
            <groupId>org.springframework.boot</groupId>
            <artifactId>spring-boot-maven-plugin</artifactId>
            <configuration>
                <includeSystemScope>true</includeSystemScope>
            </configuration>
        </plugin>
    </plugins>
</build>
(If you are using different name or ID in Step 1.1, or your downloaded files have different version names, please specify your own content in pom.xml. Here I suggest to use JAVA version 1.8, because it will fail to start the application in the SAP Cloud Platform if JAVA version is too high.)
1.4 Create Controller
Create controller – FileServiceImpl.java under package – com.example.demo:

Then copy and replace the source code in FileServiceImpl.java as below:
package com.example.demo;
import com.epapyrus.api.ExportCustomFile;
import org.springframework.web.bind.annotation.PostMapping;
import org.springframework.web.bind.annotation.RequestBody;
import org.springframework.web.bind.annotation.RequestParam;
import org.springframework.web.bind.annotation.RestController;

@RestController
public class fileServiceImpl {
    @PostMapping(value= {"/fileParsing","/fileParsing/{szn}{pwd}",}, produces = "multipart/form-data")
    public String fileParsing(@RequestParam(value = "szn", required = true) String szName,
    @RequestParam(value = "pwd", required = false) String password, @RequestBody byte[] pdfBytes) {
        String strValue = ""; // return value
        try {
            ExportCustomFile pdf = new ExportCustomFile();
            // Data Transfer
            byte[] buf = pdf.NTS_GetFileBufEx(pdfBytes, password, szName, false);
            int v_ret = pdf.NTS_GetLastError();
            if (v_ret == 1) {
            strValue = new String(buf, "UTF-8");
            } else if (v_ret == 0) {
                strValue = "<!-- It is an invalid file. -->";
            } else if (v_ret == -1) {
                strValue = "<!-- Invalid password. -->";
            } else if (v_ret == -2) {
                strValue = "<!-- It is not a PDF file or the file is damaged. -->";
            } else {
                strValue = "<!-- Failure to output data. -->";
            }
        } catch (Exception e) {
            strValue = "Failure to output data"+e.toString();
        }
        return strValue;
    }
}
(If you are using different name or ID in Step 1.1, please specify your own Source path and package accordingly)
1.5 Create Manifest.yml
Create a new file Manifest.yml under the root directory.

Copy the content into Manifest.yml as below:
applications:
- name: demo
  memory: 1G
  timeout: 360
  path: target/demo.jar
  env:
    SPRING_PROFILES_DEFAULT: cf
(If you are using different name or ID in Step 1.1, please specify your own folder and name.)
STEP 2 : Deploy the Application
2.1 Build the JAR file
Before this step, please check the Properties of your project and copy the Location:

Make sure your maven is working fine. Open Command Prompt, try the command as below:
mvn -v
Let’s build the jar file of the project. Redirect to the folder of your project, replace {location} with the location of your project as below:
cd {location}Use the maven command line tool with the following command:
mvn clean install -P cf

Wait until BUILD SUCCESS displays.

2.2 Login to SAP Cloud Platform
First find the proper API endpoint for you. https://help.sap.com/viewer/3504ec5ef16548778610c7e89cc0eac3/Cloud/en-US/350356d1dc314d3199dca15bd2a...
Replace {endpoint} with your own endpoint if necessary.
Set up the API endpoint:
cf api {endpoint}
Then login:
cf login
Input your Email and Password. Check your org and space.

(Specify org and space when necessary.)
2.3 Push the application
After logging in, now you can push your application to SAP Cloud Platform. use command as below:
cf push

Wait for the web service application to start:

STEP 3: Call the API
Now the application is deployed. Check Application Routes of your prototype in SAP Cloud Platform cockpit.

For example, the Application Routes is: https://demo.XXXXXXXXXXXXXXX.com
You can now use the link to call the API: https://demo.XXXXXXXXXXXXXXXX.com/fileParsing?szn=XML
3.1 (Optional test) POST {Application Routes}/fileParsing?szn=XML
You can use Postman to check the link of the web service application.
Convert the PDF (without password) file into XML format.
convert into xml
Then you can confirm the XML format content of the PDF document in the Body
3.2 (Optional test) POST {Application Routes}/fileParsing?szn=XML/{password}
Check the password for the PDF document. Convert the PDF (with password) file into XML format.
Further Actions
Now you can consume the web service application via the request to build a complete solution for KR employee to upload his/her Year-end income & tax deductions information.
However, this prototype can only help us to make sure the process works. Please notice that there are more you should do to make this prototype into a complete solution, like security, performance, etc. You should also pay attention how you call this web service application and consume the xml format information, like data protection, virus attack, xml bomb, etc.
Please understand that all development is at your own risk.
- SAP Managed Tags:
- SAP SuccessFactors Employee Central Payroll,
- HCM (Human Capital Management)
Labels:
You must be a registered user to add a comment. If you've already registered, sign in. Otherwise, register and sign in.
Labels in this area
-
1H 2023 Product Release
3 -
2H 2023 Product Release
3 -
Business Trends
104 -
Business Trends
4 -
Cross-Products
13 -
Event Information
75 -
Event Information
9 -
Events
5 -
Expert Insights
26 -
Expert Insights
15 -
Feature Highlights
16 -
Hot Topics
20 -
Innovation Alert
8 -
Leadership Insights
4 -
Life at SAP
67 -
Life at SAP
1 -
Product Advisory
5 -
Product Updates
499 -
Product Updates
28 -
Release
6 -
Technology Updates
408 -
Technology Updates
6
Related Content
- Health and Vaccine Status Tracking Block/Portlet in SuccessFactors People Profile in Human Capital Management Blogs by SAP
- Extending SuccessFactors using Intelligent Services and SAP cloud platform in Human Capital Management Blogs by SAP
- SAP ERECRUIT – some reflections at the end of the implementation Project. in Human Capital Management Blogs by Members
Top kudoed authors
| User | Count |
|---|---|
| 4 | |
| 4 | |
| 2 | |
| 2 | |
| 2 | |
| 2 | |
| 2 | |
| 1 | |
| 1 | |
| 1 |