
- SAP Community
- Products and Technology
- Technology
- Technology Blogs by SAP
- Setting up SAP API Management on Cloud Foundry
Technology Blogs by SAP
Learn how to extend and personalize SAP applications. Follow the SAP technology blog for insights into SAP BTP, ABAP, SAP Analytics Cloud, SAP HANA, and more.
Turn on suggestions
Auto-suggest helps you quickly narrow down your search results by suggesting possible matches as you type.
Showing results for
Advisor
Options
- Subscribe to RSS Feed
- Mark as New
- Mark as Read
- Bookmark
- Subscribe
- Printer Friendly Page
- Report Inappropriate Content
09-25-2020
9:59 AM
INTRODUCTION
APIs are the building blocks of any enterprise facilitating consumption and interactions with digital assets. They also serve as channels where partners can interact with the digital assets to consume the assets for development. For organizations to have better control over the consumption and transformation of their digital assets through API's it is crucial for them to implement an API Management solution.
The SAP Cloud Platform API Management provides a means for organizations to have greater control over their digital assets and allow their partners to consume these assets across various channels. SAP API Management helps provide governance of an organizations APIs across heterogeneous landscapes by offering a unified provisioning platforms for APIs. It also facilitates the consumption of digital assets through an API centric approach with partners and developers. This leads to drastic reductions in application development time and simplifying integration while also guaranteeing the benefits of security, traffic management and deep-analytics.
The first step towards setting up SAP API Management is onboarding. This article details the steps required in order to set up both the API Portal and Developer portal.
1) Creation of a Sub Account
Navigate to the global account and click on the New Subaccount button. This opens a dialogue box.

a. Enter the details in the dialogue box.
Provide a Display Name

Select a Provider

Select a Region

Enter a subdomain

Click Create to create a sub account. This initiates the creation/onboarding of the sub account.

Click on the tile of the sub account after the onboarding of the sub-account is completed to navigate to the sub account view.

2) Onboarding on API Portal
a) Click on the subscriptions section.

b) Navigate to the tile API Management, API Portal

c) Click on Subscribe to create in instance of API Portal

d) Click on the section Trust Configuration

e) Click on your identity provider (SAP ID Service if you do not have a default identity provider configured.

f) Provide the e-mail address and click on the button, Show Assignments to view all role collections assigned to your e-mail address.

g) Click on the button Assign Role Collection, which opens up a dialog box to assign a role collection.

h) In the dialogue box select APIManagement.SelfService.Administrator and click the button Assign Role Collection. This assigns the roles required during the onboarding process to the user.

i) Navigate back to the sub-account page.

j) Click on the subscriptions section.

k) Click on the API Management, API portal tile
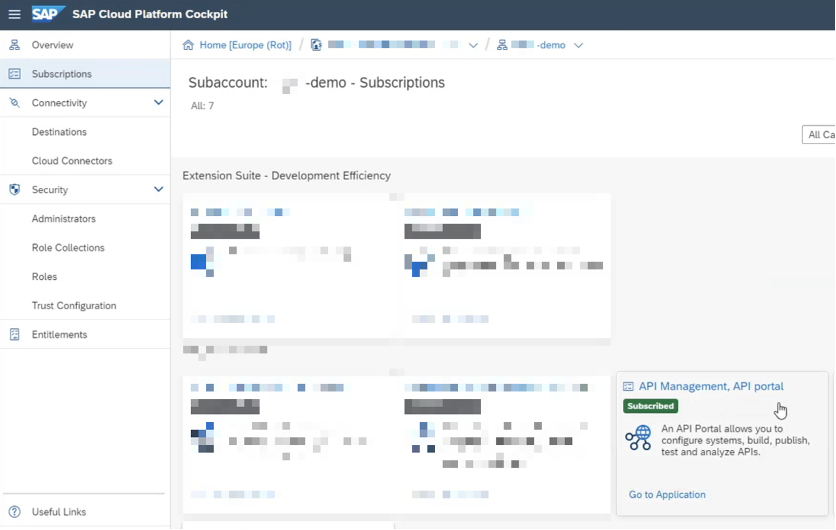
l) Click on Go to Application link

m) Enter your credentials in the page that opens up
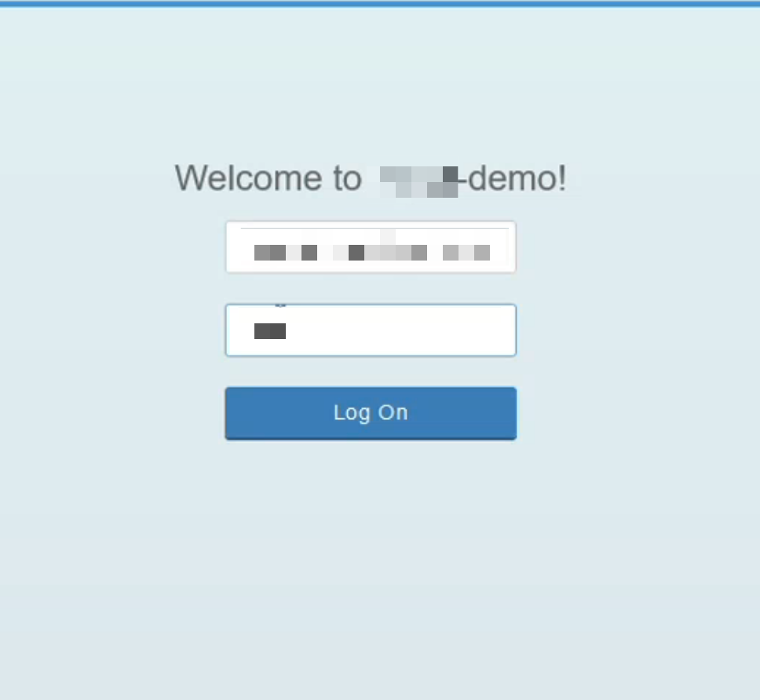
n) On successful authentication the onboarding page for the API Portal opens.
Here provide the following details
Account Type: Production or Non – Production

Note: Non-Production environments do not have any SLA's associated with it and should be used for test landscapes.
Virtual Host Alias: The virtual host name that you would like for the API portal.

The virtual host alias is an alias that would appear as the host in the API proxy URL.
Communication: The e-mail id that a mail that notifications are sent to for API portal specific communications.

(Optional) There is also a checkbox which allows the current user to be made the administrator of the API Portal by assigning administrator privileges.

o) Click the button Set Up after entering the details.

p) This opens a dialogue box allowing you to verify the details. Click confirm to trigger the onboarding process.

q) After a few minutes on successful onboarding you are presented with the following screen.

r) A mail is also sent to the email address(es) provided in Step n intimating them of the success or failure of the onboarding.

At this point the steps for onboarding the API Portal is completed.
t) On the API Portal click Logout.

u) Login to access the onboarded API Portal by providing the credentials.

u) You should then be logged in to the API Portal landing page.

Note: On successful onboarding, a simple sample proxy (HelloWorldAPI) will also be deployed as part of your first onboarding that can be used to test is the proxy mechanism works.
3) Onboarding on the Developer Portal
After successful onboarding of the API Portal, we can start the onboarding of the Developer Portal.
Note: The Developer Portal should always be onboarded after successfully onboarding the API portal.
a) Navigate to the subaccount created previously.

b) Click on Subscriptions

c) Click on the tile API Management, developer portal

d) Click on the button Subscribe to create an instance of the developer portal

e) Click on the section Trust Configuration

f) Click on your identity provider (SAP ID Service if you do not have a default identity provider configured.

g) Enter the E-Mail Address and click the button Show Assignments

h) Click on the Assign Role Collection button.

i) In the dialogue box that opens select the role collection AuthGroup.SelfService.Admin and click the button Assign Role Collection.

j) Click on the Sub Account

k) Click on Subscriptions

l) Click on the Tile API Management, developer portal’s Go To Application link

m) This will then take you to the login page. Enter your credentials and click Log On. This initiates the onboarding process on the Developer Portal.

n) On successful onboarding the following message is displayed on the Developer Portal.

o) Click the Logout link on the top right to logout.

p) Click the Login button to login to the onboarded Developer Portal.
 q) Provide the credentials as before.

That is it. You are now all set to use the SAP API Management platform to manage all the APIs of your organisation though the API Portal and Developer Portal.
Points to note:
- Developer Portal should not be onboarded before the API Portal. This would lead to inconsistencies.
- The API Portal can be used even if the Developer Portal is not onboarded. This is typically used in cases where we want to manage and create APIs. The Developer portal requires that the API Portal always be onboarded first.
- Quota assignment is not required for onboarding. You can directly navigate to the subscriptions tab to get the API Portal and Dev Portal tiles. DO not assign quotas from Subaccount Assignments as it is only required for the service broker.

- SAP Managed Tags:
- API,
- API Management
Labels:
1 Comment
You must be a registered user to add a comment. If you've already registered, sign in. Otherwise, register and sign in.
Labels in this area
-
ABAP CDS Views - CDC (Change Data Capture)
2 -
AI
1 -
Analyze Workload Data
1 -
BTP
1 -
Business and IT Integration
2 -
Business application stu
1 -
Business Technology Platform
1 -
Business Trends
1,658 -
Business Trends
92 -
CAP
1 -
cf
1 -
Cloud Foundry
1 -
Confluent
1 -
Customer COE Basics and Fundamentals
1 -
Customer COE Latest and Greatest
3 -
Customer Data Browser app
1 -
Data Analysis Tool
1 -
data migration
1 -
data transfer
1 -
Datasphere
2 -
Event Information
1,400 -
Event Information
66 -
Expert
1 -
Expert Insights
177 -
Expert Insights
293 -
General
1 -
Google cloud
1 -
Google Next'24
1 -
Kafka
1 -
Life at SAP
780 -
Life at SAP
13 -
Migrate your Data App
1 -
MTA
1 -
Network Performance Analysis
1 -
NodeJS
1 -
PDF
1 -
POC
1 -
Product Updates
4,577 -
Product Updates
341 -
Replication Flow
1 -
RisewithSAP
1 -
SAP BTP
1 -
SAP BTP Cloud Foundry
1 -
SAP Cloud ALM
1 -
SAP Cloud Application Programming Model
1 -
SAP Datasphere
2 -
SAP S4HANA Cloud
1 -
SAP S4HANA Migration Cockpit
1 -
Technology Updates
6,873 -
Technology Updates
419 -
Workload Fluctuations
1
Related Content
- Consuming SAP with SAP Build Apps - Mobile Apps for iOS and Android in Technology Blogs by SAP
- Easy way to automate and configure the setup of a BTP account and Cloud Foundry using Terraform. in Technology Blogs by Members
- Enabling Support for Existing CAP Projects in SAP Build Code in Technology Blogs by Members
- When to Use Multi-Off in 3SL in Technology Blogs by SAP
- Corporate Git Setup on SAP BTP versus connecting to Corporate Git directly from SAP BAS in Technology Q&A
Top kudoed authors
| User | Count |
|---|---|
| 36 | |
| 25 | |
| 16 | |
| 13 | |
| 7 | |
| 7 | |
| 6 | |
| 6 | |
| 6 | |
| 6 |