
- SAP Community
- Products and Technology
- Technology
- Technology Blogs by SAP
- Fetching data from Non-SAP system in a loop via SA...
Technology Blogs by SAP
Learn how to extend and personalize SAP applications. Follow the SAP technology blog for insights into SAP BTP, ABAP, SAP Analytics Cloud, SAP HANA, and more.
Turn on suggestions
Auto-suggest helps you quickly narrow down your search results by suggesting possible matches as you type.
Showing results for
divyamary
Contributor
Options
- Subscribe to RSS Feed
- Mark as New
- Mark as Read
- Bookmark
- Subscribe
- Printer Friendly Page
- Report Inappropriate Content
09-23-2020
12:49 PM
SAP Cloud Platform Integration Suite is a versatile, dynamic and enterprise-grade iPaaS (integration platform-as-a-service) from SAP that simplifies and accelerates enterprise integration and helps organizations to quickly transition to becoming intelligent enterprises. It consists of Cloud Integration component to support end-to-end process integration across cloud-based and on-premise applications and Open Connectors component to accelerate integration to Non-SAP cloud applications via 160+ pre-built connectors. Pre-built connectors to Non-SAP cloud applications provides harmonized authentication, error handling, search, pagination and bulk support regardless of the underlying architecture of the Non-SAP applications. More information on SAP Cloud Platform Suite in this blog.
In this blog, steps to fetch records from Non-SAP applications in batches or via pagination in SAP Cloud Platform Integration Suite is showcased. Fetching records in batches will enable you to iterate over large number of data stored in your target system and use the data within your integration project. At a high level fetching records in batches from Non-SAP applications and consuming it within an integration flow will consist of the following steps :-
The value of the address field can vary based on the environment where Open Connectors is enabled. To get information about your Open Connectors URL refer this blog.
In the query parameter you can notice that property pageSize is referenced dynamically as ${property.pageSize}. pageSize will be set later in this blog to define the number of records that you would like to fetch from the Non-SAP system. You can also notice the usage of the query parameter nextPage which is set up dynamically to custom header Elements-Next-Page-Token. After the records are fetched from the Non-SAP system, Open Connectors will set the response header Elements-Next-Page-Token to get the next set of records using pagination. More details on pagination can be found in this help documentation.
Since the authorization required to connect to the connector instance will be set later in this blog using the content modifier integration step the authentication type is selected to None.
Add this content modifier step to the main Integration Process.
Set pageSize exchange property and Elements-Returned-Count message header to the same value.
You can notice that the Looping process call condition is set to be called as long as the number of records returned in Open Connectors response is equivalent to number of records to be fetched. If the number of records returned is less than the number of records to be fetched, it means that there are no further data to be fetched via pagination in Open Connectors. The header Elements-Returned-Count will be automatically set to the number of returned records by Open Connectors.
With this an integration flow that reads data from your Non-SAP applications in a loop via Open Connectors is successfully created and deployed.
Note, the first-time deployment might take some time before the changes are fully deployed.
Using the harmonized pagination support across 160+ connectors provided by Open Connectors capability of Integration Suite you can leverage the approach outlined in this blog to fetch data from a Non-SAP system of your choice in batches and use it within your integration flows.
More blogs on SAP Cloud Platform Integration Suite available in SAP Community.
In this blog, steps to fetch records from Non-SAP applications in batches or via pagination in SAP Cloud Platform Integration Suite is showcased. Fetching records in batches will enable you to iterate over large number of data stored in your target system and use the data within your integration project. At a high level fetching records in batches from Non-SAP applications and consuming it within an integration flow will consist of the following steps :-
- A Looping Process Call in Cloud Integration that invokes a Local Integration Process iteratively till the conditions are met.
- Fetched of data from a Non-SAP system of your choice via Open Connectors leveraging the harmonized pagination approach of using pageSize and nextPage within the Local Integration Process.
Prerequisites
- SAP Cloud Platform Integration Suite (Trial Environment)
- Connector instance to your Non-SAP system via Open Connectors ( details in this blog)
Integration Flow to fetch data in batches or loop
- Logon to your SAP Cloud Platform trial
- Select Subscription and search and select Integration Suite. Click on Go to Application

- It will launch the Integration Suite launch pad in a new browser tab. Select Design, Develop and Operate Integrate Scenarios option. In case this option is not visible for you, you can click on Manage Capabilities and enable Cloud Integration capability

- From the Cloud Integration workspace, Navigate to Design tab, click Create to create an integration package.

- Enter integration package details like name, description as provided in the table below and select Save.
| Name | Demo Integration Suite Scenarios |
| Short Description | Demo Integration Suite Scenarios |

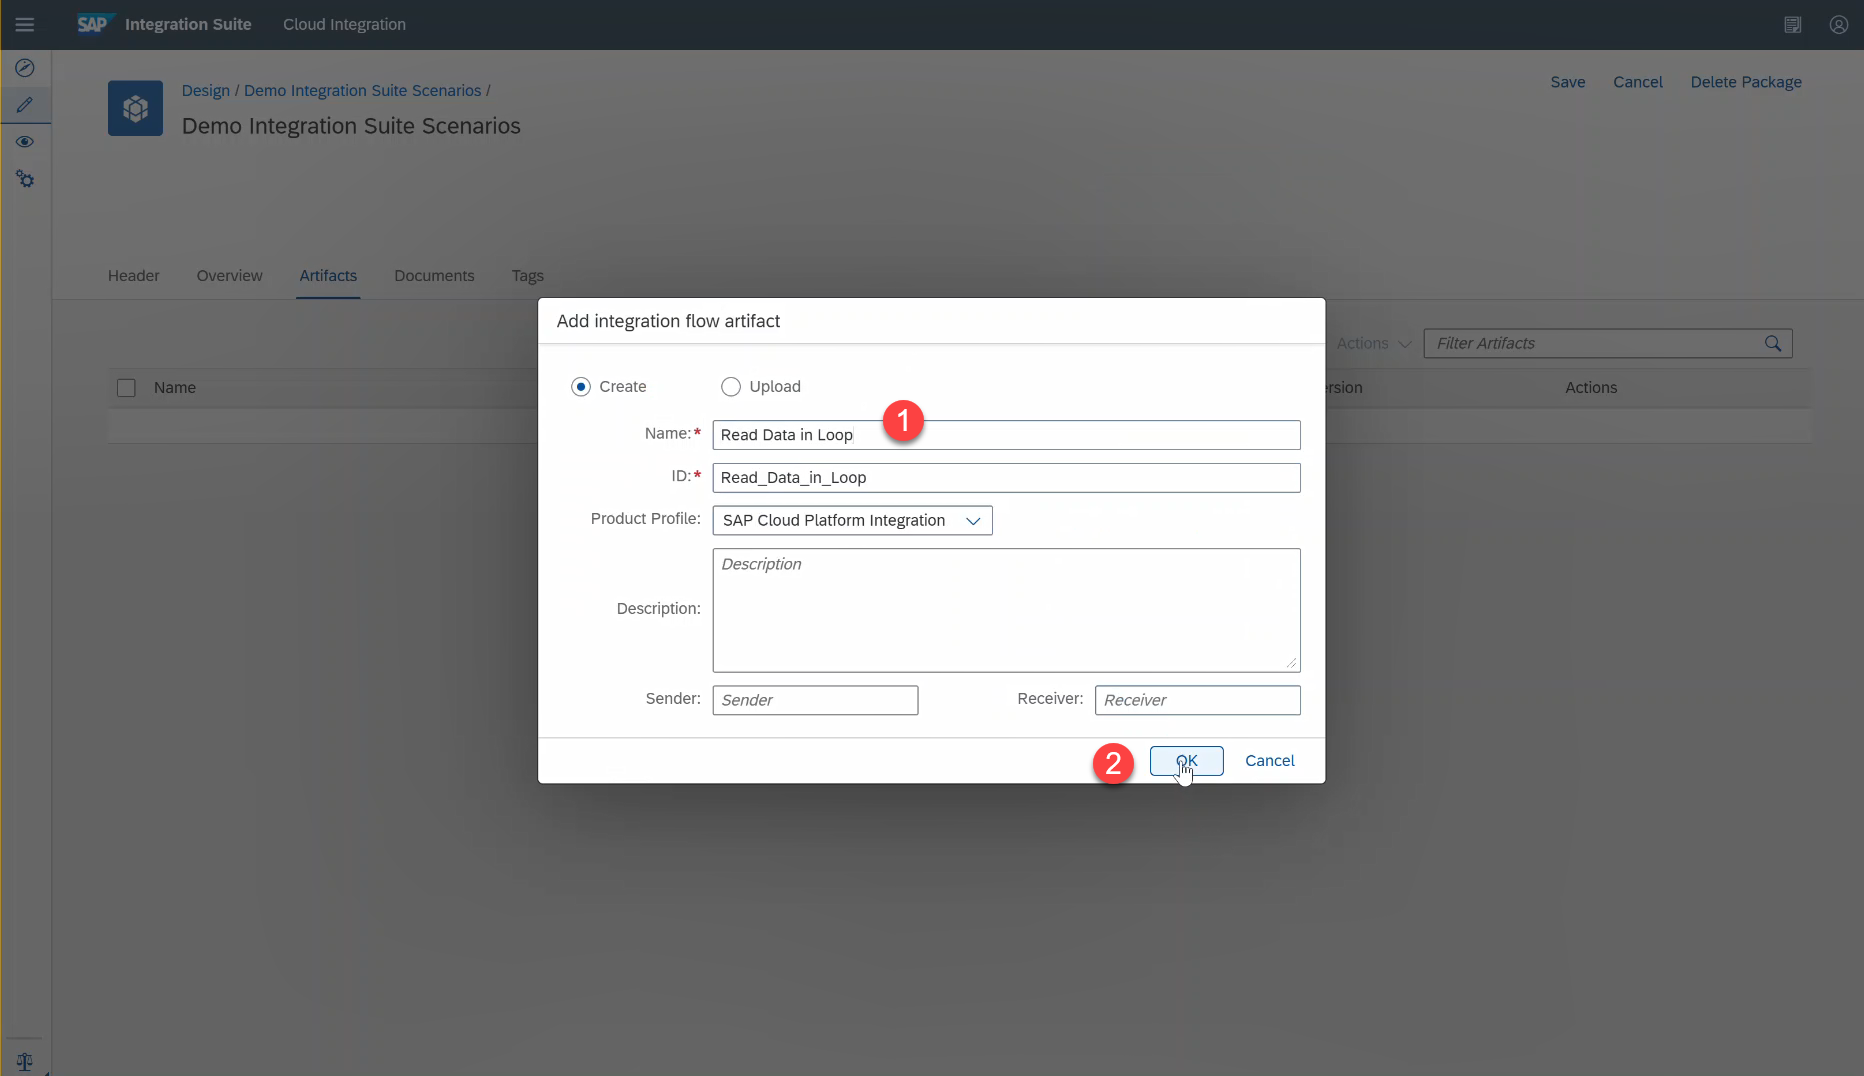
- Navigate to Artifacts tab, Select Integration Flow from Add action to add in a new Integration flow.

- In the Add integration flow artifact dialog enter integration flow name say Read Data in Loop and select OK.
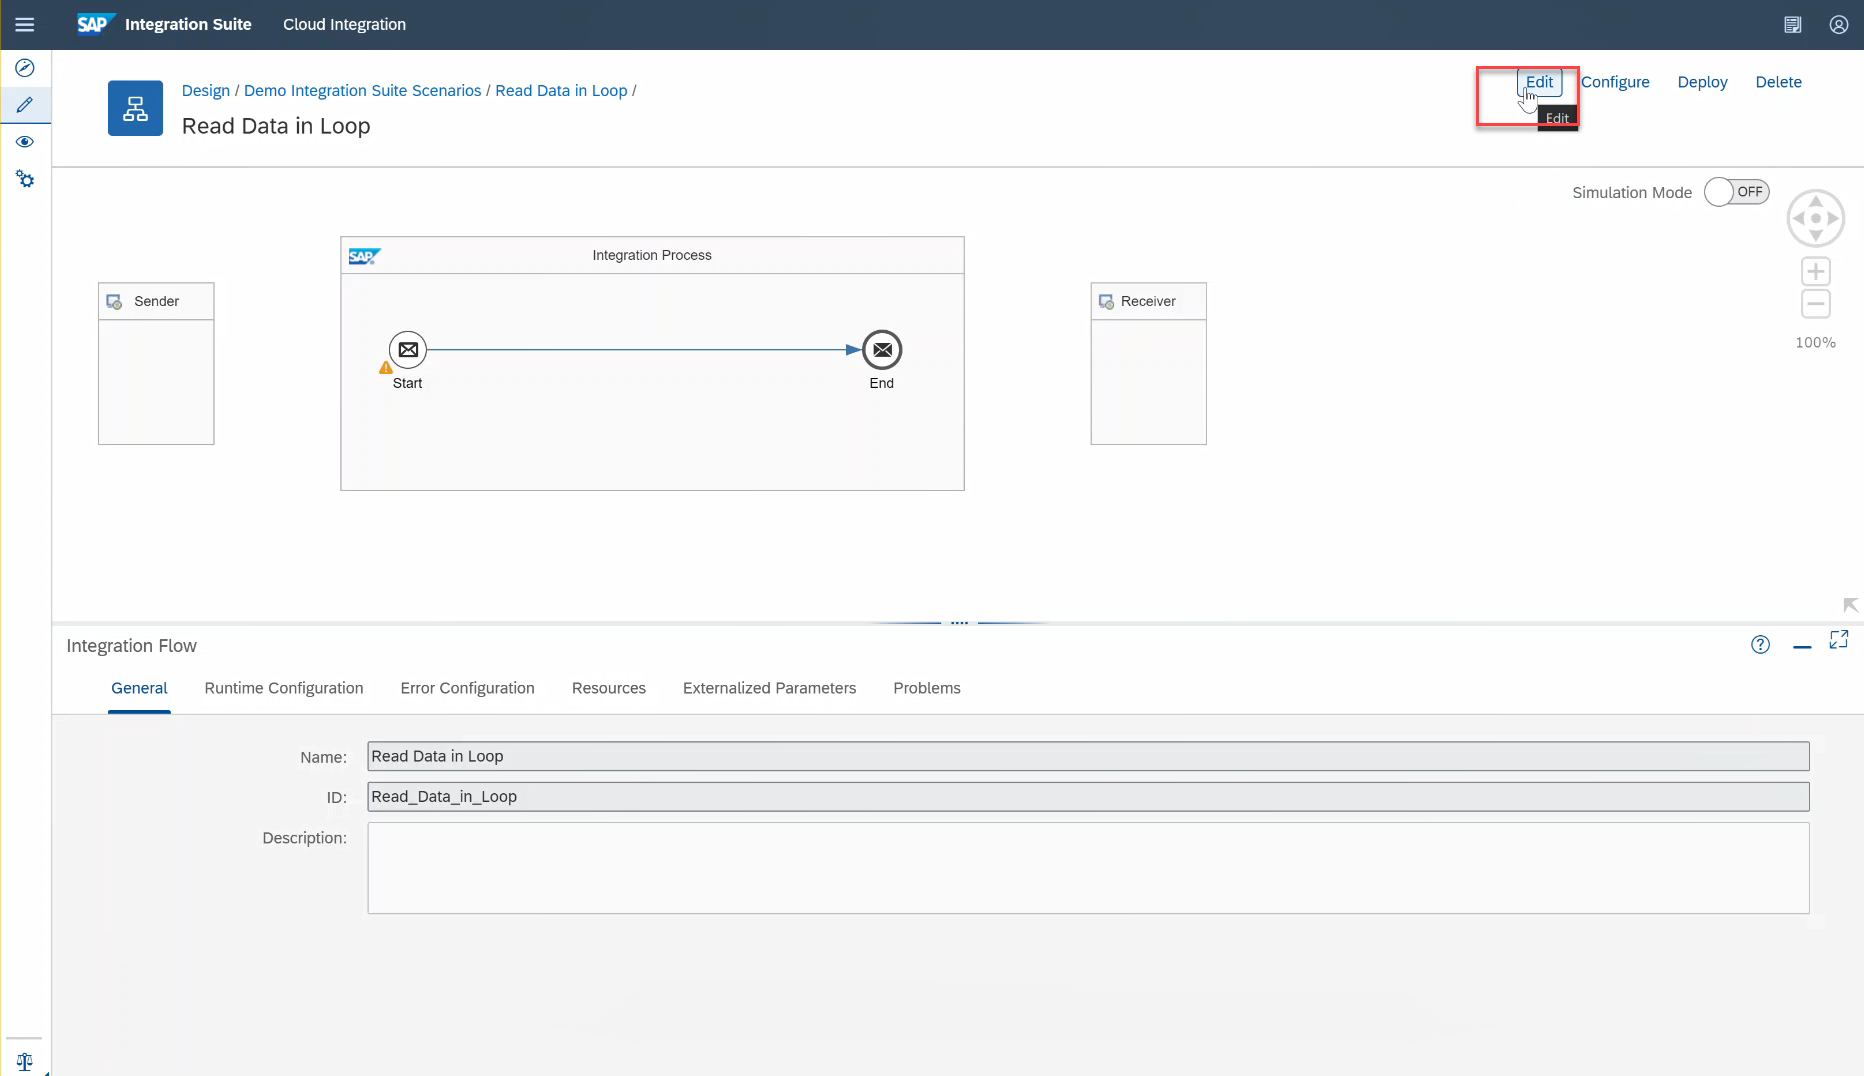
- Select the newly created Integration Flow named Read Data in Loop and then select Edit to start editing the integration flow.

- In this blog, a start timer approach is used to trigger the integration flow as soon as it is deployed and therefore the Sender adapter added by default can be deleted. Select the default Sender and Receiver adapter and select delete (recycle bin) icon.


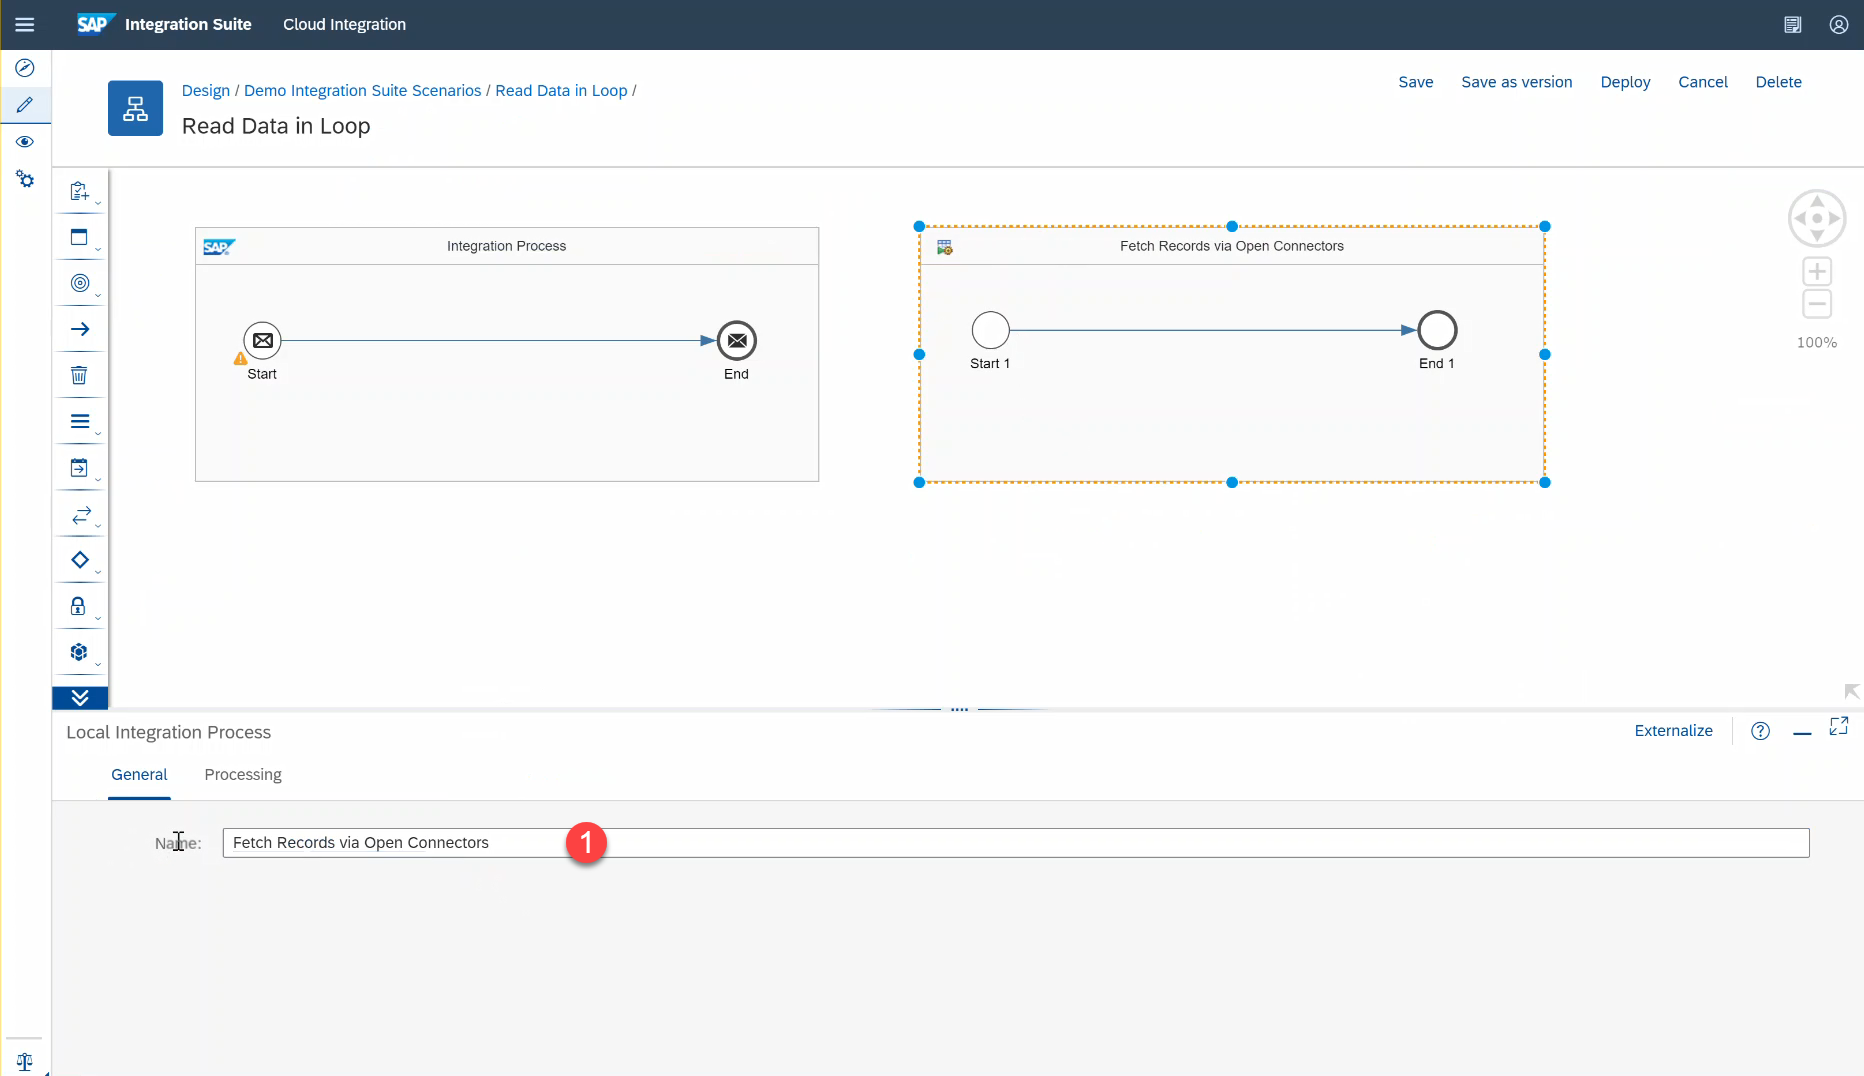
- Select and add Local Integration Process from the Process step of the integration palette to your Integration canvas. This Local Integration Process will be called from a Looping process call step in later parts of this blog.

- To improve readability, select the newly added Local Integration Process and change the name to Fetch Records via Open Connectors from General tab.
- To read records from Open Connectors, the Request Reply integration pattern with a HTTP Receiver adapter can be used. Select Request Reply from External Call integration palette and drop it into over the line connecting the Start 1 and End 1 step of the Local Integration Process.


- Change the name of Request Reply step to Fetch Records in the General tab to improve readability.

- Add in Receiver integration step to fetch records from your connector instances of Open Connectors.

- Select and connect the Fetch Records request reply step to the newly added Receiver. This would open the Adapter list, from the available Adapter select HTTP.


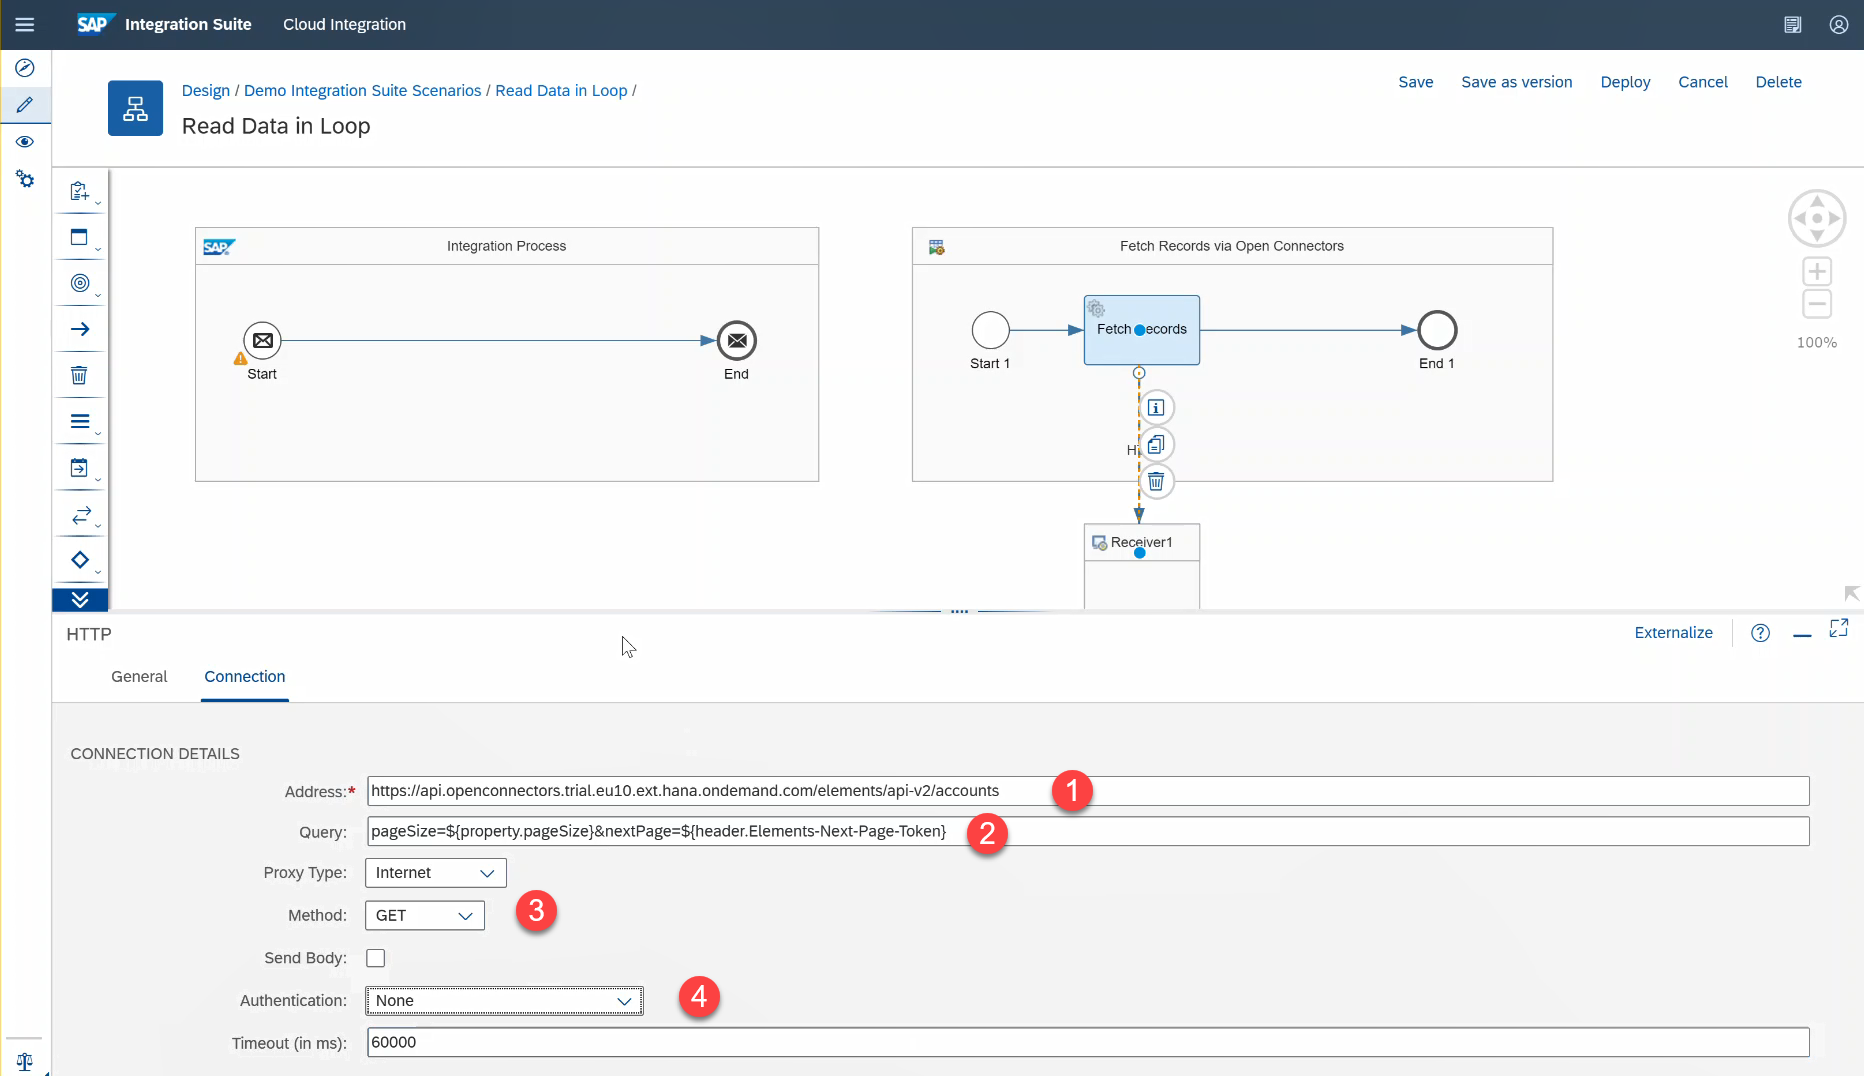
- Under the Connection tab, enter details as follows.
- Address : https://api.openconnectors.trial.eu10.ext.hana.ondemand.com/elements/api-v2/accounts
- Query : pageSize=${property.pageSize}&nextPage=${header.Elements-Next-Page-Token}
- Method : GET
- Authentication: None
The value of the address field can vary based on the environment where Open Connectors is enabled. To get information about your Open Connectors URL refer this blog.
In the query parameter you can notice that property pageSize is referenced dynamically as ${property.pageSize}. pageSize will be set later in this blog to define the number of records that you would like to fetch from the Non-SAP system. You can also notice the usage of the query parameter nextPage which is set up dynamically to custom header Elements-Next-Page-Token. After the records are fetched from the Non-SAP system, Open Connectors will set the response header Elements-Next-Page-Token to get the next set of records using pagination. More details on pagination can be found in this help documentation.
Since the authorization required to connect to the connector instance will be set later in this blog using the content modifier integration step the authentication type is selected to None.
- Add Content Modifier step to initialize the connector instance authorization token of Open Connectors and the number of records ( pageSize) that needs to be fetched in loop.
Add this content modifier step to the main Integration Process.

- Change name to Set Initial Values in General tab to improve readability.

- Navigate to Message Header
- Select Add to add a new message header. Enter Elements-Returned-Count in Name field and enter a value equivalent to the number of records to be fetched in each call. In the demo Non-SAP system there were only 5 records and to showcase reading of 2 records in each batch or loop the value was set to 2. If you have a large number of records to be fetched, set this value accordingly.
- Select Add to add another message header named Elements-Next-Page-Token. This value will be automatically set by the response returned by Open Connector and therefore the value field is left empty.
- Select Add to add another message header. Enter Authorization in Name field and enter your connector instance authorization token from Open Connectors in the value field. To know more about your connector instance authorization token refer this blog.

- Navigate to Exchange Property.
- Select Add to add a new exchange property. Enter pageSize in Name field and enter a value equivalent to the number of records to be fetched in each call. In the demo Non-SAP system there were only 5 records and to showcase reading of 2 records in each batch or loop the value was set to 2. If you have a large number of records to be fetched, set this value accordingly.
Set pageSize exchange property and Elements-Returned-Count message header to the same value.

- Select Local call and add it to the main Integration Process.


- Change name of integration step to Fetch Records in Loop.

- Navigate to Processing tab. Select the Fetch Records via Open Connectors as the local integration process. This local process will be called as long as the conditions or the maximum number of processing is met based on whichever is met first.


- Select Non-XML as the Expression Type. Set the ${property.pageSize} = ${header.Elements-Returned-Count} as the Condition Expression. Set Max. Number of Iterations say 100 and set End Loop as the action when max. iteration is reached.
You can notice that the Looping process call condition is set to be called as long as the number of records returned in Open Connectors response is equivalent to number of records to be fetched. If the number of records returned is less than the number of records to be fetched, it means that there are no further data to be fetched via pagination in Open Connectors. The header Elements-Returned-Count will be automatically set to the number of returned records by Open Connectors.

- In this blog sample, a timer based integration flow is used and therefore the default start message can be deleted. Select the Start message from Integration Process and then select delete (recycle bin icon).

- Select and add the Timer integration step. The default property of timer integration step is to execute the integration flow immediately after you deploy the integration flow. More about the available timer configurations is available in help documentation.

- Select Start Timer integration step and then drag the arrow icon to point towards Connect Modifier step to connect the timer and content modifier integration step.

- Select Save and then Deploy button to deploy this integration flow to your Cloud Integration tenant.

With this an integration flow that reads data from your Non-SAP applications in a loop via Open Connectors is successfully created and deployed.
Note, the first-time deployment might take some time before the changes are fully deployed.
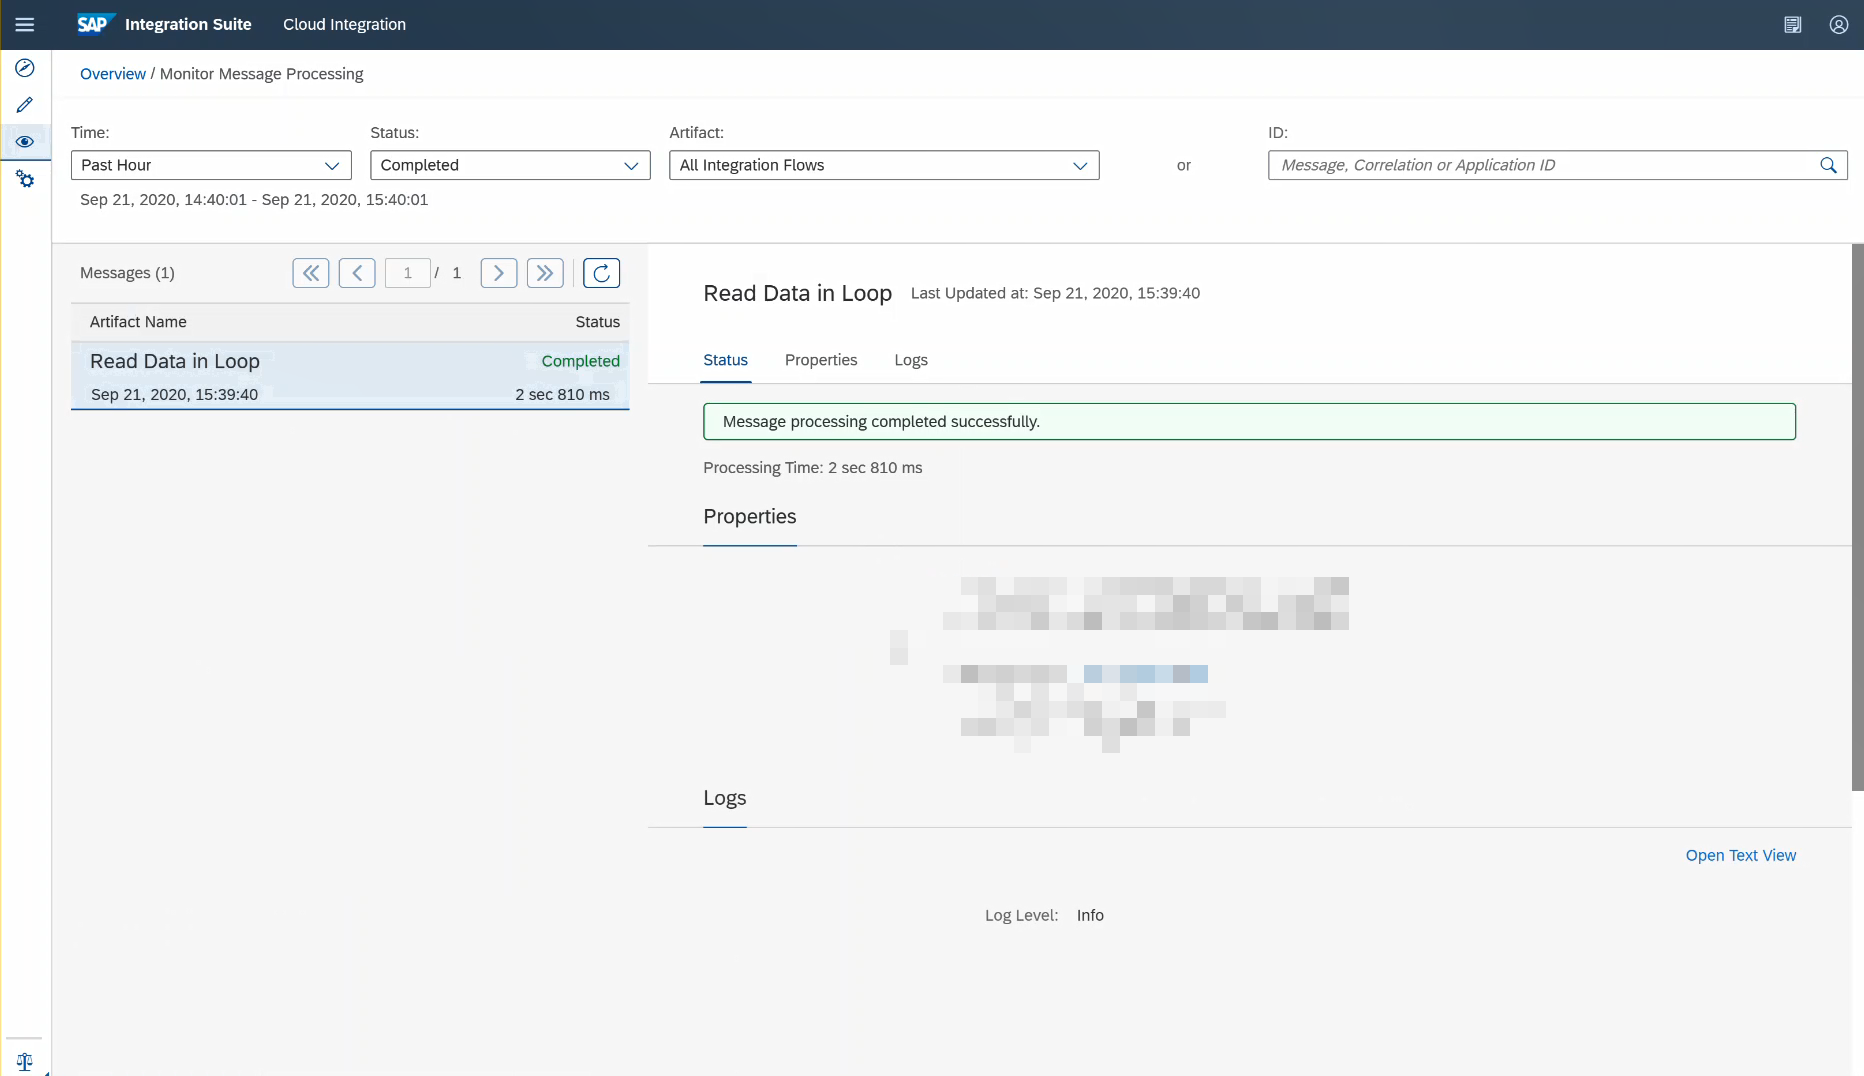
- Navigate to Monitor tab to check the status of the deployed integration flow.
- Since the integration flow was designed as a Run immediate timer-based integration the flow will be executed as soon as it deployed. Select Completed Messages tile to view the successfully executed integration flows. In case of any failure it will appear under Failed Messages.

- Check the status of the newly created integration flow from the Monitor Message Processing. If status changes to Completed, then the records would have been successfully fetched from Non-SAP system via Open Connectors in batches.
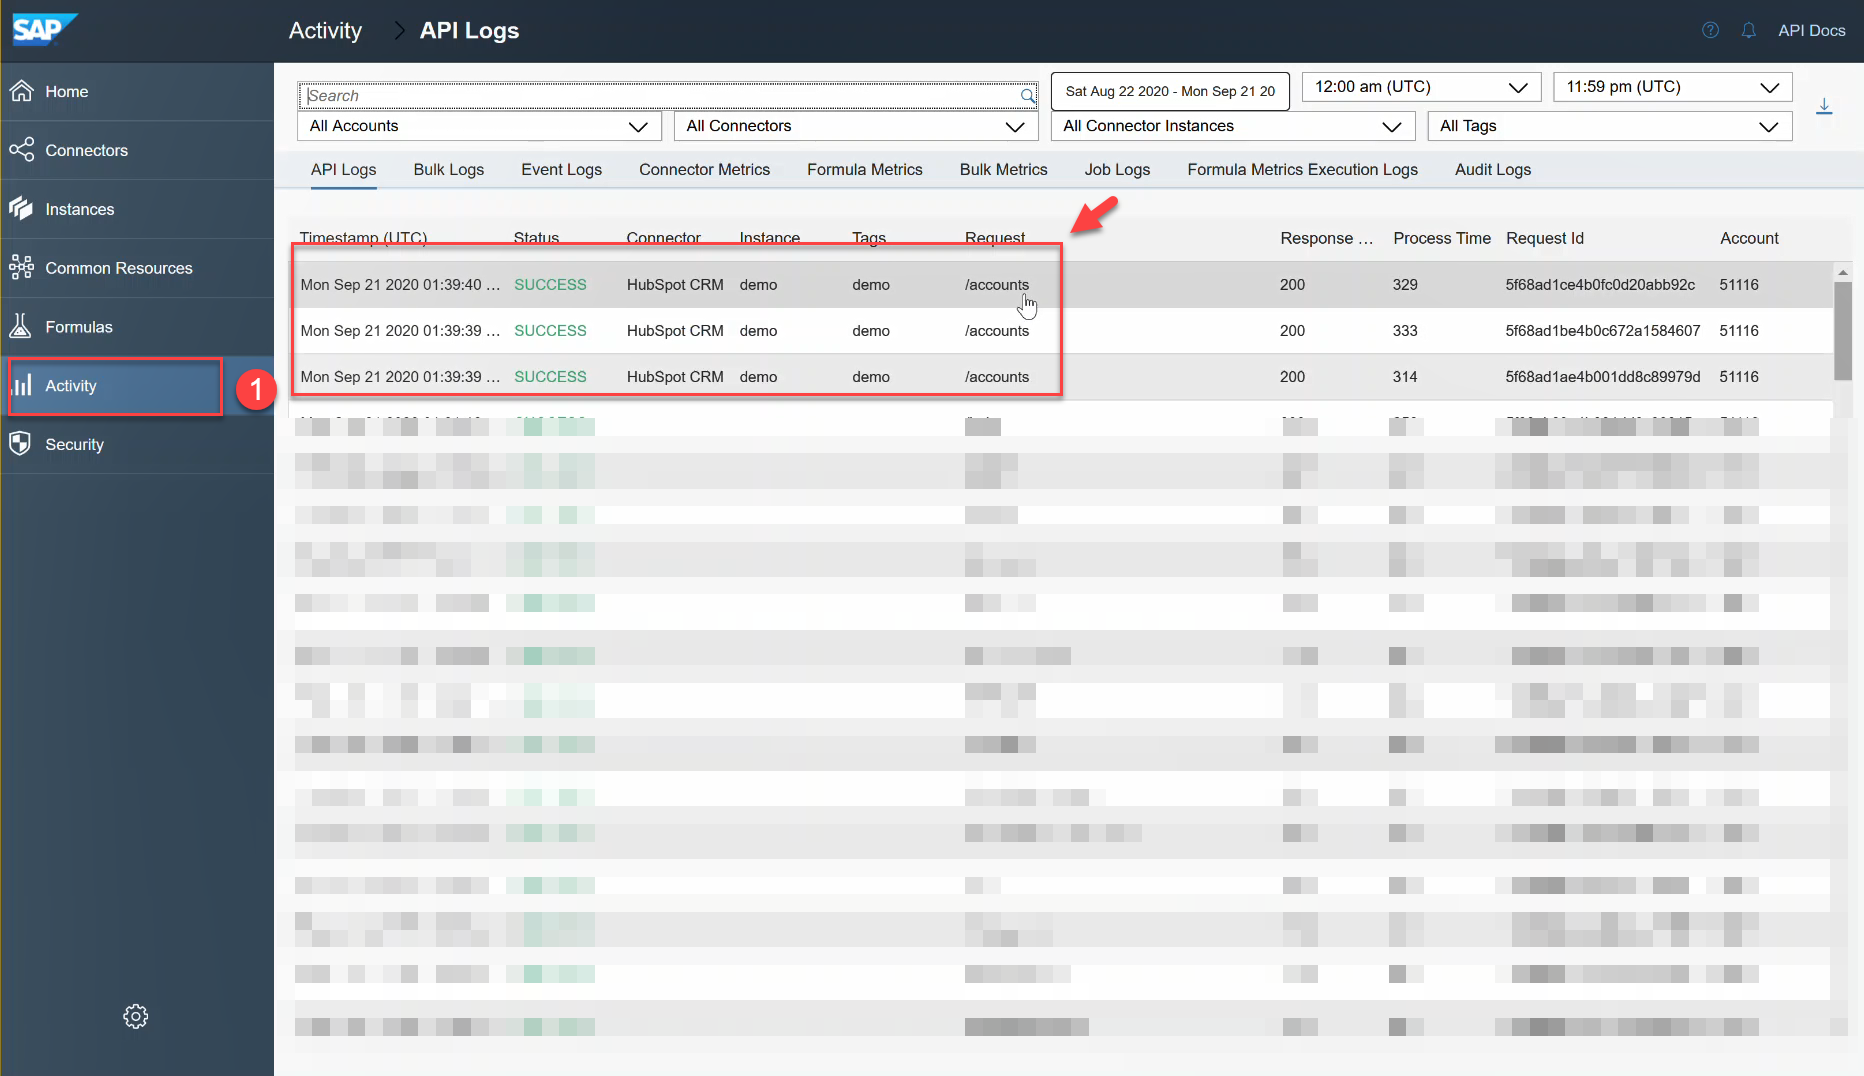
- To confirm, if the records where fetched in batches or via pagination. Navigate to the Activity tab of your Open Connectors tab and you can notice that incoming calls from Cloud Integration. In the demo system the number of records was 5 and the pageSize was set to 2 and therefore you can notice 3 calls in the Activity tab.
Using the harmonized pagination support across 160+ connectors provided by Open Connectors capability of Integration Suite you can leverage the approach outlined in this blog to fetch data from a Non-SAP system of your choice in batches and use it within your integration flows.
More blogs on SAP Cloud Platform Integration Suite available in SAP Community.
- SAP Managed Tags:
- SAP Integration Suite,
- Cloud Integration,
- Open Connectors
Labels:
2 Comments
You must be a registered user to add a comment. If you've already registered, sign in. Otherwise, register and sign in.
Labels in this area
-
ABAP CDS Views - CDC (Change Data Capture)
2 -
AI
1 -
Analyze Workload Data
1 -
BTP
1 -
Business and IT Integration
2 -
Business application stu
1 -
Business Technology Platform
1 -
Business Trends
1,661 -
Business Trends
88 -
CAP
1 -
cf
1 -
Cloud Foundry
1 -
Confluent
1 -
Customer COE Basics and Fundamentals
1 -
Customer COE Latest and Greatest
3 -
Customer Data Browser app
1 -
Data Analysis Tool
1 -
data migration
1 -
data transfer
1 -
Datasphere
2 -
Event Information
1,400 -
Event Information
64 -
Expert
1 -
Expert Insights
178 -
Expert Insights
281 -
General
1 -
Google cloud
1 -
Google Next'24
1 -
Kafka
1 -
Life at SAP
784 -
Life at SAP
11 -
Migrate your Data App
1 -
MTA
1 -
Network Performance Analysis
1 -
NodeJS
1 -
PDF
1 -
POC
1 -
Product Updates
4,577 -
Product Updates
330 -
Replication Flow
1 -
RisewithSAP
1 -
SAP BTP
1 -
SAP BTP Cloud Foundry
1 -
SAP Cloud ALM
1 -
SAP Cloud Application Programming Model
1 -
SAP Datasphere
2 -
SAP S4HANA Cloud
1 -
SAP S4HANA Migration Cockpit
1 -
Technology Updates
6,886 -
Technology Updates
408 -
Workload Fluctuations
1
Related Content
- It’s Official - SAP BTP is Again a Leader in G2’s Reports in Technology Blogs by SAP
- SAP HANA Cloud Vector Engine: Quick FAQ Reference in Technology Blogs by SAP
- 10+ ways to reshape your SAP landscape with SAP Business Technology Platform - Blog 7 in Technology Blogs by SAP
- 10+ ways to reshape your SAP landscape with SAP BTP - Blog 4 Interview in Technology Blogs by SAP
- 10+ ways to reshape your SAP landscape with SAP Business Technology Platform – Blog 4 in Technology Blogs by SAP
Top kudoed authors
| User | Count |
|---|---|
| 13 | |
| 10 | |
| 10 | |
| 7 | |
| 6 | |
| 5 | |
| 5 | |
| 5 | |
| 5 | |
| 4 |