
- SAP Community
- Products and Technology
- Technology
- Technology Blogs by SAP
- Create First Project using SAP Cloud Services (SAP...
Technology Blogs by SAP
Learn how to extend and personalize SAP applications. Follow the SAP technology blog for insights into SAP BTP, ABAP, SAP Analytics Cloud, SAP HANA, and more.
Turn on suggestions
Auto-suggest helps you quickly narrow down your search results by suggesting possible matches as you type.
Showing results for
former_member68
Explorer
Options
- Subscribe to RSS Feed
- Mark as New
- Mark as Read
- Bookmark
- Subscribe
- Printer Friendly Page
- Report Inappropriate Content
09-23-2020
9:38 AM
This is the second part of Create First Project using SAP Cloud Services (SAP Web IDE & SAP HANA Database). In this part, we will try to cover the development of Database and OData services using SAP HANA Service of SAP Cloud Platform. If you didn’t go through the first part of this article, I suggest you do so. This will give you an overview of what we want to achieve in this part and why we are doing that, as the overall objective and boost your understanding of the topic.
Let’s Begin the Development:
Now, start thinking like a developer and try to decide by yourself what you want to develop first. For me, I am going to follow the bottom-up approach, for which I need to modularize my development and start developing the project from the very bottom:
Steps I will follow to develop the Project:
Development of HANA Database:
Select the SAP HANA Database Service, it will lead you to a Service Home page, from there you can click on the “Go to Service” Button.
Those who come on this page for the very first time will see the page as blank, others if they have any database schema created will see the list of schemas in the table.
Step1: Create New Schema for your project by clicking on the New Button.
Step2: A popup will show up (shown below), fill the popup as per the requirement, and make sure to remember your details properly for later use.
Note: For now, take parameters as Web Access - ON and DP Server – OFF
Step3: After filling all the details properly press Create Button. This will take little time to create the Database Schema and spaces for your database in the Database Management System. This process will create your schema in the list.
Step4: Open your Database schema by clicking on the schema name. Now the below screen will show up, where we have different options, we will go through each option one by one in brief.
Step5: Open the Administrative tools (SAP HANA Cockpit) to get the developer-related roles for the development of the database table and service in the development tool for our project. Select Manage Roles and Users and then in the SYSTEM option you can add several roles related to Catalog Developer and Editor Developer, given below:
Step6: After getting the Roles, go back to the schema detail page and open the Development Tools with the same Username and Password we mentioned above, if asked.
Step7: Here we will find 4 tiles related to the development, if you want you can explore each tile but currently, we are interested in just two tiles, i.e. Editor and Catalog tile.
Step8: First Click on the Catalog tile to create our project related table in the SYSTEM folder. For the Employee Detail Project, I am going to create only one table by writing a SQL Query to create the table in SQL Panel (to open SQL panel click on the SQL button in the Catalog Workbench menu bar), after saving the SQL Query the Table gets created in the Tables folder.
You can Execute the Query directly to create the table.
Note: You can go with the simple SQL query and slowly you can start exploring advance, by yourself.
Note: You can find your table in CATALOG>SYSTEM>TABLES Folder
Note: As HANA supports both ROW & COLUMN based architecture for table creation, I am going with the Column Based which is a plus in HANA Database.
Fig: Table Schema
After table creation, create few records in the table. HANA workbench will provide you an easy way to create the records, but I recommend you try creating records using SQL query.
Step9: Creating OData Service to expose our Database table, after that we will use the OData service link to create the connection in our UI Application. For this step, we need to move from Catalog Workbench to the Editor Workbench.
On the home screen, you will find default packages inside the Content Folder. There We need to create one more package to encapsulate all project-related files.
Here in this package we need to create 3 files (.xsaccess | .xsapp | EmployeeDetail.xsodata). If you want to learn more about these files, let me know in the comments, I will try to create a separate article for that only. But for now, I will cover just the basics of what we want to do to create the OData service and exposing it.
Syntax (for line number 2): <SCHEMA>.<TABLE_NAME>
After the creation of all the 3 files, we need to create the OData service link by executing the “EmployeeDetails.xsodata” file (Click on Execution button). This process will create a link that will act as the REST API for you.
Till now, we are done creating the Table for our first full-stack development project. During this journey, we covered the Analysis & Design Phase, Database development, and OData Service Creation. Now, In the next part, I will be focused on the consumption of the OData services in our UI Application.
But before going forward, I would like to recommend you learn few more things on your own, which will give you more understanding of the technologies, we are using in creating our first full-stack development project. I am listing a few of the topics below for your betterment:
I will continue this article in part III of Create First Project using SAP Cloud Services (SAP Web IDE & HANA Database), where we will try to understand and create the connectivity between the OData service we created and the UI Application. And then we will start building the user interface for our application.
#Regards
Tanuj Sharma
Let’s Begin the Development:
Now, start thinking like a developer and try to decide by yourself what you want to develop first. For me, I am going to follow the bottom-up approach, for which I need to modularize my development and start developing the project from the very bottom:
Steps I will follow to develop the Project:
- Development of SAP HANA Database
- Development of Database Tables
- Development of OData Services and Entities for the Database Table
- Expose the OData Services
- Then establish the Connectivity between the UI and OData Services
- And then the User Interface & Its functionality
Development of HANA Database:
Select the SAP HANA Database Service, it will lead you to a Service Home page, from there you can click on the “Go to Service” Button.
Those who come on this page for the very first time will see the page as blank, others if they have any database schema created will see the list of schemas in the table.

Step1: Create New Schema for your project by clicking on the New Button.
Step2: A popup will show up (shown below), fill the popup as per the requirement, and make sure to remember your details properly for later use.

Note: For now, take parameters as Web Access - ON and DP Server – OFF
Step3: After filling all the details properly press Create Button. This will take little time to create the Database Schema and spaces for your database in the Database Management System. This process will create your schema in the list.

Step4: Open your Database schema by clicking on the schema name. Now the below screen will show up, where we have different options, we will go through each option one by one in brief.

- The system gets started and it will be active for the next 11 hours and 39 minutes as shown, then after it will get stop automatically and we must come back and start the database system again.
- If you want to stop the system you can do that by pressing the Stop button.
- For deleting the current database schema, we will click on the delete button which will clear up all the space and delete the current schema, we are in.
- In the Detail section, we have 3 links which will lead to different tools. If you want to learn more then I recommend you explore Education Tools, but for this project, I will be only working with Administration and Development tools.
- As the name suggests Administration tool will provide us admin related functionality, for example: if we want some roles then we will have that using Administration tools.
- Development Tools will help us to create a database table and we will expose our tables to the outer world using the OData service in this.
- To access these tools system will ask you to provide the Username and Password

Provide Username: SYSTEM (all in capital letters)
Password: Same password you created while creating the database schema
Step5: Open the Administrative tools (SAP HANA Cockpit) to get the developer-related roles for the development of the database table and service in the development tool for our project. Select Manage Roles and Users and then in the SYSTEM option you can add several roles related to Catalog Developer and Editor Developer, given below:
 Fig: Steps to add roles for the development

Fig: Roles to be added
Step6: After getting the Roles, go back to the schema detail page and open the Development Tools with the same Username and Password we mentioned above, if asked.
Step7: Here we will find 4 tiles related to the development, if you want you can explore each tile but currently, we are interested in just two tiles, i.e. Editor and Catalog tile.

Step8: First Click on the Catalog tile to create our project related table in the SYSTEM folder. For the Employee Detail Project, I am going to create only one table by writing a SQL Query to create the table in SQL Panel (to open SQL panel click on the SQL button in the Catalog Workbench menu bar), after saving the SQL Query the Table gets created in the Tables folder.


You can Execute the Query directly to create the table.
Note: You can go with the simple SQL query and slowly you can start exploring advance, by yourself.
Note: You can find your table in CATALOG>SYSTEM>TABLES Folder
Note: As HANA supports both ROW & COLUMN based architecture for table creation, I am going with the Column Based which is a plus in HANA Database.
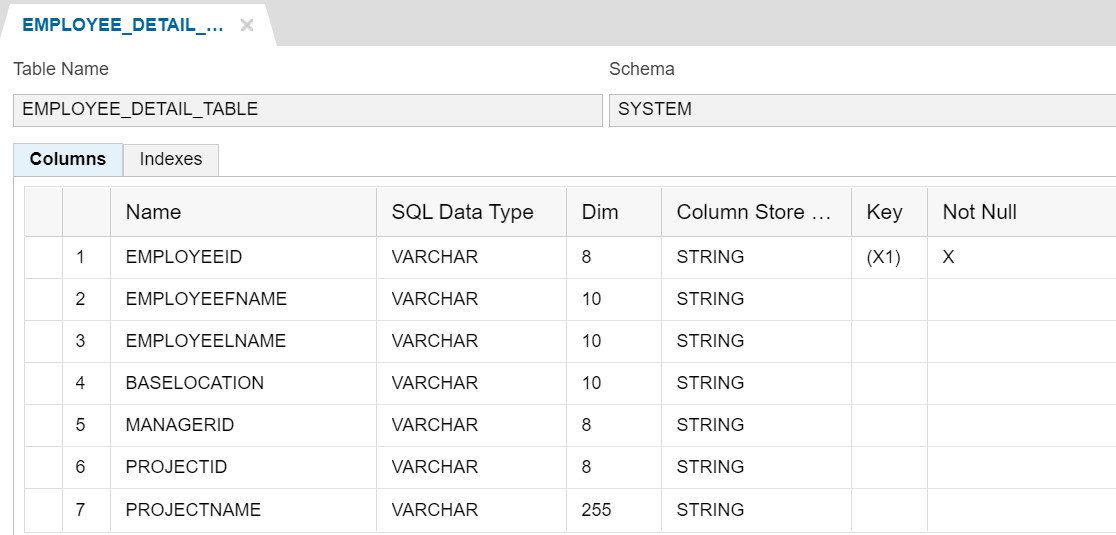
Fig: Table Schema
After table creation, create few records in the table. HANA workbench will provide you an easy way to create the records, but I recommend you try creating records using SQL query.
Step9: Creating OData Service to expose our Database table, after that we will use the OData service link to create the connection in our UI Application. For this step, we need to move from Catalog Workbench to the Editor Workbench.
On the home screen, you will find default packages inside the Content Folder. There We need to create one more package to encapsulate all project-related files.
- Right-click on Content>New>Package.
- Provide the basic details in the popup and press Create Button.

Here in this package we need to create 3 files (.xsaccess | .xsapp | EmployeeDetail.xsodata). If you want to learn more about these files, let me know in the comments, I will try to create a separate article for that only. But for now, I will cover just the basics of what we want to do to create the OData service and exposing it.
- .xsaccess File: This file will enable access to SAP HANA XS Application, by default value will come as false, make that value as true.

- .xsapp File: This is an SAP HANA XS Application Descriptor, which contains no data in it.

- .xsodata File: This file will help us to create the OData service for the mentioned database table in it. You can give any name to this file with the “.xsodata” extension.

Syntax (for line number 2): <SCHEMA>.<TABLE_NAME>
After the creation of all the 3 files, we need to create the OData service link by executing the “EmployeeDetails.xsodata” file (Click on Execution button). This process will create a link that will act as the REST API for you.

Till now, we are done creating the Table for our first full-stack development project. During this journey, we covered the Analysis & Design Phase, Database development, and OData Service Creation. Now, In the next part, I will be focused on the consumption of the OData services in our UI Application.
But before going forward, I would like to recommend you learn few more things on your own, which will give you more understanding of the technologies, we are using in creating our first full-stack development project. I am listing a few of the topics below for your betterment:
- Hasso’s New Architecture (HANA)
- Relational Database Model
- Normalization (1NF-2NF-3NF-BCNF)
- MVC Framework (Model-View-Controller)
- POSTMEN & Basic of REST Architecture
- DOM (Document Object Model)
I will continue this article in part III of Create First Project using SAP Cloud Services (SAP Web IDE & HANA Database), where we will try to understand and create the connectivity between the OData service we created and the UI Application. And then we will start building the user interface for our application.
#Regards
Tanuj Sharma
- SAP Managed Tags:
- ABAP Development,
- SAPUI5,
- SAP HANA,
- SAP Business Technology Platform
Labels:
You must be a registered user to add a comment. If you've already registered, sign in. Otherwise, register and sign in.
Labels in this area
-
ABAP CDS Views - CDC (Change Data Capture)
2 -
AI
1 -
Analyze Workload Data
1 -
BTP
1 -
Business and IT Integration
2 -
Business application stu
1 -
Business Technology Platform
1 -
Business Trends
1,658 -
Business Trends
91 -
CAP
1 -
cf
1 -
Cloud Foundry
1 -
Confluent
1 -
Customer COE Basics and Fundamentals
1 -
Customer COE Latest and Greatest
3 -
Customer Data Browser app
1 -
Data Analysis Tool
1 -
data migration
1 -
data transfer
1 -
Datasphere
2 -
Event Information
1,400 -
Event Information
66 -
Expert
1 -
Expert Insights
177 -
Expert Insights
296 -
General
1 -
Google cloud
1 -
Google Next'24
1 -
Kafka
1 -
Life at SAP
780 -
Life at SAP
13 -
Migrate your Data App
1 -
MTA
1 -
Network Performance Analysis
1 -
NodeJS
1 -
PDF
1 -
POC
1 -
Product Updates
4,577 -
Product Updates
342 -
Replication Flow
1 -
RisewithSAP
1 -
SAP BTP
1 -
SAP BTP Cloud Foundry
1 -
SAP Cloud ALM
1 -
SAP Cloud Application Programming Model
1 -
SAP Datasphere
2 -
SAP S4HANA Cloud
1 -
SAP S4HANA Migration Cockpit
1 -
Technology Updates
6,873 -
Technology Updates
420 -
Workload Fluctuations
1
Related Content
- CAP Autentication error in Technology Q&A
- What’s new in Mobile development kit client 24.4 in Technology Blogs by SAP
- How to use AI services to translate Picklists in SAP SuccessFactors - An example in Technology Blogs by SAP
- SAP CAP: Controller - Service - Repository architecture in Technology Blogs by Members
- Improving Time Management in SAP S/4HANA Cloud: A GenAI Solution in Technology Blogs by SAP
Top kudoed authors
| User | Count |
|---|---|
| 36 | |
| 25 | |
| 17 | |
| 13 | |
| 8 | |
| 7 | |
| 7 | |
| 6 | |
| 6 | |
| 6 |