Developers can extend the functionality of SAP Fiori Launchpad using Shell Plugins. The concept of plugins allows SAP Fiori implementers to hook into the Launchpad Shell and add new elements like menu items, custom footers, header extensions and many more.
In this blog post I will show you how to extend your SAP Fiori Launchpad on SAP BTP (Multi-Cloud Environment) via a HTML5 Application/Shell Plugin managed by SAP BTP (Multi-Cloud Environment).
In this example we will add a button to the SAP Fiori Launchpad header, which opens a pop-up with some basic information.
Following steps are necessary to deploy your shell plugin successfully to SAP BTP (Multi-Cloud Environment).
You can find the Source Code in this
GIT Repository.
1. Open the SAP Business Application Studio
Open the SAP Business Application Studio in your SAP BTP (Multi-Cloud Environment) Subaccount.

Create a new Dev Space and select “SAP Fiori” for application type and click on the created item header afterwards.


2. Create the Shell Plugin Project
Select “Create project from template”. Choose “SAP Fiori Freestyle – Project Generator” and confirm with “Next”.


Select “Cloud Foundry” as target running environment and choose “SAPUI5 Application”.

Enter a Project Name and continue with “Next”.

Select “Managed by SAP Cloud Platform” as HTML5 application and enter a service name.

Enter some basic attributes.

Enter a view name.

Create the project and select “Open in New Workspace” afterwards.

3. Modify the created project to use it as a Shell Plugin
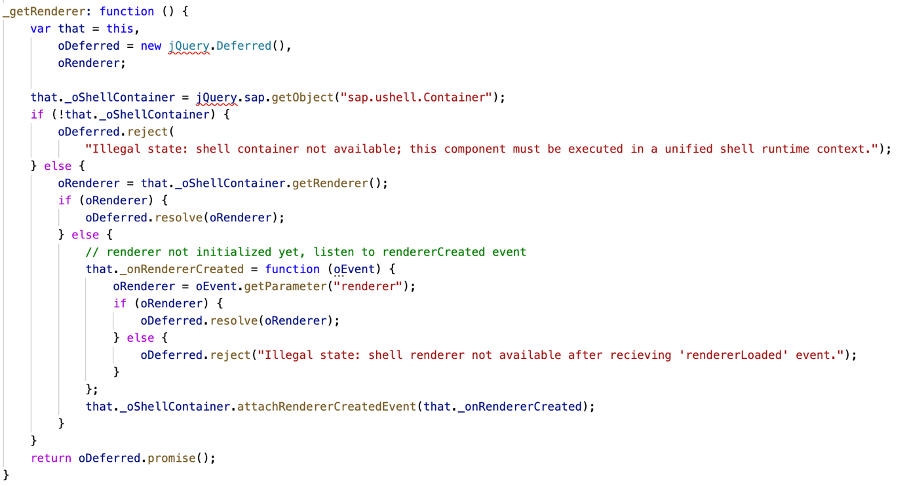
Please develop your own custom Shell Plugin code in the component.js file.
For my example you can modify the “init” Method as well as the Method “_getRenderer”.

Please also adjust the “manifest.json” as follows:

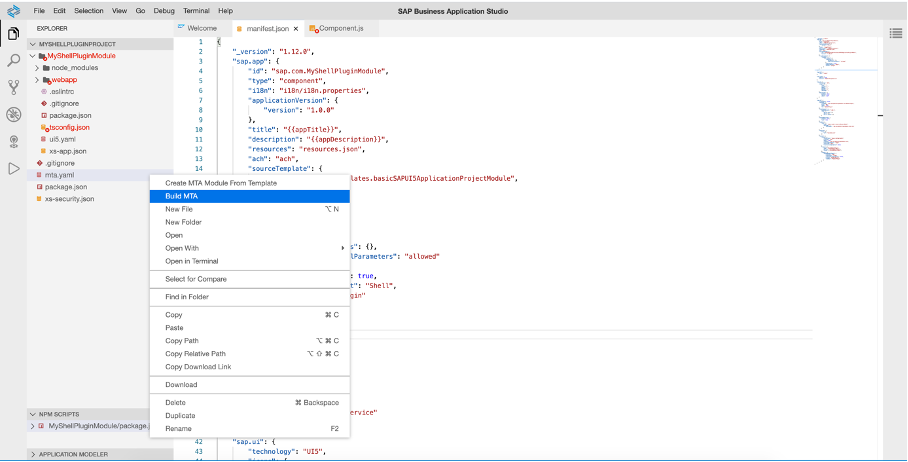
4. Build and deploy your Multi Target Application
Right click on “mta.yaml” and select “Build MAT”.
The folder “mta_archives” is created automatically. Please select the .mtar file and select “Deploy MTA Archive”.

Enter the Cloud Foundry endpoint, followed by username and password. Afterwards please select the organization and your space.

5. Check if deployment process was successful
Please go back to the SAP BTP (Multi-Cloud Environment) Cockpit and check if the following was created:
5.1 Service instances in your selected space


5.2 Destination

6. Assign your Shell Plugin to a SAP Fiori Launchpad
Open your Site-Manager and navigate to the Provider-Manager. Please refresh the “HTML5 Apps” content provider.


Afterwards you can see your Shell Plugin in the “Content-Explorer” and you can add it to your content.

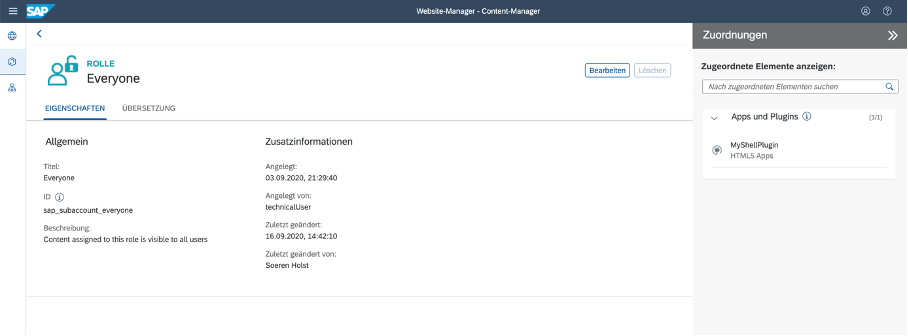
Assign your Shell Plugin to the “Everyone” Role.

Please create a new Website (or choose an existing one).

Open the URL. You will see an additional button in the Shell Header.

I hope this blog post provides the necessary information to develop and deploy your Shell Plugins successful to SAP BTP (Multi-Cloud Environment). Please leave a comment if you have further questions.
If you prefer using Web IDE please check
this blog post.
