
- SAP Community
- Products and Technology
- Technology
- Technology Blogs by SAP
- Use CAP to expose HANA Cloud tables as OData servi...
Technology Blogs by SAP
Learn how to extend and personalize SAP applications. Follow the SAP technology blog for insights into SAP BTP, ABAP, SAP Analytics Cloud, SAP HANA, and more.
Turn on suggestions
Auto-suggest helps you quickly narrow down your search results by suggesting possible matches as you type.
Showing results for
former_member43
Contributor
Options
- Subscribe to RSS Feed
- Mark as New
- Mark as Read
- Bookmark
- Subscribe
- Printer Friendly Page
- Report Inappropriate Content
09-08-2020
5:28 AM
When you want to expose data residing into a HANA database to the outside world, the recommended best practice is to use OData.
Recently, SAP started promoting a new Cloud Application Programming model (CAP). The SAP Cloud Application Programming model is a framework of languages, libraries, and tools for building enterprise-grade services and applications. It guides developers along a ‘golden path’ of proven best practices and a great wealth of out-of-the-box solutions to recurring tasks.
CAP-based projects benefit from a primary focus on domain. Instead of delving into overly technical disciplines.
In this blog, I will use the SAP Cloud Application Programming Model to create tables on SAP HANA Cloud, and expose these tables as OData services.With this method, data is exposed using OData v4.0. As opposed to the traditional xsodata method, where data is exposed using OData v2.0.
When your HANA Cloud instance is set up, and you are ready to start, open the subscriptions in your subaccount and click on SAP Business Application Studio.
Create a new Dev space.
Select the SAP Cloud Business Application Template and provide a name for your Dev Space.
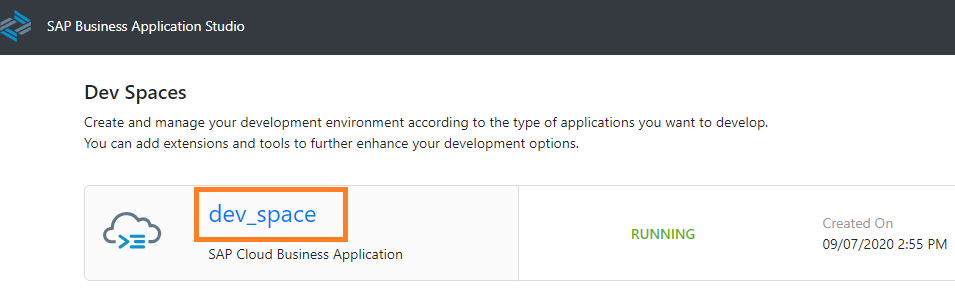
Wait until the status changes from Starting to Running, then click on the tile with the Dev Space name. In the background, the Dev Space has been prepared with all of the necessary components that you would otherwise have to install on your laptop. For example, Node JS, CDS, etc.
Now we have our Business Application Studio started, configured and ready for use. On the Welcome tab, click on "Create project from template".
Select the @Sap/cap Project template.
Check the hana box in order to include SAP HANA-related features in your project.
Behind the scenes, your project will be generated. Once complete, the screen will return and you will see a pop-up message box in the bottom right to open a workspace with your project. Click on the Open in New Workspace button.
The editor will reopen in a new workspace and now you can start creating.
Notice the blue bar at the bottom of your screen that the Space has not been set with Cloud Foundy.
Click on this bar to connect Business Application Studio to the space where you want to deploy your OData service.
Insert the Cloud foundry endpoint, then enter your credentials and select the space in which you want to work.
Business Application Studio is now connected to your Cloud Foundry space, let's create objects in your database model.
From the File Structure on the left, right-click on the db folder and create a new file ending with .cds .
I call mine schema.cds . The name of the file can be anything, this file will define all objects(tables, views) deployed in your HANA database.
Within the new schema.cds, create your first CAP Structure :
In this example, we are defining a namespace scp.cloud.
We then call the library @sap/cds/common and use the cuid aspect. It automatically defines an ID column for us in the entity SafetyIncidents. Learn more about aspects in the CAP documentation.
An entity defined in CAP will be deployed as a table in your database.
Open a terminal window by going to the Top Menu and selecting Terminal -> New Terminal.
Within your project folder, execute the command npm install
Now we will introduce you to a very useful command: cds watch .
Whenever you feed your project with new content, for example, by adding or modifying .cds , .json , or .js files, the server automatically restarts to serve the new content.
Execute
As long as that command is running, each time you change the project structure, it will automatically save and redeploy those project changes.

After a few seconds, the cds watch command generates your OData service.
It also creates the table from schema.cds in an SQLite database within your development environment.
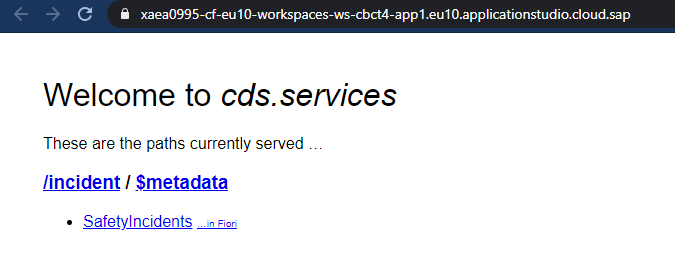
Click on the button Expose and Open to see if your initial empty service gets rendered in the browser window.
It is still empty now.
Now that we have an entity for
Within
The first line references the schema.cds file we created earlier. The second line exposes cloud.SafetyIncidents as an OData service called Incident Service.
If you closed your preview tab, you can always re-open it by clicking on view: find commands, then searching for the command Ports: Preview . This will open a preview of the currently exposed ports.
Now let's insert some data into our table. Start by creating a new folder called data within the db folder.
Within that folder, create a file called
The file name has to match the name space (scp.cloud) and the entity name (SafetyIncidents) where you want to insert data.
Double check as shown in the screenshot that you have the right spelling of the data folder under the db folder and that the filename is spelt correctly. Make sure that the column names are correct in the actual csv file.
If the cds watch is still running, stop it once and execute cds run in the terminal to ensure data is imported into your SQLite table.
The message > filling scp.cloud.SafetyIncidents from db/data/scp.cloud.SafetyIncidents.csv tells you that data is being imported.
Now that's it running, you can open the service and click on the SafetyIncidents entry, you should see the following data:
You now have a table deployed on your SQLite database within your development environment, filled with some test data. This table is exposed through an OData service which can be accessed from outside through REST calls.
Now that you have the backend services running on SQLite in a local environment, it's time to get this project running on SAP HANA Cloud.
On SAP HANA Cloud, CDS models are deployed through the
Add the following line in the "cds" section of package.json.
Your code should be similar to this screenshot :
Within the Node.JS world, there is an environment variable called NODE_ENV. Until now we have been using the "development" environment. It is time to switch that variable to "production". It will affect the way that CDS behave. In order to deploy your project to SAP BTP, the following commands must be run from the Terminal window.
This command will build all of the relevant HANA artifacts and place them in a newly created folder that you should now see called gen. If you expland it, you should see 2 folders DB and SRV. As you might expect, if you drill into the DB folder, you will see the HANA DB artifacts and if you drill into the SRV, there are new files in there as well.
Once the build process has completed, you will now execute 3 commands in succession in order to (1)create the HANA Deployment Infrastructure (HDI) container on Cloud Foundry, (2)deploy the HANA Artifacts and (3)deploy the SRV Artifacts.
Notice that in your terminal, the build process tells you which command you need to run in order to create the HDI container.
Execute the following command:
(The creation of the container can take a few minutes, you should wait before executing the next step!)
This will create a HDI container called cap_project-db.
Note: On the screenshot below, I run the command
Use the parameter hana to deploy on HANA Cloud.
This will deploy the generated
The HDI container creation takes a couple of minutes,
Execute the following command:
This will deploy the Node.JS application exposing your OData service.
If all three of the last commands executed correctly, you should see a route specified towards the bottom of the terminal window. The use of the word option
Once you find the route name that was generated uniquely for you, you can paste that URL into a browser to validate that it is running and available on the internet.
Open a web browser, paste your newly created route and you should see a familiar screen that looks like this when you open your entity. This fully deployed service is now available on the internet and using SAP HANA Cloud as a persistence layer.
Good job, you just deployed an OData service on SAP HANA Cloud !
If you want to build a more complex OData service, here are some ideas to start. I will use this service in my next blog where I create a Fiori UI to create an application where users can report Safety Incidents. Explore the entity definitions below and the CAP Documentation to learn how CAP makes your life easier.
Replace your
Replace your
Find here a few more advanced examples of using CAP to develop applications :
Maxime SIMON
Recently, SAP started promoting a new Cloud Application Programming model (CAP). The SAP Cloud Application Programming model is a framework of languages, libraries, and tools for building enterprise-grade services and applications. It guides developers along a ‘golden path’ of proven best practices and a great wealth of out-of-the-box solutions to recurring tasks.
CAP-based projects benefit from a primary focus on domain. Instead of delving into overly technical disciplines.
In this blog, I will use the SAP Cloud Application Programming Model to create tables on SAP HANA Cloud, and expose these tables as OData services.With this method, data is exposed using OData v4.0. As opposed to the traditional xsodata method, where data is exposed using OData v2.0.
 References :
Combine CAP with SAP HANA Cloud to Create Full-Stack Applications
SAP Experience academy (SAP Internal)
CAP Getting started guide
Prerequisites
- Free Trial account of SAP BTP with SAP HANA Cloud and Business Application Studio.
Get your development environment ready
When your HANA Cloud instance is set up, and you are ready to start, open the subscriptions in your subaccount and click on SAP Business Application Studio.

Create a new Dev space.

Select the SAP Cloud Business Application Template and provide a name for your Dev Space.

Wait until the status changes from Starting to Running, then click on the tile with the Dev Space name. In the background, the Dev Space has been prepared with all of the necessary components that you would otherwise have to install on your laptop. For example, Node JS, CDS, etc.
Create a CAP Project from a template
Now we have our Business Application Studio started, configured and ready for use. On the Welcome tab, click on "Create project from template".

Select the @Sap/cap Project template.

Check the hana box in order to include SAP HANA-related features in your project.

Behind the scenes, your project will be generated. Once complete, the screen will return and you will see a pop-up message box in the bottom right to open a workspace with your project. Click on the Open in New Workspace button.

The editor will reopen in a new workspace and now you can start creating.
Notice the blue bar at the bottom of your screen that the Space has not been set with Cloud Foundy.
Click on this bar to connect Business Application Studio to the space where you want to deploy your OData service.

Insert the Cloud foundry endpoint, then enter your credentials and select the space in which you want to work.

Create your database model
Business Application Studio is now connected to your Cloud Foundry space, let's create objects in your database model.
From the File Structure on the left, right-click on the db folder and create a new file ending with .cds .
I call mine schema.cds . The name of the file can be anything, this file will define all objects(tables, views) deployed in your HANA database.

Within the new schema.cds, create your first CAP Structure :
namespace scp.cloud;


using {

  cuid,

  sap.common

} from '@sap/cds/common';


entity SafetyIncidents : cuid {

  title                  : String(50)                    @title : 'Title';

  description            : String(1000)                  @title : 'Description';

}
In this example, we are defining a namespace scp.cloud.
We then call the library @sap/cds/common and use the cuid aspect. It automatically defines an ID column for us in the entity SafetyIncidents. Learn more about aspects in the CAP documentation.
An entity defined in CAP will be deployed as a table in your database.
Open a terminal window by going to the Top Menu and selecting Terminal -> New Terminal.

Within your project folder, execute the command npm install

Now we will introduce you to a very useful command: cds watch .
Whenever you feed your project with new content, for example, by adding or modifying .cds , .json , or .js files, the server automatically restarts to serve the new content.
Execute
cds watch in the terminal window.As long as that command is running, each time you change the project structure, it will automatically save and redeploy those project changes.
After a few seconds, the cds watch command generates your OData service.
It also creates the table from schema.cds in an SQLite database within your development environment.
Click on the button Expose and Open to see if your initial empty service gets rendered in the browser window.

It is still empty now.

Expose an entity as an OData service
Now that we have an entity for
SafetyIncidents defined, you can easily add a service definition to expose it as an OData service. Lets do that now! Create a new file within the srv folder called incidentService.cds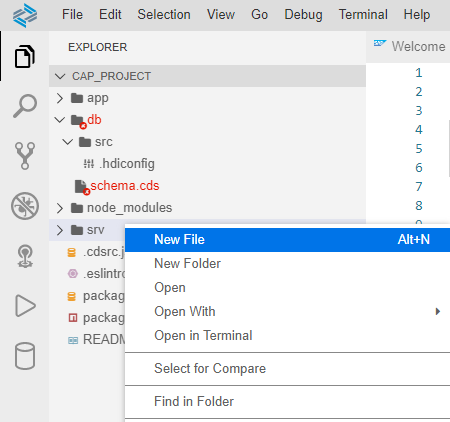
Within
incidentService.cds, enter the following code:using scp.cloud from '../db/schema';
service IncidentService {
entity SafetyIncidents as projection on cloud.SafetyIncidents;
}
The first line references the schema.cds file we created earlier. The second line exposes cloud.SafetyIncidents as an OData service called Incident Service.
If you closed your preview tab, you can always re-open it by clicking on view: find commands, then searching for the command Ports: Preview . This will open a preview of the currently exposed ports.

Now let's insert some data into our table. Start by creating a new folder called data within the db folder.

Within that folder, create a file called
scp.cloud.SafetyIncidents.csv with the following entries:ID;title;description
067460c5-196c-4783-9563-ede797399da8;Broken machine;The printing machine is leaking
efec3e9f-ceea-4d17-80a7-50073f71c322;Software bug;The computer is on fireThe file name has to match the name space (scp.cloud) and the entity name (SafetyIncidents) where you want to insert data.

Double check as shown in the screenshot that you have the right spelling of the data folder under the db folder and that the filename is spelt correctly. Make sure that the column names are correct in the actual csv file.
If the cds watch is still running, stop it once and execute cds run in the terminal to ensure data is imported into your SQLite table.
The message > filling scp.cloud.SafetyIncidents from db/data/scp.cloud.SafetyIncidents.csv tells you that data is being imported.

Now that's it running, you can open the service and click on the SafetyIncidents entry, you should see the following data:

You now have a table deployed on your SQLite database within your development environment, filled with some test data. This table is exposed through an OData service which can be accessed from outside through REST calls.
Deploy your data model and your OData service to SAP BTP
Now that you have the backend services running on SQLite in a local environment, it's time to get this project running on SAP HANA Cloud.
Quick recap
- A schema for the incident management application has been created
schema.cds - A service definition has been added to expose the correct entities
incidentService.cds - The SQLite node module let us run the application connected to SQLite with data loaded into a table
Prepare your project for HANA Cloud
On SAP HANA Cloud, CDS models are deployed through the
hdbtable and hdbview formats instead of hdbcds. Edit your package.json to set the deploy-format to hdbtable.Add the following line in the "cds" section of package.json.
"hana" : { "deploy-format": "hdbtable" }Your code should be similar to this screenshot :

Build your project
Within the Node.JS world, there is an environment variable called NODE_ENV. Until now we have been using the "development" environment. It is time to switch that variable to "production". It will affect the way that CDS behave. In order to deploy your project to SAP BTP, the following commands must be run from the Terminal window.
- Stop your running cds process with CTRL+C if it's already running.
- Execute :
export NODE_ENV=production - After this command runs successfully, execute :
cds build/all --clean

This command will build all of the relevant HANA artifacts and place them in a newly created folder that you should now see called gen. If you expland it, you should see 2 folders DB and SRV. As you might expect, if you drill into the DB folder, you will see the HANA DB artifacts and if you drill into the SRV, there are new files in there as well.
Create your HDI Container and deploy objects
Once the build process has completed, you will now execute 3 commands in succession in order to (1)create the HANA Deployment Infrastructure (HDI) container on Cloud Foundry, (2)deploy the HANA Artifacts and (3)deploy the SRV Artifacts.
Notice that in your terminal, the build process tells you which command you need to run in order to create the HDI container.
Execute the following command:
cf create-service hana hdi-shared cap_project-db(The creation of the container can take a few minutes, you should wait before executing the next step!)
This will create a HDI container called cap_project-db.
Note: On the screenshot below, I run the command
cf create-service hanatrial hdi-shared cap_project-db: I am actually deploying on "HANA as a Service".Use the parameter hana to deploy on HANA Cloud.

Execute the following command: cf push -f gen/db -k 256M
This will deploy the generated
hdbtable and hdbview objects to your HDI Container.The HDI container creation takes a couple of minutes,

Execute the following command:
cf push -f gen/srv --random-route -k 320MThis will deploy the Node.JS application exposing your OData service.

If all three of the last commands executed correctly, you should see a route specified towards the bottom of the terminal window. The use of the word option
--random-route directs the process to create a random URL.Once you find the route name that was generated uniquely for you, you can paste that URL into a browser to validate that it is running and available on the internet.

Open a web browser, paste your newly created route and you should see a familiar screen that looks like this when you open your entity. This fully deployed service is now available on the internet and using SAP HANA Cloud as a persistence layer.

Good job, you just deployed an OData service on SAP HANA Cloud !
Expore further
If you want to build a more complex OData service, here are some ideas to start. I will use this service in my next blog where I create a Fiori UI to create an application where users can report Safety Incidents. Explore the entity definitions below and the CAP Documentation to learn how CAP makes your life easier.
Replace your
schema.cds file with the following code:namespace scp.cloud;
using {
cuid,
managed,
sap.common
} from '@sap/cds/common';
entity SafetyIncidents : cuid, managed {
title : String(50) @title : 'Title';
category : Association to Category @title : 'Category';
priority : Association to Priority @title : 'Priority';
incidentStatus : Association to IncidentStatus @title : 'IncidentStatus';
description : String(1000) @title : 'Description';
incidentResolutionDate : Date @title : 'ResolutionDate';
assignedIndividual : Association to Individual;
incidentPhotos : Association to many IncidentPhotos
on incidentPhotos.safetyIncident = $self;
incidentHistory : Association to many IncidentHistory
on incidentHistory.safetyIncident = $self;
}
entity Individual : cuid, managed {
firstName : String @title : 'First Name';
lastName : String @title : 'Last Name';
emailAddress : String @title : 'Email Address';
safetyIncidents : Association to many SafetyIncidents
on safetyIncidents.assignedIndividual = $self;
}
entity IncidentHistory : cuid, managed {
oldStatus : Association to IncidentStatus @title : 'OldCategory';
newStatus : Association to IncidentStatus @title : 'NewCategory';
safetyIncident : Association to SafetyIncidents;
}
entity IncidentPhotos : cuid, managed {
@Core.IsMediaType : true imageType : String;
@Core.MediaType : ImageType image : LargeBinary;
safetyIncident : Association to SafetyIncidents;
}
entity IncidentsCodeList : common.CodeList {
key code : String(20);
}
entity Category : IncidentsCodeList {}
entity Priority : IncidentsCodeList {}
entity IncidentStatus : IncidentsCodeList {}Replace your
incidentService.cds with the following code:using scp.cloud from '../db/schema';
service IncidentService {
entity SafetyIncidents as projection on cloud.SafetyIncidents {*,assignedIndividual: redirected to Individual };
entity Individual as projection on cloud.Individual {*,safetyIncidents : redirected to SafetyIncidents};
entity SafetyIncidentsNoImages as projection on cloud.SafetyIncidents{ID ,createdAt, priority, incidentStatus,description};
entity IncidentPhotos as projection on cloud.IncidentPhotos {*,safetyIncident : redirected to SafetyIncidents};
entity IncidentHistory as projection on cloud.IncidentHistory {*,safetyIncident : redirected to SafetyIncidents};
entity IncidentsByCategory as select from cloud.SafetyIncidents {count(ID) as categories:Integer,key category} Group By category;
@readonly entity Category as projection on cloud.Category;
@readonly entity Priority as projection on cloud.Priority;
}Find here a few more advanced examples of using CAP to develop applications :
- Developing CAP applications in SAP Business Application Studio
- E2E: SAP BTP Internet of Things to SAP Analytics Cloud
- Developing a Fiori elements app with CAP and Fiori Tools
- Create Calculation views and OData services in a single project with HANA Cloud
- Architecting, Solutioning & Scaling Complex Apps using SAP BTP Extension Suite: Real Time CAPM Scena...
Maxime SIMON
- SAP Managed Tags:
- SAP HANA Cloud
Labels:
34 Comments
You must be a registered user to add a comment. If you've already registered, sign in. Otherwise, register and sign in.
Labels in this area
-
ABAP CDS Views - CDC (Change Data Capture)
2 -
AI
1 -
Analyze Workload Data
1 -
BTP
1 -
Business and IT Integration
2 -
Business application stu
1 -
Business Technology Platform
1 -
Business Trends
1,658 -
Business Trends
93 -
CAP
1 -
cf
1 -
Cloud Foundry
1 -
Confluent
1 -
Customer COE Basics and Fundamentals
1 -
Customer COE Latest and Greatest
3 -
Customer Data Browser app
1 -
Data Analysis Tool
1 -
data migration
1 -
data transfer
1 -
Datasphere
2 -
Event Information
1,400 -
Event Information
66 -
Expert
1 -
Expert Insights
177 -
Expert Insights
299 -
General
1 -
Google cloud
1 -
Google Next'24
1 -
Kafka
1 -
Life at SAP
780 -
Life at SAP
13 -
Migrate your Data App
1 -
MTA
1 -
Network Performance Analysis
1 -
NodeJS
1 -
PDF
1 -
POC
1 -
Product Updates
4,577 -
Product Updates
344 -
Replication Flow
1 -
RisewithSAP
1 -
SAP BTP
1 -
SAP BTP Cloud Foundry
1 -
SAP Cloud ALM
1 -
SAP Cloud Application Programming Model
1 -
SAP Datasphere
2 -
SAP S4HANA Cloud
1 -
SAP S4HANA Migration Cockpit
1 -
Technology Updates
6,873 -
Technology Updates
422 -
Workload Fluctuations
1
Related Content
- CAP Autentication error in Technology Q&A
- SAP HANA Cloud Vector Engine: Quick FAQ Reference in Technology Blogs by SAP
- Access Denied: 403 Error in SAP BTP / XSUAA issue in Technology Q&A
- Consuming SAP with SAP Build Apps - Connectivity options for low-code development - part 2 in Technology Blogs by SAP
- Upload Excel using SAP RAP Only in Technology Blogs by Members
Top kudoed authors
| User | Count |
|---|---|
| 39 | |
| 25 | |
| 17 | |
| 13 | |
| 7 | |
| 7 | |
| 7 | |
| 7 | |
| 6 | |
| 6 |