
- SAP Community
- Products and Technology
- Enterprise Resource Planning
- ERP Blogs by Members
- Tips & tricks Installing SAP Business One on HANA ...
Enterprise Resource Planning Blogs by Members
Gain new perspectives and knowledge about enterprise resource planning in blog posts from community members. Share your own comments and ERP insights today!
Turn on suggestions
Auto-suggest helps you quickly narrow down your search results by suggesting possible matches as you type.
Showing results for
dotpablo
Explorer
Options
- Subscribe to RSS Feed
- Mark as New
- Mark as Read
- Bookmark
- Subscribe
- Printer Friendly Page
- Report Inappropriate Content
09-08-2020
8:23 AM
Brief
The following blog post is oriented to show the process of installing SAP Business One on HANA 10 PL02 (latest version at the moment) and some tricks / tips associated when installing on AWS.
When we receive a Linux instance provisioned on AWS to install HANA, sometimes we have to consider some tasks that we must perform beforehand that will save us headaches at installation time.
Except for these considerations, the rest of the process is the standard dictated by the official administration guide of SAP Business One on HANA 10 at the time of writing the article.
For this purpose I will divide this process into phases:
PART I: Pre-installation
Before pre-installation, it is always good to review the following points (it has happened to me that the client may have forgotten one or more of them):
- Review the estimated minimum amount of memory that was obtained from sizing for the HANA server (free -g on the console will tell us how much we have).
Review the correct creation of the file systems at the HANA level.
Both Windows and HANA servers in the same VPC or internal network. - Each requirements demanded in the PAM
- Check that the provisioned instance is x64 architecture. It happened to me that the client provisioned an aarch64 architecture and could not do the installation. I realized when I was trying to decompress the software with SAPCAR and it was neither working nor able to run the software. The best thing then is to launch the lscpu command in the console and see that everything is OK.
By default AWS provisions the latest version of Linux SUSE for EC2 instances.
It happened to me that the client did not contemplate that (today) SAP Business One on HANA is not installed on SUSE 15 SP2, and when you try to install the SAP Business One's Linux components it gives this error:

Error with SUSE15 SP2
SAP Business One has some "backward" compatibility at the version level (see PAM), but not forward. So it is good practice to launch this simple command at the terminal and see if we are in the right version of the product:
![]()
The problem here is that you realize the "real problem"after having installed HANA and because of that, a lot of rework is generated and you have to start from scratch again since the client will have to provisioning a new instance with 15 SP1 SUSE image and we will have to reinstall everything again to the point that we arrived.
Then next thing to do is to install a series of libraries that by default in many hyperscalers (cloud providers) are not installed.
In the case of AWS particularly (which is the example I'll show below), we need to install the following:
To view minimal network features:
zypper install net-tools-deprecated
To avoid HANA installation error (Nota 2892338 - SAP HANA DB installation fails on SUSE 15 SP01):
zypper install insserv
Install xrdp (graphical remote access):
zypper install xrdp
The package installation manager (we need to enable the graphical environment as well, just yast as a console is not enough for us):
zypper install yast2
zypper install glib2-devel
zypper in yast*qt*
zypper in firewalld
zypper in rpm-build
After this it is good to update the SUSE repositories (after this please restart):
zypper update
After this we must find a way to access the Linux graphical environment, since it is necessary for the installation of the product.
It can be do it by:
Setting xrdp, vnc, remina, etc.. But also if none of these are enabled it can be accessed by putty + xming.
I explain the last one, since it is autonomous for access, but it requires some additional configuration when we do not have the root user directly.
To configure xming and enter with the supplied .ppk or .pem key, we usually always configure the X11 parameter as localhost: 0.0 to make the display.
If they give us a user to root and then once authenticated we become root with sudo su - we will lose that value of the DISPLAY variable, so we will have to do this trick:
- Login with given user (user).
- Execute xclock and it works fine. If not check putty configuration or see if xclock is installed with which xclock and you should return the location where it is installed.
- Do sudo su - to have root privileges
When trying to xclock it gives a display error, then:

Display error
The xclock works with the given non-root user but not with root.
With root you must install HANA and SAP B1 server components, then you have to do this:
export DISPLAY=localhost:10.0
(it has to be a different number than the one defined in the other user)
The first time it will not work and it will give the error of the image, then if it does not work for root but for the user, do this:
rm /root/.Xauthority
ln -s /home/user/.Xauthority /root/
The spanish explanation (sorry for that) http://www.luispa.com/archivos/5506
With that we can raise the xclock and we can start with the installation:

xclock running
PART II: Installing HANA and additional components
Apply the command suggested by the note: 2593824 - Linux: Running SAP applications compiled with GCC 7.x
zypper in libatomic1
The installation sequence of the HANA components are always like this:
- Database
- AFL
- Clients (32 in this case may not be installable)
- HANA Studio
Before logically starting we have to decompress the packages with:
SAPCAR -xvf <file>.SAR
If we do it this way for the folder SAP HANA DATABASE ... It will not work and will give this error to launch the installer later:

In general, to launch the installer we can use these 2 commands:
./hdblcmgui
./hdblcmgui --action=update --ignore=check_signature_file
With the 2nd you could avoid the error, but now HANA does not allow it.
If we go to the installation log, we'll find something like this:
13:44:23.400 - ERR : File 'SIGNATURE.SMF' cannot be found in the SAP HANA Database installation kit. To include the signature when extracting the installation kit from a .SAR archive, use the SAPCAR option: -manifest SIGNATURE.SMF You can ignore this error and continue with the execution by passing the ignore option 'check_signature_file' to hdblcm, started as root. See SAP note 2078425, section 'How to prepare SAP HANA packages for installation or update' for instructions how to prepare packages for update or implications of ignoring this error.
So you have to do what the note says:: 2078425 - Troubleshooting note for SAP HANA platform lifecycle management tool hdblcm and it is nothing more than decompressing the file in this way:
![]()
We give the configuration of the necessary parameters of the corresponding installation and then we have the installation process running:

Once the installation process is complete, the logical thing is to start HANA:
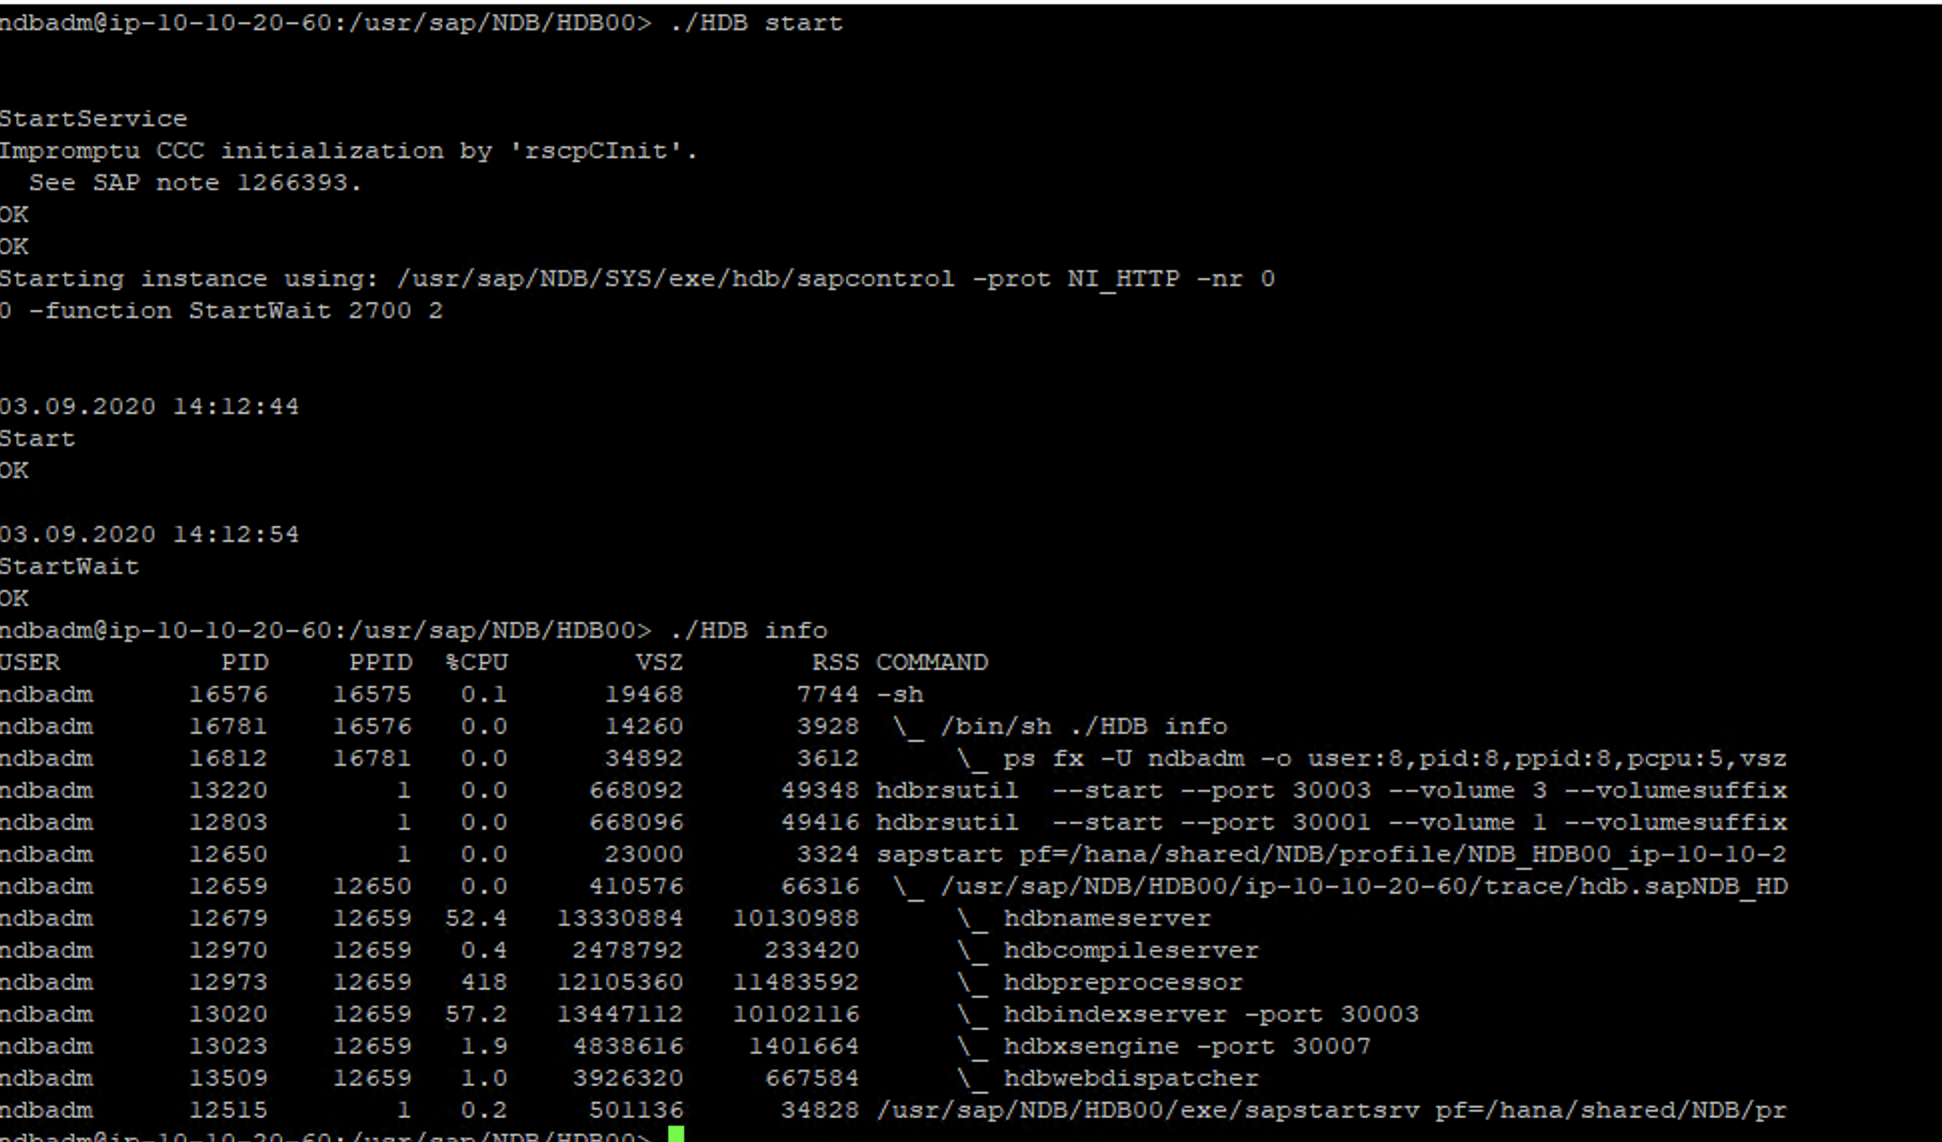
Everything OK so far, then you have to install the HANA clients and the AFL's (in any order) and we unzip the clients:

The 64-bit HANA client installs without any problems (console or graphic mode) but the 32-bit gives an error in this case:

AFL's:

And optional but it is very useful, you should install HANA Studio on Linux.
PART III: Installing SAP Business One's Linux components
Pre-installation tips
Step 1:
Before starting the installation it is necessary to check if samba is installed as a service, or simply do a restart to see if everything is in order with this command:
sudo systemctl restart nmb smb
In case it returns an error message, check if it was installed correctly.
Step 2:
Open HANA Studio on the SYSTEMDB tenant and there open a SQL console to be able to execute this command:
ALTER DATABASE NDB ADD 'scriptserver'
*NDB is the System ID of our tenant with which we install HANA and where we will use to install SAP Business One.
Step 3:
It is recommended to verify the security policies at the tenant level of SYSTEMDB and SYSTEM for the key management issue, change password in first session, etc.
Step 4:
Create the HANA super user that will install SAP B1. To create this user logically we have to do it with the SYSTEM user.
This user (according to the SAP B1 administration guide) must have the following permissions, privileges, etc. in HANA in order to install the solution:
- Roles:
- PUBLIC
- CONTENT_ADMIN
- AFLPM_CREATOR_ERASER_EXECUTE(grantable)
- System privileges:
- CREATE SCHEMA (grantable)
- USER ADMIN (grantable)
- ROLE ADMIN (grantable)
- CATALOG READ (grantable)
- IMPORT
- EXPORT
- INIFILE ADMIN
- LOG ADMIN
- SQL object privileges:
- SYSTEM schema:
- CREATEANY,SELECT
- SYSTEM schema:
- _SYS_REPO schema:
- SELECT,EXECUTE,DELETE(all grantable)
- _SYS_REPO schema:
After B1 is installed:
- SBOCOMMON schema:
- SELECT, INSERT, DELETE, UPDATE, EXECUTE, CREATE ANY, DROP (all grantable)
- COMMON schema:
- SELECT, INSERT, DELETE, UPDATE, EXECUTE (all grantable)
So that the following screen does not appear when executing the ./install:

It is necessary to install the following libraries:
zypper in python-crypto
zypper in python-openssl
After fill all the config screens, the installation process look like this:

An improvement from the latest versions is the clock per sub = installation process.

Everything green ?


Final part of the Linux-level installation.
PART IV: Installing Windows Components of SAP Business One
Step 1:
Unzip via SAPCAR and install the clients for HANA (32 and 64 bits)

Step 2:
Go to the SAP B1 folder and run the installer in Administrator mode:

The first thing that is requested as an installation parameter is the address of the SLD's HANA server, with which we give it the IP or server name (it takes the DNS one by AWS policy) plus the port 40000.
After this this screen this should appear (if not appears the server you have problem with the HANA client):

On the next screen this error will happen if the server is Windows 2019

This is a problem at samba level for Windows.
Samba was installed for Linux but in Windows 2019 you have to install and activate it manually.
Go to the add roles and features section on the server by selecting SMB 1.0 (blue box) and then restart the instance:

Guest access in SMB2 will be disabled by default in Windows Server 2019 so we have to do it manually.
Go to the group policy editor:

When opening enter that path that you see in the folder tree:

Enable expressly selecting the radio button (and place a reminder of the change):

And now check if there you (the Windows server) has access to the shared folders on Linux by samba service.
You have to type the name / IP of the Linux server on the Windows explorer and just press enter:

If those do not appear, check the samba configuration in HANA, check that the Windows firewall is disabled and check if the described process was done correctly.
In the next screen we can see that now the installer does not show the problem with the Repository installation message:

Continuing with the installation, the Browser access service (using with the self-signed certificate):

The password that is placed here is the Integration Framework user (administrator = B1iadmin):

The configuration required to connect to HANA:

I always use the same B1iadmin password here:

Choose what you need here:

You'll notice the startup of the multiple installers of the tools that were chosen to be installed in the first selection screen:

Be aware that the installers can and some ask for confirmation to continue and we may think that the process is hanging.
One of the last screens is informative on these points that require manual restoration (just a simple restart will be ok):

The final installation screen:

Part V: Other tips
Before starting with the installation of the Windows components, it is possible to take advantage of the fact that using the same installer you can upgrade the model company that may be needing the functional equipment at once.
Simply select the database to upgrade it and before finishing the installation, and then this process is launched. With this we avoid calling the installer again to upgrade the demo database (company in B1).
To download the demo databases (prior authentication to SAP PartnerEdge):
In this case, the Chile localization was chosen:

Rename the zip file in Windows to something shorter. Then transfer it through Winscp or similar to a linux location. Unzip with unzip command and grant permissions on the folder:

Copy path and go to HANA Studio:

Using the SAP Business One installation user, open a SQL console and run this command:
create schema SBODEMOCL;
import "SBODEMOCL"."*" as binary from ‘/hana/data/software/SBODEMOCL’ with ignore existing

Here we have to wait a few minutes until the HANA status bar and the result of the command action warn us that it is finished.
Then if we did not do the trick of loading the company before launching the installation process, then we will have to run it again using those same parameters used for the installation (recommended).
Then we would arrive at this screen where we see the database/company that has not been migrated since it is in version 9.2:

A series of screens will appear and in this type of upgrades you do not have to do anything else, this screen will appear at the end of the operation:

Then it is always prudent to authenticate against the SLD and see that everything is OK by placing this address https://<Server HANA>:40000/ControlCenter/ where <Server HANA> is the name or IP of our Linux server (you have to agree to enter the non-secure area of the notice sent by the browser and that's it):

Here you can see the company already migrated among many other data and information provided by the SLD:

Another point to take into account is to load the B1 and HANA licenses
To enter SAP B1 licensing
https://<Server HANA>:40000/LicenseControlCenter/
Same password as B1SiteUser used in SLD and then upload the corresponding txt file, if the license is correct it will give a success message.
When you change the hardware key it is necessary to replace the license.

For HANA licensing go to HANA Studio in the administrative tenant, right click on properties:
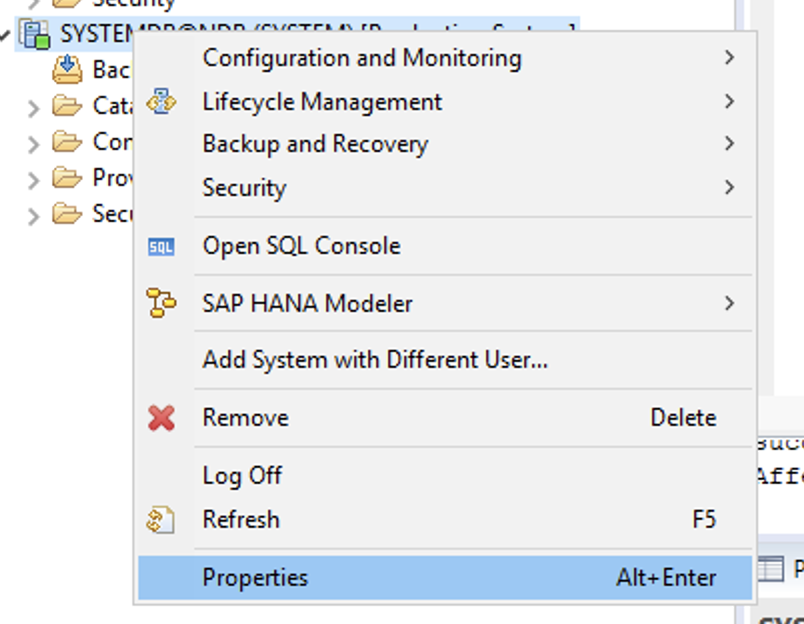
and this screen will appear (never delete it):

THE END.
I hope it is useful to you and thanks for reading!
- SAP Managed Tags:
- SAP Business One, version for SAP HANA
4 Comments
You must be a registered user to add a comment. If you've already registered, sign in. Otherwise, register and sign in.
Labels in this area
-
"mm02"
1 -
A_PurchaseOrderItem additional fields
1 -
ABAP
1 -
ABAP Extensibility
1 -
ACCOSTRATE
1 -
ACDOCP
1 -
Adding your country in SPRO - Project Administration
1 -
Advance Return Management
1 -
AI and RPA in SAP Upgrades
1 -
Approval Workflows
1 -
Ariba
1 -
ARM
1 -
ASN
1 -
Asset Management
1 -
Associations in CDS Views
1 -
auditlog
1 -
Authorization
1 -
Availability date
1 -
Azure Center for SAP Solutions
1 -
AzureSentinel
2 -
Bank
1 -
BAPI_SALESORDER_CREATEFROMDAT2
1 -
BRF+
1 -
BRFPLUS
1 -
Bundled Cloud Services
1 -
business participation
1 -
Business Processes
1 -
CAPM
1 -
Carbon
1 -
Cental Finance
1 -
CFIN
1 -
CFIN Document Splitting
1 -
Cloud ALM
1 -
Cloud Integration
1 -
condition contract management
1 -
Connection - The default connection string cannot be used.
1 -
Custom Table Creation
1 -
Customer Screen in Production Order
1 -
Data Quality Management
1 -
Date required
1 -
Decisions
1 -
desafios4hana
1 -
Developing with SAP Integration Suite
1 -
Direct Outbound Delivery
1 -
DMOVE2S4
1 -
EAM
1 -
EDI
3 -
EDI 850
1 -
EDI 856
1 -
edocument
1 -
EHS Product Structure
1 -
Emergency Access Management
1 -
Energy
1 -
EPC
1 -
Financial Operations
1 -
Find
1 -
FINSSKF
1 -
Fiori
1 -
Flexible Workflow
1 -
Gas
1 -
Gen AI enabled SAP Upgrades
1 -
General
1 -
generate_xlsx_file
1 -
Getting Started
1 -
HomogeneousDMO
1 -
IDOC
2 -
Integration
1 -
Learning Content
2 -
LogicApps
2 -
low touchproject
1 -
Maintenance
1 -
management
1 -
Material creation
1 -
Material Management
1 -
MD04
1 -
MD61
1 -
methodology
1 -
Microsoft
2 -
MicrosoftSentinel
2 -
Migration
1 -
mm purchasing
1 -
MRP
1 -
MS Teams
2 -
MT940
1 -
Newcomer
1 -
Notifications
1 -
Oil
1 -
open connectors
1 -
Order Change Log
1 -
ORDERS
2 -
OSS Note 390635
1 -
outbound delivery
1 -
outsourcing
1 -
PCE
1 -
Permit to Work
1 -
PIR Consumption Mode
1 -
PIR's
1 -
PIRs
1 -
PIRs Consumption
1 -
PIRs Reduction
1 -
Plan Independent Requirement
1 -
Premium Plus
1 -
pricing
1 -
Primavera P6
1 -
Process Excellence
1 -
Process Management
1 -
Process Order Change Log
1 -
Process purchase requisitions
1 -
Product Information
1 -
Production Order Change Log
1 -
purchase order
1 -
Purchase requisition
1 -
Purchasing Lead Time
1 -
Redwood for SAP Job execution Setup
1 -
RISE with SAP
1 -
RisewithSAP
1 -
Rizing
1 -
S4 Cost Center Planning
1 -
S4 HANA
1 -
S4HANA
3 -
Sales and Distribution
1 -
Sales Commission
1 -
sales order
1 -
SAP
2 -
SAP Best Practices
1 -
SAP Build
1 -
SAP Build apps
1 -
SAP Cloud ALM
1 -
SAP Data Quality Management
1 -
SAP Maintenance resource scheduling
2 -
SAP Note 390635
1 -
SAP S4HANA
2 -
SAP S4HANA Cloud private edition
1 -
SAP Upgrade Automation
1 -
SAP WCM
1 -
SAP Work Clearance Management
1 -
Schedule Agreement
1 -
SDM
1 -
security
2 -
Settlement Management
1 -
soar
2 -
Sourcing and Procurement
1 -
SSIS
1 -
SU01
1 -
SUM2.0SP17
1 -
SUMDMO
1 -
Teams
2 -
User Administration
1 -
User Participation
1 -
Utilities
1 -
va01
1 -
vendor
1 -
vl01n
1 -
vl02n
1 -
WCM
1 -
X12 850
1 -
xlsx_file_abap
1 -
YTD|MTD|QTD in CDs views using Date Function
1
- « Previous
- Next »
Related Content
- SAP ERP Functionality for EDI Processing: UoMs Determination for Inbound Orders in Enterprise Resource Planning Blogs by Members
- FINS_ACDOC_PLANNING 009 Category doesn't exist and FINS_ACDOC_CUST602 in Enterprise Resource Planning Q&A
- SAP Business One 10.0 New Installation in Enterprise Resource Planning Q&A
- How to design sales prices in SAP S/4HANA and be ready for future innovations in Enterprise Resource Planning Blogs by SAP
- Asset Management for Resource Scheduling - External availabilities (Rostering) in Enterprise Resource Planning Blogs by SAP
Top kudoed authors
| User | Count |
|---|---|
| 5 | |
| 2 | |
| 2 | |
| 2 | |
| 2 | |
| 2 | |
| 2 | |
| 1 | |
| 1 | |
| 1 |