
- SAP Community
- Products and Technology
- Technology
- Technology Blogs by SAP
- SuccessFactors Integrations Beginners Guide- Expl...
Technology Blogs by SAP
Learn how to extend and personalize SAP applications. Follow the SAP technology blog for insights into SAP BTP, ABAP, SAP Analytics Cloud, SAP HANA, and more.
Turn on suggestions
Auto-suggest helps you quickly narrow down your search results by suggesting possible matches as you type.
Showing results for
Sriprasadsbhat
Active Contributor
Options
- Subscribe to RSS Feed
- Mark as New
- Mark as Read
- Bookmark
- Subscribe
- Printer Friendly Page
- Report Inappropriate Content
09-04-2020
9:47 AM
Introduction:
As a part of beginner series in earlier blogs we discussed API Center and Connectivity from SuccessFactors Employee Central perspective.In this blog will look into few integration touch points from SuccessFactors Learning Management System perspective ( LMS ).
Refer below for the other blogs as a part of SuccessFactors Integration series.
SFSF EC - Beginners guide to Integration Center
SFSF EC - Connectivity and User Creation
Integration Options with SuccessFactors Learning Management System:
SuccessFactors LMS is leading Learning Management System bundled as a part of Successfactors Suite.SuccessFactors LMS provides different options to import and export data either using industry standard protocols or using home grown connectors .Will discuss one by one in detailed manner.
OData APIs:
SuccessFactors LMS has series of Microservices enabled to get and post data using OData Protocol.Will split this into multiple parts something like below
- Creation of Admin User
- Enabling OAuth in SuccessFactors LMS
- Exploring APIs using rest client ( POSTMAN )
Technical Admin User Creation:
SuccessFactors LMS supports 2 types of user namely People-> Users and Security->Administrators.For API connectivity Admin users are mandatory.
Step 1: Login into SuccessFactors LMS with Administrative Privileges.
Step 2:
Navigate to Menu-> System Administration->Security->Administrators .Click On Add New.

Step 3:
Enter necessary details with correct field name.Make sure to select domain as Public so that user specific to integration have access to all the data irrespective of different domains ( Organizations or Departments as per LMS ).
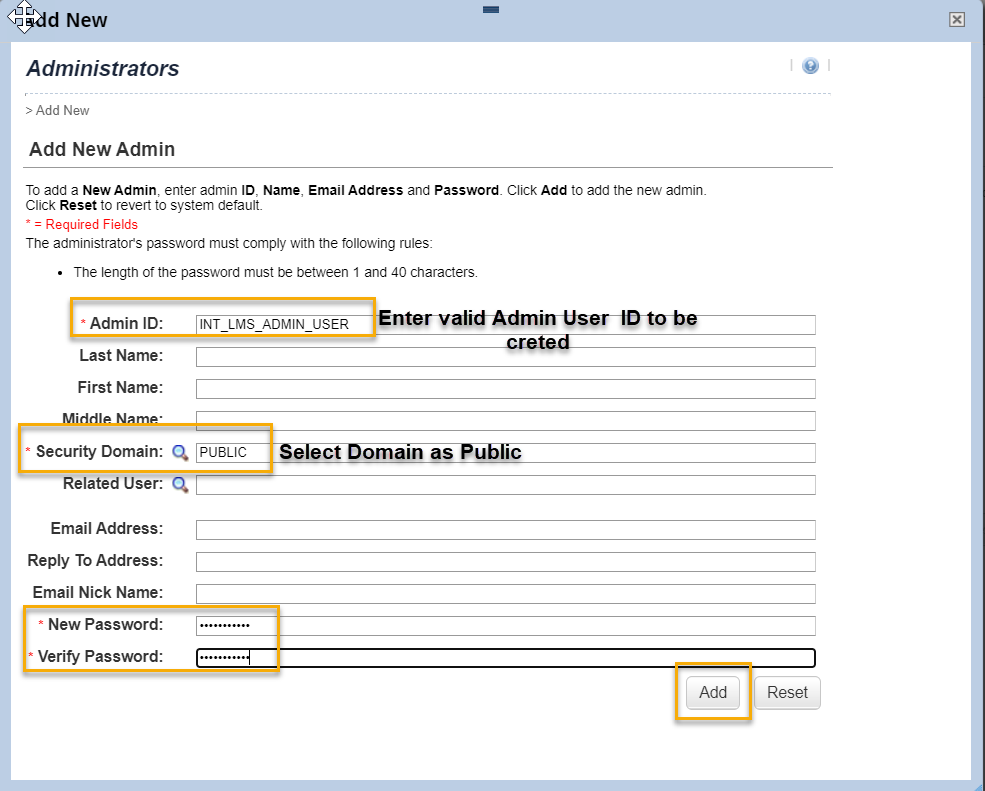
Step 4:
Now you have user created and you need to assign correct roles to them.Click On search to select list of Roles need to be assigned.
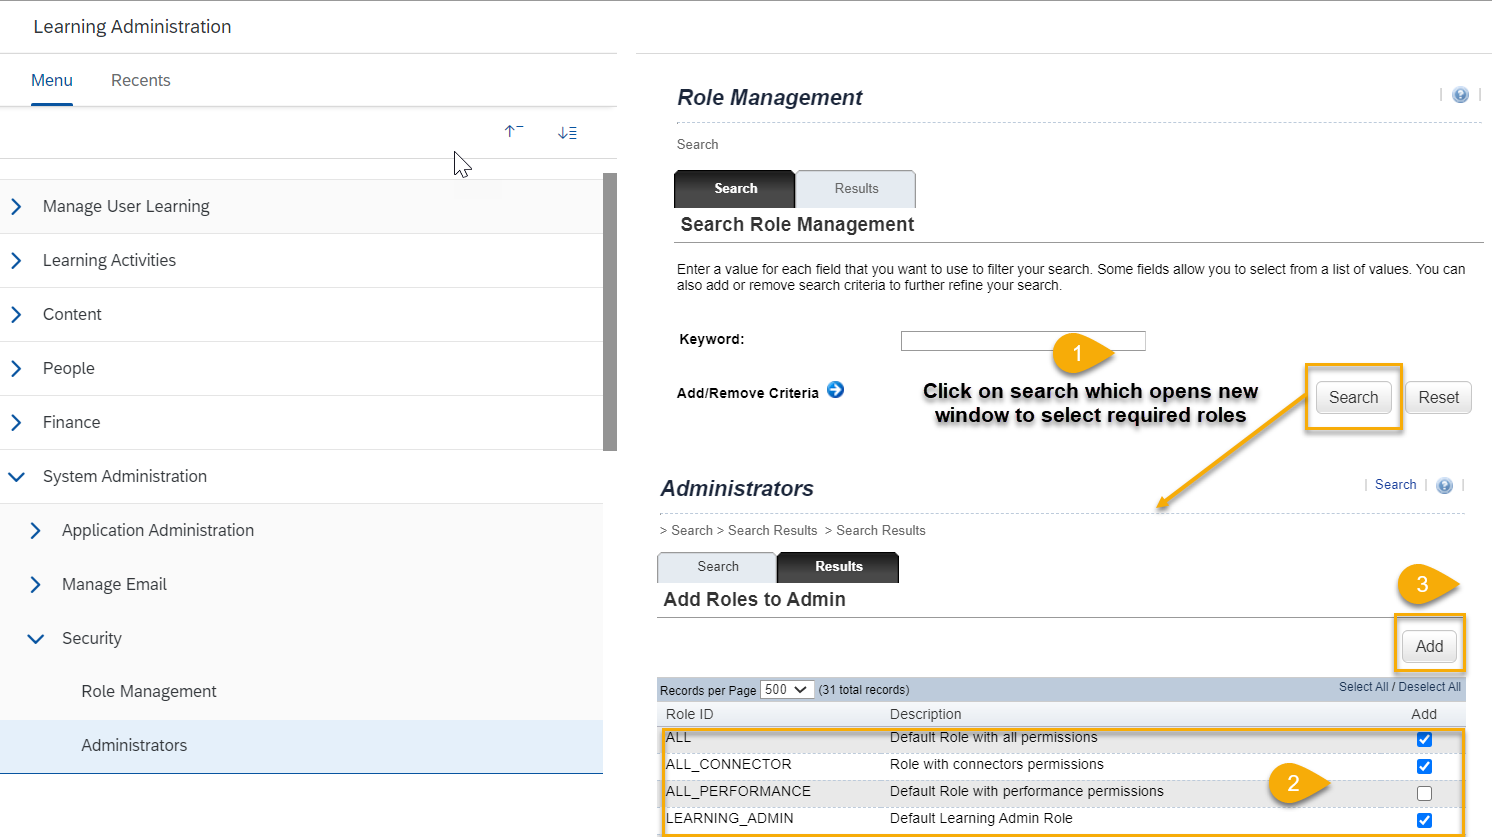
Step 5:
Once you have selected required roles below screen appears to apply changes to user ( with summary of roles assigned ).

Finally we have created Administrative User: INT_LMS_ADMIN_USER ready to be used in Integrations.
Enable OAuth Authorization:
Navigate to Configuration-> OAuth Token Server to generate Client ID,Client Secret as this is the only authentication type SFSF LMS supports.

Copy the Client ID,Company ID and Client Secret to be used in either POSTMAN or SAP CPI.
How to explore APIs in POSTMAN:
Copy Client ID and Client Secret in format ClientID:ClientSecret and base64 encode it.
Example:
ClientID - TESTCLIENTIDXXX
ClientSecret - XYEICHFERJ-+YEKFOEHE
Open https://www.base64encode.org or similar base64 encoded and encode it to Base 64 with format TESTCLIENTIDXXX:XYEICHFERJ-+YEKFOEHE

Open Postman and create new request.
Get Token:

{ "grant_type":"client_credentials",

    "scope":{

      "userId":"INT_LMS_ADMIN_USER",

	  "companyId":"XXXXX",

      "userType":"admin",

      "resourceType":"learning_public_api"

    }

}
Get Data:

- Create a request with url
URL has several parts and below is the different components of the url
{servlet_context}/odatav4/{visibility}/{user_type}/{odata_service}/ {odata_service_version}/{entity/function/action}
- servlet_context: Base URL of your SFSF LMS
- visibility: To define who can access this url.Is it Public or something specific to Group.
- user_type: Who can access this url,either user or administrators.
- OData_Service: Entity Set which you want to access
- OData_Service_version: version of the exposed APIs .In our case v1.
- Entity: Individual entity which is part of EntityContainer.
- Actions are operations exposed by an OData service that MAY have side effects when invoked. Actions MAY return data but MUST NOT be further composed with additional path segments.
- Functions are operations exposed by an OData service that MUST return data and MUST have no observable side effects.
- Navigate to Headers section and Add header with Name Authorization and value Bearer <Value>
Add Authorization header with value of access token you have received from previous call.
Hit the Send Button to get response from SFSF LMS system.Below is the response you will be getting for sample Metadata call.On high level it has 3 parts and will discuss each in brief.

- Entity Containers: Entity containers define the entity sets, singletons, function and action imports exposed by the service.In the above example Entity Container is having 2 Entity Sets each referring to different Entity Sets
- Entity Type:Entity types are nominal structured types with a key that consists of one or more references to structural properties. An entity type is the template for an entity: any uniquely identifiable record such as a customer or order.
- Complex Types: Complex types are keyless nominal structured types. The lack of a key means that complex types cannot be referenced, created, updated or deleted independently of an entity type. Complex types allow entity models to group properties into common structures
Above will help Integration Consultant to see what are the different entities available in expose Microservice and what kind of data he will be getting in addition to identify key values.
Connectors:
Connectors are integral part of SFSF LMS which are mostly used to import the data ( earlier days there were connectors to export data too ).
Navigate to System Administration->Configuration-> System Configuration-> Connectors to view / edit the connector configurations.

Lets deep dive into configuration of Connectors by clicking Edit button.Once you click on Edit button it opens up side bar allowing you to change the parameters for all the connectors and once done with the changes you can click on Apply Changes.

There are different aspects of Connector Configuration and will try to summarise as much we can.
- Common Connector Settings- Which is common for all the Connectors for below parameters.
- Input File Settings
- Output File Settings
- Individual Connector Settings- Each Connector has its own set of parameters including
- Default Values
- Field Mapping
As you know its lengthy to go through each and every configuration I have put all these details into single place so that we can summarise easily.

Once you are done with the configuration you can explore each one of the connectors by navigating System Administration -> Connectors
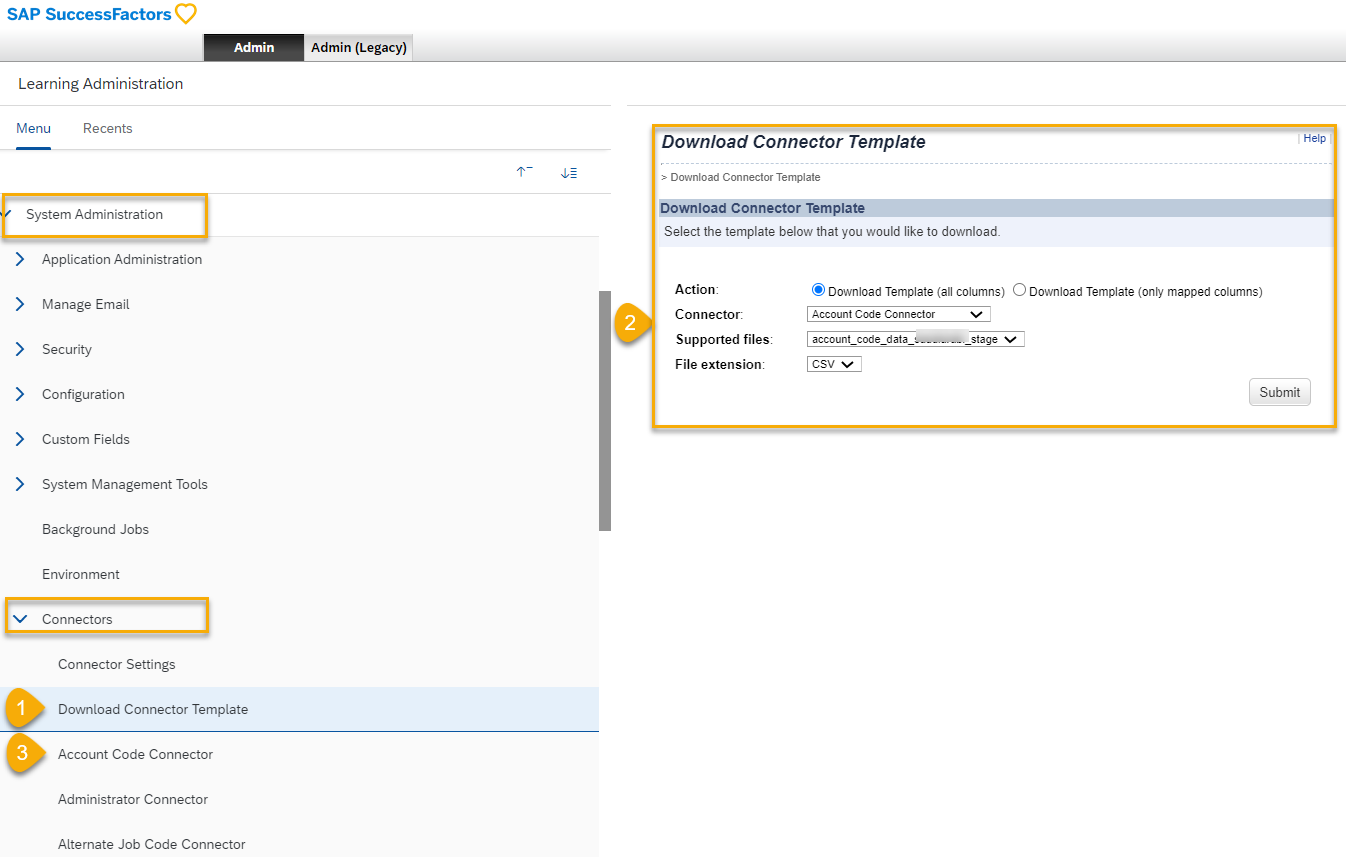
Option 1 & 2 will let you to download the Template for each of the connector in the file format ( .txt,.csv and .zip formats ) required.
Option 3 and onwards are settings for each individual connectors.
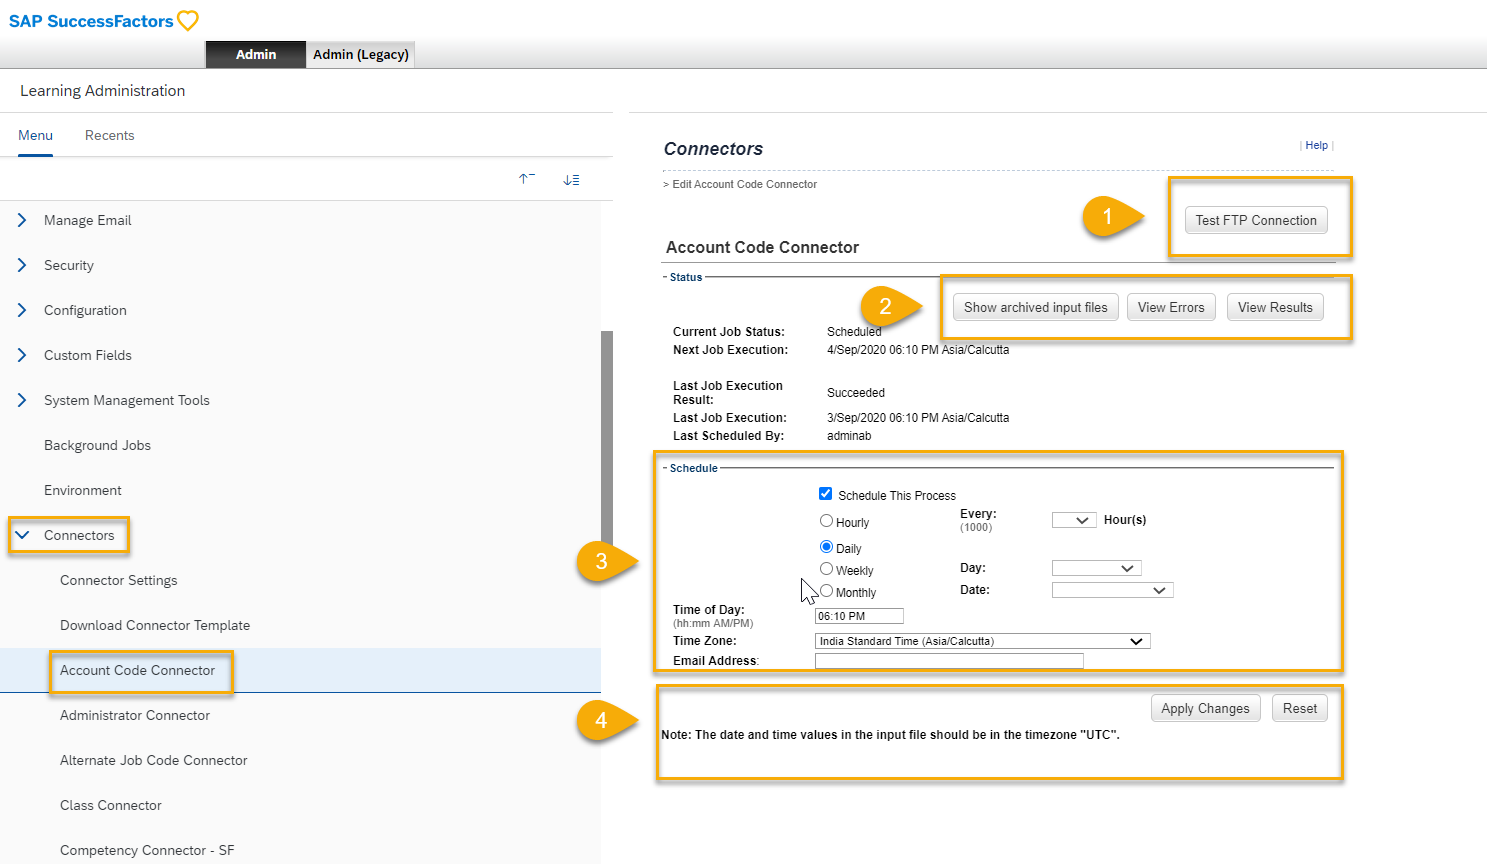
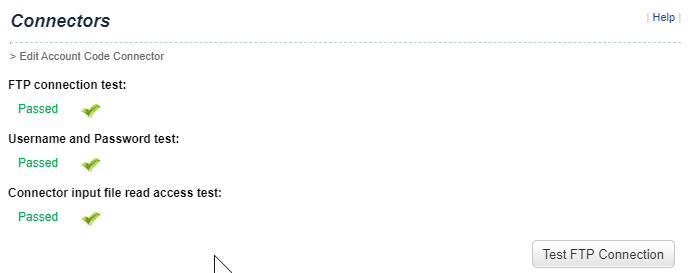
Step 1:
Allows you to perform Connection test ( either FTP or SFTP ) based on the Connector Config shown in the earlier step.
Step 2:
Allows you to Monitor Errors,Reports for scheduler( History of all the runs so for ) and previously archived files.
Step 3:
Advanced scheduler to schedule your imports for the particular connector.
Step 4:
Once you are done with all the steps click on Apply Changes to schedule your job.
Conclusion:
This Concludes first part of the blog.
Hope this helps Integration Consultant to understand some of the basic touch points from SFSF LMS perspective.Will See more details on how to export data from SFSF LMS and exploring integration using SAP Cloud Platform Integration Suite- Integration Service in upcoming blog.
Thanks to my colleague Ankush for all the support from functional aspects.
Cheers!
Regards,
Sriprasad Shivaram Bhat
Labels:
11 Comments
You must be a registered user to add a comment. If you've already registered, sign in. Otherwise, register and sign in.
Labels in this area
-
ABAP CDS Views - CDC (Change Data Capture)
2 -
AI
1 -
Analyze Workload Data
1 -
BTP
1 -
Business and IT Integration
2 -
Business application stu
1 -
Business Technology Platform
1 -
Business Trends
1,658 -
Business Trends
105 -
CAP
1 -
cf
1 -
Cloud Foundry
1 -
Confluent
1 -
Customer COE Basics and Fundamentals
1 -
Customer COE Latest and Greatest
3 -
Customer Data Browser app
1 -
Data Analysis Tool
1 -
data migration
1 -
data transfer
1 -
Datasphere
2 -
Event Information
1,400 -
Event Information
69 -
Expert
1 -
Expert Insights
177 -
Expert Insights
329 -
General
1 -
Google cloud
1 -
Google Next'24
1 -
GraphQL
1 -
Kafka
1 -
Life at SAP
780 -
Life at SAP
13 -
Migrate your Data App
1 -
MTA
1 -
Network Performance Analysis
1 -
NodeJS
1 -
PDF
1 -
POC
1 -
Product Updates
4,575 -
Product Updates
375 -
Replication Flow
1 -
REST API
1 -
RisewithSAP
1 -
SAP BTP
1 -
SAP BTP Cloud Foundry
1 -
SAP Cloud ALM
1 -
SAP Cloud Application Programming Model
1 -
SAP Datasphere
2 -
SAP S4HANA Cloud
1 -
SAP S4HANA Migration Cockpit
1 -
Technology Updates
6,872 -
Technology Updates
460 -
Workload Fluctuations
1
Related Content
- SAP BTP FAQs - Part 2 (Application Development, Programming Models and Multitenancy) in Technology Blogs by SAP
- SAP BTP FAQs - Part 1 (General Topics in SAP BTP) in Technology Blogs by SAP
- B2B Business Processes - Ultimate Cyber Data Security - with Blockchain and SAP BTP 🚀 in Technology Blogs by Members
- Integration between SAP and One Identity in Technology Blogs by SAP
- What’s New for SAP Start – May 2024 in Technology Blogs by SAP
Top kudoed authors
| User | Count |
|---|---|
| 13 | |
| 8 | |
| 8 | |
| 6 | |
| 6 | |
| 6 | |
| 6 | |
| 6 | |
| 5 | |
| 4 |