
- SAP Community
- Products and Technology
- Enterprise Resource Planning
- ERP Blogs by Members
- Developing Rest API based on SAP S/4HANA Cloud Vir...
Enterprise Resource Planning Blogs by Members
Gain new perspectives and knowledge about enterprise resource planning in blog posts from community members. Share your own comments and ERP insights today!
Turn on suggestions
Auto-suggest helps you quickly narrow down your search results by suggesting possible matches as you type.
Showing results for
sudipghosh
Active Contributor
Options
- Subscribe to RSS Feed
- Mark as New
- Mark as Read
- Bookmark
- Subscribe
- Printer Friendly Page
- Report Inappropriate Content
09-02-2020
12:47 AM
Hello Everyone,
Welcome to my another blog 'Developing Rest API based on SAP S/4HANA Cloud Virtual Data Model using Extension Factory and SAP Cloud SDK', In this blog i will show you how you can access SAP S/4HANA Cloud Virtual Data Model using SAP Cloud SDK and SAP Cloud Platform Extension Factory and finally build a Node.js Application which would be running on SAP Cloud Platform Cloud Foundry.
This is one of the easiest and best way i found to access SAP S/4HANA Cloud Virtual Data Model and create extension application, because one side SAP S/4HANA Cloud Extensibility service in Extension Factory take care many things like automatic creation of communication user, communication system, Communication Arrangements and SAP Cloud Platform Destination, In other side SAP Cloud SDK gives best developer experience to play with SAP S/4HANA Cloud oData Virtual Data Model.
In this blog i am not going to discuss what is extension factory and how to use sap cloud sdk because there are many blogs already has been published about these topics. In this Blog you would learn how you can create extension application or access SAP S/4HANA Cloud oData Virtual Data Model easily using Extension Factory and SAP Cloud SDK.
Now from above technical architecture most of you have already figured out how this whole flow works, but still let me simplify the steps so that it would clear how extenstion factory make real differences.
Standard
Custom Scenario (Read Only)
N.B : As a Prerequisite you should have enabled the Extension Factory and S/4HANA Cloud Extensibility service enabled in your Cloud Platform tenant
Step 1: Register SAP S/4HANA Cloud System in SAP Cloud Platform
Click on Register System
Give a Name (i.e S4HANACLOUD) and select the type SAP S/4HANA Cloud and Click on Register
Integration Token will be generated, Copy that Integration Token and keep it with you it would be required in SAP S/4HANA Cloud during maintaining Extension for Cloud Platform
Now After Saving it if you look at the Status of connection is Pending because its waiting for pairing, Once you use the Integration key in SAP S/4HANA Cloud Pairing, It will be registered.
Step 2: Maintain the Cloud Platform Extension in SAP S/4HANA Cloud (Pair the Integration key in SAP S/4HANA Cloud)
Login to SAP S/4HANA Cloud and Navigate to Communication Management Group and Click on Maintain SAP Cloud Platform Extension
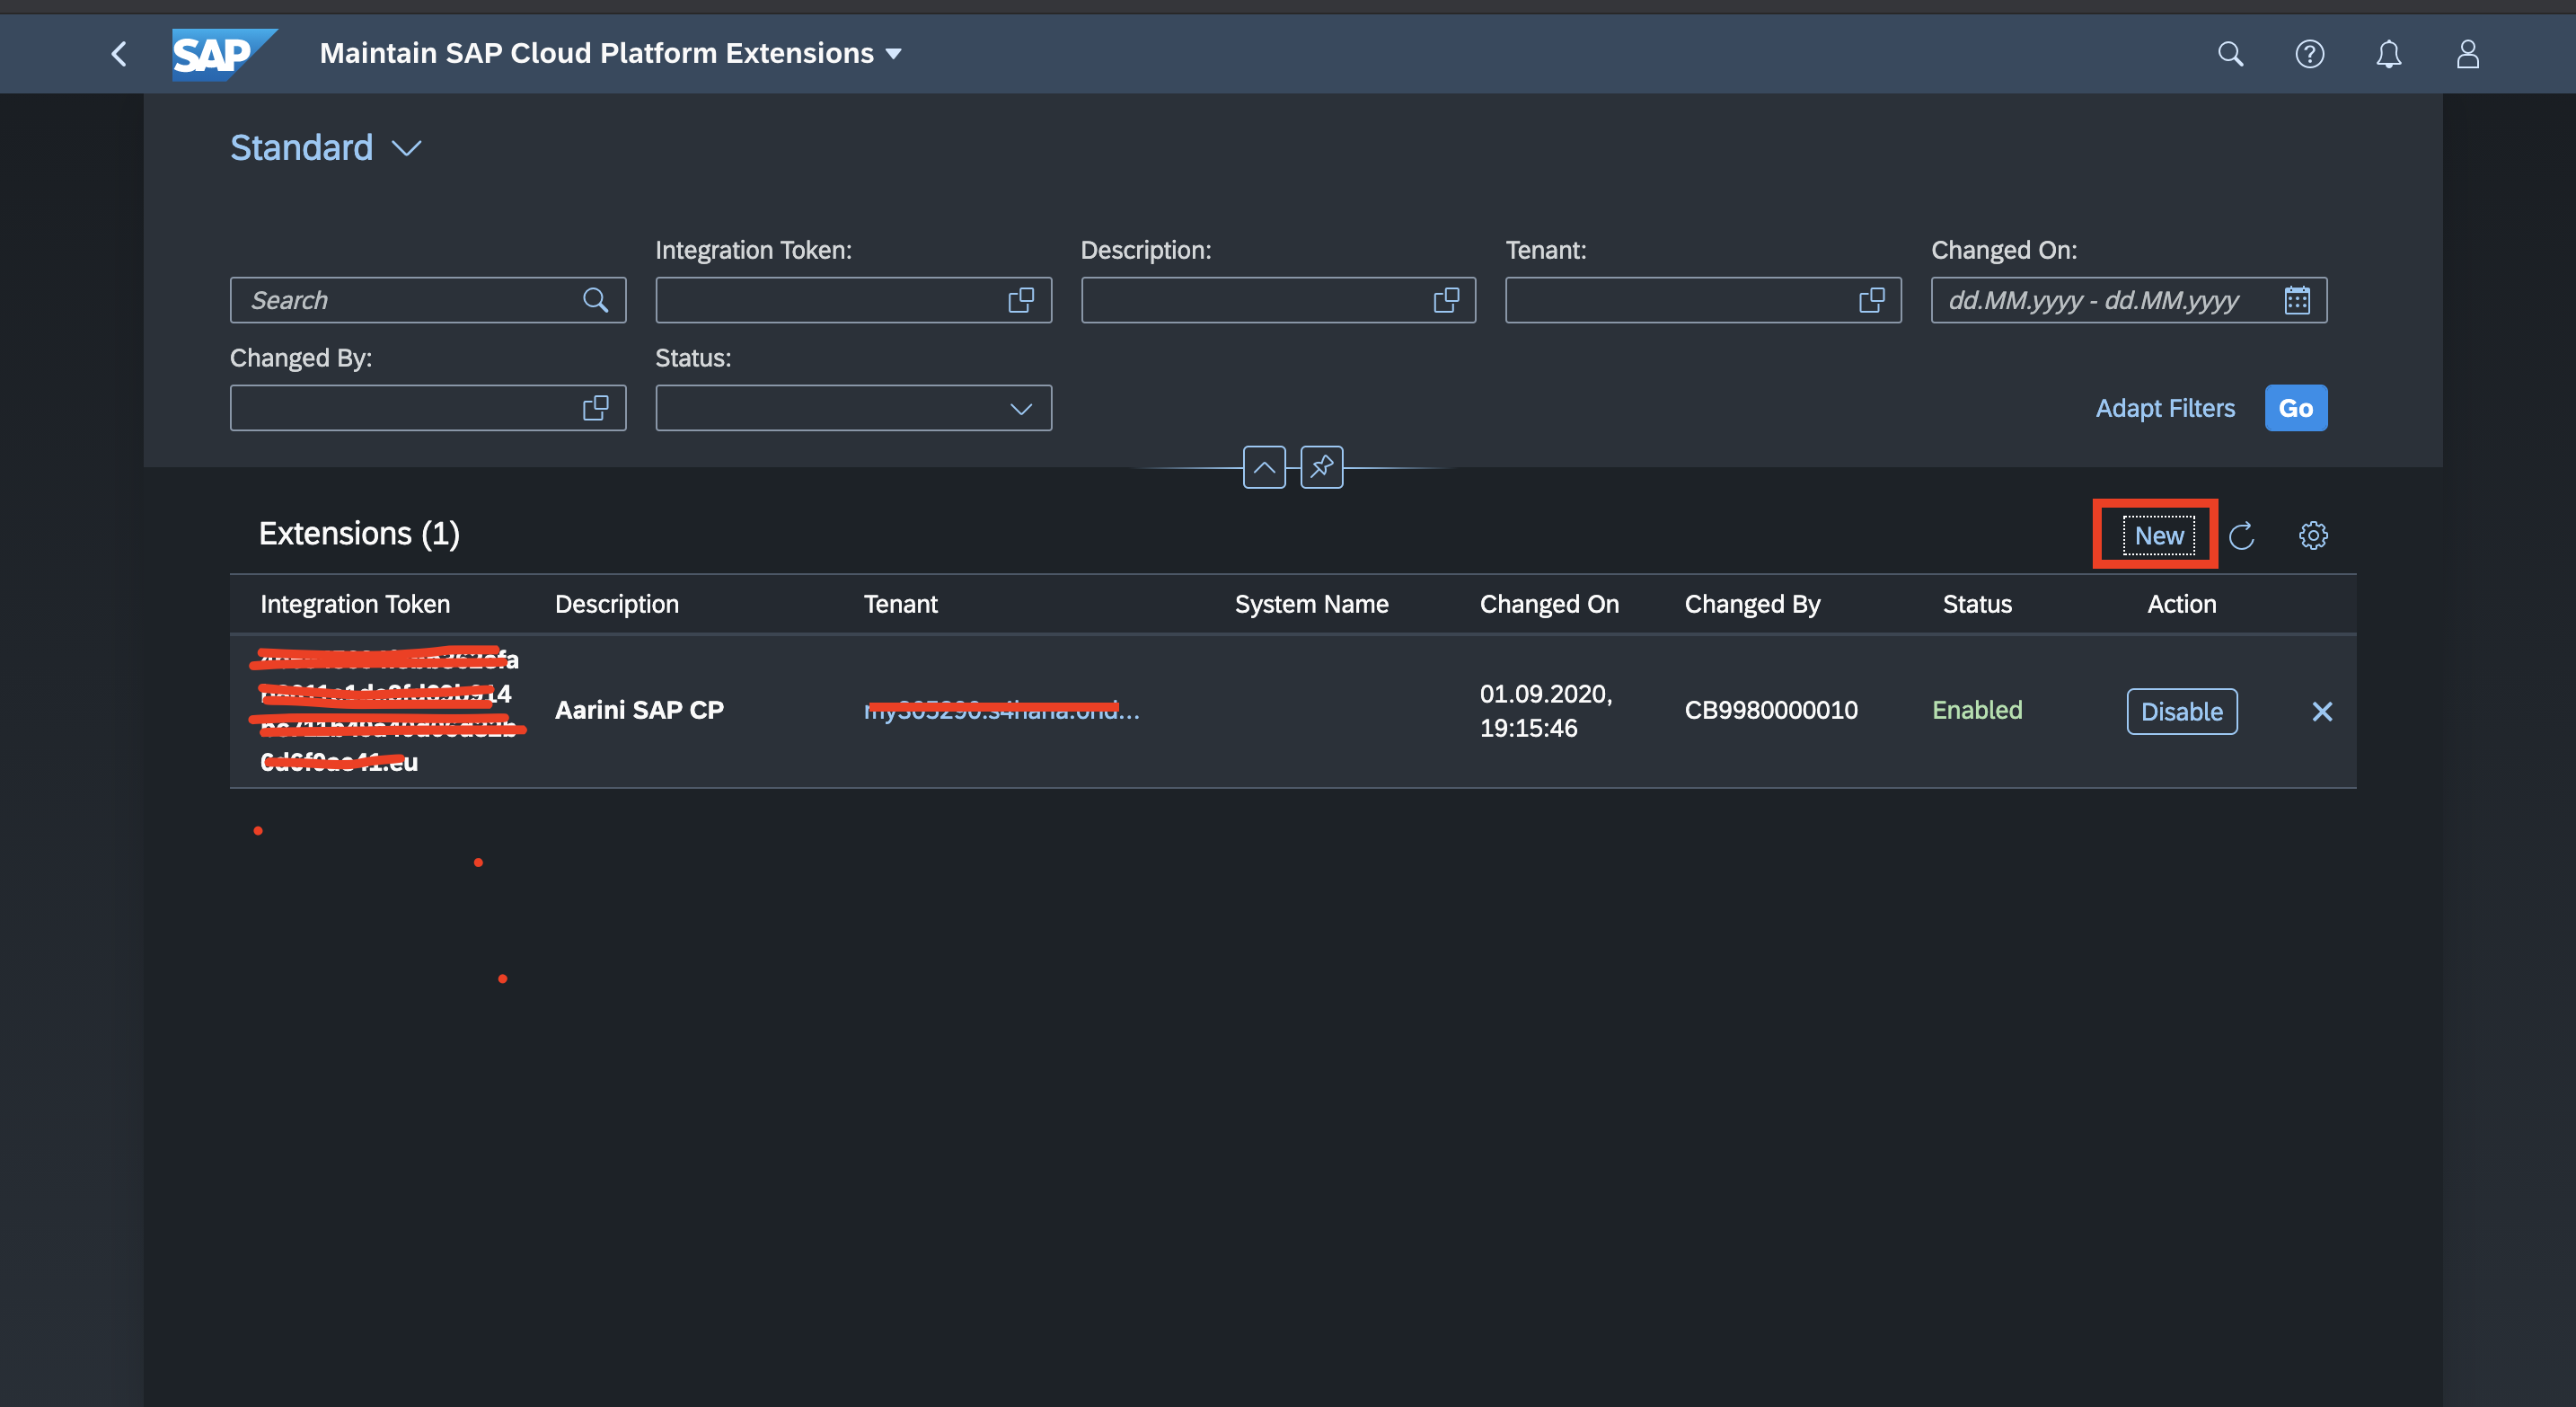
Click on new
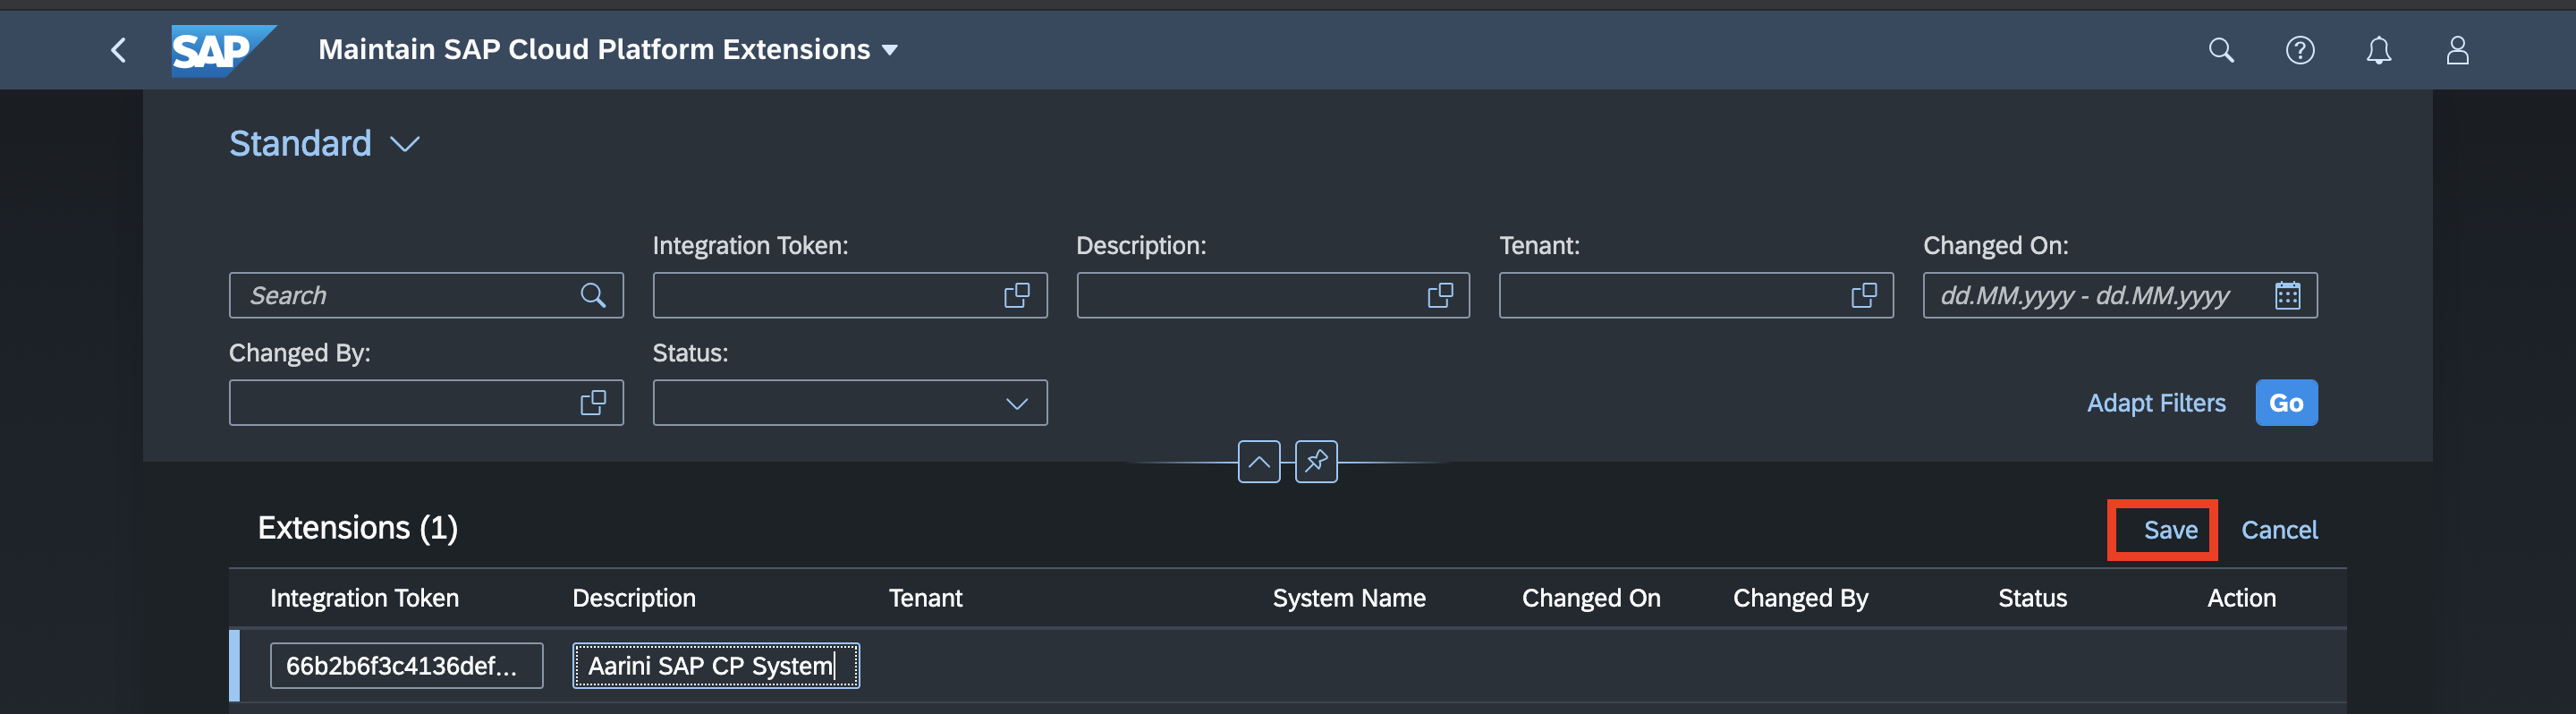
Insert the Integration Token, Description and Save
Now After saving go back to SAP Cloud Platform and Check the Status
Now Pairing is Completed, We can go ahead with creation of S/4HANA Extensibility Service
Step 3: Creating S/4HANA Cloud Extensibility Service Instance
Go to SAP S/4HANA Cloud Extensibility
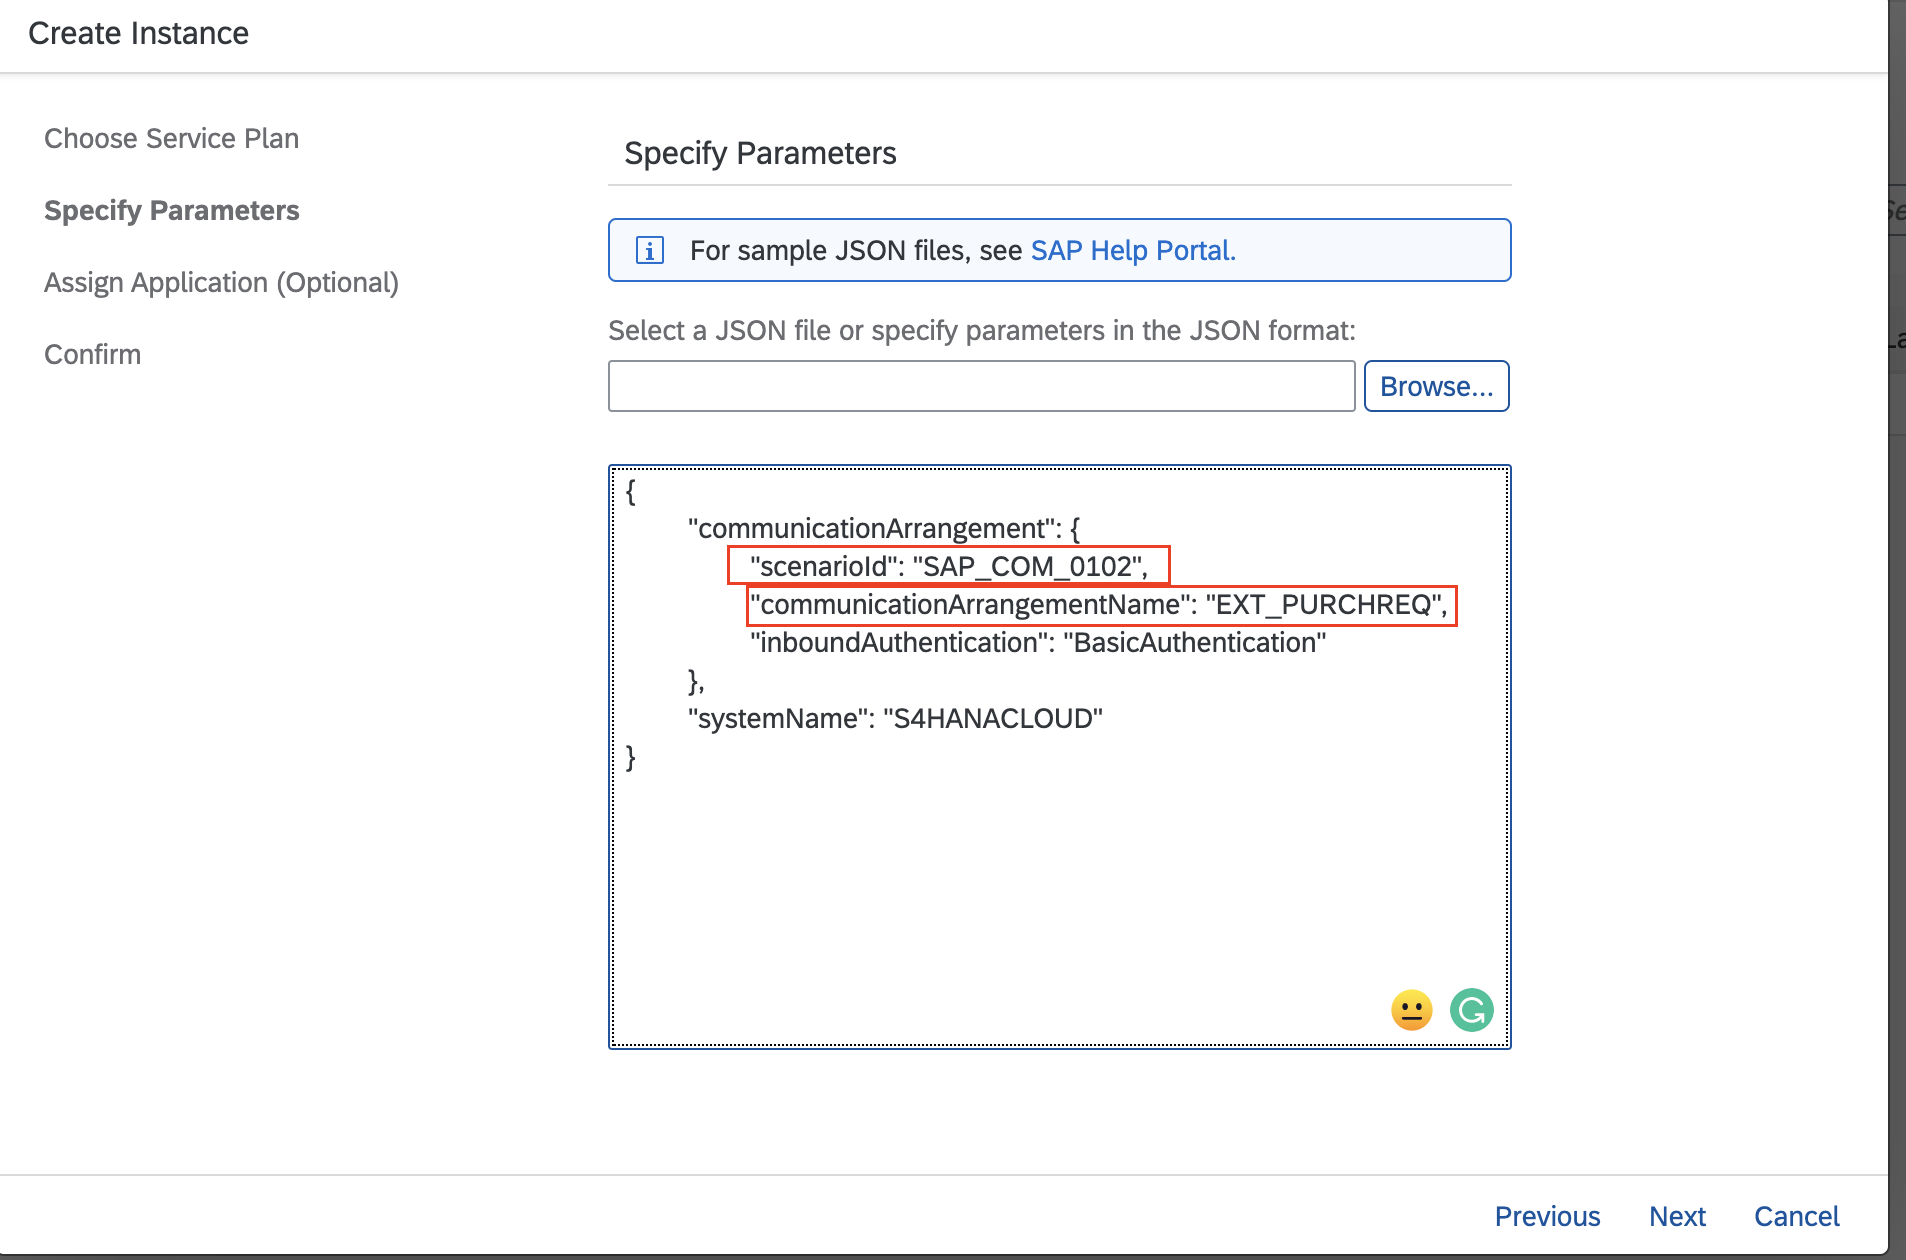
Create new Instance with plan api-access and System Name which we created in last Step
In this example we want to access Purchase Requisition oData Virtual Data Model, for that Scenario ID is SAP_COM_0102, Give Communicaton Arrangement name which will be created in SAP S/4HANA Cloud
Give the Instance Name, you would notice with same name a Destination would be also getting created automatically
Now lets have look at SAP Cloud Platform Destination
Also it would create Communication Arrangement Automatically in SAP S/4HANA Cloud
Step 4: Develop Node.Js Based Rest API using SAP Cloud SDK
Before developing node.js based rest api, lets have a look at the documentation of SAP Cloud SDK for Purchase Requisition
You can check out all the method available in the Documenation, beelow is code snippet.
Below is how manifest.yaml file looks like
In Service we need to provide the Service Instance name and in environment variable apiDest we can pass Destination Name. After that finally you can deploy this application to Cloud Foundry using simple cf push command.
Step 5: Test the Application
Though in this Blog you just saw how to access, but similar way you can create Purchase Requisition and Store Data in Somewhere and Validate also.
I hope everyone enjoyed this blog,Please dont forget to like , put comment and share ?
Welcome to my another blog 'Developing Rest API based on SAP S/4HANA Cloud Virtual Data Model using Extension Factory and SAP Cloud SDK', In this blog i will show you how you can access SAP S/4HANA Cloud Virtual Data Model using SAP Cloud SDK and SAP Cloud Platform Extension Factory and finally build a Node.js Application which would be running on SAP Cloud Platform Cloud Foundry.
This is one of the easiest and best way i found to access SAP S/4HANA Cloud Virtual Data Model and create extension application, because one side SAP S/4HANA Cloud Extensibility service in Extension Factory take care many things like automatic creation of communication user, communication system, Communication Arrangements and SAP Cloud Platform Destination, In other side SAP Cloud SDK gives best developer experience to play with SAP S/4HANA Cloud oData Virtual Data Model.

In this blog i am not going to discuss what is extension factory and how to use sap cloud sdk because there are many blogs already has been published about these topics. In this Blog you would learn how you can create extension application or access SAP S/4HANA Cloud oData Virtual Data Model easily using Extension Factory and SAP Cloud SDK.
How to do
Now from above technical architecture most of you have already figured out how this whole flow works, but still let me simplify the steps so that it would clear how extenstion factory make real differences.
Traditional Step
Standard
- Create Inbound Communication User
- Create Communication System
- Create Communication Arrangement based on Communication Scenario, Communication System and Communication user
- Consume the oData Service
Custom Scenario (Read Only)
- Create Custom CDS Views and Generate oData
- Create Inbound Communication User
- Create Custom Communication Scenario based and Consume Custom CDS based oData as Inbound Service
- Create Communication System
- Create Communication Arrangement based on custom communication scenario, communication system and inbound communication user
- Consume the oData Service
Extension Factory way (Extensibility Service)
- Enable Extension Factory S/4HANA Cloud Extensibility Service (API Plan and Enterprise messaging Plan)
- (Key-pairing method)Register SAP S/4HANA Cloud System in SAP Cloud Platform and maintain Cloud Platform Extension in SAP S/4HANA Cloud using Integration Token from SAP Cloud Platform
- Create Service Instance of SAP S/4HANA Cloud Extensibility Service, During creation provide the Communication Scenario id, Arrangment name and Inbound Authentication type, It will create Automatically Communication Arrangement, Communication system and Communication user in SAP S/4HANA Cloud and Also it will create a SAP Cloud Platform Destination
- Use SAP Cloud SDK to Consume the oData VDM
Let have a look at all the step
N.B : As a Prerequisite you should have enabled the Extension Factory and S/4HANA Cloud Extensibility service enabled in your Cloud Platform tenant
Step 1: Register SAP S/4HANA Cloud System in SAP Cloud Platform
Click on Register System

Give a Name (i.e S4HANACLOUD) and select the type SAP S/4HANA Cloud and Click on Register

Integration Token will be generated, Copy that Integration Token and keep it with you it would be required in SAP S/4HANA Cloud during maintaining Extension for Cloud Platform

Now After Saving it if you look at the Status of connection is Pending because its waiting for pairing, Once you use the Integration key in SAP S/4HANA Cloud Pairing, It will be registered.

Step 2: Maintain the Cloud Platform Extension in SAP S/4HANA Cloud (Pair the Integration key in SAP S/4HANA Cloud)
Login to SAP S/4HANA Cloud and Navigate to Communication Management Group and Click on Maintain SAP Cloud Platform Extension

Click on new
Insert the Integration Token, Description and Save
Now After saving go back to SAP Cloud Platform and Check the Status
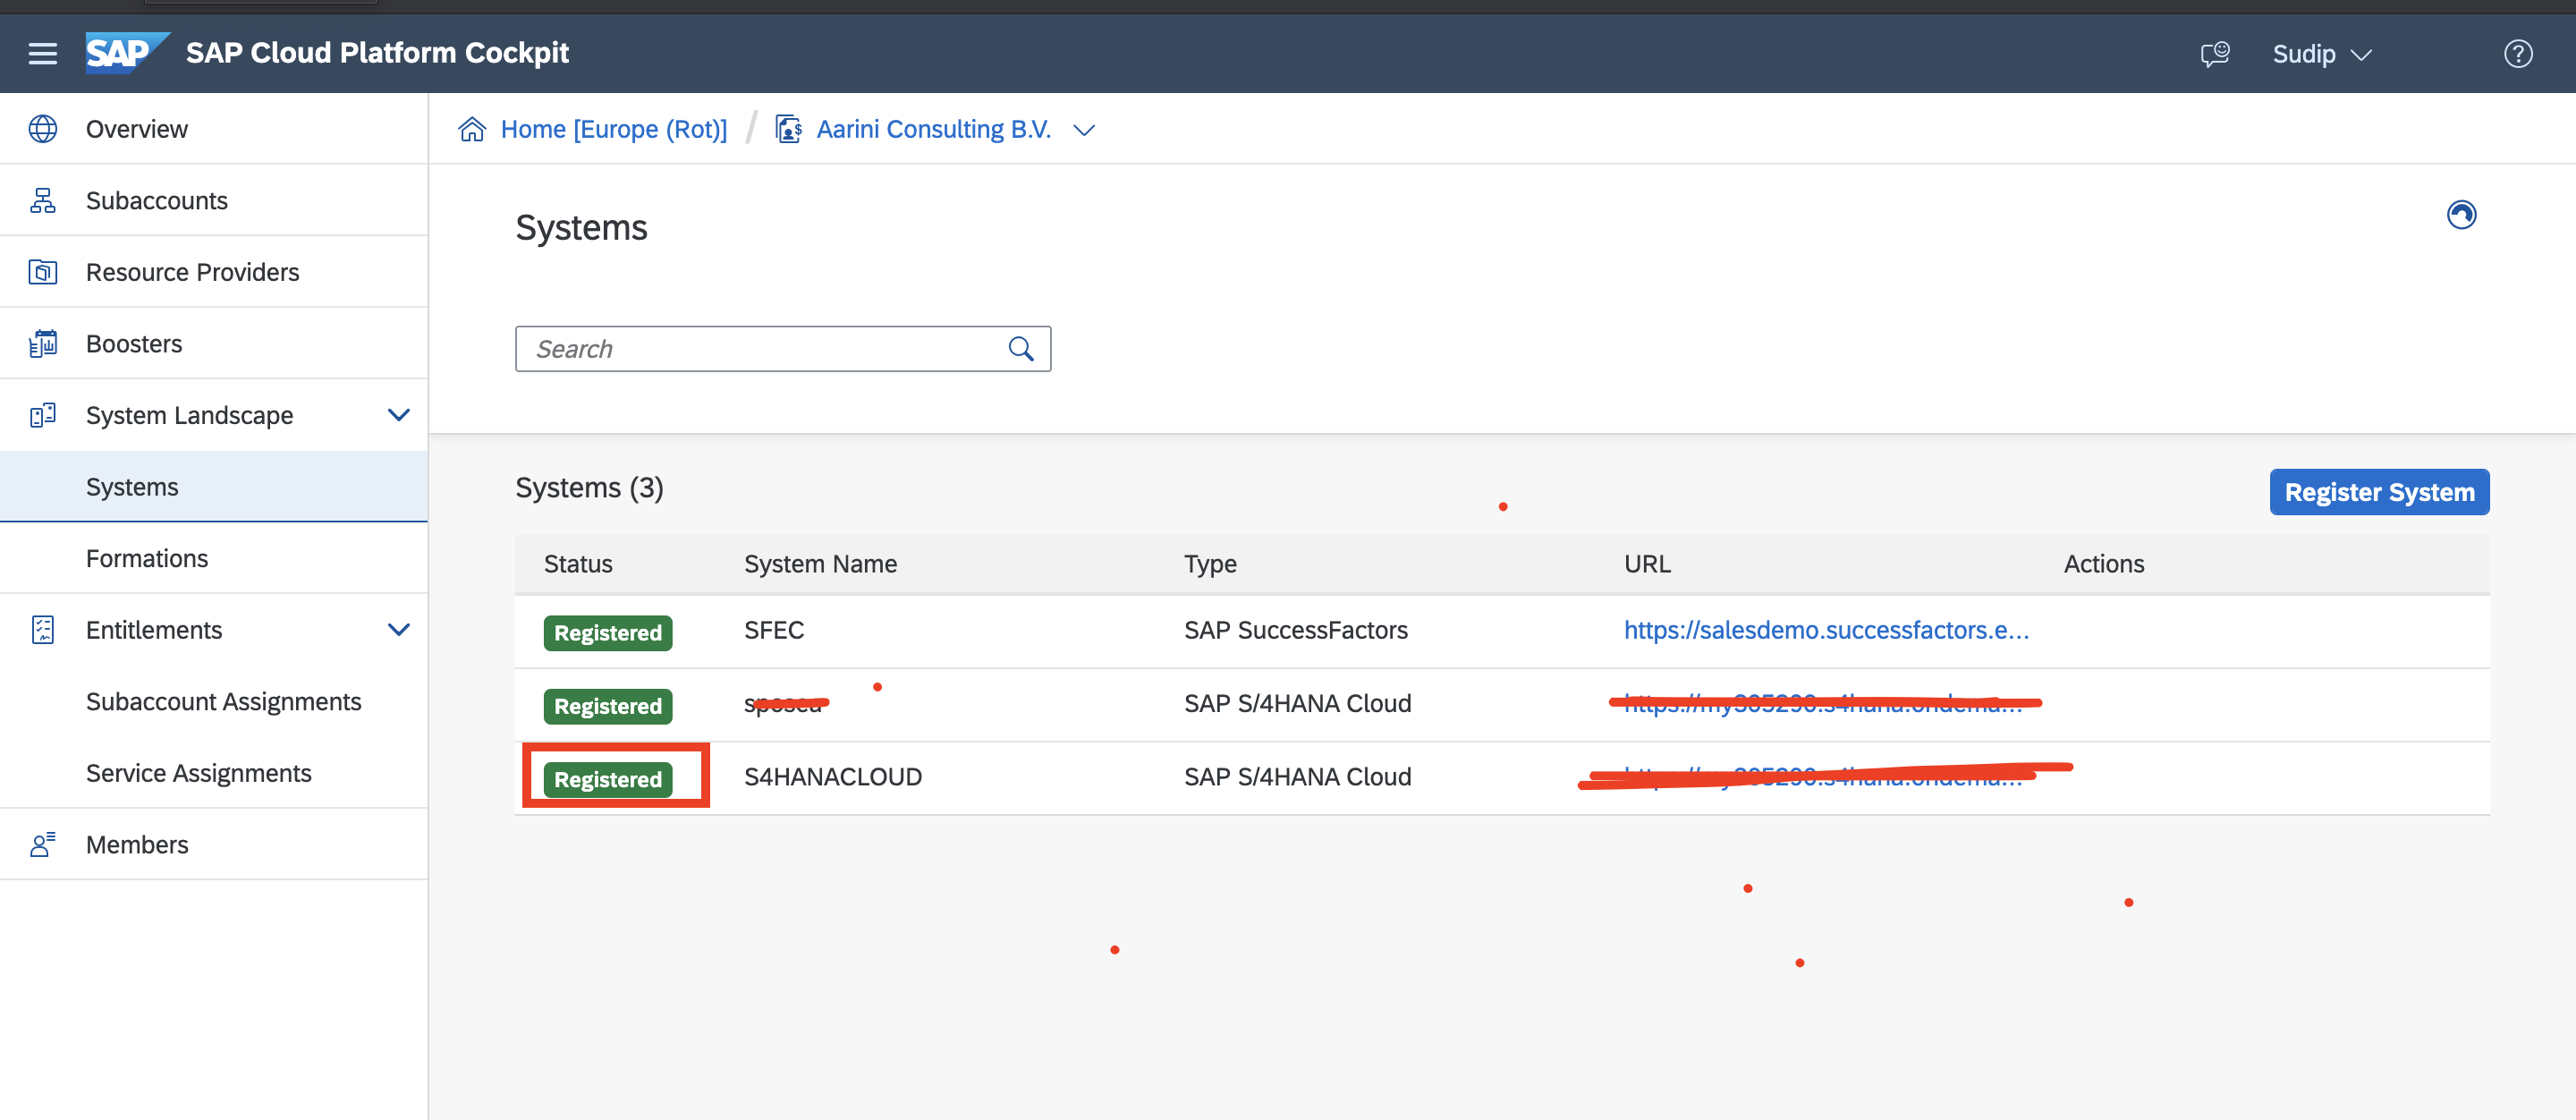
Now Pairing is Completed, We can go ahead with creation of S/4HANA Extensibility Service
Step 3: Creating S/4HANA Cloud Extensibility Service Instance
Go to SAP S/4HANA Cloud Extensibility

Create new Instance with plan api-access and System Name which we created in last Step

In this example we want to access Purchase Requisition oData Virtual Data Model, for that Scenario ID is SAP_COM_0102, Give Communicaton Arrangement name which will be created in SAP S/4HANA Cloud
Give the Instance Name, you would notice with same name a Destination would be also getting created automatically


Now lets have look at SAP Cloud Platform Destination

Also it would create Communication Arrangement Automatically in SAP S/4HANA Cloud

Step 4: Develop Node.Js Based Rest API using SAP Cloud SDK
Before developing node.js based rest api, lets have a look at the documentation of SAP Cloud SDK for Purchase Requisition

You can check out all the method available in the Documenation, beelow is code snippet.
const express = require("express");

const app = express();


const {

    desc

} = require("@sap/cloud-sdk-core");


const {

    PurchaseRequisitionHeader,

    PurchaseRequisitionItem

} = require("@sap/cloud-sdk-vdm-purchase-requisition-service");


function getPurchaseRequisitions() {

   return PurchaseRequisitionHeader.requestBuilder()

   .getAll()

   .select(PurchaseRequisitionHeader.PURCHASE_REQUISITION,

           PurchaseRequisitionHeader.PURCHASE_REQUISITION_TYPE,

           PurchaseRequisitionHeader.PUR_REQN_DESCRIPTION,

           PurchaseRequisitionHeader.SOURCE_DETERMINATION,

           PurchaseRequisitionHeader.TO_PURCHASE_REQN_ITEM.select(

               PurchaseRequisitionItem.CREATED_BY_USER,

               PurchaseRequisitionItem.BASE_UNIT,

               PurchaseRequisitionItem.COMPANY_CODE,

               PurchaseRequisitionItem.DELIVERY_DATE,

               PurchaseRequisitionItem.MATERIAL,

               PurchaseRequisitionItem.PURCHASE_REQUISITION_ITEM,

               PurchaseRequisitionItem.PURCHASE_REQUISITION_PRICE,

               PurchaseRequisitionItem.PUR_REQ_CREATION_DATE,

               PurchaseRequisitionItem.REQUESTED_QUANTITY,

               PurchaseRequisitionItem.PURCHASE_REQUISITION_STATUS


           )


    ).execute(

        {

            destinationName: process.env.apiDest

        }

    )


}


app.get("/getpr", function (req, res) {

    getPurchaseRequisitions()

        .then(purchasereq => {

            res.status(200).json(purchasereq);

        });

});


const port = process.env.PORT || 3000;

app.listen(port, function () {

    console.info("Listening on port: " + port);

});
Below is how manifest.yaml file looks like
applications:

- name: s4cpr

  path: s4cpr

  command: node index.js

  random-route: true

  memory: 256M

  disk_quota: 256M

  buildpacks:

    - nodejs_buildpack

  services:

    - S4CPREXT

  env:

    apiDest: S4CPREXT
In Service we need to provide the Service Instance name and in environment variable apiDest we can pass Destination Name. After that finally you can deploy this application to Cloud Foundry using simple cf push command.
Step 5: Test the Application
Testing in Postman

Though in this Blog you just saw how to access, but similar way you can create Purchase Requisition and Store Data in Somewhere and Validate also.
I hope everyone enjoyed this blog,Please dont forget to like , put comment and share ?
You must be a registered user to add a comment. If you've already registered, sign in. Otherwise, register and sign in.
Labels in this area
-
"mm02"
1 -
A_PurchaseOrderItem additional fields
1 -
ABAP
1 -
ABAP Extensibility
1 -
ACCOSTRATE
1 -
ACDOCP
1 -
Adding your country in SPRO - Project Administration
1 -
Advance Return Management
1 -
AI and RPA in SAP Upgrades
1 -
Approval Workflows
1 -
Ariba
1 -
ARM
1 -
ASN
1 -
Asset Management
1 -
Associations in CDS Views
1 -
auditlog
1 -
Authorization
1 -
Availability date
1 -
Azure Center for SAP Solutions
1 -
AzureSentinel
2 -
Bank
1 -
BAPI_SALESORDER_CREATEFROMDAT2
1 -
BRF+
1 -
BRFPLUS
1 -
Bundled Cloud Services
1 -
business participation
1 -
Business Processes
1 -
CAPM
1 -
Carbon
1 -
Cental Finance
1 -
CFIN
1 -
CFIN Document Splitting
1 -
Cloud ALM
1 -
Cloud Integration
1 -
condition contract management
1 -
Connection - The default connection string cannot be used.
1 -
Custom Table Creation
1 -
Customer Screen in Production Order
1 -
Customizing
1 -
Data Quality Management
1 -
Date required
1 -
Decisions
1 -
desafios4hana
1 -
Developing with SAP Integration Suite
1 -
Direct Outbound Delivery
1 -
DMOVE2S4
1 -
EAM
1 -
EDI
3 -
EDI 850
1 -
EDI 856
1 -
edocument
1 -
EHS Product Structure
1 -
Emergency Access Management
1 -
Energy
1 -
EPC
1 -
Financial Operations
1 -
Find
1 -
FINSSKF
1 -
Fiori
1 -
Flexible Workflow
1 -
Gas
1 -
Gen AI enabled SAP Upgrades
1 -
General
1 -
generate_xlsx_file
1 -
Getting Started
1 -
HomogeneousDMO
1 -
How to add new Fields in the Selection Screen Parameter in FBL1H Tcode
1 -
IDOC
2 -
Integration
1 -
Learning Content
2 -
Ledger Combinations in SAP
1 -
LogicApps
2 -
low touchproject
1 -
Maintenance
1 -
management
1 -
Material creation
1 -
Material Management
1 -
MD04
1 -
MD61
1 -
methodology
1 -
Microsoft
2 -
MicrosoftSentinel
2 -
Migration
1 -
mm purchasing
1 -
MRP
1 -
MS Teams
2 -
MT940
1 -
Newcomer
1 -
Notifications
1 -
Oil
1 -
open connectors
1 -
Order Change Log
1 -
ORDERS
2 -
OSS Note 390635
1 -
outbound delivery
1 -
outsourcing
1 -
PCE
1 -
Permit to Work
1 -
PIR Consumption Mode
1 -
PIR's
1 -
PIRs
1 -
PIRs Consumption
1 -
PIRs Reduction
1 -
Plan Independent Requirement
1 -
Premium Plus
1 -
pricing
1 -
Primavera P6
1 -
Process Excellence
1 -
Process Management
1 -
Process Order Change Log
1 -
Process purchase requisitions
1 -
Product Information
1 -
Production Order Change Log
1 -
purchase order
1 -
Purchase requisition
1 -
Purchasing Lead Time
1 -
Redwood for SAP Job execution Setup
1 -
RISE with SAP
1 -
RisewithSAP
1 -
Rizing
1 -
S4 Cost Center Planning
1 -
S4 HANA
1 -
S4HANA
3 -
S4HANACloud audit
1 -
Sales and Distribution
1 -
Sales Commission
1 -
sales order
1 -
SAP
2 -
SAP Best Practices
1 -
SAP Build
1 -
SAP Build apps
1 -
SAP Cloud ALM
1 -
SAP Data Quality Management
1 -
SAP Maintenance resource scheduling
2 -
SAP Note 390635
1 -
SAP S4HANA
2 -
SAP S4HANA Cloud private edition
1 -
SAP Upgrade Automation
1 -
SAP WCM
1 -
SAP Work Clearance Management
1 -
Schedule Agreement
1 -
SDM
1 -
security
2 -
Settlement Management
1 -
soar
2 -
Sourcing and Procurement
1 -
SSIS
1 -
SU01
1 -
SUM2.0SP17
1 -
SUMDMO
1 -
Teams
2 -
Time Management
1 -
User Administration
1 -
User Participation
1 -
Utilities
1 -
va01
1 -
vendor
1 -
vl01n
1 -
vl02n
1 -
WCM
1 -
X12 850
1 -
xlsx_file_abap
1 -
YTD|MTD|QTD in CDs views using Date Function
1
- « Previous
- Next »
Related Content
- Quick Start guide for PLM system integration 3.0 Implementation/Installation in Enterprise Resource Planning Blogs by SAP
- SAP S/4HANA Cloud Extensions with SAP Build Best Practices: An Expert Roundtable in Enterprise Resource Planning Blogs by SAP
- How to transport Developer Extensibility objects? in Enterprise Resource Planning Q&A
- SAP S/4hana Cloud Public, BADIs with developers extensibility for service contracts in Enterprise Resource Planning Q&A
- Deliver Extensions in SAP S/4HANA Cloud using Multi-Off delivery in Enterprise Resource Planning Blogs by SAP
Top kudoed authors
| User | Count |
|---|---|
| 3 | |
| 3 | |
| 3 | |
| 2 | |
| 2 | |
| 2 | |
| 2 | |
| 2 | |
| 1 | |
| 1 |