
- SAP Community
- Products and Technology
- Technology
- Technology Blogs by SAP
- Cloud Integration - Connect to Microsoft 365 Mail ...
Technology Blogs by SAP
Learn how to extend and personalize SAP applications. Follow the SAP technology blog for insights into SAP BTP, ABAP, SAP Analytics Cloud, SAP HANA, and more.
Turn on suggestions
Auto-suggest helps you quickly narrow down your search results by suggesting possible matches as you type.
Showing results for
Employee
Options
- Subscribe to RSS Feed
- Mark as New
- Mark as Read
- Bookmark
- Subscribe
- Printer Friendly Page
- Report Inappropriate Content
08-20-2020
1:30 PM
Microsoft 365 supports connecting to Outlook 365 via OAuth2 with Authorization Code grant type. This blog provides a step by step description on how you can connect from SAP Cloud Integration to a mail account in Outlook 365 via OAuth2 with Authorization Code grant type, using either the protocol SMTP for sending e-mails or the protocol IMAP for reading e-mails.
If you want to send mails using Microsoft Graph REST API, then follow the blog "Cloud Integration – Send Mail via Microsoft Graph API with OAuth 2.0 Authorization Code".
When connecting to Microsoft Outlook 365 with OAuth2, you need to have an organizational directory/tenant in Microsoft Azure Active Directory and a user in this directory which has a subscription to Outlook 365. The following screen shots show an example of such a user in the Azure Active Directory with name "testusermail" which has the license "Exchange Online (Plan1)".
You can check whether the user has a subscription to Outlook 365 by logging-in with the user to https://outlook.office365.com/mail/.
For the configuration tasks in the Azure Active Directory, you also need a user with the “Application administrator” and the “Application developer” role.
Furthermore, you need a SAP Cloud Integration tenant on which you have a user with the "Integration Developer" role. If you only have a user with the "Administrator" role, you can do all the configurations mentioned below in SAP CPI, except for the last two configurations in the integration flow.
If you want to read emails then IMAP and if you want to send emails then SMTP must be enabled for the used Outlook 365 mailbox:
You have to use the sender mail adapter version 1.8 or higher and the receiver mail adapter version 1.9 or higher. If you use older adapter versions in your integration flows, you have to delete these adapters and recreate them.
To set up the OAuth2 connection for reading and sending e-mails with SAP Cloud Integration, do the following steps:
When you log into the SAP Cloud Integration or Integration Suite WEB-UI, you see your host name in the browser address field:
Use the <host name> to construct the following redirect URI:
You need this redirect URI in the next step.
We assume that you are familiar with the Integration Flow modeling in SAP Cloud Integration, and provide here only configuration details for the OAuth2 configuration in the mail adapter.
Be aware that the adapter version must be at least 1.8 (you see the version if you press the i button, see screen shot below). If your adapter has a lower version, then you have to delete the adapter and recreate the adapter (this will automatically use the newest version).
If you want to receive mails, you configure the Mail Sender Adapter with the created OAuth2 Credential. In the creation dialog for the Mail sender adapter, you have to chose the transport protocol "IMAP4" (we do not support OAuth2 for POP3). Enter the Address value "outlook.office365.com:993". In the "Connection" tab, choose "OAuth2 Authorization Code" as "Authentication". Protection must be defined as "IMAPS" for Microsoft 365.
Be aware that the receiver adapter version must be at least 1.9 (you see the version if you press the i button, see screen shot below). If your adapter has a lower version, then you have to delete the adapter and recreate the adapter (this will automatically use the newest version).
If you want to send mails, you need to configure the Mail Receiver adapter. Enter the Address value "smtp.office365.com:587". Enter "OAuth2 Authorization Code" for "Authentication" in the "Connection". Protection must be defined as "STARTTLS Mandatory" for Microsoft 365.
Microsoft 365 supports shared mailboxes so that several people can access and write to the same mailbox. Only users who are members of the mailbox, can read mails from the shared mailbox or send mails from the shared mailbox. The shared mailbox itself does only have an e-mail address, but does not have a password. Members of the shared mailbox must have a licence for Outlook 365 (the cheapest license is "Exchange Online (Plan1)").
Reading from a Shared Mailbox
You can read e-mails from a shared mailbox with an OAuth2 Authorization Code credential, if you have the email address of the shared mailbox and a user/password of a member of the shared mailbox. You need the user/password of the member for "authorizing" the Oauth2 Authorization Code credential. Follow the below instructions when creating and "authorizing" the OAuth2 Authorization Code credential.
The shared mail box and the member of the shared mailbox must be members of the same Azure Directory as shown in the following screen shot of the Azure Portal user view:
During creating the OAuth2 Authorization Code credential you enter in the field "User Name" the email address of the shared mailbox, in the following screenshot the field is marked with a red circle. And we also recommend to add in the description the user name of the member of the shared mailbox which you will use for the "Authorize" action (marked with a blue circle).
When you "authorize" the credential (step 3 of above chapter "Create an OAuth2 Authorization Code Credential in SAP CPI Tenant") then you choose the option "Sign in with another account" in the login dialog.
Now you can sign in with the member of the shared mailbox.
If you use this OAuth2 Authorization Code credential in the configuration of a mail sender adapter as described in the chapter "Configure the Mail Sender Adapter in an Integration Flow", then this adapter will read emails from the shared mailbox using the member user you used for the login.
Sending Mails from a Shared Mailbox
If you want to send mails which have in the "from" field the address of the shared mailbox, then you need a user which is member of the shared mailbox. During the configuration of the OAuth2 Authorization Code credential you use the e-mail address of the member in the field "User Name". Be also aware that the mailbox of the member must have SMTP enabled.
In the configuration of the receiver adapter you use the email of the sharad mailbox in the "from" field:
Symptom:
Cause
Resolution
Symptom:
Resolution:
If you want to send mails using Microsoft Graph REST API, then follow the blog "Cloud Integration – Send Mail via Microsoft Graph API with OAuth 2.0 Authorization Code".
Prerequisites
When connecting to Microsoft Outlook 365 with OAuth2, you need to have an organizational directory/tenant in Microsoft Azure Active Directory and a user in this directory which has a subscription to Outlook 365. The following screen shots show an example of such a user in the Azure Active Directory with name "testusermail" which has the license "Exchange Online (Plan1)".
- The user must be member of the Azure Directory:

- The user must have a license for Outlook 365:

You can check whether the user has a subscription to Outlook 365 by logging-in with the user to https://outlook.office365.com/mail/.
For the configuration tasks in the Azure Active Directory, you also need a user with the “Application administrator” and the “Application developer” role.
Furthermore, you need a SAP Cloud Integration tenant on which you have a user with the "Integration Developer" role. If you only have a user with the "Administrator" role, you can do all the configurations mentioned below in SAP CPI, except for the last two configurations in the integration flow.
If you want to read emails then IMAP and if you want to send emails then SMTP must be enabled for the used Outlook 365 mailbox:
- From the Microsoft 365 Admin Center, navigate to Users > Active users > select a user > Mail tab > Email apps > Select Manage email apps link
- Select IMAP (if you want to read emails) and Authenticated SMTP (if you want to send emails)
- Click the Save changes button at the bottom
You have to use the sender mail adapter version 1.8 or higher and the receiver mail adapter version 1.9 or higher. If you use older adapter versions in your integration flows, you have to delete these adapters and recreate them.
Setup
To set up the OAuth2 connection for reading and sending e-mails with SAP Cloud Integration, do the following steps:
- Determine Redirect URI
- Create OAuth Client/App in Microsoft Azure Active Directory
- Create OAuth2 Authorization Code Credential in your SAP Cloud Integration tenant
- Configure Mail Sender Adapter in your integration flow
- Configure Mail Receiver Adapter in your integration flow
Determine Redirect URI
When you log into the SAP Cloud Integration or Integration Suite WEB-UI, you see your host name in the browser address field:
https://<host name>/itspaces (for Cloud Integration)


https://<host name>/shell/home (for Integration Suite)
Use the <host name> to construct the following redirect URI:
https://<host name>/itspaces/odata/api/v1/OAuthTokenFromCode |
You need this redirect URI in the next step.
Create OAuth Client/App in Microsoft Azure Active Directory
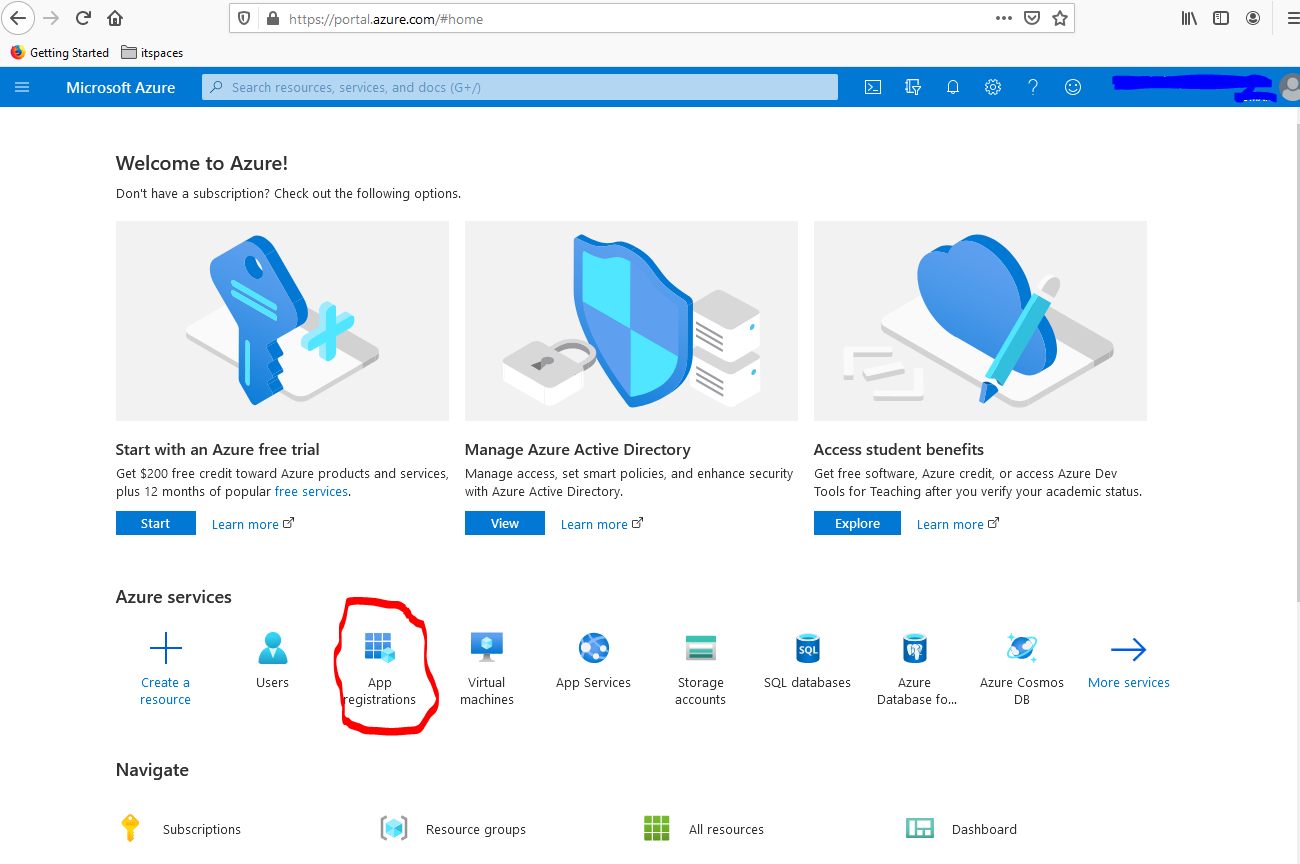
- Log into your Azure tenant by using https://portal.azure.com/
- Select "App registrations" under "Azure services".
- Click on "New registration”, provide a name for your app, choose in the drop down "Seledct a platform" the value "Web", and enter the redirect URI you determined at the beginning. Do not change the default setting for the “account types” (“Accounts in this organizational directory only”). After that, select "Register".

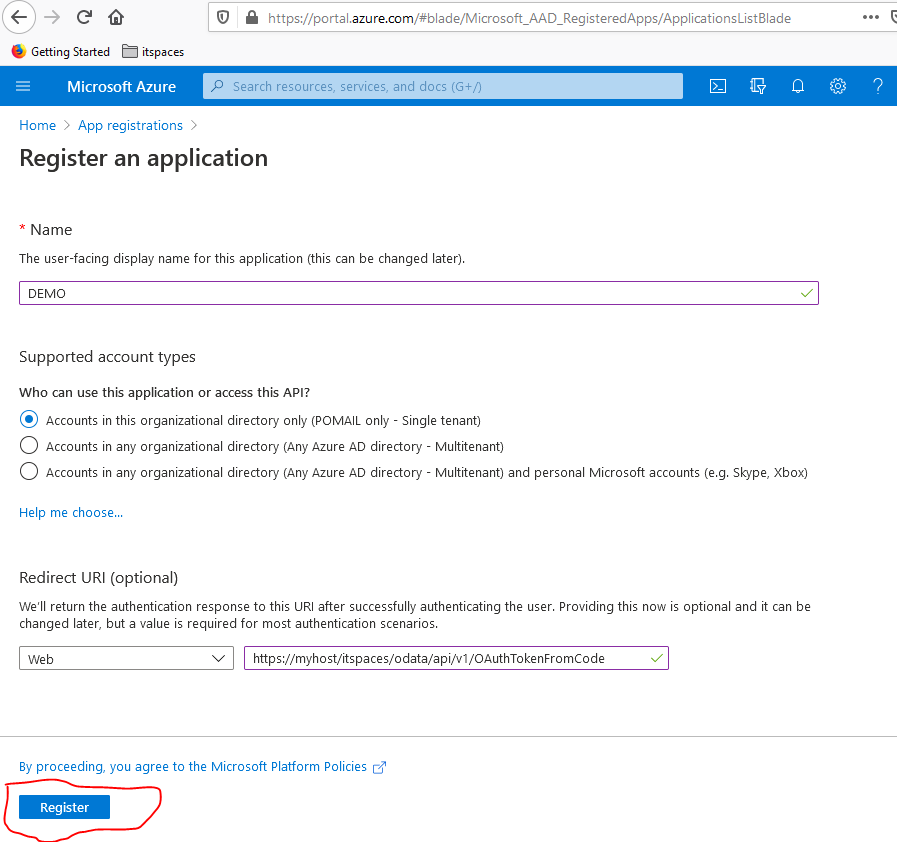
Remark: If you do not see the option "Account in this organizational directory only ..." for "Supported account types" then you do not have an organizational directory/tenant in Microsoft Azure. You have to first purchase such an organizational directory from Microsoft, before you can continue.
Save the Application (client) ID anywhere on your local desktop. You will need this ID later to configure the OAuth2 Credential in CPI.
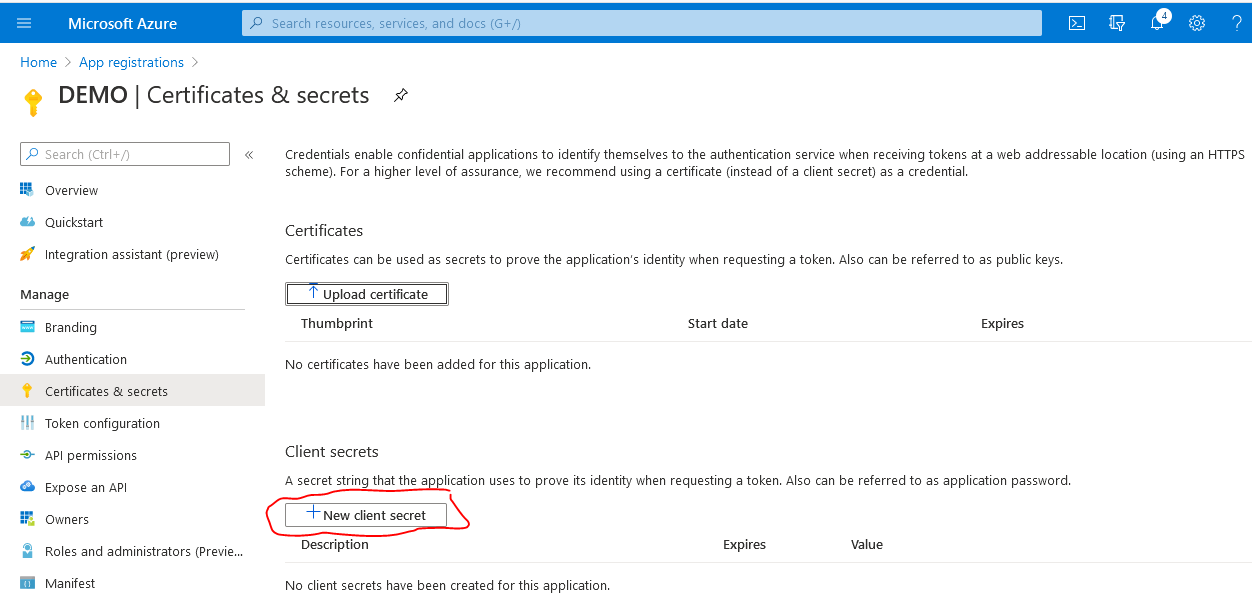
4. Choose "Certificates & secrets" in the menu on the left.

5. Select "New client secret", choose your preferred expiry period. Optionally, you can also add a description. When you're done, select "Add".

Remark: Before the secret expires you have to create a new secret and transfer the new secret to the SAP CPI OAuth2 Authorization Code credential (see below).
6. Use the "Copy to clipboard" button to remember the created secret (you will need this later to configure the OAuth2 credential in CPI).

7. Go back to the "Overview" view of the app and select the "Endpoints" tab.

Copy the "OAuth 2.0 authorization endpoint (v2)" and the "OAuth 2.0 token endpoint (v2)" to your local desktop. You need these values later for the creation of the OAuth2 credential in Cloud Integration.
8. Choose "API permissions" in the menu on the left and remove the permission "User.Read" if it is there.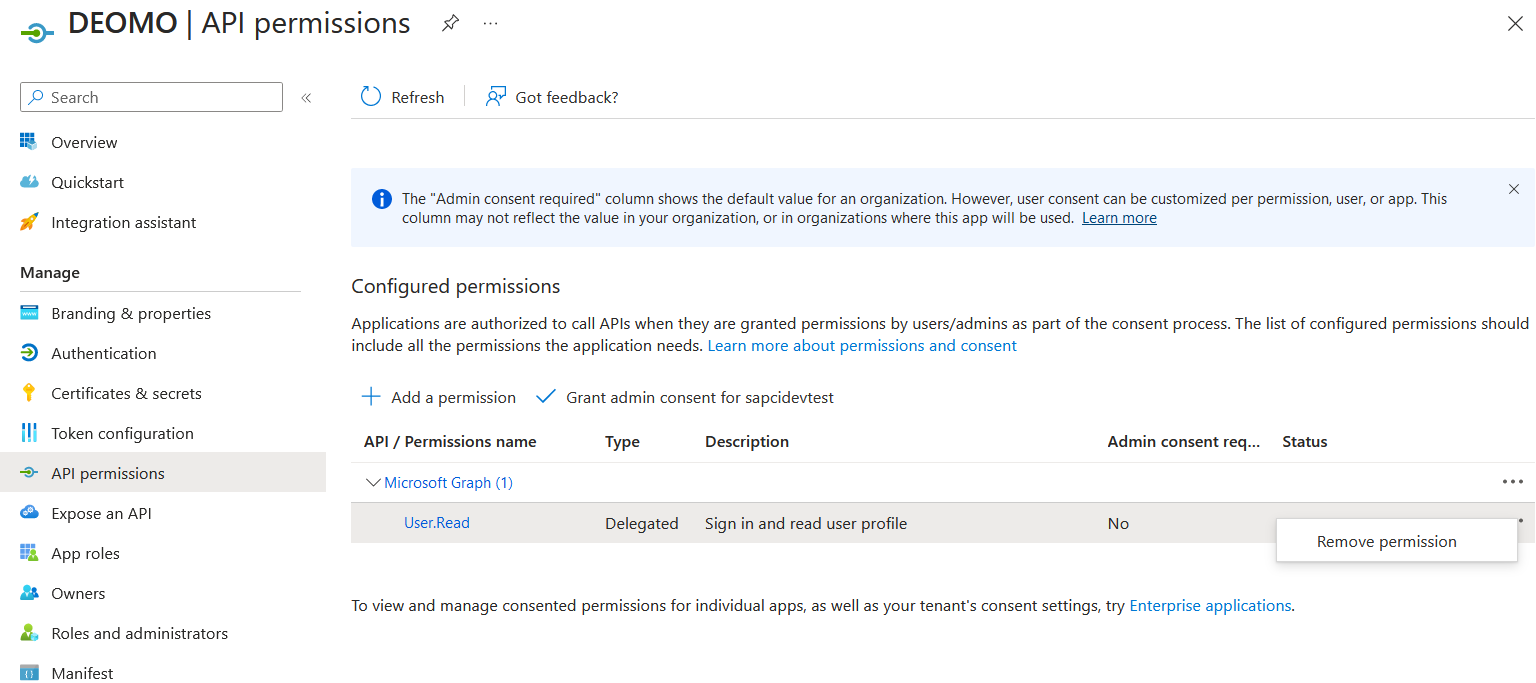 Click on "Add a permission" button
 Select Microsoft Graph
 Then select "Delegated permissions", enter in the search "SMTP.Send" if you want to send e-mails or "IMAP" if you want to read e-mails, and select the corresponding permission ("SMTP.Send" or "IMAP.AccessAsUser.All")
 Press the "Add permissions" button.
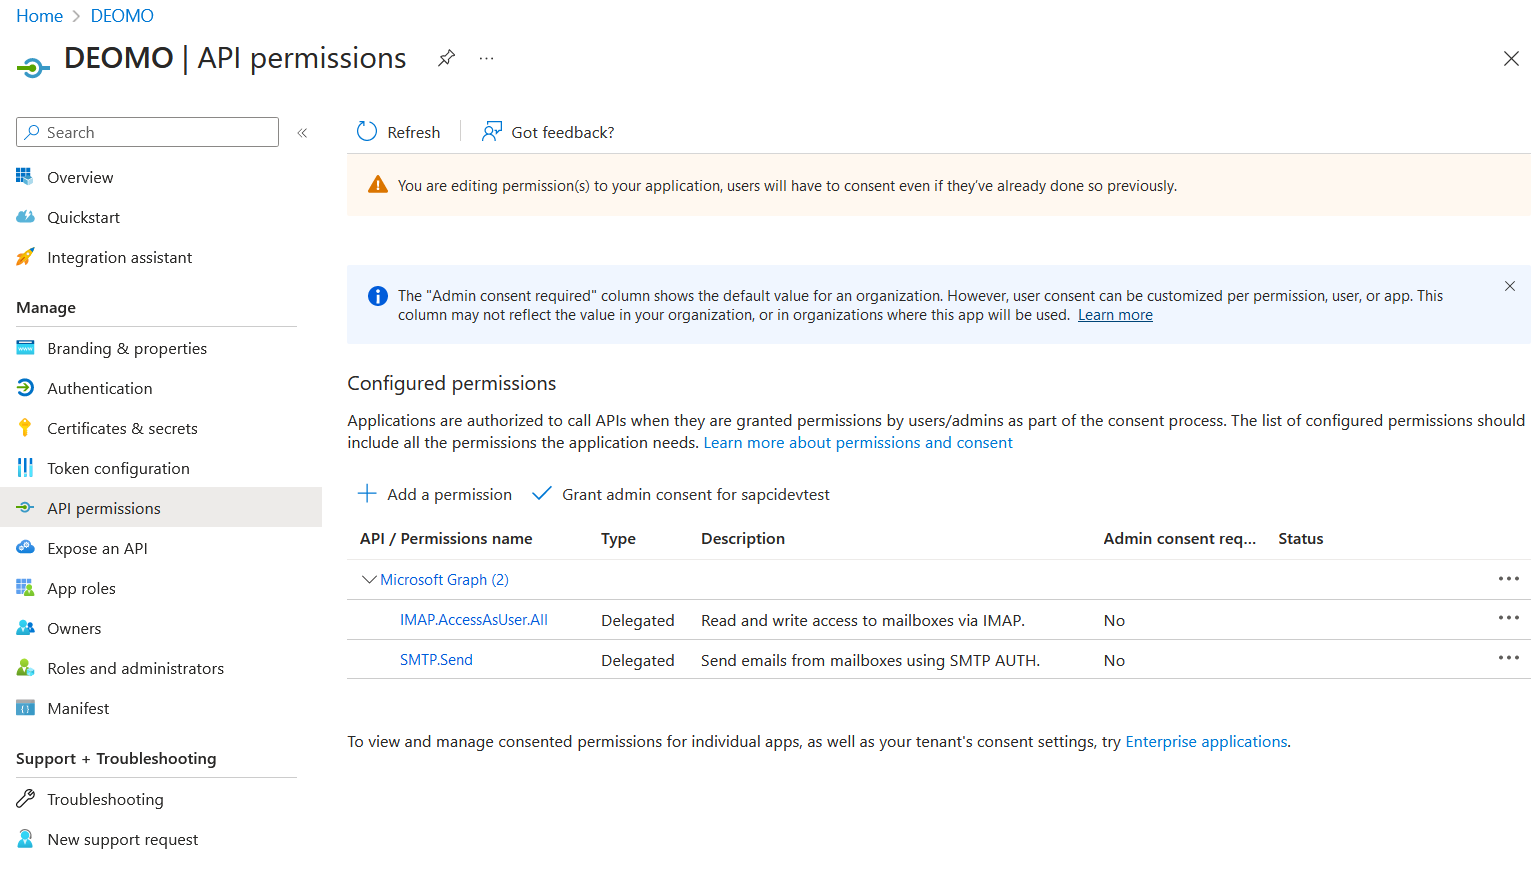 The above screenshot shows the result, if you add both permissions ("IMAP.AccessAndUser.All" and "SMTP.Send"). But be aware if you only want to send e-mails then you only need the permission "SMTP.Send", or if you only want to receive e-mails then you only need the permission "IMAP.AccessAndUser.All".
Create an OAuth2 Authorization Code Credential in SAP CPI Tenant
- Log into your Cloud Integration tenant via the URL https://<host name>/itspaces. Change to the "Operations View" (press the eye icon), and select the "Security Materials" tile. Select the "Create" button and choose "OAuth2 Authorization Code".

- Enter a name for the Credential and the "Authorization URL", "Token Service URL", "Client ID", and "Client Secret" from your Microsoft App.
Enter also a "User Name". This is the e-mail address of the user whose mail resources you want to access in an integration flow. This user must exist in the same Microsoft Azure directory/tenant as the App created and must have an Outlook 365 account.
Enter the necessary scope (see https://docs.microsoft.com/en-us/exchange/client-developer/legacy-protocols/how-to-authenticate-an-i...😞
- "https://outlook.office.com/IMAP.AccessAsUser.All" for accessing e-mails
- "https://outlook.office.com/SMTP.Send" for sending e-mails
Additionally, you need the scope "offline_access" for creating refresh tokens (if this scope is not added, SAP Cloud Integration will add this scope automatically). The scopes must be separated by a space.
The default value for the Refresh Token Expiry is set to 90 days for "Microsoft 365" (see: https://docs.microsoft.com/en-us/azure/active-directory/develop/active-directory-configurable-token-...). However, if the expiry time was changed for your Microsoft tenant, then you have to adjust this value. After clicking on the "Deploy" button, you see the newly created "OAuth2 Authorization Code" credential in the list of Security Materials in status "Unauthorized".

- Select the three dots in the entry with the created credential and choose the "Authorize" option.
A confirmation pop-up will come up. Select "Continue":
 A Microsoft login screen appears. Enter the password of the user you specified in the OAuth2 credential:
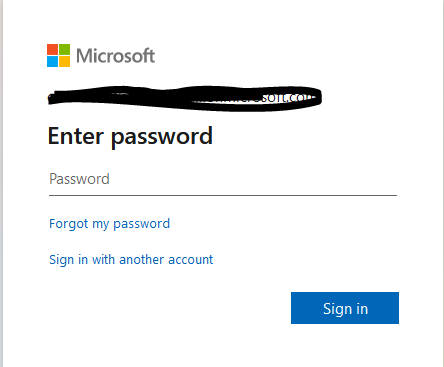
After you've selected "Sign in", a further pop-up comes up, indicating the requested permissions required by the app:

Select "Accept". You should get a success message:

Return to your previous browser page and refresh the Security Materials list (button "Reload content"). The state of the "OAuth2 Authorization Code" credential changed to "Deployed":

Now, with status "Deployed", the credential can be used by the mail adapters.
Configure the Mail Sender Adapter in an Integration Flow
We assume that you are familiar with the Integration Flow modeling in SAP Cloud Integration, and provide here only configuration details for the OAuth2 configuration in the mail adapter.
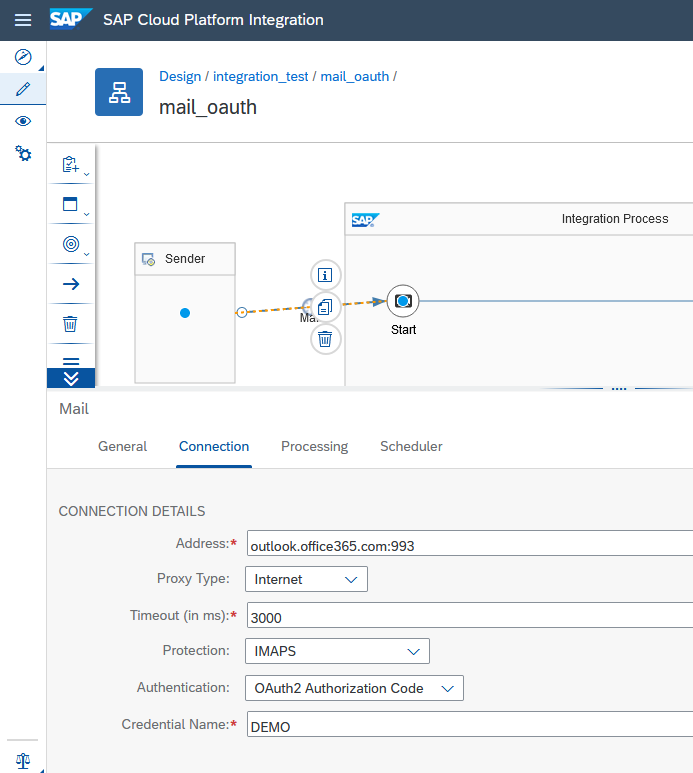
Be aware that the adapter version must be at least 1.8 (you see the version if you press the i button, see screen shot below). If your adapter has a lower version, then you have to delete the adapter and recreate the adapter (this will automatically use the newest version).
If you want to receive mails, you configure the Mail Sender Adapter with the created OAuth2 Credential. In the creation dialog for the Mail sender adapter, you have to chose the transport protocol "IMAP4" (we do not support OAuth2 for POP3). Enter the Address value "outlook.office365.com:993". In the "Connection" tab, choose "OAuth2 Authorization Code" as "Authentication". Protection must be defined as "IMAPS" for Microsoft 365.
Configure the Mail Receiver Adapter in an Integration Flow
Be aware that the receiver adapter version must be at least 1.9 (you see the version if you press the i button, see screen shot below). If your adapter has a lower version, then you have to delete the adapter and recreate the adapter (this will automatically use the newest version).
If you want to send mails, you need to configure the Mail Receiver adapter. Enter the Address value "smtp.office365.com:587". Enter "OAuth2 Authorization Code" for "Authentication" in the "Connection". Protection must be defined as "STARTTLS Mandatory" for Microsoft 365.

Using Shared Mailbox
Microsoft 365 supports shared mailboxes so that several people can access and write to the same mailbox. Only users who are members of the mailbox, can read mails from the shared mailbox or send mails from the shared mailbox. The shared mailbox itself does only have an e-mail address, but does not have a password. Members of the shared mailbox must have a licence for Outlook 365 (the cheapest license is "Exchange Online (Plan1)").
Reading from a Shared Mailbox
You can read e-mails from a shared mailbox with an OAuth2 Authorization Code credential, if you have the email address of the shared mailbox and a user/password of a member of the shared mailbox. You need the user/password of the member for "authorizing" the Oauth2 Authorization Code credential. Follow the below instructions when creating and "authorizing" the OAuth2 Authorization Code credential.
The shared mail box and the member of the shared mailbox must be members of the same Azure Directory as shown in the following screen shot of the Azure Portal user view:

During creating the OAuth2 Authorization Code credential you enter in the field "User Name" the email address of the shared mailbox, in the following screenshot the field is marked with a red circle. And we also recommend to add in the description the user name of the member of the shared mailbox which you will use for the "Authorize" action (marked with a blue circle).

When you "authorize" the credential (step 3 of above chapter "Create an OAuth2 Authorization Code Credential in SAP CPI Tenant") then you choose the option "Sign in with another account" in the login dialog.
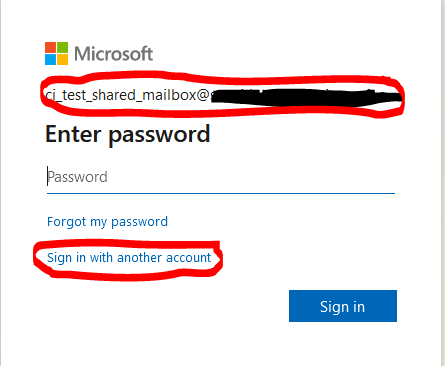
Now you can sign in with the member of the shared mailbox.

If you use this OAuth2 Authorization Code credential in the configuration of a mail sender adapter as described in the chapter "Configure the Mail Sender Adapter in an Integration Flow", then this adapter will read emails from the shared mailbox using the member user you used for the login.
Sending Mails from a Shared Mailbox
If you want to send mails which have in the "from" field the address of the shared mailbox, then you need a user which is member of the shared mailbox. During the configuration of the OAuth2 Authorization Code credential you use the e-mail address of the member in the field "User Name". Be also aware that the mailbox of the member must have SMTP enabled.
In the configuration of the receiver adapter you use the email of the sharad mailbox in the "from" field:

Limits and Scope
- SAP Cloud Integration does not support the authentication with OAuth2 for the POP protocol. If you are currently using the POP protocol in the mail sender adapter, you can switch to the IMAP protocol in order to use the OAuth2 authentication.
- The maximum number of OAuth2 Authorization Code credentials in a Cloud Integration tenant is limited to 500.
- Microsoft does not support OAuth2 for personal e-mail accounts ending in "outlook.com".
Troubleshooting
"BAD User is authenticated but not connected" due to Overload
Symptom:
- You have several integration flows with Mail sender adapters pulling from the same mailbox (same e-mail address).
- Some of the integration flows are working others are failing with the error "BAD User is authenticated but not connected". Some integration flows have the status "Error" and in the Status Details you see the mentioned error.
Cause
- The integration flows open too many connections to the mailbox at the same point in time.
Resolution
- The newer versions of the Mail sender adapter (since version 1.11) offer the setting "Automatically Disconnect". With this setting the connection to the mailbox will be closed as soon as the processing is finished so that other requests can get the connection. If your used Mail sender adapter does not have this option, delete the Mail sender adapter and recreate the adapter. The new version will provide you the setting.

- If you still get the overload problem, try to increase the period of the Mail sender adapter.
"The call to the token endpoint failed with HTTP return code 401" due to Secret Expired
Symptom:
- In the message processing of an iflow with mail adapter you see the error:
Http Connection failed with status 400 Bad Request; error message:
{
"error": {
"code": "Bad Request",
"message": {
"lang": "en",
"value": "[OAuthCodeCredentialManagement][OAUTH][TokenEndpointCallReturned401]:
The call to the token endpoint failed with HTTP return code 401 (Unauthenticated).
Please check the client ID and client secret of the OAuth2 Authorization Code Credential \"<Credential Name>\":
\"Problem during refreshing the refresh token for the OAuth2 Authorization Code Credential '<Credential Name>':
HTTP request failed: null( HTTP response code:
401, token URL 'https://login.microsoftonline.com/<your azure directory ID>/oauth2/v2.0/token',
client Id '<client ID of the Azure app>',
client secret SHA256 hash '<some hash value',
refresh token SHA 256 hash '<some hash value',
and scope 'https://outlook.office365.com/IMAP.AccessAsUser.All https://outlook.office365.com/SMTP.Send offline_access')\""
}
}
}
- In the Azure Portal you see for the app which corresponds to the client Id mentioned in the error message that the secret is expired:

Resolution:
- Create a new secret in the Azure app.
- Update the OAuth2 Authorization Code credential with the new secret in the Cloud Integration Web UI.
- Trigger the "Activate" action for the OAuth2 Authorization Code credential.
- SAP Managed Tags:
- SAP Integration Suite,
- Cloud Integration
Labels:
48 Comments
You must be a registered user to add a comment. If you've already registered, sign in. Otherwise, register and sign in.
Labels in this area
-
ABAP CDS Views - CDC (Change Data Capture)
2 -
AI
1 -
Analyze Workload Data
1 -
BTP
1 -
Business and IT Integration
2 -
Business application stu
1 -
Business Technology Platform
1 -
Business Trends
1,661 -
Business Trends
87 -
CAP
1 -
cf
1 -
Cloud Foundry
1 -
Confluent
1 -
Customer COE Basics and Fundamentals
1 -
Customer COE Latest and Greatest
3 -
Customer Data Browser app
1 -
Data Analysis Tool
1 -
data migration
1 -
data transfer
1 -
Datasphere
2 -
Event Information
1,400 -
Event Information
64 -
Expert
1 -
Expert Insights
178 -
Expert Insights
273 -
General
1 -
Google cloud
1 -
Google Next'24
1 -
Kafka
1 -
Life at SAP
784 -
Life at SAP
11 -
Migrate your Data App
1 -
MTA
1 -
Network Performance Analysis
1 -
NodeJS
1 -
PDF
1 -
POC
1 -
Product Updates
4,578 -
Product Updates
323 -
Replication Flow
1 -
RisewithSAP
1 -
SAP BTP
1 -
SAP BTP Cloud Foundry
1 -
SAP Cloud ALM
1 -
SAP Cloud Application Programming Model
1 -
SAP Datasphere
2 -
SAP S4HANA Cloud
1 -
SAP S4HANA Migration Cockpit
1 -
Technology Updates
6,886 -
Technology Updates
397 -
Workload Fluctuations
1
Related Content
- Top Picks: Innovations Highlights from SAP Business Technology Platform (Q1/2024) in Technology Blogs by SAP
- SAP GUI for Java 8.10 on the Horizon in Technology Blogs by SAP
- What’s New in SAP Analytics Cloud Release 2024.08 in Technology Blogs by SAP
- What’s New in SAP Datasphere Version 2024.8 — Apr 11, 2024 in Technology Blogs by Members
- It has never been easier to print from SAP with Microsoft Universal Print in Technology Blogs by Members
Top kudoed authors
| User | Count |
|---|---|
| 11 | |
| 11 | |
| 10 | |
| 9 | |
| 7 | |
| 7 | |
| 7 | |
| 7 | |
| 6 | |
| 5 |