
- SAP Community
- Products and Technology
- Technology
- Technology Blogs by SAP
- Cloud Integration – Using the JDBC Adapter to Impl...
Technology Blogs by SAP
Learn how to extend and personalize SAP applications. Follow the SAP technology blog for insights into SAP BTP, ABAP, SAP Analytics Cloud, SAP HANA, and more.
Turn on suggestions
Auto-suggest helps you quickly narrow down your search results by suggesting possible matches as you type.
Showing results for
Associate
Options
- Subscribe to RSS Feed
- Mark as New
- Mark as Read
- Bookmark
- Subscribe
- Printer Friendly Page
- Report Inappropriate Content
08-17-2020
1:20 PM
The JDBC adapter allows you to connect an integration flow with a database system. In this blog, I'll combine this topic with the topic of exception handling.
Let’s assume that you’ve implemented a simple scenario where you read the latest product details (e.g. the price) for a dedicated product from the WebShop component. A simple scenario that you might have used to solve this task is described under Sender-Initiated Scenario (with HTTPS Sender Adapter). In this scenario, the sender provides a product identifier with an HTTP request body. With the OData receiver adapter, SAP Cloud Integration connects to the WebShop and reads product details (for the given product identifier) from the WebShop’s product catalog. The product details are, finally, sent to an email account (with the Mail adapter).
Let’s consider what should happen in case the connection to the WebShop is temporarily not accessible? What can we do in order to make this scenario even more robust and reliable?
In this blog, I describe an enhanced variation of said scenario which handles such an error case in the following way: If the connection to the WebShop fails, Cloud Integration connects to a “fallback” database table instead of the WebShop. The database table contains a copy of the product catalog. The “database table is updated on a regular basis (e.g. once a day) with data from the WebShop by a separate, timer-based integration flow to make sure that this data source is as up-to-date as possible. Using this scenario, even if an error is thrown, product data can be retrieved that is as up-to-date as possible.
This is a use case for the SAP Cloud Integration JDBC adapter.
In the blog Cloud Integration – A Simple Demo Scenario Using the JDBC Adapter, I have given an introduction to the JDBC adapter and have shown step by step how to set up the connection to a database system. If you have not worked with this adapter yet, I recommend that you work through this blog first.
Let’s get started.
We need to create (and regularly update) a database table that contains the complete product list from the WebShop catalog with dedicated attributes for each product. We restrict the list of attributes for sakes of simplicity to the ProductId, Name, and Price. We need two integration flows to implement the scenario. The integration flows are related to each other as explained schematically in the following figure.
The integration flows work together in the following way.
The first integration flow (Regularly Update Product Table) is started by a timer event (in a productive scenario, scheduled such a way that the integration flow is processed regularly, e.g. once every day). The integration flow (1) reads the complete product list from the WebShop and (2) updates the “fallback” database table. With each message processing run, the complete product list is updated (to reflect the case that, e.g. a price might have changed since the last message processing run). This integration flow also stores the time when the database table is updated in a variable, so that this information is available in the second integration flow built to enrich the error information.
To show the capabilities of working with a database system, we design the product table in the following way: The table does not only just mirror the actual snapshot of the product catalog accessible through the WebShop’s OData API. Instead, the table rather presents the history of price changes: Every time a price has changed for a dedicated product (between two processing runs of this integration flow), a new entry is inserted for this product with the new price and the actual timestamp. That way, it would be possible to build a scenario on top of this integration flow where a consumer could analyze the price history of a product. Even if the WebShop demo application might not show a dedicated price history for its fictitious products, this table design and the way updates are taken might shed a light on the complexity you can manage when using a database system. It also gives you an idea about additional scenarios you can build on top of this design.
The second integration flow (Read Product Details) (3) reads details for a product (associated with the value of the productId element provided with the message body of an inbound HTTP request). In case the connection to the WebShop component is successful, the result message is stored as a data store entry (with an entry ID Success).
Note, to simplify the design, I will not add an email receiver but use a data store to simulate a receiver (in a similar way like in the integration flows for the integration flow design guidelines, see Generic Receiver). The result messages are sent to the data store instead of an email receiver.
In case the connection to the WebShop component fails (4), the integration flow connects to the database system and reads the latest information for the product stored in the “fallback” table (5). This information is also stored as a data store entry (in this case, with entry ID Error). The message in the error case contains additional information to make the reader aware of the fact that the information this time comes from the “fallback” table because an error occurred. The error message will also contain the timestamp of when the “fallback” table has been updated.
Both integration flows run independently from each other. Therefore, we’ll use a global variable to share the timestamp (6) of the latest update of the “fallback” database table between the two integration flows.
Note that the data store used to simulate a receiver is located on the Cloud Integration tenant (in the tenant database), whereas the ASE database that contains the “fallback” product table is usually located on another subaccount.
The global variable used to share the timestamp is also stored in the tenant database.
Let’s use a table with the name ProductTable. Let’s assume that no such table already exists in the database system (when you’re the only user of the tenant and you do this exercise the first time, this is a valid assumption).
However, for thorough readers, I would like to add the following comment: it could be the case that you and your colleagues share the same database system. In such a situation, there might already be a table in the database system with the same name. In that case, you would either run into an error when trying to manually create a table with the same name again, or you would create inconsistent data when updating the (already existing) table. Also consider the case that in a productive environment you need to deal with many different integration flows working on the same database system. In such a case, the creation of the database table needs to be designed in a way that anticipates future problems, i.e. that a table with a certain name already exists. You can, for example, add a step where Cloud Integration checks with an SQL select statement first if a database table with the desired name already exists. Only if that is not the case, Cloud Integration will create a new table. Else, an error message is raised.
However, for now I’ll keep it simple and show you how to create a database table with the proposed name without further considerations. To do that, you can simply use the integration flow from the blog Cloud Integration – A Simple Demo Scenario Using the JDBC Adapter and set up a Postman call with the request body:
In other words, a table with the name provided by the calling integration flow with the columns ProductId, Name, Price, and Time is created.
ProductId, Name and Price are stored as characters with variable lengths. The Time column has been added to store the system time when the database table is updated by the first integration flow (timestamp for the table update time provided by the global variable). In that case, the data is stored as a character in datetime format which means that it will consist of two integers, representing the day and the time.
Now, I’ll we explain how to design the two new integration flows.
Let me briefly explain how the integration flow Regularly Update Product Table is supposed to work, and then the settings of its components in more detail.
The integration flow works in the following way:
Once the Timer step (1) initiates the integration flow execution, the first Content Modifier (2) creates an exchange property for the table name. Furthermore, it creates a property that contains the actual system time.
The OData adapter (3) calls the WebShop reading the complete list of products (with attributes ProductId, Name, and Price).
As we’d like to make the information about the time when the product table was updated available for the second integration flow Read Product Details, we store the system time (from the property set in step 2) in a Write Variables step (4) as a global variable. Note that both integration flows run independently from each other. Therefore, a variable shared on the tenant is the option to go (as this data cannot be transferred from one integration flow to the other in a header).
A General Splitter (5) splits the message (which is a list of several products) so that one message per product results out of this step. This step is required because the integration flow needs to update the table product-by-product in a loop. The subsequent Content Modifier (6) creates exchange properties for all product attributes to be stored in the table. The following Content Modifier (7) contains the SQL command which uses the exchange properties created in the previous Content Modifier as dynamic variables. At runtime, an SQL statement with concrete values for ProductId, Name and Price is injected into the database system in each split loop. Lastly, the JDBC adapter (8) opens the connection to the database system to enable the integration flow to place the SQL operation on the table.
Now let’s go through the integration flow components one-by-one: For the Timer step, we propose that you specify the Scheduler setting Run Once. In a productive scenario, it would make sense to specify a regular initiation of the integration flow as the product table needs to be updated on a regular basis.
In the first Content Modifier (2), tab Exchange Property, add two properties like shown in this screenshot.
The first property sets the property Tablename. Note that I define the Value parameter as externalized parameter. This makes it more convenient to configure a unique table name for both involved integration flows.
For the second property, specify the Name as TableUpdateTime and for Type select Expression. In the Value field, enter the following expression:
This expression from Camel Simple Language retrieves the actual system time. We need this value in a later step to store it as a global variable (so that the other integration flow that reads the product details in the error case can get the information about the system time when the product table has been updated the latest).
Configure the OData receiver adapter in the following way:
In the Connection tab, enter the address of the WebShop OData API:
In the Processing tab, make sure that as Resource Path the entity Products is selected and that the Query Options field contains the following expression:
Configure the Write Variables step (number 4 in Figure above) in the following way.
Add a variable with the following settings: As Name enter TableUpdateTime; as Type, select Property; and as Value enter TableUpdateTime, and select the Global Scope checkbox. Based on these settings, this step stores the content of the property TableUpdateTime (which is the system time when the second content modifier is processed) as a global variable (that is also available to other integration flows on the same tenant).
The General Splitter (5) requires the following settings.
Note that the OData receiver adapter reads a list of products (a bulk message with multiple product items) from the WebShop API. Also, the database table needs to be filled out anew for each product individually because checks for each product are required whether a table record (with a certain value for ProductId and Price) already exists. Only if that is not the case, a new entry is inserted into the table (I’ll explain the corresponding SQL statement in a minute). Therefore, a message split is required, and as split point the Product element of the OData response is to be specified. Therefore, as Expression Type, keep the default setting XPath, and as XPath Expression enter //Product. Leave the other settings as proposed by the system.
Following the General Splitter step (6), in the Content Modifier define properties for all three attributes that are given for a product in the OData response message (as given by the OData adapter selection criteria $select=ProductId,Name,Price, see above). We need to extract these values from the response (XML) message and store them in properties to make them available for the subsequent Content Modifier that contains the SQL command.
Configure the Exchange Property settings as shown in the following screenshot.
Note that I used small letters for the properties to distinguish between the properties and the names of the elements in the response from the WebShop. This is not necessary but makes it easier to analyze the message flow in case of an error.
Note that the SQL command is operated for each split message one-by-one and for each value of ProductId contained in the response message from the WebShop.
The next Content Modifier (7), in the Message Body tab, contains the SQL command to be executed on the database table:
In detail, this SQL operation checks if a table entry exists with ProductId and Price given by the values of the properties productId and price this loop.
Note that as we have defined the properties in the preceding Content Modifier with small letters, it is easy now for you to distinguish properties from table entities.
As the attribute Name is uniquely associated with a ProductId, we don’t need to check for this value here explicitly. You might also notice that the table name is given dynamically by the value of a related property as defined by you with the externalized parameter for the second Content Modifier of this integration flow. If no such entry exists, a new entry is created with these values and the actual system time (defined with the dynamic expression ${property.TableUpdateTime}). This time reflects the update time and is also stored as a global variable so that the integration flow that reads the product details can consume it.


According to these settings, this step stores the content of the Name and Price fields of the OData response as properties.
In the subsequent Content Modifier (5), define the message body by the following expression (in tab Message Body😞
For parameter Type select Expression.
The resulting message is to be stored as a data store entry. For that purpose, a data store Write step (6) with the settings as shown in the screenshot follows the Content Modifier.
The step creates a data store with name ProductInformation and an entry with entry ID Success. As mentioned above, we store the result message in a data store instead sending it to a receiver system (for sakes of simplicity). Let's keep the option Overwrite Existing Message enabled. If you would not enable that option, Cloud Integration would raise an error in case a data store entry with the same entry ID already exists (from a previous message processing run).
Now, let’s enhance the integration flow by adding the exception handling.
Let’s first discuss what should happen in case of an error with the OData connection. In such a case, the Exception Subprocess (see: Extend Integration Flows with Exception Subprocesses) (7) takes over message processing and performs the following steps:
In the Exception Subprocess, a first Content Modifier (8) defines the SQL SELECT statement which uses the dynamically resolved value of the productId property to define which table entry to read. The JDBC adapter (9) opens the connection to the database system. In a subsequent Content Modifier (10), three exchange properties are created: one for the timestamp of the time when the table has been updated at the latest (this value is retrieved from the global variable created by the first integration flow), one for the price of the product (as read from the respective table row), and another one for the product name. The next Content Modifier (11) creates the message body using all three properties as dynamic expressions. The message is stored as data store entry (12) (with entry ID Error) in the same data store as in the success case.
Let me walk you through the steps contained in the Exception Subprocess one-by-one.
The first Content Modifier (8) contains the SQL statement (in the Message Body tab):
For parameter Type select Expression.
That means, for the given value of productId in the inbound message, the related record is selected from the product table (which has been defined by the other integration flow).
Configure the JDBC adapter (9) in exactly the same way as in the other integration flow (see setup of the first integration flow) with the JDBC Data Source Alias defined as externalized parameter.
For the Content Modifier, after the Request Reply step (10), specify the settings as shown in the following screenshot.
Define the following three properties (in the Exchange Property tab):
Note that property timestamp gets the system time when the integration flow that updates the product table had its last processing run (from the global variable created by this other integration flow).
The last two properties store values contained in the response from the database call as properties and are required to define the message body in the succeeding Content Modifier.
The next Content Modifier (11) (tab Message Body) defines the message body for the error case and is configured as shown below.
Note that, as compared to the message created in the success case, the following paragraph was added that in the response from the integration flow you can easily see if the main process or the exception subprocess was taken:
You also notice that the point in time when the product table was updated the last time is also given in the message to make it easier for support people to handle the situation.
The resulting message is to be stored as a data store entry. For that purpose, a data store Write step (12) with the settings shown in the screenshot follows the Content Modifier:

Now you can initiate the integration flow by sending an HTTP request with Postman. We would like to provide the productId value with the message body. To keep it simple, let's define the following message body (with the productId value HT-1000😞
In success mode (when the connection to the WebShop application is without any error), you get a response from the WebShop looking like this:
Now, let’s see what happens in case of the exception that the WebShop is not accessible. To initiate a broken connection to the WebShop, when configuring integration flow Read Product Details, enter a wrong address for the WebShop in the OData adapter, save and deploy the integration flow again.
When you run the integration flow again, you should get a response with the product details, but with a modified text appended (assuming there was no price change between the processing of the Timer-initiated integration flow and this one):
Let’s assume that you’ve implemented a simple scenario where you read the latest product details (e.g. the price) for a dedicated product from the WebShop component. A simple scenario that you might have used to solve this task is described under Sender-Initiated Scenario (with HTTPS Sender Adapter). In this scenario, the sender provides a product identifier with an HTTP request body. With the OData receiver adapter, SAP Cloud Integration connects to the WebShop and reads product details (for the given product identifier) from the WebShop’s product catalog. The product details are, finally, sent to an email account (with the Mail adapter).
Let’s consider what should happen in case the connection to the WebShop is temporarily not accessible? What can we do in order to make this scenario even more robust and reliable?
In this blog, I describe an enhanced variation of said scenario which handles such an error case in the following way: If the connection to the WebShop fails, Cloud Integration connects to a “fallback” database table instead of the WebShop. The database table contains a copy of the product catalog. The “database table is updated on a regular basis (e.g. once a day) with data from the WebShop by a separate, timer-based integration flow to make sure that this data source is as up-to-date as possible. Using this scenario, even if an error is thrown, product data can be retrieved that is as up-to-date as possible.
This is a use case for the SAP Cloud Integration JDBC adapter.
In the blog Cloud Integration – A Simple Demo Scenario Using the JDBC Adapter, I have given an introduction to the JDBC adapter and have shown step by step how to set up the connection to a database system. If you have not worked with this adapter yet, I recommend that you work through this blog first.
Let’s get started.
Overview
We need to create (and regularly update) a database table that contains the complete product list from the WebShop catalog with dedicated attributes for each product. We restrict the list of attributes for sakes of simplicity to the ProductId, Name, and Price. We need two integration flows to implement the scenario. The integration flows are related to each other as explained schematically in the following figure.

The integration flows work together in the following way.
The first integration flow (Regularly Update Product Table) is started by a timer event (in a productive scenario, scheduled such a way that the integration flow is processed regularly, e.g. once every day). The integration flow (1) reads the complete product list from the WebShop and (2) updates the “fallback” database table. With each message processing run, the complete product list is updated (to reflect the case that, e.g. a price might have changed since the last message processing run). This integration flow also stores the time when the database table is updated in a variable, so that this information is available in the second integration flow built to enrich the error information.
To show the capabilities of working with a database system, we design the product table in the following way: The table does not only just mirror the actual snapshot of the product catalog accessible through the WebShop’s OData API. Instead, the table rather presents the history of price changes: Every time a price has changed for a dedicated product (between two processing runs of this integration flow), a new entry is inserted for this product with the new price and the actual timestamp. That way, it would be possible to build a scenario on top of this integration flow where a consumer could analyze the price history of a product. Even if the WebShop demo application might not show a dedicated price history for its fictitious products, this table design and the way updates are taken might shed a light on the complexity you can manage when using a database system. It also gives you an idea about additional scenarios you can build on top of this design.
The second integration flow (Read Product Details) (3) reads details for a product (associated with the value of the productId element provided with the message body of an inbound HTTP request). In case the connection to the WebShop component is successful, the result message is stored as a data store entry (with an entry ID Success).
Note, to simplify the design, I will not add an email receiver but use a data store to simulate a receiver (in a similar way like in the integration flows for the integration flow design guidelines, see Generic Receiver). The result messages are sent to the data store instead of an email receiver.
In case the connection to the WebShop component fails (4), the integration flow connects to the database system and reads the latest information for the product stored in the “fallback” table (5). This information is also stored as a data store entry (in this case, with entry ID Error). The message in the error case contains additional information to make the reader aware of the fact that the information this time comes from the “fallback” table because an error occurred. The error message will also contain the timestamp of when the “fallback” table has been updated.
Both integration flows run independently from each other. Therefore, we’ll use a global variable to share the timestamp (6) of the latest update of the “fallback” database table between the two integration flows.
Note that the data store used to simulate a receiver is located on the Cloud Integration tenant (in the tenant database), whereas the ASE database that contains the “fallback” product table is usually located on another subaccount.
The global variable used to share the timestamp is also stored in the tenant database.
Creating the Product Table
Let’s use a table with the name ProductTable. Let’s assume that no such table already exists in the database system (when you’re the only user of the tenant and you do this exercise the first time, this is a valid assumption).
However, for thorough readers, I would like to add the following comment: it could be the case that you and your colleagues share the same database system. In such a situation, there might already be a table in the database system with the same name. In that case, you would either run into an error when trying to manually create a table with the same name again, or you would create inconsistent data when updating the (already existing) table. Also consider the case that in a productive environment you need to deal with many different integration flows working on the same database system. In such a case, the creation of the database table needs to be designed in a way that anticipates future problems, i.e. that a table with a certain name already exists. You can, for example, add a step where Cloud Integration checks with an SQL select statement first if a database table with the desired name already exists. Only if that is not the case, Cloud Integration will create a new table. Else, an error message is raised.
However, for now I’ll keep it simple and show you how to create a database table with the proposed name without further considerations. To do that, you can simply use the integration flow from the blog Cloud Integration – A Simple Demo Scenario Using the JDBC Adapter and set up a Postman call with the request body:
Create table ProductTable (ProductId varchar(255), Name varchar(255), Price varchar(255), Time datetime)In other words, a table with the name provided by the calling integration flow with the columns ProductId, Name, Price, and Time is created.
ProductId, Name and Price are stored as characters with variable lengths. The Time column has been added to store the system time when the database table is updated by the first integration flow (timestamp for the table update time provided by the global variable). In that case, the data is stored as a character in datetime format which means that it will consist of two integers, representing the day and the time.
Now, I’ll we explain how to design the two new integration flows.
Creating the Integration Flow to Regularly Update Product Table
Let me briefly explain how the integration flow Regularly Update Product Table is supposed to work, and then the settings of its components in more detail.

The integration flow works in the following way:
Once the Timer step (1) initiates the integration flow execution, the first Content Modifier (2) creates an exchange property for the table name. Furthermore, it creates a property that contains the actual system time.
The OData adapter (3) calls the WebShop reading the complete list of products (with attributes ProductId, Name, and Price).
As we’d like to make the information about the time when the product table was updated available for the second integration flow Read Product Details, we store the system time (from the property set in step 2) in a Write Variables step (4) as a global variable. Note that both integration flows run independently from each other. Therefore, a variable shared on the tenant is the option to go (as this data cannot be transferred from one integration flow to the other in a header).
A General Splitter (5) splits the message (which is a list of several products) so that one message per product results out of this step. This step is required because the integration flow needs to update the table product-by-product in a loop. The subsequent Content Modifier (6) creates exchange properties for all product attributes to be stored in the table. The following Content Modifier (7) contains the SQL command which uses the exchange properties created in the previous Content Modifier as dynamic variables. At runtime, an SQL statement with concrete values for ProductId, Name and Price is injected into the database system in each split loop. Lastly, the JDBC adapter (8) opens the connection to the database system to enable the integration flow to place the SQL operation on the table.
Now let’s go through the integration flow components one-by-one: For the Timer step, we propose that you specify the Scheduler setting Run Once. In a productive scenario, it would make sense to specify a regular initiation of the integration flow as the product table needs to be updated on a regular basis.
In the first Content Modifier (2), tab Exchange Property, add two properties like shown in this screenshot.

The first property sets the property Tablename. Note that I define the Value parameter as externalized parameter. This makes it more convenient to configure a unique table name for both involved integration flows.
For the second property, specify the Name as TableUpdateTime and for Type select Expression. In the Value field, enter the following expression:
${date:now:yyyy-MM-dd HH:mm:ss}This expression from Camel Simple Language retrieves the actual system time. We need this value in a later step to store it as a global variable (so that the other integration flow that reads the product details in the error case can get the information about the system time when the product table has been updated the latest).
Configure the OData receiver adapter in the following way:
In the Connection tab, enter the address of the WebShop OData API:
https://refapp-espm-ui-cf.cfapps.eu10.hana.ondemand.com/espm-cloud-web/espm.svc/In the Processing tab, make sure that as Resource Path the entity Products is selected and that the Query Options field contains the following expression:
$select=ProductId,Name,Price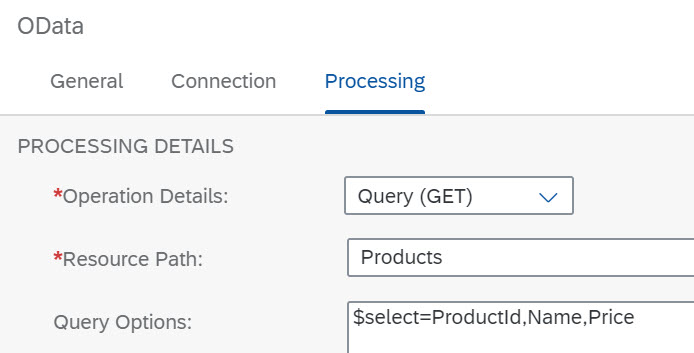
Configure the Write Variables step (number 4 in Figure above) in the following way.

Add a variable with the following settings: As Name enter TableUpdateTime; as Type, select Property; and as Value enter TableUpdateTime, and select the Global Scope checkbox. Based on these settings, this step stores the content of the property TableUpdateTime (which is the system time when the second content modifier is processed) as a global variable (that is also available to other integration flows on the same tenant).
The General Splitter (5) requires the following settings.

Note that the OData receiver adapter reads a list of products (a bulk message with multiple product items) from the WebShop API. Also, the database table needs to be filled out anew for each product individually because checks for each product are required whether a table record (with a certain value for ProductId and Price) already exists. Only if that is not the case, a new entry is inserted into the table (I’ll explain the corresponding SQL statement in a minute). Therefore, a message split is required, and as split point the Product element of the OData response is to be specified. Therefore, as Expression Type, keep the default setting XPath, and as XPath Expression enter //Product. Leave the other settings as proposed by the system.
Following the General Splitter step (6), in the Content Modifier define properties for all three attributes that are given for a product in the OData response message (as given by the OData adapter selection criteria $select=ProductId,Name,Price, see above). We need to extract these values from the response (XML) message and store them in properties to make them available for the subsequent Content Modifier that contains the SQL command.
Configure the Exchange Property settings as shown in the following screenshot.

Note that I used small letters for the properties to distinguish between the properties and the names of the elements in the response from the WebShop. This is not necessary but makes it easier to analyze the message flow in case of an error.
Note that the SQL command is operated for each split message one-by-one and for each value of ProductId contained in the response message from the WebShop.
The next Content Modifier (7), in the Message Body tab, contains the SQL command to be executed on the database table:
IF NOT EXISTS (SELECT * FROM ${property.TableName} WHERE ProductId = '${property.productId}' AND Price = '${property.price}')

BEGIN

INSERT INTO ${property.TableName} (ProductId, Name, Price, Time) VALUES ('${property.productId}', '${property.name}', '${property.price}', '${property.TableUpdateTime}')

END
In detail, this SQL operation checks if a table entry exists with ProductId and Price given by the values of the properties productId and price this loop.
Note that as we have defined the properties in the preceding Content Modifier with small letters, it is easy now for you to distinguish properties from table entities.
As the attribute Name is uniquely associated with a ProductId, we don’t need to check for this value here explicitly. You might also notice that the table name is given dynamically by the value of a related property as defined by you with the externalized parameter for the second Content Modifier of this integration flow. If no such entry exists, a new entry is created with these values and the actual system time (defined with the dynamic expression ${property.TableUpdateTime}). This time reflects the update time and is also stored as a global variable so that the integration flow that reads the product details can consume it.
The condition takes into account the following cases:
- A record already exists for the given ProductId value but with a different price. That means, the price has changed since the last message processing run and, therefore, a new record needs to be stored.
- No record exists already (neither for the given ProductId nor the Price value in the current loop). In that case, a new product has been published since the recent message processing run and, therefore, also a new record needs to be added to the table.
Only if since the last message processing run a new product has been added or the price of an existing product has been changed, a new record with the actual timestamp is added. That fits exactly to the requirement that the product table should be able to record the product price history. The accuracy of the “price history” is given by the frequency of message processing runs configured in the Timer step of the integration flow.
Specify the Processing settings of the JDBC adapter as follows.
Note that we recommend that you define the JDBC Data Source Alias as an externalized parameter, that means, when editing the channel, enter the following expression:
{{mydatabase}}Before deploying this integration flow, you can specify the actual value of this parameter (as defined when setting up your database system) by configuring the integration flow (without the need to edit the integration flow model again).
Save the integration flow, but wait with its deployment as with the first message processing run the table is already created. We’d like to show this later when you have designed the second integration flow.
Creating Integration Flow to Read Product Details
I’ll design the integration flow Read Product Details in two steps:
- I will first create the “good day” scenario without the fallback database. It reads product details from the WebShop and stores the result in a data store entry with entry ID Success.
- I will then enhance the “good day” scenario by adding an Exception Subprocess with a connection to the fallback database.
Let’s first create the “good day” scenario:
The HTTP client provides (1) a productid element with an actual value as part of the body of the HTTP request. A first, the Content Modifier (2) stores two exchange properties: The (externalized) name of the table (it must be identical to the table name used by the first integration flow), and the productId value (from the inbound message body). The OData channel (3) reads the product information from the WebShop for the given product identifier. The Content Modifier (4) stores the name and price attributes from the OData response as properties. The subsequent Content Modifier (5) creates the message body. Finally, the message body is stored as a data store entry (6).
Let’s start designing this integration flow.
For the HTTPS channel, you can define an address unique across the tenant (e.g., /readProductPrice).
Configure the Content Modifier (2) as shown in the following screenshot:
The property for the table name is defined as an externalized parameter. Before we run the scenario, we need to make sure that the value of this property is the same as for the first integration flow.
Configure the OData channel like described in Create the Outbound OData Channel. In particular, specify the following settings:
- In the Connection tab, enter the address of the WebShop OData API:
https://refapp-espm-ui-cf.cfapps.eu10.hana.ondemand.com/espm-cloud-web/espm.svc/Make sure to define the address also as externalized parameter. This makes it easy later, before deploying the integration flow, to define a "wrong" address (to simulate the situation that the WebShp cannot be reached).
- In the Processing tab, make sure that as Resource Path the entity Products is selected and that the Query Options field contains the following expression (so that the attributes ProductId, Name and Price are retrieved):
$select=ProductId,Name,Price&$filter=ProductId eq '${property.productId}'To configure the Content Modifier (4) after the OData call, in tab Exchange Property add the properties as shown in the followinh screenshot.
According to these settings, this step stores the content of the Name and Price fields of the OData response as properties.
In the subsequent Content Modifier (5), define the message body by the following expression (in tab Message Body😞
Product ${property.name} with ID ${property.productId} has the following price: ${property.price}.For parameter Type select Expression.

The resulting message is to be stored as a data store entry. For that purpose, a data store Write step (6) with the settings as shown in the screenshot follows the Content Modifier.

The step creates a data store with name ProductInformation and an entry with entry ID Success. As mentioned above, we store the result message in a data store instead sending it to a receiver system (for sakes of simplicity). Let's keep the option Overwrite Existing Message enabled. If you would not enable that option, Cloud Integration would raise an error in case a data store entry with the same entry ID already exists (from a previous message processing run).
Now, let’s enhance the integration flow by adding the exception handling.

Let’s first discuss what should happen in case of an error with the OData connection. In such a case, the Exception Subprocess (see: Extend Integration Flows with Exception Subprocesses) (7) takes over message processing and performs the following steps:
In the Exception Subprocess, a first Content Modifier (8) defines the SQL SELECT statement which uses the dynamically resolved value of the productId property to define which table entry to read. The JDBC adapter (9) opens the connection to the database system. In a subsequent Content Modifier (10), three exchange properties are created: one for the timestamp of the time when the table has been updated at the latest (this value is retrieved from the global variable created by the first integration flow), one for the price of the product (as read from the respective table row), and another one for the product name. The next Content Modifier (11) creates the message body using all three properties as dynamic expressions. The message is stored as data store entry (12) (with entry ID Error) in the same data store as in the success case.
Let me walk you through the steps contained in the Exception Subprocess one-by-one.
The first Content Modifier (8) contains the SQL statement (in the Message Body tab):
SELECT * FROM ${property.TableName} WHERE ProductId='${property.productId}'For parameter Type select Expression.

That means, for the given value of productId in the inbound message, the related record is selected from the product table (which has been defined by the other integration flow).
Configure the JDBC adapter (9) in exactly the same way as in the other integration flow (see setup of the first integration flow) with the JDBC Data Source Alias defined as externalized parameter.
For the Content Modifier, after the Request Reply step (10), specify the settings as shown in the following screenshot.

Define the following three properties (in the Exchange Property tab):
Note that property timestamp gets the system time when the integration flow that updates the product table had its last processing run (from the global variable created by this other integration flow).
The last two properties store values contained in the response from the database call as properties and are required to define the message body in the succeeding Content Modifier.
The next Content Modifier (11) (tab Message Body) defines the message body for the error case and is configured as shown below.

Note that, as compared to the message created in the success case, the following paragraph was added that in the response from the integration flow you can easily see if the main process or the exception subprocess was taken:
Product ${property.name} with ID ${property.productId} has the following price: ${property.price}.

Caution: data might be outdated (last synchronization with WebShop on ${property.timestamp}).
You also notice that the point in time when the product table was updated the last time is also given in the message to make it easier for support people to handle the situation.
The resulting message is to be stored as a data store entry. For that purpose, a data store Write step (12) with the settings shown in the screenshot follows the Content Modifier:

Running the Scenario
Now that we’re all set up and ready to go, let’s first run the first integration flow to fill the product table with content.
- Open the integration flow Regularly Update Product Table that you’ve just developed in the previous tutorial.
- Select Configure.
- Open the dropdown list under All Parameters and select Content Modifier.
- As Value enter the name of the product table (e.g. ProductTable).
- Click Save.
- Click Deploy.
If everything works well, the integration flow now creates the product table, filling it with the content from the WebShop.
You can check the content of the database table by calling the integration flow with the help of information provided in this blog Cloud Integration – A Simple Demo Scenario Using the JDBC Adapter. Provide the following SQL command in the request body in Postman:
Select * From ProductTableIf the integration flow was processed without errors, you get a response that contains multiple entries for different products:
To deploy and run the second integration flow (that reads product details), perform the following steps:
- Open integration flow Read Product Details that you’ve just developed in the previous tutorial.
- Select Configure.
- Open the dropdown list under All Parameters and select Content Modifier.
- As Value, enter the name of the product table (e.g. ProductTable).
Make sure that you use exactly the same name as configured for the integration flow Regularly Update Product Table. Both integration flows work on the same database table.
- Click Save.
- Click Deploy.
Now you can initiate the integration flow by sending an HTTP request with Postman. We would like to provide the productId value with the message body. To keep it simple, let's define the following message body (with the productId value HT-1000😞
<root><productId>HT-1000</productId></root>
In success mode (when the connection to the WebShop application is without any error), you get a response from the WebShop looking like this:

Now, let’s see what happens in case of the exception that the WebShop is not accessible. To initiate a broken connection to the WebShop, when configuring integration flow Read Product Details, enter a wrong address for the WebShop in the OData adapter, save and deploy the integration flow again.
When you run the integration flow again, you should get a response with the product details, but with a modified text appended (assuming there was no price change between the processing of the Timer-initiated integration flow and this one):

Note that the timestamp provided in the HTTP response in the error case relates to the latest processing run of the integration flow Regularly Update Product Table. However, when running this integration flow a new record to the database table is only added (with a new timestamp) if either a new product has been added to the WebShop or the price of an existing product has changed since the previous processing run of this integration flow.
You can also check the data store entries created by the two message processing runs. To do that, open the Monitor section of the Web UI and select the Data Stores tile (under Manage Stores). You will find a data store with Name ProductInformation containing two entries: Success and Error. You can download each entry and will get a .zip file that contains the expected message body (that was also returned by Cloud Integration in the Postman response).
That’s it! You’ve now designed and executed an integration scenario that reads data from a database system in the error case. That means, you have learned, first, how to use the JDBC adapter and, secondly, how you can use this feature in the context of a certain error handling strategy.
However, when starting to think about error handling, you will always find room for improvement. For instance, what happens in case the timer-initiated integration flow cannot connect to the WebShop? What happens in case SAP Cloud Integration cannot connect to the database system? If you want to go productive with your integration content, you need to anticipate such error situations and design the respective behavior of the scenario for these cases.
More Information
- For more information on Cloud Integration error handling, see the design guideline Handle Errors Gracefully. You find more example integartion flows covering exception handling on SAP API Business Hub in the integration package Integration Flow Design Guidelines - Handle Errors Gracefully.
- For more information on the JDBC adapter, check out the JDBC Receiver Adapter topic at SAP Help Portal.
- For more information on JDBC data sources, check out topic Managing JDBC Data Sources at SAP Help Portal.
- Fore more information on the tenant database, the data store and global variables, check out the Help Portal documentation: Tenant Database and Data Containers
- SAP Managed Tags:
- Cloud Integration
Labels:
3 Comments
You must be a registered user to add a comment. If you've already registered, sign in. Otherwise, register and sign in.
Labels in this area
-
ABAP CDS Views - CDC (Change Data Capture)
2 -
AI
1 -
Analyze Workload Data
1 -
BTP
1 -
Business and IT Integration
2 -
Business application stu
1 -
Business Technology Platform
1 -
Business Trends
1,658 -
Business Trends
93 -
CAP
1 -
cf
1 -
Cloud Foundry
1 -
Confluent
1 -
Customer COE Basics and Fundamentals
1 -
Customer COE Latest and Greatest
3 -
Customer Data Browser app
1 -
Data Analysis Tool
1 -
data migration
1 -
data transfer
1 -
Datasphere
2 -
Event Information
1,400 -
Event Information
66 -
Expert
1 -
Expert Insights
177 -
Expert Insights
299 -
General
1 -
Google cloud
1 -
Google Next'24
1 -
Kafka
1 -
Life at SAP
780 -
Life at SAP
13 -
Migrate your Data App
1 -
MTA
1 -
Network Performance Analysis
1 -
NodeJS
1 -
PDF
1 -
POC
1 -
Product Updates
4,577 -
Product Updates
345 -
Replication Flow
1 -
RisewithSAP
1 -
SAP BTP
1 -
SAP BTP Cloud Foundry
1 -
SAP Cloud ALM
1 -
SAP Cloud Application Programming Model
1 -
SAP Datasphere
2 -
SAP S4HANA Cloud
1 -
SAP S4HANA Migration Cockpit
1 -
Technology Updates
6,873 -
Technology Updates
427 -
Workload Fluctuations
1
Related Content
- Exploring Integration Options in SAP Datasphere with the focus on using SAP extractors - Part II in Technology Blogs by SAP
- How to use AI services to translate Picklists in SAP SuccessFactors - An example in Technology Blogs by SAP
- IoT - Ultimate Data Cyber Security - with Enterprise Blockchain and SAP BTP 🚀 in Technology Blogs by Members
- Mistral gagnant. Mistral AI and SAP Kyma serverless. in Technology Blogs by SAP
- 10+ ways to reshape your SAP landscape with SAP BTP - Blog 4 Interview in Technology Blogs by SAP
Top kudoed authors
| User | Count |
|---|---|
| 41 | |
| 25 | |
| 17 | |
| 14 | |
| 9 | |
| 7 | |
| 6 | |
| 6 | |
| 6 | |
| 6 |