
- SAP Community
- Products and Technology
- Technology
- Technology Blogs by SAP
- SAP Intelligent RPA: Ariba Export loop tutorial
Technology Blogs by SAP
Learn how to extend and personalize SAP applications. Follow the SAP technology blog for insights into SAP BTP, ABAP, SAP Analytics Cloud, SAP HANA, and more.
Turn on suggestions
Auto-suggest helps you quickly narrow down your search results by suggesting possible matches as you type.
Showing results for
Product and Topic Expert
Options
- Subscribe to RSS Feed
- Mark as New
- Mark as Read
- Bookmark
- Subscribe
- Printer Friendly Page
- Report Inappropriate Content
08-14-2020
8:43 AM
Hello!
This will be a guide to create a bot that can log into the Ariba System then export multiple tables by looping the workflow. I will guide you through creating the project, capturing the required pages, then building the workflow. This guide will demonstrate how to use the reuse and loop flow activities.
Why would you want to do this?
By automating the extraction of data from Ariba it enables improved analytics by providing access to this data to then upload it to a visualization tool like the SAP Analytics Cloud. The workflow this tutorial creates can then be leveraged in larger scale projects which require data from Ariba.
Requirements to follow along with this guide
Note: Trial accounts or services always come with limitations, but this project is possible with a trial account
Before you begin, you may want to look at these courses offered on openSAP
1. Creation of new project [File->New project]
3. Today we are going to be exporting tables from RFPs on the sourcing page, once you build the login workflow you can capture the sourcing page.
4. For the page criteria we will use the partial url by selecting it from the captured data window and selecting 'Part' from the drop-down

6. Next add the link to the completed RFPs as a item for this page
7. Go to the workflows and create a new workflow. Then click and drag your login workflow to the start activity. This will create a reuse activity which will run the login workflow.
Note: This can be useful if you want to build multiple workflows that rely on the same login procedure. The original login workflow can be modified and it will be applied to each workflow that uses that login workflow.
8. Next, connect the Sourcing page to the Reuse activity. Then use a click activity to select the completed RFPs. I have found that clickMouse() works better than click() so I will go to the script and edit the click to use that function instead.
9. Capture the page which has the completed RFPs listed out.
10. Select the button which opens the RFP and add criteria, then select 'Occurs' which will capture each occurrence of this object on the page. You will see all the buttons for opening the RFP will be highlighted in green
11. Now we will start building our loop, add a Start loop and an Exit loop activity after the Reuse login activity. The exit loop activity is use to test an exit condition at the start of each loop.
12. Navigate to the details page for an RFP manually and capture the page, then add the table options button as an item associated with the page. On this page the captured data for the button does not distinguish it from the other table options button so we will select 'Occurs' and will address this manually in the script once we have built the workflow.
13. Add the RFP Details page to the workflow then use a click activity to click on the table options button. It will show in the UI that it is set to click on both the menu buttons but we will resolve this in the script.
14. Next we need to capture the RFP Details page again, but with the table options menu present. To distinguish this page from the RFP Details page I added items from the table options menu and set them to 'must exist' then I duplicated one of the items and dragged it to the RFP details page and set it to 'must not exist'. This will help the bot know the difference between these two similar pages.
15. Now connect the page with the Table menu open to the workflow and we will use the click activity to have the bot click on 'Export all Rows'
16. Go to the captured RFP detail page and add the back button as an item so we can tell the bot to click on it after exporting the table. Attach this page to the workflow and use a click activity to select the back arrow.
17. Finally, add a 'Loop' Activity from the 'Flow - Loop' section of activities. This will be where the workflow stops and loops back to the 'Start Loop' activity. Once you have done this click 'Build' and we will start working on editing the script for this loop.
18. Go to the script for this workflow and we will go through some changes from top to bottom. First at the step to start the application we will add a line to set the browser as chrome. Before the line that says the 'application name'.start() put the 'application name'.navigator = e.navigator.Chrome and this will make the webpage open in chrome.
19. Change any click() to clickMouse() so the click is sent using a mouse click.
20. For the exit loop step we will have to create an IF statement to determine when to stop looping. For this we will nbeed the number of RFPs to be extracted. We can get this by using the get() function on the RFP item from the Sourcing Page. In the step for the Sourcing page enter this code below the page loading function. This will take the value from the RFP button and save it locally.
21. Then in the Exit_loop step we will update the IF statement to include the variable created above. I subtract 1 from the count so that it will stop looping once it reaches the last record.
22. For the step which clicks on the table option button on the RFP Detail Page the script will autofill the iterable variable with the loop count variable, but we want to fix this to always be 1 so it clicks on the second table option button. To do this we will use the ApplicationName.PageName.item.i(1).clickMouse(); which will make the bot always select the second menu button.
Now you can save the project and run it. The bot will then log in and extract the RFPs to your download folder. You can then use that output to build larger automation projects.
Please comment below if you have any questions or get stuck while trying to replicate this process.
Have a great day and happy bot building!
–Max McPhee
This will be a guide to create a bot that can log into the Ariba System then export multiple tables by looping the workflow. I will guide you through creating the project, capturing the required pages, then building the workflow. This guide will demonstrate how to use the reuse and loop flow activities.
Why would you want to do this?
By automating the extraction of data from Ariba it enables improved analytics by providing access to this data to then upload it to a visualization tool like the SAP Analytics Cloud. The workflow this tutorial creates can then be leveraged in larger scale projects which require data from Ariba.
Requirements to follow along with this guide
- Desktop Studio
- Desktop Agent
- The zoom level of the web page (Chrome) and Display (I.e. Change the size of text, apps, and other items) should be 100% to ensure a good capture.
Note: Trial accounts or services always come with limitations, but this project is possible with a trial account
Before you begin, you may want to look at these courses offered on openSAP
- How to Build Bots with SAP Intelligent Robotic Process Automation
- SAP Intelligent Robotic Process Automation in a Nutshell
1. Creation of new project [File->New project]
 2. Build a workflow to log in to the Ariba management page, you can visit my other tutorial for detailed steps of how to build a login workflow here
3. Today we are going to be exporting tables from RFPs on the sourcing page, once you build the login workflow you can capture the sourcing page.
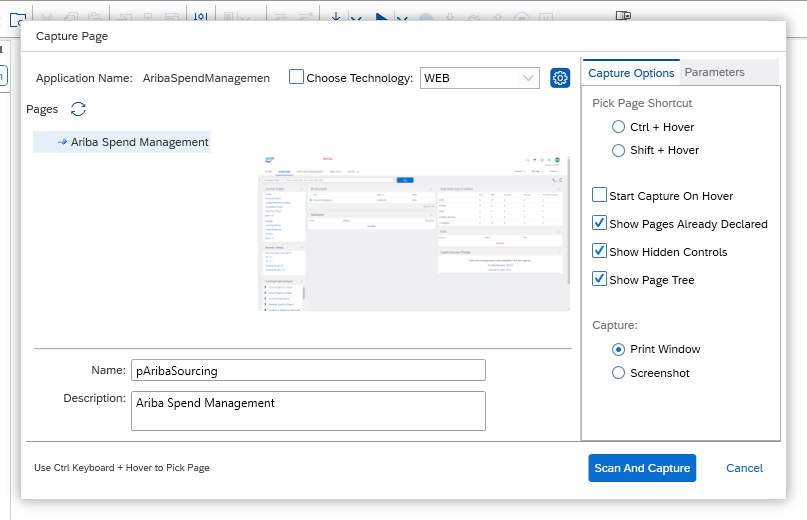
4. For the page criteria we will use the partial url by selecting it from the captured data window and selecting 'Part' from the drop-down

5. We can then improve the page capture by adding the 'Sourcing' page button and adding the criteria that it must be selected. Then by setting that element as 'Must exist' it will only recognize this as the sourcing page if the sourcing tab is selected.
6. Next add the link to the completed RFPs as a item for this page
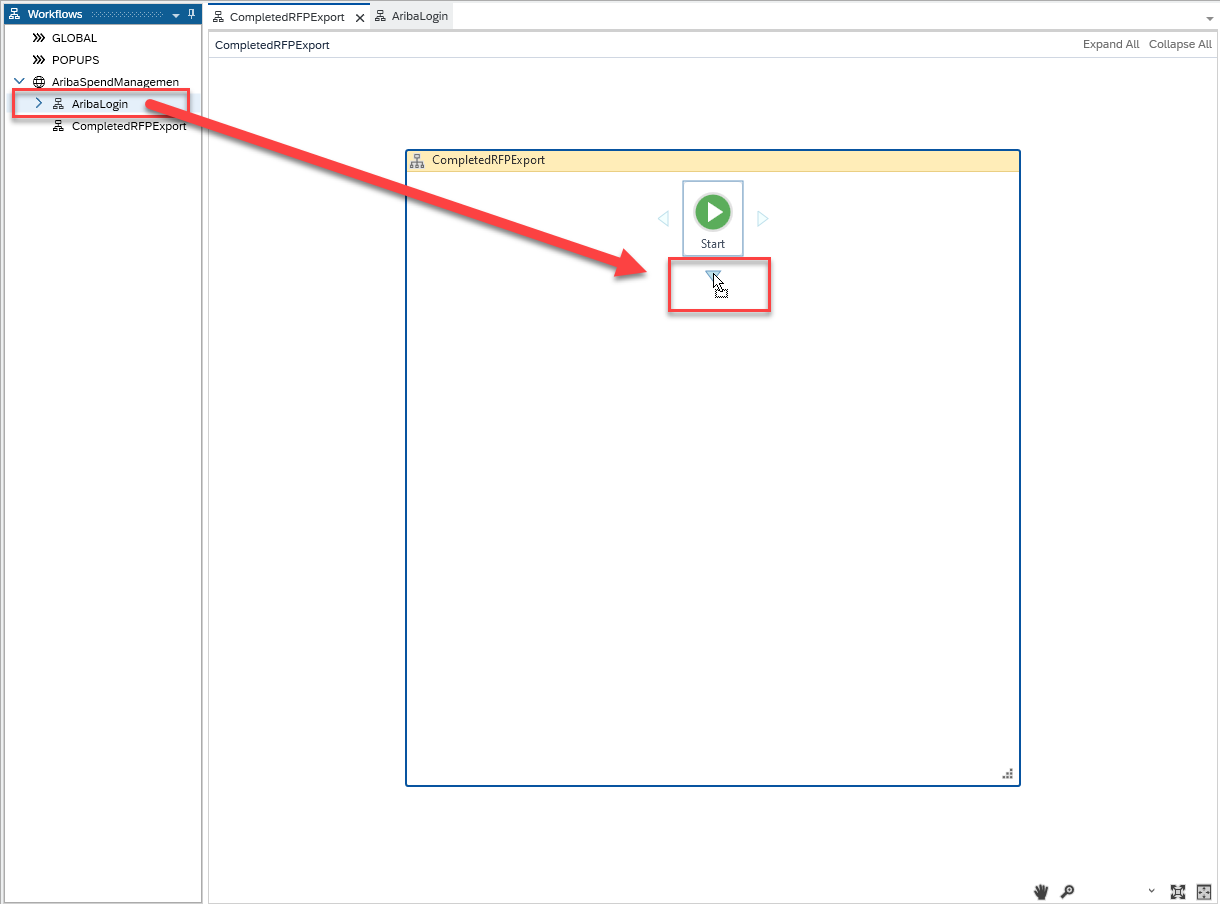
7. Go to the workflows and create a new workflow. Then click and drag your login workflow to the start activity. This will create a reuse activity which will run the login workflow.
Note: This can be useful if you want to build multiple workflows that rely on the same login procedure. The original login workflow can be modified and it will be applied to each workflow that uses that login workflow.

8. Next, connect the Sourcing page to the Reuse activity. Then use a click activity to select the completed RFPs. I have found that clickMouse() works better than click() so I will go to the script and edit the click to use that function instead.

9. Capture the page which has the completed RFPs listed out.
10. Select the button which opens the RFP and add criteria, then select 'Occurs' which will capture each occurrence of this object on the page. You will see all the buttons for opening the RFP will be highlighted in green

11. Now we will start building our loop, add a Start loop and an Exit loop activity after the Reuse login activity. The exit loop activity is use to test an exit condition at the start of each loop.

12. Navigate to the details page for an RFP manually and capture the page, then add the table options button as an item associated with the page. On this page the captured data for the button does not distinguish it from the other table options button so we will select 'Occurs' and will address this manually in the script once we have built the workflow.

13. Add the RFP Details page to the workflow then use a click activity to click on the table options button. It will show in the UI that it is set to click on both the menu buttons but we will resolve this in the script.

14. Next we need to capture the RFP Details page again, but with the table options menu present. To distinguish this page from the RFP Details page I added items from the table options menu and set them to 'must exist' then I duplicated one of the items and dragged it to the RFP details page and set it to 'must not exist'. This will help the bot know the difference between these two similar pages.

15. Now connect the page with the Table menu open to the workflow and we will use the click activity to have the bot click on 'Export all Rows'

16. Go to the captured RFP detail page and add the back button as an item so we can tell the bot to click on it after exporting the table. Attach this page to the workflow and use a click activity to select the back arrow.

17. Finally, add a 'Loop' Activity from the 'Flow - Loop' section of activities. This will be where the workflow stops and loops back to the 'Start Loop' activity. Once you have done this click 'Build' and we will start working on editing the script for this loop.

18. Go to the script for this workflow and we will go through some changes from top to bottom. First at the step to start the application we will add a line to set the browser as chrome. Before the line that says the 'application name'.start() put the 'application name'.navigator = e.navigator.Chrome and this will make the webpage open in chrome.
AribaSpendManagemen.navigator = e.navigator.Chrome19. Change any click() to clickMouse() so the click is sent using a mouse click.
20. For the exit loop step we will have to create an IF statement to determine when to stop looping. For this we will nbeed the number of RFPs to be extracted. We can get this by using the get() function on the RFP item from the Sourcing Page. In the step for the Sourcing page enter this code below the page loading function. This will take the value from the RFP button and save it locally.
sc.localData.RFPCount = AribaSpendManagemen.pAribaSourcing.btCompletedRFP.get();21. Then in the Exit_loop step we will update the IF statement to include the variable created above. I subtract 1 from the count so that it will stop looping once it reaches the last record.
if (sc.localData.Startloop > sc.localData.RFPCount-1)22. For the step which clicks on the table option button on the RFP Detail Page the script will autofill the iterable variable with the loop count variable, but we want to fix this to always be 1 so it clicks on the second table option button. To do this we will use the ApplicationName.PageName.item.i(1).clickMouse(); which will make the bot always select the second menu button.
AribaSpendManagemen.pAribaRFPDetail.btTableOptions.i(1).clickMouse();Now you can save the project and run it. The bot will then log in and extract the RFPs to your download folder. You can then use that output to build larger automation projects.
Please comment below if you have any questions or get stuck while trying to replicate this process.
Have a great day and happy bot building!
–Max McPhee
Labels:
1 Comment
You must be a registered user to add a comment. If you've already registered, sign in. Otherwise, register and sign in.
Labels in this area
-
ABAP CDS Views - CDC (Change Data Capture)
2 -
AI
1 -
Analyze Workload Data
1 -
BTP
1 -
Business and IT Integration
2 -
Business application stu
1 -
Business Technology Platform
1 -
Business Trends
1,661 -
Business Trends
86 -
CAP
1 -
cf
1 -
Cloud Foundry
1 -
Confluent
1 -
Customer COE Basics and Fundamentals
1 -
Customer COE Latest and Greatest
3 -
Customer Data Browser app
1 -
Data Analysis Tool
1 -
data migration
1 -
data transfer
1 -
Datasphere
2 -
Event Information
1,400 -
Event Information
64 -
Expert
1 -
Expert Insights
178 -
Expert Insights
270 -
General
1 -
Google cloud
1 -
Google Next'24
1 -
Kafka
1 -
Life at SAP
784 -
Life at SAP
11 -
Migrate your Data App
1 -
MTA
1 -
Network Performance Analysis
1 -
NodeJS
1 -
PDF
1 -
POC
1 -
Product Updates
4,578 -
Product Updates
323 -
Replication Flow
1 -
RisewithSAP
1 -
SAP BTP
1 -
SAP BTP Cloud Foundry
1 -
SAP Cloud ALM
1 -
SAP Cloud Application Programming Model
1 -
SAP Datasphere
2 -
SAP S4HANA Cloud
1 -
SAP S4HANA Migration Cockpit
1 -
Technology Updates
6,886 -
Technology Updates
395 -
Workload Fluctuations
1
Related Content
- SAP Build Code - Speed up your development with Generative AI Assistant - Joule in Technology Blogs by SAP
- Print Crystal PDF using Service Layer in Technology Q&A
- Deliver Real-World Results with SAP Business AI: Q4 2023 & Q1 2024 Release Highlights in Technology Blogs by SAP
- SAP Build Code is now on SAP BTP Trial in Technology Blogs by SAP
- What’s New in SAP HANA Cloud – March 2024 in Technology Blogs by SAP
Top kudoed authors
| User | Count |
|---|---|
| 11 | |
| 10 | |
| 10 | |
| 9 | |
| 8 | |
| 7 | |
| 7 | |
| 7 | |
| 7 | |
| 6 |