
- SAP Community
- Groups
- Interest Groups
- Application Development
- Blog Posts
- A Universal Design Pattern for ABAP OO Development...
Application Development Blog Posts
Learn and share on deeper, cross technology development topics such as integration and connectivity, automation, cloud extensibility, developing at scale, and security.
Turn on suggestions
Auto-suggest helps you quickly narrow down your search results by suggesting possible matches as you type.
Showing results for
former_member29
Discoverer
Options
- Subscribe to RSS Feed
- Mark as New
- Mark as Read
- Bookmark
- Subscribe
- Printer Friendly Page
- Report Inappropriate Content
07-31-2020
11:04 AM
Introduction
I would like to propose a new design pattern for organizing ABAP OO development and unit testing in a universal way.
This design pattern is based on interface and factory design pattern.
It has the following important features
- One factory class to create all interfaces' instances.
- One injector class to inject the test double interface instance for unit testing.
- Determining the specific interface implementation class with design-time static configuration and run-time dynamic context.
- Using specific initialization data for a particular class implementing the same interface is possible.
What can it do
This design pattern contains two key components.
- The factory class to create interface instance dynamically.
- The injector class to assist unit testing.
Before diving into the theory parts, let's have a visual view of the usage of this design pattern in programs and classes.
The usage of the factory class
There is a universal cross-client customizing table ZANDERS_IF_IMPL for design time class name configuration.
Here's an example

One entry for table ZANDERS_IF_IMPL
There is a universal BADI ZANDERS_IF for run time class name determination.

BADI Definition and Implementation
When running the program ZANDERS_TEST_BUS1.
There are three sets of data to demo the functionality of the factory class ZAND_CF_OBJECT.
- KEY1:1, KEY2:1 for the default class name determination
- KEY1:1, KEY2:2 for the design time class name determination
- KEY1:1, KEY2:3 for the run time class name determination
Take the first set as an example.
When the debugging window shows up, we will see the class name for the variable lr_bus1 is ZANDERS_CL_BUS1.

Interface implementation class name
The behavior for this program is that for the same interface ZANDERS_IF_BUS1, with different data sets there are three different classes can be used:
- ZANDERS_CL_BUS1
- ZANDERS_CL_BUS2
- ZANDERS_CL_BUS3
This feature gives amazing flexibility to customizing your coding logic based on the attribute of data.
The usage of the injector class
There is a class ZANDERS_CL_BUS1_ENH, which uses the interface ZANDERS_IF_BUS1.
In the method MY_DISPLAY, there is a local temporary usage of an interface instance.

A local temporary instance
If you have experience in unit testing, you will know the problem here.
For using test double, the local object has to be upgraded to a class-level attribute.
When implementing the unit testing, you have to go back to your real coding to do some changes.
Do you have such an unpleasant experience?
However, for this class, the strange thing is that when you perform unit testing, it passes successfully.
The secret is the usage of injector class.
This feature saves you the trouble of returning to modify the coding when creating unit testing.
The design thinking
Now it is time to see the theory part.
The following picture shows the architecture of this design pattern.

Design Overview
Let me explain the design by starting from the beginning point of a real coding process.
There is a requirement to display business data.
So an interface ZANDERS_IF_BUS1, which has only one method DISPLAY, is created.
This interface should include (inherit) the universal interface ZANDERS_IF_OBJ_INIT, which is used to initialize the class object.
Normally, the next step is to create classes that implement the interface.
So three classes are created(only two classes show in the above picture as the limitation of Visio page size).
There are three rules for the class:
- The insatiability of a class should be protected or private.
- The friend of a class should be ZANDERS_CF_OBJECT.
- The class should not have a constructor method.
Take the class ZANDERS_CL_BUS1 as an example, its configuration is as following picture shows.

Rule 1 for class

Rule 2 for class
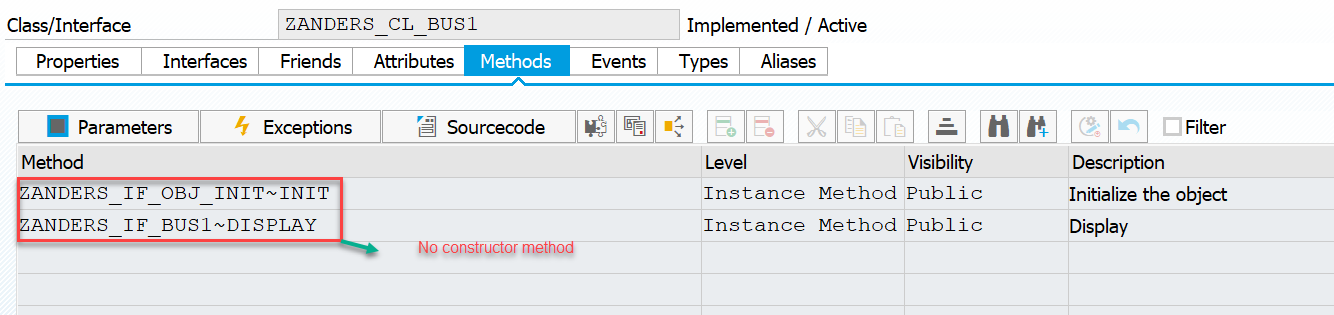
Rule 3 for class
Finally, let's use these classes in a program ZANDERS_TEST_BUS1.

Report code
In line 17 there is a call to the static method: zanders_cf_object=>inst_by_infname
to get the interface instance.
This method has three parameters:
- IV_INFNAME is the interface name.
- IS_IFKEYS is the universal business key,.e.g, Company Code, and Fiscal Year for finance.
Here, for simplicity and generality, I only use two components KEY1 and KEY2 to represent key fields.
3. CV_DETAILS is the class object initialization data.
Note that this is a changing parameter.
It means it is possible to change the initialization data as needed.
Let's go into the coding details of this method.

Coding details
The logic can be divided into two parts:
- Part 1 is for the unit testing injection.
- Part 2 is for the interface instance creation.
It has three steps to get the class name.
- By replacing the string ‘IF_’ with ‘CL_’ to get the default class name.
- By reading the customizing table ZANDERS_IF_IMPL to get the static design-time configuration name.
- By calling the BADI ZANDERS_IF to get the dynamical run-time name.
when the class name is determined finally, the instance will be created in line 34.
In line 35, the interface method ZANDERS_IF_OBJ_INIT~INIT will be called to do the initialization for the class instance.
When using BADI ZANDERS_IF, you can not only determine the class name but also change the initialization data cv_details.
Running program ZANDERS_TEST_BUS1 with KEY1 = 1, KEY2 = 3, you will get a clear view of how this BADI works.
Components of this design pattern
The required developing components for this design pattern:
- The cross-client customizing table ZANDERS_IF_IMPL.

Its key fields have two parts:
- IMPLIFNAME is the interface name.
- KEY1 and KEY2 are the universal business keys.
- The BADI ZANDERS_IF with KEY1 and KEY2 are used as filters.

BADI
- The universal interface ZANDERS_IF_OBJ_INIT for all class instance initialization.
- The universal factory class ZANDERS_CF_OBJECT for all interface creation.
- The universal injector class ZANDERS_CF_OBJECT_I for all unit testing.
How to apply it
If you would like to apply this design pattern to your application, please follow the following steps.
- Determine the universal keys for your business scenario.
- Create the required components in your namespace and replace KEY1 and KEY2 with your keys.
- Create your interface.
- Create your classes(Protected instance) which implement the interface.
- Add your factory class as a friend of classes(in my example it is ZANDERS_CF_OBJECT).
- Anywhere you use this interface, you have to use the factory class to get the instance.
- In unit testing, use your injector class(my example is class ZANDERS_CL_BUS1_ENH)
Summary
This design pattern is based on two common object-oriented technologies,i.e., interfaces and factory class.
It also combines the ABAP programming feature to provide a universal and flexible way to choose the right run-time class.
It provides a universal way of injecting the test double interface instance to make your unit testing work easy.
Finally, I hope you have understood it clearly.
- SAP Managed Tags:
- ABAP Testing and Analysis,
- Design Thinking
6 Comments
You must be a registered user to add a comment. If you've already registered, sign in. Otherwise, register and sign in.
Labels in this area
-
A Dynamic Memory Allocation Tool
1 -
ABAP
8 -
abap cds
1 -
ABAP CDS Views
14 -
ABAP class
1 -
ABAP Cloud
1 -
ABAP Development
4 -
ABAP in Eclipse
1 -
ABAP Keyword Documentation
2 -
ABAP OOABAP
2 -
ABAP Programming
1 -
abap technical
1 -
ABAP test cockpit
7 -
ABAP test cokpit
1 -
ADT
1 -
Advanced Event Mesh
1 -
AEM
1 -
AI
1 -
API and Integration
1 -
APIs
8 -
APIs ABAP
1 -
App Dev and Integration
1 -
Application Development
2 -
application job
1 -
archivelinks
1 -
Automation
4 -
BTP
1 -
CAP
1 -
CAPM
1 -
Career Development
3 -
CL_GUI_FRONTEND_SERVICES
1 -
CL_SALV_TABLE
1 -
Cloud Extensibility
8 -
Cloud Native
7 -
Cloud Platform Integration
1 -
CloudEvents
2 -
CMIS
1 -
Connection
1 -
container
1 -
Debugging
2 -
Developer extensibility
1 -
Developing at Scale
4 -
DMS
1 -
dynamic logpoints
1 -
Eclipse ADT ABAP Development Tools
1 -
EDA
1 -
Event Mesh
1 -
Expert
1 -
Field Symbols in ABAP
1 -
Fiori
1 -
Fiori App Extension
1 -
Forms & Templates
1 -
IBM watsonx
1 -
Integration & Connectivity
10 -
JavaScripts used by Adobe Forms
1 -
joule
1 -
NodeJS
1 -
ODATA
3 -
OOABAP
3 -
Outbound queue
1 -
Product Updates
1 -
Programming Models
13 -
Restful webservices Using POST MAN
1 -
RFC
1 -
RFFOEDI1
1 -
SAP BAS
1 -
SAP BTP
1 -
SAP Build
1 -
SAP Build apps
1 -
SAP Build CodeJam
1 -
SAP CodeTalk
1 -
SAP Odata
1 -
SAP UI5
1 -
SAP UI5 Custom Library
1 -
SAPEnhancements
1 -
SapMachine
1 -
security
3 -
text editor
1 -
Tools
16 -
User Experience
5
Top kudoed authors
| User | Count |
|---|---|
| 6 | |
| 5 | |
| 3 | |
| 3 | |
| 2 | |
| 2 | |
| 2 | |
| 2 | |
| 1 | |
| 1 |