
- SAP Community
- Products and Technology
- CRM and Customer Experience
- CRM and CX Blogs by SAP
- All About E-mail Sales Campaign Execution in SAP C...
CRM and CX Blogs by SAP
Stay up-to-date on the latest developments and product news about intelligent customer experience and CRM technologies through blog posts from SAP experts.
Turn on suggestions
Auto-suggest helps you quickly narrow down your search results by suggesting possible matches as you type.
Showing results for
Product and Topic Expert
Options
- Subscribe to RSS Feed
- Mark as New
- Mark as Read
- Bookmark
- Subscribe
- Printer Friendly Page
- Report Inappropriate Content
07-27-2020
9:58 AM
The key marketing capabilities in SAP Cloud for Customer are designed to help you convert marketing initiatives into sales opportunities. The scope involves creating target groups and campaigns, using surveys with embedded analytics, automated sales follow-ups, and monitoring key metrics. You can also use the integrated Content work center view to manage your marketing creative assets such as e-mail templates and external surveys.
In order to execute the Sales Campaign from Cloud for Customer you need to scope the relevant Business Object from Business Configuration, Please follow the below steps to scope the solution:
You can follow the below steps to create Email Template in your system:
You can refer to the below links for more details on HTML snippet:
Community Question
Use E-Mail Templates for Sales Campaigns
w3schools
To create Target Group please follow the below steps:
Create Target Groups for Sales Campaigns.
Create E-Mail Sales Campaigns: Send personalized HTML e-mail messages directly from your cloud solution.
Use E-Mail Templates for Sales Campaigns: To send out personalized mass e-mail message to a target group, first create an HTML template with a desired layout, message texts, and placeholders for the various attributes to be personalized during campaign execution with the target group member attribute values.
Create SMS Sales Campaigns: Send personalized Short Messaging Service (SMS) directly from your cloud solution.
Create Multistep Sales Campaigns: You can create multi-step sales campaigns based on triggers and actions.
Please follow the below steps to create E-mail Sales Campaign:
Once you created E-mail Sales campaign follow the below steps to execute the campaign:
After successful execution of E-Mail Sales Campaign below are the results:
Further you can refer the below Help Portal links:
Sales Campaign, Create E-Mail Sales Campaigns.
Regards,
Ankit K
Scope your Solution for Sales Campaign Execution:
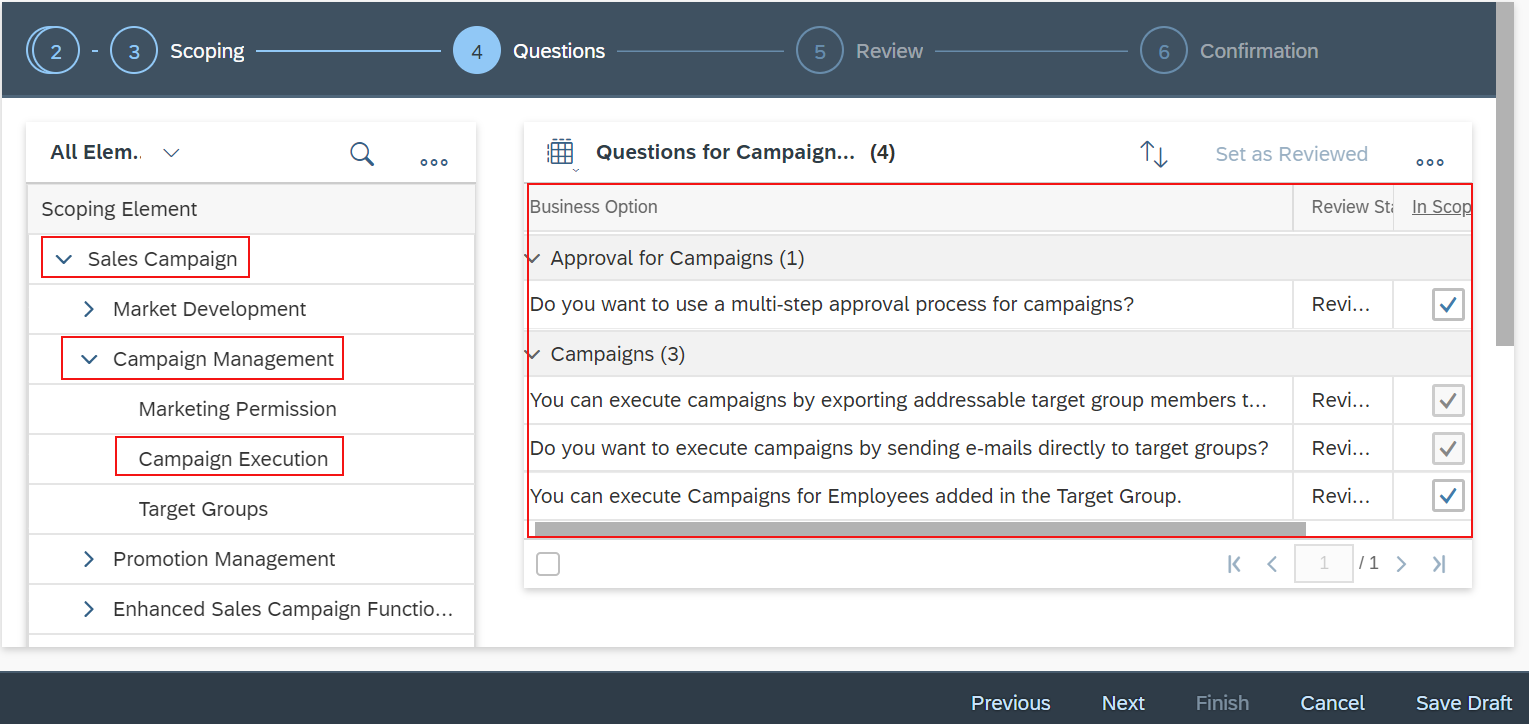
In order to execute the Sales Campaign from Cloud for Customer you need to scope the relevant Business Object from Business Configuration, Please follow the below steps to scope the solution:
- Login to the tenant.
- Go to Business Configuration work center.
- Edit Implementation Project.
- Go to Questions tab.
- Navigate to Sales Campaign-> Campaign Management-> Campaign Execution and scope the questions accordingly as shown below:
Pre-requisites:
- In order to execute Sales Campaign, Mass E-mail functionality needs to be activated.
- To execute Sales Campaign you need to have Target Group to be created.
- Also you need to create the E-Mail Template in the Content work center.
- Contacts/Members which are added to the Target Group should have valid E-mail ID and this can be verified by clicking on Check E-mail Address in the Target group as shown below:

- Set Contact Permission to Allowed for contacts/members which are added to the Target Group, this needs to be allowed both in header of the contact and also in marketing permission facet. If this Target Group is created for an Account, Contact Permission needs to be allowed in Account Header as well, as shown below:


Create & Activate E-mail Template:
You can follow the below steps to create Email Template in your system:
- Create the HTML e-mail template file locally on your machine.
- Go to Sales Campaign work center.
- Go to Content view.
- Click on New & Click on E-Mail Template.
- Fill the fields Name, Communication Category, From Name and From Address.
- Click Save and open the newly created Email template. Under Language section, click Add and select the template you have created in step 1.
- Go to Actions and click on Activate.
You can refer to the below links for more details on HTML snippet:
Community Question
Use E-Mail Templates for Sales Campaigns
w3schools
Recommendation: We recommend that you use an HTML text editor such as Microsoft Expression Web. Currently, HTML5 is not supported.
Note: For the upload to work correctly, ensure that the following prerequisites are fulfilled:
- HTML syntax of placeholders is correct.
- Unsubscribe link is included (due to legal requirements).
- HTML syntax is virus-free.
- Save HTML templates with UTF-8 encoding. Templates saved with a different encoding result in upload errors.
- Reply-To Address can only be editable/modifiable only when the status of the Email Template is in In Preparation.
- System will capture replies only when the Reply-to Address is set to Technical E-mail Address(*.campaign.reply@myxxxxxx.answermail.crm.ondemand.com) in the Content/E-mail template, other than the mentioned email ID, system will not capture any response emails in the system.
- Once the Email Template is Activated you can test by sending test email, to perform testing Open created E-Mail Template->Go to Actions->click on Send Test E-Mail->Enter Recipient E-Mail Address and click on OK. If the mass email functionality is activated E-mail will be delivered to entered E-Mail ID, however it also depends on the settings done in the Email and Fax Settings.
Create Target Group:
Administrators can enable target groups with a scoping question.
Go to Business Configuration->Implementation Project->Your Project->Edit Project Scope->Scoping->Sales Campaign->Campaign Management->Target Groups and select the checkbox.
To create Target Group please follow the below steps:
- Go to Sales Campaign work center.
- Go to Target Group view.
- Click on New.
- Include basic details for your target group and choose No for Member Determination.
Note: Member Determination is used when you create dynamic target groups. - Click on Save and Open.
- Choose the pencil icon to edit your target group.
- Go to Members tab, and then from Add context menu, add your target group members from Accounts, Individual Customers, Contacts, Target Groups, or Leads.
- Save your target group.
Create Target Groups for Sales Campaigns.
Create Sales Campaign:
You can create e-mail or SMS campaigns directly out of the system.
Go to Sales Campaign Campaigns New or Target Groups Actions New Campaign to create new sales campaigns.
Create E-Mail Sales Campaigns: Send personalized HTML e-mail messages directly from your cloud solution.
Use E-Mail Templates for Sales Campaigns: To send out personalized mass e-mail message to a target group, first create an HTML template with a desired layout, message texts, and placeholders for the various attributes to be personalized during campaign execution with the target group member attribute values.
Create SMS Sales Campaigns: Send personalized Short Messaging Service (SMS) directly from your cloud solution.
Create Multistep Sales Campaigns: You can create multi-step sales campaigns based on triggers and actions.
Please follow the below steps to create E-mail Sales Campaign:
- Go to Sales Campaign work center.
- Go to Campaigns view.
- Click on '+' icon to create new Sales Campaign as shown below:

- Enter the Name of the campaign & Click on Save and Open.
- In the Details tab Edit required information and update Schedule.
- Go to Build tab.
- Click on Target Group under Target Audience and Click on Select to add Target Group as shown below:

- Add E-mail template under Actions Tab as shown below:

- Set the Actions and Triggers accordingly & Click on Apply.
- Click on Save.
Execute E-mail Sales Campaign:
Once you created E-mail Sales campaign follow the below steps to execute the campaign:
- Go to Sales Campaign work center.
- Go to Campaigns view.
- Open the Campaign.
- Go to Actions and Click on Activate.
- Refresh the screen from Actions and see the status of the campaign in Execution Details tab.
E-mail Sales Campaign Execution Results/Track Responses to E-Mail Sales Campaigns:
After successful execution of E-Mail Sales Campaign below are the results:
- In Execution Details tab, you can find the Contacted, Not Contacted, Unopened details. You can also see who is contacted under Contacted section as shown below:

- If you Reply to the Mass/Campaign E-mail which is sent to Accounts or Contacts, this can be found in two places:
- Under Respondents tab, from All table you can click on hyper link of the respective Account/Contact and navigate to the Activities tab, their you can find the details of sent and received E-mails with respect to the executed Campaign, as shown below:

- Under Activities tab you can find the email interaction for the executed mass/campaign email as shown below:
 Note:
Note:
- If you don’t get any Emails even after customer/contact replied to the email which is sent via Email/Campaign, Request you to create incident from same tenant with details and send it to SAP Product Support.
- System will capture replies only when the Reply-to Address is set to Technical E-mail Address(*.campaign.reply@myxxxxxx.answermail.crm.ondemand.com) in the Content/E-mail template.
- Under Respondents tab, from All table you can click on hyper link of the respective Account/Contact and navigate to the Activities tab, their you can find the details of sent and received E-mails with respect to the executed Campaign, as shown below:
- After successful campaign execution, based Triggers & Actions set for the campaign,based on the responses you received from contacts/accounts/etc for your email, it will create follow up activities or tasks.
- Track hard and soft bounces as well as unsubscribe clicks for your e-mail campaigns.The key response to an e-mail is whether the customers opened the e-mail, read and also clicked the enclosed hyperlinks for further information. You can check the response to the e-mail on the Execution Details tab of the specific e-mail campaign.
Hard Bounce: A hard bounce can be defined as an undelivered e-mail for reasons such as an invalid e-mail address. In the event of a hard bounce, the outbound tracking record status for a campaign is updated and an appropriate reason (such as Delivery Failed or E-Mail Address not Correct) is set.
- Soft Bounce: A soft bounce response is set if an e-mail cannot be delivered for reasons such as the inbox is full, server is temporarily unavailable, or an out-of-office reply is set. The soft bounces are displayed as Soft Bounce: Temporary not Available in the Not Contacted list on the Execution Details tab.
- Unsubscribe: The recipient can unsubscribe by sending back a pre-configured e-mail to a certain e-mail address. The recipient will be removed from any future campaigns. The corresponding e-mail communication information for the recipient including e-mail and marketing permissions mail is updated in the master data as Opt-Out. To resubscribe the customer again, set the e-mail channel back to Opt-In on the Marketing Permissions tab of the contact, individual customer, or lead.
Further you can refer the below Help Portal links:
Sales Campaign, Create E-Mail Sales Campaigns.
Regards,
Ankit K
- SAP Managed Tags:
- SAP Cloud for Customer add-ins,
- SAP Sales Cloud,
- C4C Sales
Labels:
11 Comments
You must be a registered user to add a comment. If you've already registered, sign in. Otherwise, register and sign in.
Labels in this area
-
Business Trends
270 -
Business Trends
9 -
chitchat
1 -
customerexperience
1 -
Event Information
256 -
Event Information
17 -
Expert Insights
30 -
Expert Insights
47 -
Life at SAP
133 -
Life at SAP
1 -
Product Updates
666 -
Product Updates
23 -
SAP HANA Service
1 -
SAPHANACloud
1 -
SAPHANAService
1 -
Technology Updates
453 -
Technology Updates
15
Related Content
- Campaign Build - Segmentation Best Practice in CRM and CX Blogs by SAP
- SAP Marketing Cloud: Custom attributes of Marketing Permission check in Suppression Rules in CRM and CX Questions
- Adding campaigns to program after they have finished in CRM and CX Questions
- SAP Marketing Cloud - interests after campaign execution not displayed in contact profiles in CRM and CX Questions
- SAP Commerce Cloud Q3 ’23 Release Highlights in CRM and CX Blogs by SAP
Top kudoed authors
| User | Count |
|---|---|
| 4 | |
| 2 | |
| 2 | |
| 1 | |
| 1 | |
| 1 | |
| 1 | |
| 1 | |
| 1 | |
| 1 |