
- SAP Community
- Products and Technology
- Technology
- Technology Blogs by SAP
- SAP Intelligent RPA: SuccessFactors Log in tutoria...
Technology Blogs by SAP
Learn how to extend and personalize SAP applications. Follow the SAP technology blog for insights into SAP BTP, ABAP, SAP Analytics Cloud, SAP HANA, and more.
Turn on suggestions
Auto-suggest helps you quickly narrow down your search results by suggesting possible matches as you type.
Showing results for
Product and Topic Expert
Options
- Subscribe to RSS Feed
- Mark as New
- Mark as Read
- Bookmark
- Subscribe
- Printer Friendly Page
- Report Inappropriate Content
07-24-2020
11:25 PM
Hello!
This will be a guide to create a bot that can log into the SAP SuccessFactors admin page. I will guide you through creating the project, capturing the required pages, then building the workflow. At the end I will include some debugging tips I learned while building this for the first time myself.
Requirements to follow along with this guide
Note: Trial accounts or services always come with limitations, but this project is possible with a trial account
Before you begin, you may want to look at these courses offered on openSAP
1. Creation of new project [File->New project]
2. Open https://salesdemo.successfactors.eu/login?company=******* (where ***** is your SF ID) in Chrome
3. Select Add Application in the Desktop Studio.
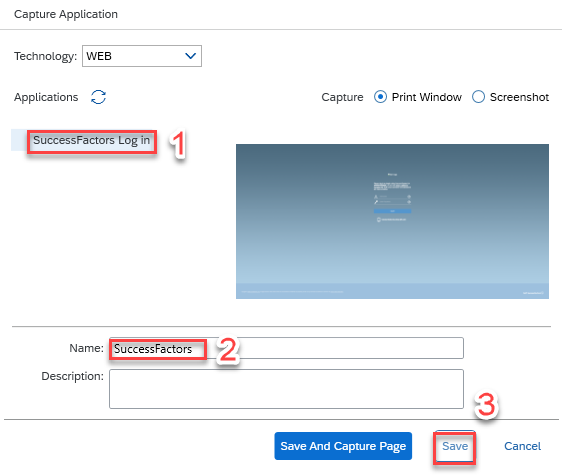
4. Select the page we navigated to in chrome (it will appear in the capture application screen). If the page does not appear, click on the refresh button. Edit and change the Name as highlighted below. I changed it to ‘SuccessFactors’ because this is the application name and not the page name (We will add the page next). Click on the Save option.
6. Select the login page - If the page is not shown, click on the refresh icon. Then click on Scan and Capture.
Note:- If the target zoom level is more than 100 percent, it will not fully capture the page. The zoom level of the web page and Display (I.e. Change the size of text, apps, and other items) should always be 100% as mentioned earlier in the prerequisite.
7. Once the capturing is completed the below page will be seen. Notice how the pSuccessFactorsLogIn is shown in red we will resolve that in the next step.
8. Double click on the highlighted domain in the “Captured Data” panel to set the criteria, then double click on the title to add it as well.
Once the criteria is set, the highlighted page will turn into green, this will let you know that the criteria is properly identifying the captured page.
Click on the SuccessFactors Application and then double click on the domain in captured data to add it as a criteria for the overall application of SuccessFactors
9. Select the ‘username’ field by clicking on it. Upon selection, it will turn dark blue. After this the DOM structure is shown in the Subtree. Select input from the subtree to show the captured data, then double click on ‘name = username’ to add it to the criteria for the object. It can be renamed, but I will keep it as ‘oUsername’. Once the criteria is set, the highlighted object will turn green.
Follow the same steps for the password field
10. Select the Login button by clicking on it. From the DOM structure in the Subtree select the Button tag, then in the capture data section double click on Text = Log On. Initially, it will be red, but after setting the criteria it will turn green.
11. Now click on the workflow.
12. Right-click on SuccessFactors and then click on New Workflow
17. Double click on the page activity.
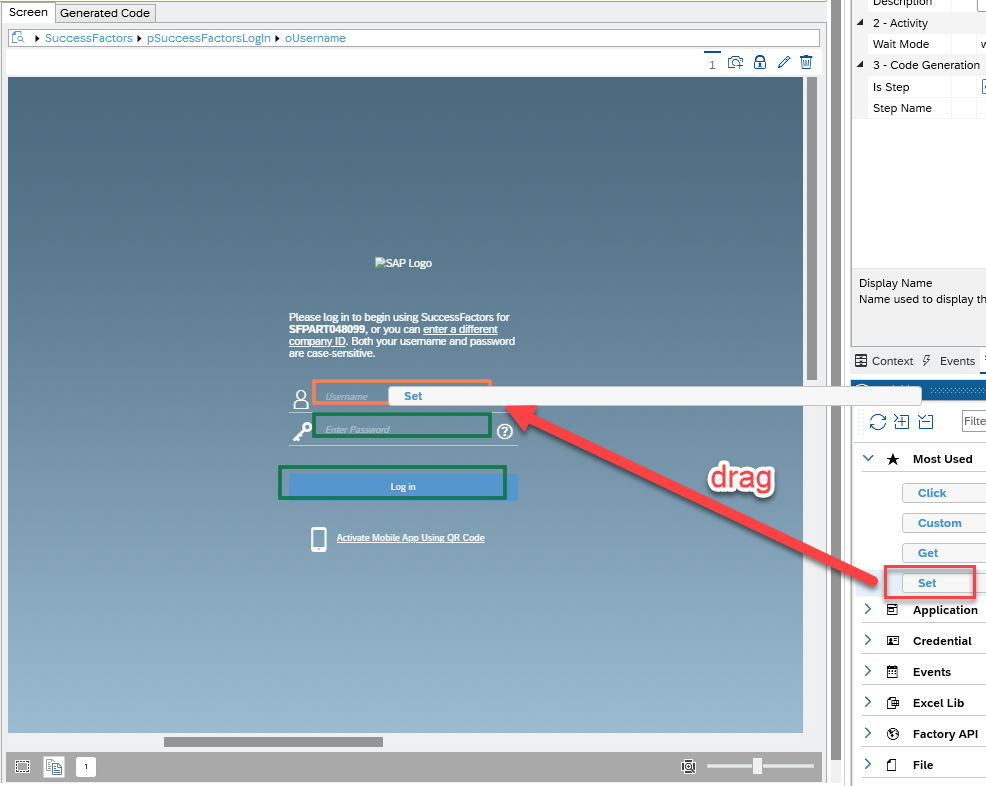
18. Drag the set activity to the highlighted item for the username and password.
19. Click on the highlighted Set activity
20. Enter the below detail in the properties. Put your username instead of “USERNAME”, but be sure to surround it with ‘’.
Do the same for the Set Password activity
25. Now that the workflow has been built we will go to the code to make some changes, first lets set chrome as the default navigator.
Go to the start application activity and right click it and select ‘Go to code’
26. Now enter “SuccessFactors.navigator = e.navigator.Chrome” to set the browser as chrome. Make sure it is before the .start() line
27. Go to the code for the Login Page activity in the workflow
28. Now edit the click() function to be a mouse click by adding ‘Mouse’.
29. Now click on the build option to build the project again.
30. Click on the debug option.
31. Debugging has started.
32. Now desktop agent will appear in the taskbar. Click on the highlighted Desktop agent.
Conclusion:-
Now you have the skills to create the first part of a workflow in SuccessFactors by having a bot complete the log in. You can then use the “Reuse” activity and reference this Log in workflow to build more complex projects.
In the next blog post we will learn how to use the reuse activity so we can leverage this workflow to create other workflows without having to recreate steps in another workflow.
If your project isn’t running properly make sure that you have the chrome IRPA extension installed and enabled and that you have both the Chrome and desktop zoom level set to 100%.
Have a great day and happy bot building!
-Max McPhee
This will be a guide to create a bot that can log into the SAP SuccessFactors admin page. I will guide you through creating the project, capturing the required pages, then building the workflow. At the end I will include some debugging tips I learned while building this for the first time myself.
Requirements to follow along with this guide
- Desktop Studio
- Desktop Agent
- The zoom level of the web page (Chrome) and Display (I.e. Change the size of text, apps, and other items) should be 100% to ensure a good capture.
Note: Trial accounts or services always come with limitations, but this project is possible with a trial account
Before you begin, you may want to look at these courses offered on openSAP
- How to Build Bots with SAP Intelligent Robotic Process Automation
- SAP Intelligent Robotic Process Automation in a Nutshell
1. Creation of new project [File->New project]
2. Open https://salesdemo.successfactors.eu/login?company=******* (where ***** is your SF ID) in Chrome
3. Select Add Application in the Desktop Studio.

4. Select the page we navigated to in chrome (it will appear in the capture application screen). If the page does not appear, click on the refresh button. Edit and change the Name as highlighted below. I changed it to ‘SuccessFactors’ because this is the application name and not the page name (We will add the page next). Click on the Save option.
 5. The capture page window should pop-up, if it doesn’t, Right-click on SuccessFactors and click on Capture a new Page.

6. Select the login page - If the page is not shown, click on the refresh icon. Then click on Scan and Capture.
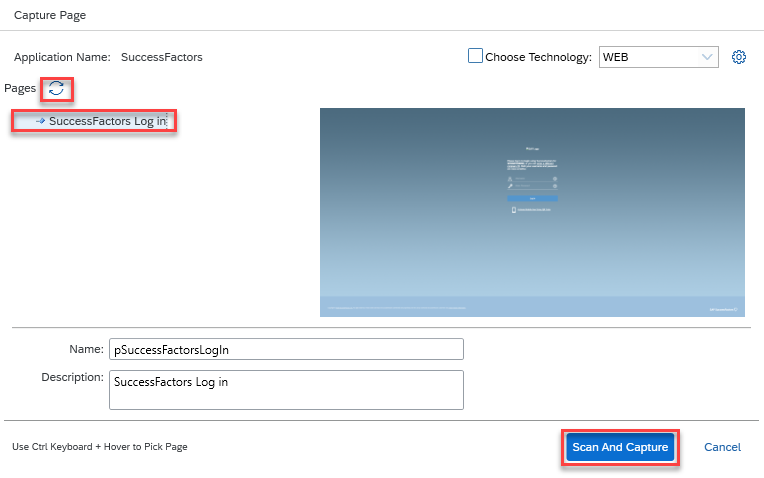
Note:- If the target zoom level is more than 100 percent, it will not fully capture the page. The zoom level of the web page and Display (I.e. Change the size of text, apps, and other items) should always be 100% as mentioned earlier in the prerequisite.
7. Once the capturing is completed the below page will be seen. Notice how the pSuccessFactorsLogIn is shown in red we will resolve that in the next step.

8. Double click on the highlighted domain in the “Captured Data” panel to set the criteria, then double click on the title to add it as well.

Once the criteria is set, the highlighted page will turn into green, this will let you know that the criteria is properly identifying the captured page.

Click on the SuccessFactors Application and then double click on the domain in captured data to add it as a criteria for the overall application of SuccessFactors

9. Select the ‘username’ field by clicking on it. Upon selection, it will turn dark blue. After this the DOM structure is shown in the Subtree. Select input from the subtree to show the captured data, then double click on ‘name = username’ to add it to the criteria for the object. It can be renamed, but I will keep it as ‘oUsername’. Once the criteria is set, the highlighted object will turn green.

Follow the same steps for the password field
10. Select the Login button by clicking on it. From the DOM structure in the Subtree select the Button tag, then in the capture data section double click on Text = Log On. Initially, it will be red, but after setting the criteria it will turn green.

11. Now click on the workflow.

12. Right-click on SuccessFactors and then click on New Workflow
 13. Now enter the Workflow Name and Comments and click on Save.
 14. Choose the workflow SuccessFactorsLogin and then in the Activities pane, select Start Application and drag and drop in the workflow to connect with the Start as shown below.

15. Then, in the properties select the drop-down arrow in the application parameter field and select SuccessFactors, the activity display name will be updated to reflect that application it will be starting

16. Now drag and drop the login page into the workflow and connect it with arrows to be after the ‘Start ‘SuccessFactors” activity.

17. Double click on the page activity.

18. Drag the set activity to the highlighted item for the username and password.
19. Click on the highlighted Set activity

20. Enter the below detail in the properties. Put your username instead of “USERNAME”, but be sure to surround it with ‘’.
Do the same for the Set Password activity
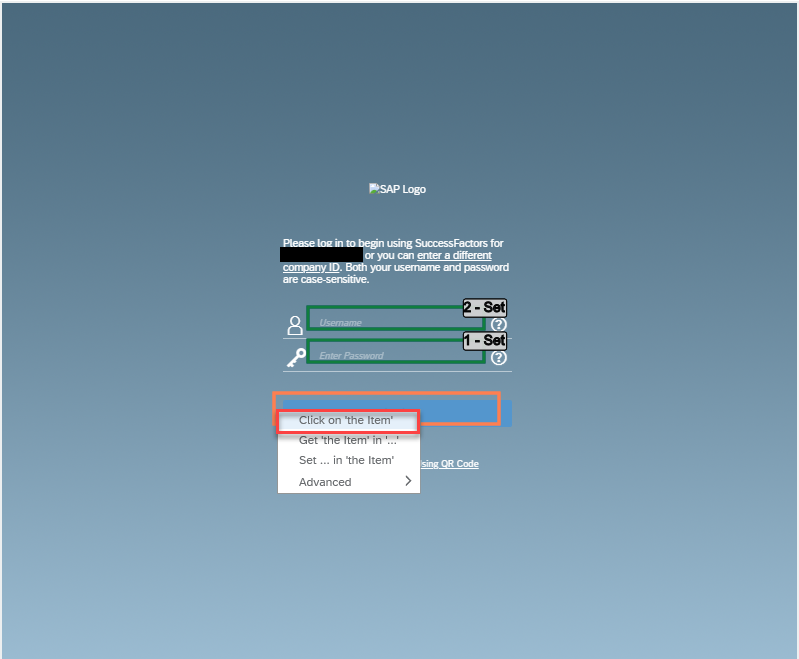
 21. Right-click on the Log In Button item and select Click on ‘the item’.
22. Now click on the ‘SuccessFactorsLogin’ to return to the main workflow


23. Next, click on the page activity and set the wait mode to ‘waitLoad’ which will make the activity start once the page has loaded and is ready

24. Now lets build the workflow by clicking the build button


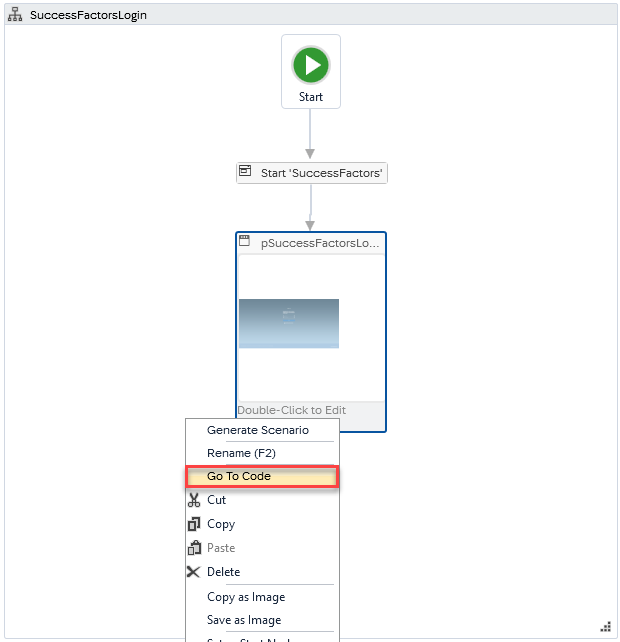
25. Now that the workflow has been built we will go to the code to make some changes, first lets set chrome as the default navigator.
Go to the start application activity and right click it and select ‘Go to code’

26. Now enter “SuccessFactors.navigator = e.navigator.Chrome” to set the browser as chrome. Make sure it is before the .start() line

27. Go to the code for the Login Page activity in the workflow
28. Now edit the click() function to be a mouse click by adding ‘Mouse’.

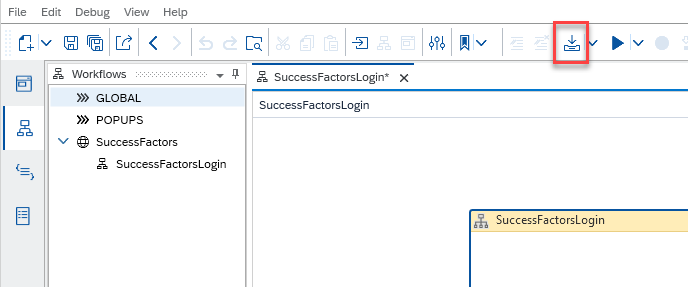
29. Now click on the build option to build the project again.
30. Click on the debug option.

31. Debugging has started.

32. Now desktop agent will appear in the taskbar. Click on the highlighted Desktop agent.

33. Click on the Test SuccessFactorsLogin.

34. The end result is a successful log in.
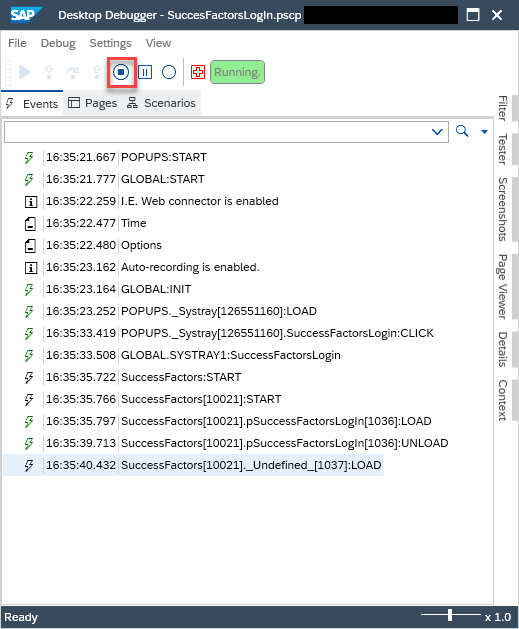
35. Stop the debugger.
Conclusion:-
Now you have the skills to create the first part of a workflow in SuccessFactors by having a bot complete the log in. You can then use the “Reuse” activity and reference this Log in workflow to build more complex projects.
In the next blog post we will learn how to use the reuse activity so we can leverage this workflow to create other workflows without having to recreate steps in another workflow.
If your project isn’t running properly make sure that you have the chrome IRPA extension installed and enabled and that you have both the Chrome and desktop zoom level set to 100%.
Have a great day and happy bot building!
-Max McPhee
- SAP Managed Tags:
- SAP Intelligent Robotic Process Automation,
- SAP SuccessFactors platform
Labels:
4 Comments
You must be a registered user to add a comment. If you've already registered, sign in. Otherwise, register and sign in.
Labels in this area
-
ABAP CDS Views - CDC (Change Data Capture)
2 -
AI
1 -
Analyze Workload Data
1 -
BTP
1 -
Business and IT Integration
2 -
Business application stu
1 -
Business Technology Platform
1 -
Business Trends
1,661 -
Business Trends
88 -
CAP
1 -
cf
1 -
Cloud Foundry
1 -
Confluent
1 -
Customer COE Basics and Fundamentals
1 -
Customer COE Latest and Greatest
3 -
Customer Data Browser app
1 -
Data Analysis Tool
1 -
data migration
1 -
data transfer
1 -
Datasphere
2 -
Event Information
1,400 -
Event Information
65 -
Expert
1 -
Expert Insights
178 -
Expert Insights
280 -
General
1 -
Google cloud
1 -
Google Next'24
1 -
Kafka
1 -
Life at SAP
784 -
Life at SAP
11 -
Migrate your Data App
1 -
MTA
1 -
Network Performance Analysis
1 -
NodeJS
1 -
PDF
1 -
POC
1 -
Product Updates
4,577 -
Product Updates
330 -
Replication Flow
1 -
RisewithSAP
1 -
SAP BTP
1 -
SAP BTP Cloud Foundry
1 -
SAP Cloud ALM
1 -
SAP Cloud Application Programming Model
1 -
SAP Datasphere
2 -
SAP S4HANA Cloud
1 -
SAP S4HANA Migration Cockpit
1 -
Technology Updates
6,886 -
Technology Updates
408 -
Workload Fluctuations
1
Related Content
- New Machine Learning features in SAP HANA Cloud in Technology Blogs by SAP
- SAP Build Code - Speed up your development with Generative AI Assistant - Joule in Technology Blogs by SAP
- SAP PI/PO migration? Why you should move to the Cloud with SAP Integration Suite! in Technology Blogs by SAP
- Deliver Real-World Results with SAP Business AI: Q4 2023 & Q1 2024 Release Highlights in Technology Blogs by SAP
- 10+ ways to reshape your SAP landscape with SAP Business Technology Platform – Blog Series in Technology Blogs by SAP
Top kudoed authors
| User | Count |
|---|---|
| 13 | |
| 10 | |
| 10 | |
| 7 | |
| 6 | |
| 5 | |
| 5 | |
| 5 | |
| 4 | |
| 4 |