
- SAP Community
- Products and Technology
- Technology
- Technology Blogs by SAP
- [SAP Business Technology Platform on Alibaba Cloud...
Technology Blogs by SAP
Learn how to extend and personalize SAP applications. Follow the SAP technology blog for insights into SAP BTP, ABAP, SAP Analytics Cloud, SAP HANA, and more.
Turn on suggestions
Auto-suggest helps you quickly narrow down your search results by suggesting possible matches as you type.
Showing results for
former_member25
Explorer
Options
- Subscribe to RSS Feed
- Mark as New
- Mark as Read
- Bookmark
- Subscribe
- Printer Friendly Page
- Report Inappropriate Content
07-24-2020
6:29 AM
In this article, you will know how to configure and use destinations in Cloud Connector in SAP Business Technology Platform on Alibaba Cloud. Before you start you need to complete the below items in the Prerequisites section first.
To use Destination service, you should entitle the quota of the service first. Make sure your subaccount be assigned with a quota of Connectivity and Destination service.
Your subaccount should have below roles:
The assign Destination Administrator role is similar to the steps in the Create new role collection for the Cloud Connector section in blog post.
Finally, you should have the role as below:
In this article, we will use the SAP NetWeaver Gateway Demo system to act as the backend system. Sign up here and then ensure your account is active and the username and password are correct, by checking you can access HTTP-based services such as the EPM_REF_APPS_SHOP_SRV OData service. If you need more help, you can follow the "Create an Account on the Gateway Demo System" tutorial.
Connectivity means you use it as the tool to connect something together. If you have a backend system in the customer's own network (behind the firewall and not directly exposed to the internet). Meanwhile, you want to connect with SAP Cloud Platform to interact with services(such as workflow) in SAP Cloud Platform then you shall need to use SAP Connectivity and configure the destination there. Overall the process can be distributed into the below parts:
See below for the process flow.
Finally, the uploaded app interacts with the backend system via destination instance.
After you complete the configuration of the Cloud Connector (blog post), the connection between Cloud Connector and SAP Cloud Platform is established. Now you need to configure the backend system which you want to use.
Select the "Cloud To On-Premise" item in the navigation menu on the left-hand side, and in the "Mapping Virtual To Internal System" section, create a new system mapping entry with the "+" icon. In the dialog that follows, you can specify the details of your backend SAP system, i.e. the ES5 system:
The dialog summary should look something like this:
Select the "Finish" button to create the system mapping.
To validate the connection to your backend SAP system, select the "Check Availability" (calendar with a magnifier) icon under "Actions" and make sure "Check Result" comes back "Reachable" as shown below:
Now the virtual host is created and can be accessed via 8000 port. Because all of these are running in the SAP Cloud Connector so that the virtual host is visible at the SAP Cloud Platform level. Meanwhile, the connection between Cloud Connector and backend system is established and is ready to use.
You still need to specify the resource of the backend system explicitly to point out which resource you want to use.
In the new "Resources of virtuales5:8000" section that is now visible, add a new resource entry with the "+" icon, specifying the following values and finishing with the "Save" button:
This establishes access to OData services, specifically those at path
Finally, you shall see below after you complete the configuration.
Notice that: In SAP Cloud Platform on AWS, Azure, from the Cloud Connectors view in SAP Cloud Platform cockpit (within the "Connectivity" item in the navigation menu) you can find all the activate connection information. And that view currently is not ready yet in the cockpit of SAP Business Technology Platform on Alibaba Cloud.
A destination is a collection of parameters that points to a remote service or resource, which might be available on the general Internet or behind a firewall in an on-prem environment. In the latter case, an SAP Cloud Connector installed and configured in that on-prem environment enables requests to flow, and that is what we've set up in the previous step.
In the "Destinations" view in the SAP Business Technology Platform cockpit (within the "Connectivity" item in the navigation menu), you can see all the destinations related with your subaccount there.
Select "New Destination" option to create a new destination. In the configuration window you input below:
The "URL" property is just the backend system resource address configured in the previous step. It is a OData service in ES5 system, here we just use it to act as an on-premise system. In order to use this OData service you still need to define new property in "Additional Properties" section.
Now you complete the definition of the new destination. The behind of destination is the address of the backend system resource.
We will deploy a sample app to test the destination, before that we still need to create three services: "xsuaa service instance", "connectivity service instance", "destination service instance".
By uploading a sample application we will test the configured destination. Refer to sample app for the code.
In the "manifest.yml" of the sample app, the custom domain is configured. In SAP Business Technology Platform on Alibaba Cloud, the user needs to configure custom domain and create an application route for the application. Refer to How to use Custom Domain in SAP Business Technology Platform on Alibaba Cloud for more detail.
You can see the application consumes three services: "codejam-xsuaa", "codejam-connectivity", "codejam-destination" that you created in the previous step.
Clone the sample app code and execute below push command in the root of the sample app directory (which you can see the "manifest.yml") to push the application to the SAP Business Technology Platform on Alibaba Cloud.
In a few moments, your app should be shown in the list as in the green "Started" state.
If you have a look at the "xs-app.json" file, you will find that the approuter configuration leads the route to the configured destination.
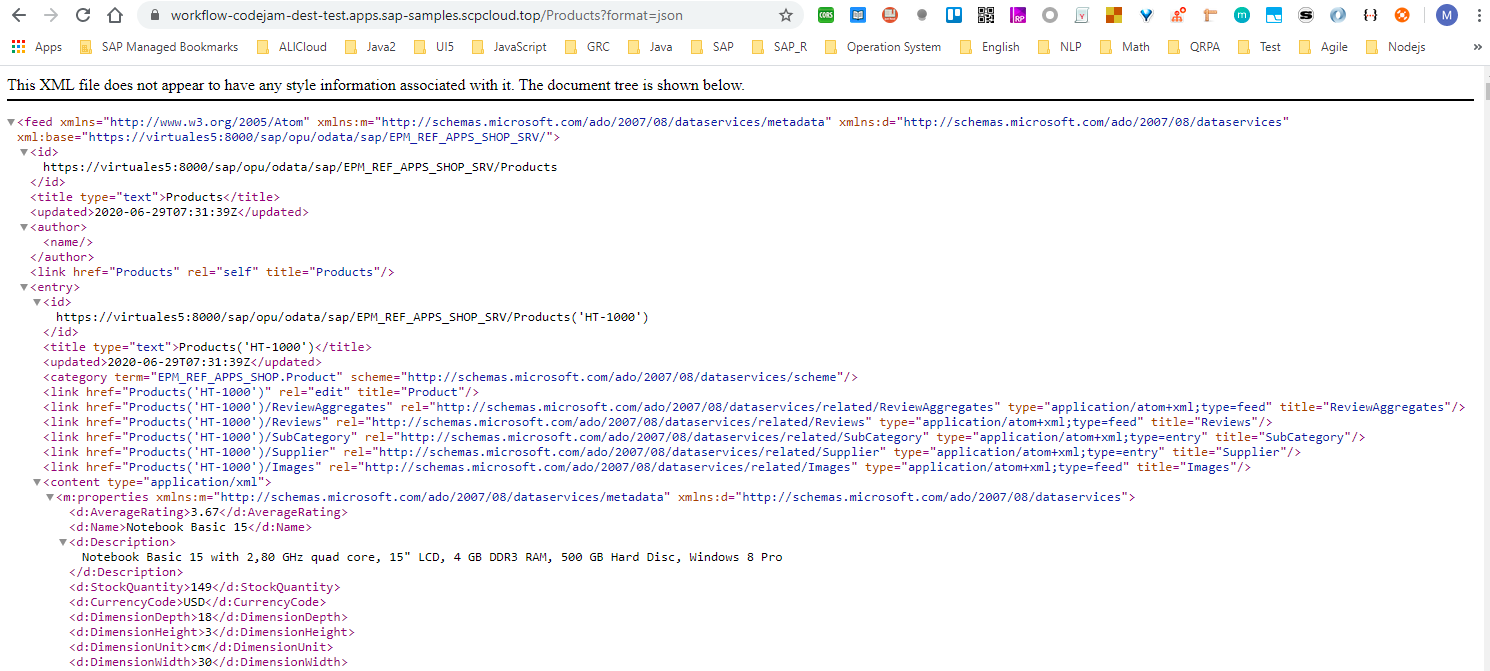
After you deploy the app to the SAP Business Technology Platform, you will find the URL in the "Application Route" section in the "Overview" page. Just append "/Products?format=json" to the end of the URL then you will get the returned data by JSON format.
Now you complete the request from the destination, and the destination reverses the proxy to the backend system to request the resource.
Some content of this blog post comes from cloud-workflow-codejam. It is really a good example showing you how to go through from the start to the end to be familiar with Cloud Connector and Destination, and you can also get information about SAP Workflow from there.
Prerequisites
- Complete the installation and configuration of the Cloud Connector, refer to blog post for more detail.
- Entitlement of Destination service
- Role configuration
- An account on the SAP NetWeaver Gateway Demo system "ES5"
Entitlement of Destination service
To use Destination service, you should entitle the quota of the service first. Make sure your subaccount be assigned with a quota of Connectivity and Destination service.
- Connectivity service with service plan 'lite'
- Destination service with service plan 'lite'
Role configuration
Your subaccount should have below roles:
- Cloud Connector Administrator Role
- Destination Administrator
The assign Destination Administrator role is similar to the steps in the Create new role collection for the Cloud Connector section in blog post.
Finally, you should have the role as below:

An account on the SAP NetWeaver Gateway Demo system "ES5"
In this article, we will use the SAP NetWeaver Gateway Demo system to act as the backend system. Sign up here and then ensure your account is active and the username and password are correct, by checking you can access HTTP-based services such as the EPM_REF_APPS_SHOP_SRV OData service. If you need more help, you can follow the "Create an Account on the Gateway Demo System" tutorial.
Configuration
Understand the process
Connectivity means you use it as the tool to connect something together. If you have a backend system in the customer's own network (behind the firewall and not directly exposed to the internet). Meanwhile, you want to connect with SAP Cloud Platform to interact with services(such as workflow) in SAP Cloud Platform then you shall need to use SAP Connectivity and configure the destination there. Overall the process can be distributed into the below parts:
- You have a backend system not running in SAP Cloud Platform
- You have a subaccount in SAP Cloud Platform, in the subaccount you consume services in SAP Cloud Platform
- Your configure a new destination and create a Connectivity service to be ready to use by an app. The app looks into the destination configuration and points to the configured address.
See below for the process flow.

Finally, the uploaded app interacts with the backend system via destination instance.
Configure the backend system in Cloud Connector
After you complete the configuration of the Cloud Connector (blog post), the connection between Cloud Connector and SAP Cloud Platform is established. Now you need to configure the backend system which you want to use.
Select the "Cloud To On-Premise" item in the navigation menu on the left-hand side, and in the "Mapping Virtual To Internal System" section, create a new system mapping entry with the "+" icon. In the dialog that follows, you can specify the details of your backend SAP system, i.e. the ES5 system:

The dialog summary should look something like this:

Select the "Finish" button to create the system mapping.
To validate the connection to your backend SAP system, select the "Check Availability" (calendar with a magnifier) icon under "Actions" and make sure "Check Result" comes back "Reachable" as shown below:

Now the virtual host is created and can be accessed via 8000 port. Because all of these are running in the SAP Cloud Connector so that the virtual host is visible at the SAP Cloud Platform level. Meanwhile, the connection between Cloud Connector and backend system is established and is ready to use.
Expose resource in the backend system
You still need to specify the resource of the backend system explicitly to point out which resource you want to use.
In the new "Resources of virtuales5:8000" section that is now visible, add a new resource entry with the "+" icon, specifying the following values and finishing with the "Save" button:

This establishes access to OData services, specifically those at path
/sap/opu/odata. Many standard OData services in an SAP system are available here, and the one we'll use later is too.Finally, you shall see below after you complete the configuration.

Notice that: In SAP Cloud Platform on AWS, Azure, from the Cloud Connectors view in SAP Cloud Platform cockpit (within the "Connectivity" item in the navigation menu) you can find all the activate connection information. And that view currently is not ready yet in the cockpit of SAP Business Technology Platform on Alibaba Cloud.
Establish a destination in SAP Business Technology Platform
A destination is a collection of parameters that points to a remote service or resource, which might be available on the general Internet or behind a firewall in an on-prem environment. In the latter case, an SAP Cloud Connector installed and configured in that on-prem environment enables requests to flow, and that is what we've set up in the previous step.
Create a new destination definition
In the "Destinations" view in the SAP Business Technology Platform cockpit (within the "Connectivity" item in the navigation menu), you can see all the destinations related with your subaccount there.

Select "New Destination" option to create a new destination. In the configuration window you input below:

The "URL" property is just the backend system resource address configured in the previous step. It is a OData service in ES5 system, here we just use it to act as an on-premise system. In order to use this OData service you still need to define new property in "Additional Properties" section.

Now you complete the definition of the new destination. The behind of destination is the address of the backend system resource.
Prepare services
We will deploy a sample app to test the destination, before that we still need to create three services: "xsuaa service instance", "connectivity service instance", "destination service instance".
- xsuaa service instance: this service is for authorization management, create a service instance with a service plan "application", and upload the "xs-security.json" in the sample app as the configuration parameter.
- connectivity service instance: create this service instance with a service plan "lite"
- destination service instance: create this service instance with a service plan "lite" (currently there is no "standard" service plan in SAP Business Technology Platform on Alibaba Cloud)
Test the destination
By uploading a sample application we will test the configured destination. Refer to sample app for the code.
In the "manifest.yml" of the sample app, the custom domain is configured. In SAP Business Technology Platform on Alibaba Cloud, the user needs to configure custom domain and create an application route for the application. Refer to How to use Custom Domain in SAP Business Technology Platform on Alibaba Cloud for more detail.
---

applications:


- name: codejam-dest-test

  host: workflow-codejam-dest-test

  domain: apps.sap-samples.scpcloud.top

  random-route: false

  buildpack: nodejs_buildpack

  memory: 128M

  services:

    - codejam-xsuaa

    - codejam-connectivity

    - codejam-destination
You can see the application consumes three services: "codejam-xsuaa", "codejam-connectivity", "codejam-destination" that you created in the previous step.
Clone the sample app code and execute below push command in the root of the sample app directory (which you can see the "manifest.yml") to push the application to the SAP Business Technology Platform on Alibaba Cloud.
cf push -f manifest.ymlIn a few moments, your app should be shown in the list as in the green "Started" state.
Explore the Products entityset
If you have a look at the "xs-app.json" file, you will find that the approuter configuration leads the route to the configured destination.
{

"routes": [

	{

		"source": "/",

		"target": "/",

		"destination": "shopinfo"

	}

]

}
After you deploy the app to the SAP Business Technology Platform, you will find the URL in the "Application Route" section in the "Overview" page. Just append "/Products?format=json" to the end of the URL then you will get the returned data by JSON format.
Now you complete the request from the destination, and the destination reverses the proxy to the backend system to request the resource.
Reference
Some content of this blog post comes from cloud-workflow-codejam. It is really a good example showing you how to go through from the start to the end to be familiar with Cloud Connector and Destination, and you can also get information about SAP Workflow from there.
- SAP Managed Tags:
- SAP Business Technology Platform
Labels:
You must be a registered user to add a comment. If you've already registered, sign in. Otherwise, register and sign in.
Labels in this area
-
ABAP CDS Views - CDC (Change Data Capture)
2 -
AI
1 -
Analyze Workload Data
1 -
BTP
1 -
Business and IT Integration
2 -
Business application stu
1 -
Business Technology Platform
1 -
Business Trends
1,658 -
Business Trends
92 -
CAP
1 -
cf
1 -
Cloud Foundry
1 -
Confluent
1 -
Customer COE Basics and Fundamentals
1 -
Customer COE Latest and Greatest
3 -
Customer Data Browser app
1 -
Data Analysis Tool
1 -
data migration
1 -
data transfer
1 -
Datasphere
2 -
Event Information
1,400 -
Event Information
66 -
Expert
1 -
Expert Insights
177 -
Expert Insights
298 -
General
1 -
Google cloud
1 -
Google Next'24
1 -
Kafka
1 -
Life at SAP
780 -
Life at SAP
13 -
Migrate your Data App
1 -
MTA
1 -
Network Performance Analysis
1 -
NodeJS
1 -
PDF
1 -
POC
1 -
Product Updates
4,577 -
Product Updates
344 -
Replication Flow
1 -
RisewithSAP
1 -
SAP BTP
1 -
SAP BTP Cloud Foundry
1 -
SAP Cloud ALM
1 -
SAP Cloud Application Programming Model
1 -
SAP Datasphere
2 -
SAP S4HANA Cloud
1 -
SAP S4HANA Migration Cockpit
1 -
Technology Updates
6,873 -
Technology Updates
421 -
Workload Fluctuations
1
Related Content
- How to transport Build Workzone Site to another subaccount via CTMS? in Technology Q&A
- SAP Build Process Automation Pre-built content for Finance Use cases in Technology Blogs by SAP
- How to configure SAP system in Eclipse ? in Technology Q&A
- Customer & Partner Roundtable for SAP BTP ABAP Environment #12 in Technology Blogs by SAP
- CAP Autentication error in Technology Q&A
Top kudoed authors
| User | Count |
|---|---|
| 39 | |
| 25 | |
| 17 | |
| 13 | |
| 7 | |
| 7 | |
| 7 | |
| 7 | |
| 6 | |
| 6 |