
- SAP Community
- Products and Technology
- Technology
- Technology Blogs by SAP
- G-Suite Integration Simplified with SAP Integratio...
Technology Blogs by SAP
Learn how to extend and personalize SAP applications. Follow the SAP technology blog for insights into SAP BTP, ABAP, SAP Analytics Cloud, SAP HANA, and more.
Turn on suggestions
Auto-suggest helps you quickly narrow down your search results by suggesting possible matches as you type.
Showing results for
Sriprasadsbhat
Active Contributor
Options
- Subscribe to RSS Feed
- Mark as New
- Mark as Read
- Bookmark
- Subscribe
- Printer Friendly Page
- Report Inappropriate Content
07-20-2020
2:19 PM
Introduction:
Post simplified Onboarding and Provisioning of Integration Suite its become very handy to liaison strong capabilities of SAP Cloud Platform Integration Suite with a free hand.
Most of our community members might have already worked on integration scenarios involving G-Suite integration which requires complex modeling and process modelling.In this blog will discuss how to we can simplify G-Suite with SuccessFactors by leveraging SAP Cloud Platform Integration Suite services , SAP CPI and Open Connectors.
Will divide this blog into two
New Employee Created /Employee Terminated in SAP SuccessFactors will be captured using Intelligent Service Center ( Using New Hire and Termination Event ) and sent to SAP CPI using Integration Center ( which sends all the required data for G-Suite ).Then SAP CPI perform necessary transformation to send the data to G-Suite using SAP Cloud Platform Open Connectors.
Create G-Suite Trial Account ( if you dont have one ) by following below threads
Enable G-Suite Trial Account
Enable G-Suite with your own domain
Once you have access you will be able to login into G-Suite Admin Page which looks like below.
Now login into Google Developer Console to enable Google Admin SDK API and create OAuth Credential to create or delete user accounts [ Directory APIs ] using SAP Open Connectors.
Create an application by manually adding additional scope "https://www.googleapis.com/auth/admin.directory.user" as shown below
Name your Credential and update the Redirect Urls ( one for POSTMAN and one for Open Connectors ) as shown below.
Bypassing regular flow of using already built Open Connector element this time we will create an G-Suite Open Connector element from scratch using working POSTMAN collection.
Open your postman and create New Collection to have 3 operations GET,POST and DELETE operations.
Add all the 3 Operations for connecting to G-Suite( have shown only GET here )
Click on Get New Authorization Code to configure details required for Access token ( This step will be again focused during SAP CP Open Connector Config ).
Now use this token to send a request to G-Suite to get details of user.
Now repeat the same for all the 3 operations and export the Postman Collection as JSON.
You can use below JSON export of the POSTMAN Collection for try out .
Now you have POSTMAN collection ( in JSON format ) will see how to build connector out of it.
Now Navigate to Resources and update the GET and DELETE operation to take input from your request ( User email id to be read or to be deleted ) .
Make sure you have copied User,Organization and Element secret from instance you have created to configure SAP CPI Open Connectors Adapter.
Second part will give more details on SuccessFactors and SAP CPI configurations which are required.
Regards,
Sriprasad Shivaram Bhat
Post simplified Onboarding and Provisioning of Integration Suite its become very handy to liaison strong capabilities of SAP Cloud Platform Integration Suite with a free hand.
Most of our community members might have already worked on integration scenarios involving G-Suite integration which requires complex modeling and process modelling.In this blog will discuss how to we can simplify G-Suite with SuccessFactors by leveraging SAP Cloud Platform Integration Suite services , SAP CPI and Open Connectors.
Will divide this blog into two
- Part 1 Covering G- Suite Configuration and Creating Open Connector element using Postman Collection.
- Part2 Covering SuccessFactors and SAP Cloud Platform Integration Suite- Integration Service including end to end testing.
High Level Design Overview:

Design Overview
New Employee Created /Employee Terminated in SAP SuccessFactors will be captured using Intelligent Service Center ( Using New Hire and Termination Event ) and sent to SAP CPI using Integration Center ( which sends all the required data for G-Suite ).Then SAP CPI perform necessary transformation to send the data to G-Suite using SAP Cloud Platform Open Connectors.
G-Suite Configuration:
Create G-Suite Trial Account ( if you dont have one ) by following below threads
Enable G-Suite Trial Account
Enable G-Suite with your own domain
Once you have access you will be able to login into G-Suite Admin Page which looks like below.

Now login into Google Developer Console to enable Google Admin SDK API and create OAuth Credential to create or delete user accounts [ Directory APIs ] using SAP Open Connectors.
Step 1:
Create Project by navigating to IAM&Admin --> Manage Resources


Step 2:
Navigate to APIs & Services to create OAuth Consent and Credentials required to connect from SAP Open Connectors.

Step 3:
Enable Google Admin SDK and Directory APIs required to create User Accounts in G-Suite

Step 4:
Update OAuth Consent which is required further to create OAuth 2.0 credentials.

Create an application by manually adding additional scope "https://www.googleapis.com/auth/admin.directory.user" as shown below

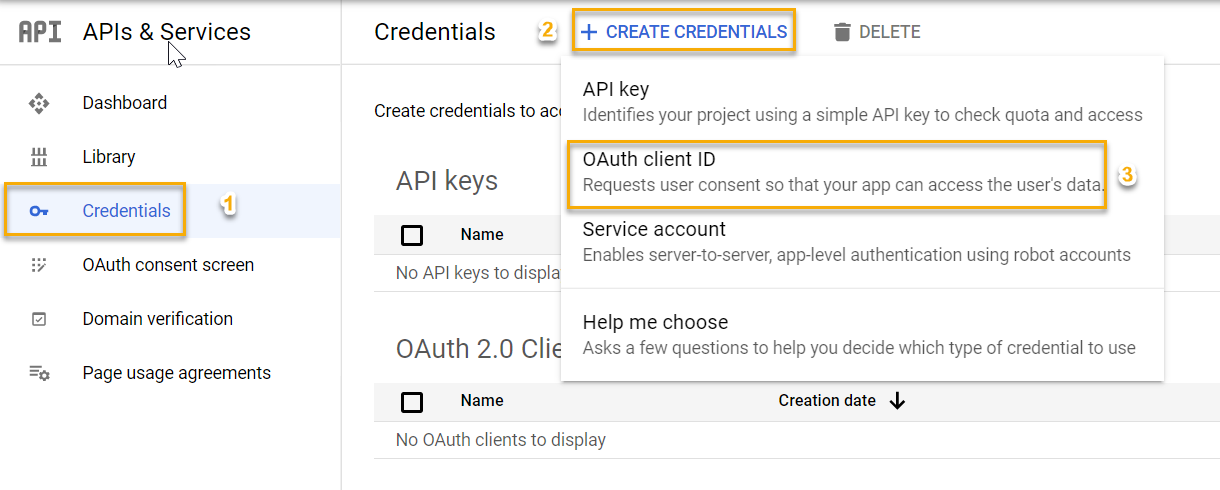
Step 5:
Navigate to Credentials and Click on Create Credentials of the type OAuth Client ID.
Name your Credential and update the Redirect Urls ( one for POSTMAN and one for Open Connectors ) as shown below.

Step 6:
Now you have Client ID and Client Secret .Copy these details and keep it handy for further configurations we do in POSTMAN and Open Connectors.

SAP Cloud Platform Integration Suite- Open Connector Configuration
Bypassing regular flow of using already built Open Connector element this time we will create an G-Suite Open Connector element from scratch using working POSTMAN collection.
Open your postman and create New Collection to have 3 operations GET,POST and DELETE operations.

Add all the 3 Operations for connecting to G-Suite( have shown only GET here )

Click on Get New Authorization Code to configure details required for Access token ( This step will be again focused during SAP CP Open Connector Config ).

Now use this token to send a request to G-Suite to get details of user.

Now repeat the same for all the 3 operations and export the Postman Collection as JSON.

You can use below JSON export of the POSTMAN Collection for try out .
{

	"info": {

		"_postman_id": "9553f61d-88e8-4b6d-a1f9-55f9e8a6ef4b",

		"name": "G-Suite Private Connector",

		"description": "Collection for G-Suite Open Connector Element Creation",

		"schema": "https://schema.getpostman.com/json/collection/v2.1.0/collection.json"

	},

	"item": [

		{

			"name": "User",

			"request": {

				"auth": {

					"type": "oauth2",

					"oauth2": [

						{

							"key": "accessToken",

							"value": "",

							"type": "string"

						},

						{

							"key": "tokenType",

							"value": "Bearer",

							"type": "string"

						},

						{

							"key": "headerPrefix",

							"value": "Bearer ",

							"type": "string"

						},

						{

							"key": "addTokenTo",

							"value": "header",

							"type": "string"

						}

					]

				},

				"method": "GET",

				"header": [],

				"url": {

					"raw": "https://www.googleapis.com/admin/directory/v1/users/<GSUITE_ADMIN_USER_EMAIL>",

					"protocol": "https",

					"host": [

						"www",

						"googleapis",

						"com"

					],

					"path": [

						"admin",

						"directory",

						"v1",

						"users",

						"<GSUITE_ADMIN_USER_EMAIL>"

					]

				},

				"description": "Get User from G-Suite Console- Operation:GET"

			},

			"response": []

		},

		{

			"name": "User",

			"request": {

				"auth": {

					"type": "oauth2",

					"oauth2": [

						{

							"key": "accessToken",

							"value": "",

							"type": "string"

						},

						{

							"key": "tokenType",

							"value": "Bearer",

							"type": "string"

						},

						{

							"key": "headerPrefix",

							"value": "Bearer ",

							"type": "string"

						},

						{

							"key": "addTokenTo",

							"value": "header",

							"type": "string"

						}

					]

				},

				"method": "POST",

				"header": [

					{

						"key": "Authorization",

						"value": "Bearer [YOUR_ACCESS_TOKEN]"

					},

					{

						"key": "Accept",

						"value": "application/json"

					},

					{

						"key": "Content-Type",

						"value": "application/json"

					}

				],

				"body": {

					"mode": "raw",

					"raw": "{\"name\":{\"familyName\":\"Bhat2\",\"givenName\":\"sri5\"},\"password\":\"Test$#!123\",\"primaryEmail\":\"srbhat9@EMAIL.COM\"}"

				},

				"url": {

					"raw": "https://www.googleapis.com/admin/directory/v1/users",

					"protocol": "https",

					"host": [

						"www",

						"googleapis",

						"com"

					],

					"path": [

						"admin",

						"directory",

						"v1",

						"users"

					]

				}

			},

			"response": []

		},

		{

			"name": "User",

			"request": {

				"auth": {

					"type": "oauth2",

					"oauth2": [

						{

							"key": "accessToken",

							"value": "<YOUR_ACCESS_TOKEN>",

							"type": "string"

						},

						{

							"key": "tokenType",

							"value": "Bearer",

							"type": "string"

						},

						{

							"key": "headerPrefix",

							"value": "Bearer ",

							"type": "string"

						},

						{

							"key": "addTokenTo",

							"value": "header",

							"type": "string"

						}

					]

				},

				"method": "DELETE",

				"header": [

					{

						"key": "Authorization",

						"value": "Bearer [YOUR_ACCESS_TOKEN]"

					},

					{

						"key": "Accept",

						"value": "application/json"

					},

					{

						"key": "Content-Type",

						"value": "application/json"

					}

				],

				"body": {

					"mode": "raw",

					"raw": "{\"name\":{\"familyName\":\"Bhat2\",\"givenName\":\"sri5\"},\"password\":\"Test@1!123\",\"primaryEmail\":\"srbhat5@test.com\"}"

				},

				"url": {

					"raw": "https://www.googleapis.com/admin/directory/v1/users/<EMAIL_ID_GSUITE_USER>",

					"protocol": "https",

					"host": [

						"www",

						"googleapis",

						"com"

					],

					"path": [

						"admin",

						"directory",

						"v1",

						"users",

						"<EMAIL_ID_GSUITE_USER>"

					]

				}

			},

			"response": []

		}

	],

	"protocolProfileBehavior": {}

}
Now you have POSTMAN collection ( in JSON format ) will see how to build connector out of it.
Step 1:
Login to your Open Connectors instance and navigate to Connectors-> Click on Build New Connector

Step 2:
Click on Import to select JSON you have exported from POSTMAN

Step 3:
Select Postman 2.1 as import option and select the file from your local machine.Click on CONTINUE IMPORT once you are done.

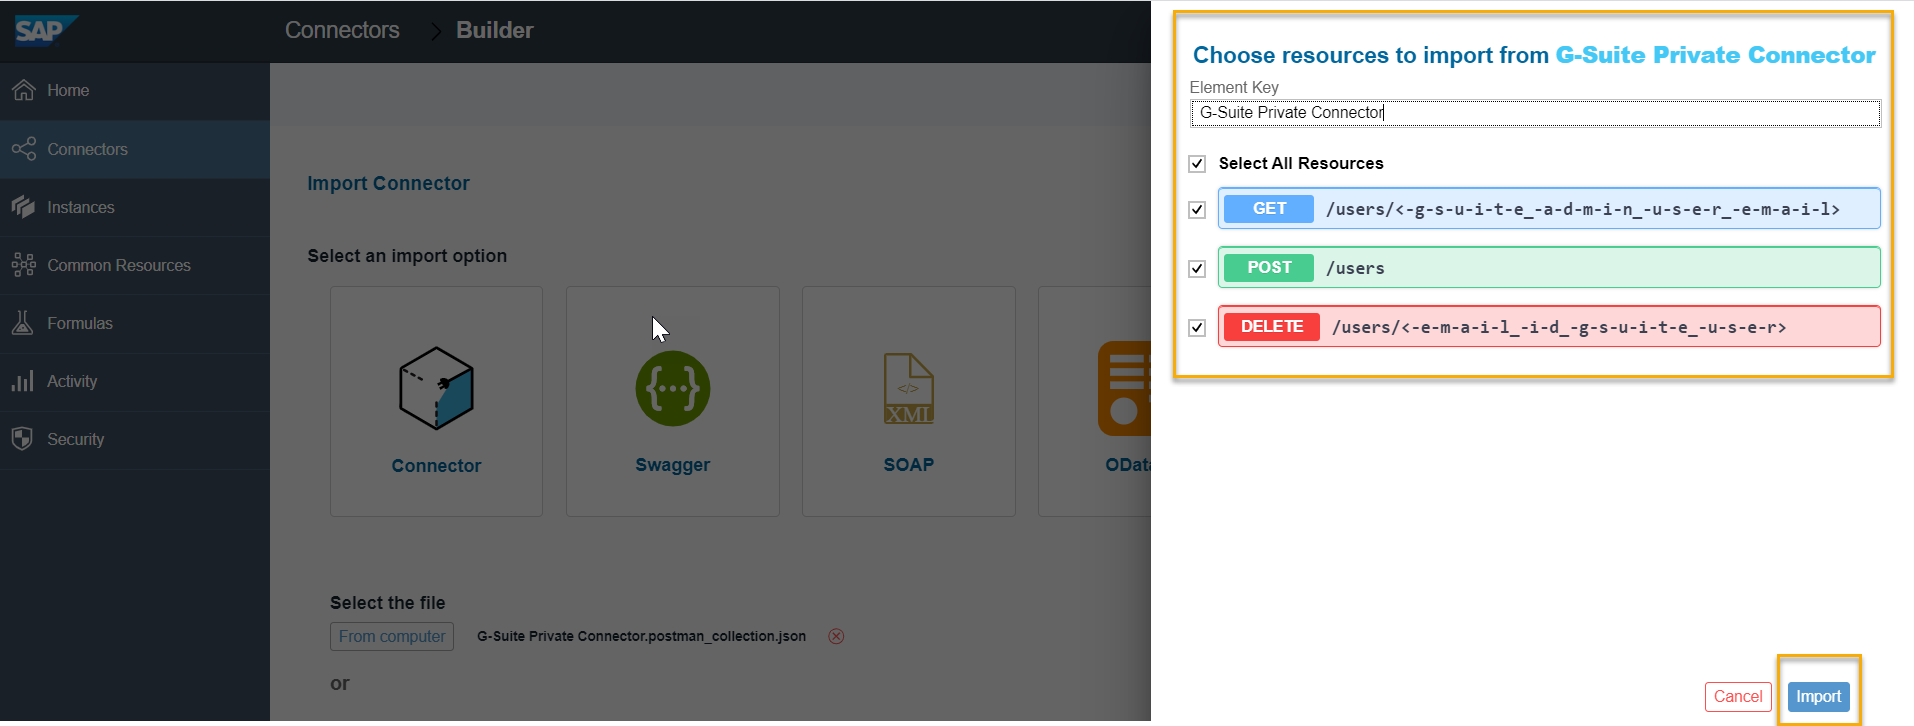
Step 4:
Rename your element ( if you want ) and Select All Resources as shown below
Step 5:
Now Setup Screen appears and copy paste the values from your POSTMAN as per mapping shown below.Save it once done.

Step 6:
Now Navigate to Resources and update the GET and DELETE operation to take input from your request ( User email id to be read or to be deleted ) .

Step 7:
Navigate to API Docs to visualize your newly created APIs look and click on Authenticate Instance to create new instance

Step 8:
New window opens and populate Client ID and Client Secret you have generated from G-Suite Developer console.

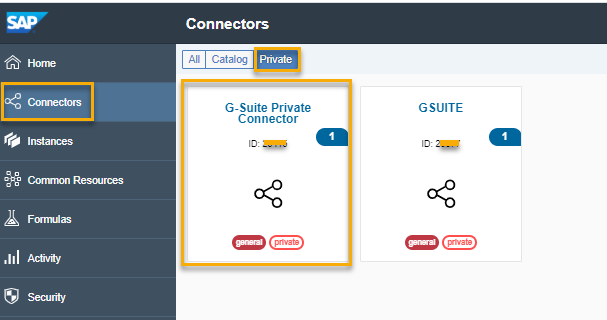
Step 9:
Now you have successfully created G-Suite Element from your POSTMAN and it will be visible in Private section of overview page.
Make sure you have copied User,Organization and Element secret from instance you have created to configure SAP CPI Open Connectors Adapter.
Second part will give more details on SuccessFactors and SAP CPI configurations which are required.
Regards,
Sriprasad Shivaram Bhat
- SAP Managed Tags:
- SAP Integration Suite,
- Cloud Integration,
- Open Connectors,
- SAP Process Integration,
- SAP Process Orchestration
Labels:
5 Comments
You must be a registered user to add a comment. If you've already registered, sign in. Otherwise, register and sign in.
Labels in this area
-
ABAP CDS Views - CDC (Change Data Capture)
2 -
AI
1 -
Analyze Workload Data
1 -
BTP
1 -
Business and IT Integration
2 -
Business application stu
1 -
Business Technology Platform
1 -
Business Trends
1,661 -
Business Trends
87 -
CAP
1 -
cf
1 -
Cloud Foundry
1 -
Confluent
1 -
Customer COE Basics and Fundamentals
1 -
Customer COE Latest and Greatest
3 -
Customer Data Browser app
1 -
Data Analysis Tool
1 -
data migration
1 -
data transfer
1 -
Datasphere
2 -
Event Information
1,400 -
Event Information
64 -
Expert
1 -
Expert Insights
178 -
Expert Insights
273 -
General
1 -
Google cloud
1 -
Google Next'24
1 -
Kafka
1 -
Life at SAP
784 -
Life at SAP
11 -
Migrate your Data App
1 -
MTA
1 -
Network Performance Analysis
1 -
NodeJS
1 -
PDF
1 -
POC
1 -
Product Updates
4,577 -
Product Updates
325 -
Replication Flow
1 -
RisewithSAP
1 -
SAP BTP
1 -
SAP BTP Cloud Foundry
1 -
SAP Cloud ALM
1 -
SAP Cloud Application Programming Model
1 -
SAP Datasphere
2 -
SAP S4HANA Cloud
1 -
SAP S4HANA Migration Cockpit
1 -
Technology Updates
6,886 -
Technology Updates
403 -
Workload Fluctuations
1
Related Content
- SAP HANA Cloud Vector Engine: Quick FAQ Reference in Technology Blogs by SAP
- 10+ ways to reshape your SAP landscape with SAP Business Technology Platform - Blog 7 in Technology Blogs by SAP
- Integration Suite trial - cannot access API proxy in Technology Q&A
- 10+ ways to reshape your SAP landscape with SAP BTP - Blog 4 Interview in Technology Blogs by SAP
- 10+ ways to reshape your SAP landscape with SAP Business Technology Platform – Blog 4 in Technology Blogs by SAP
Top kudoed authors
| User | Count |
|---|---|
| 12 | |
| 10 | |
| 9 | |
| 7 | |
| 7 | |
| 7 | |
| 6 | |
| 6 | |
| 5 | |
| 4 |