
- SAP Community
- Products and Technology
- Technology
- Technology Blogs by SAP
- Migrating SAP Fiori Applications from SAP Web IDE ...
Technology Blogs by SAP
Learn how to extend and personalize SAP applications. Follow the SAP technology blog for insights into SAP BTP, ABAP, SAP Analytics Cloud, SAP HANA, and more.
Turn on suggestions
Auto-suggest helps you quickly narrow down your search results by suggesting possible matches as you type.
Showing results for
Employee
Options
- Subscribe to RSS Feed
- Mark as New
- Mark as Read
- Bookmark
- Subscribe
- Printer Friendly Page
- Report Inappropriate Content
07-08-2020
2:41 PM
Introduction
PLEASE CHECK THE NEW MIGRATION BLOG
https://blogs.sap.com/2022/01/06/migrate-sap-fiori-projects-from-sap-web-ide-to-sap-business-applica...
SAP Business Application Studio (aka BAS) is the evolution of SAP Web IDE. It is a modular development environment, built on “Eclipse Theia”, an open-source IDE that embraces the Microsoft VS Code experience. It aims to improve time to value of the developers, provide a modern development experience and allow simple integration with SAP’s services and systems.
In this blog post, I will guide you through migrating an SAP Fiori application from SAP Web IDE to SAP Business Application Studio. The SAP Fiori application consumes an S/4 HANA on-prem service and is deployed to the SAP UI5 Repository on ABAP environment.
You can also watch my video or a a video from UI5Con showing a new application development, or you can also check my blog post regarding SAP Fiori application development.
For migration of SAP Fiori application from Neo to Cloud Foundry follow this blog post.
The environment setup below only needs to be performed one time.
Environment Setup
- Create a subaccount in your global account or use an existing account and skip to Step three.

Note: You do NOT have to enable Cloud Foundry since the SAP Fiori application runtime is on the ABAP environment.
- For trial account, Make sure that your subaccount has an SAP Business Application Studio entitlement. If the entitlement is missing, add it from Entitlements menu.
.

- Navigate to the Subscriptions menu and search for SAP Business Application Studio. Click on the tile and click Subscribe.

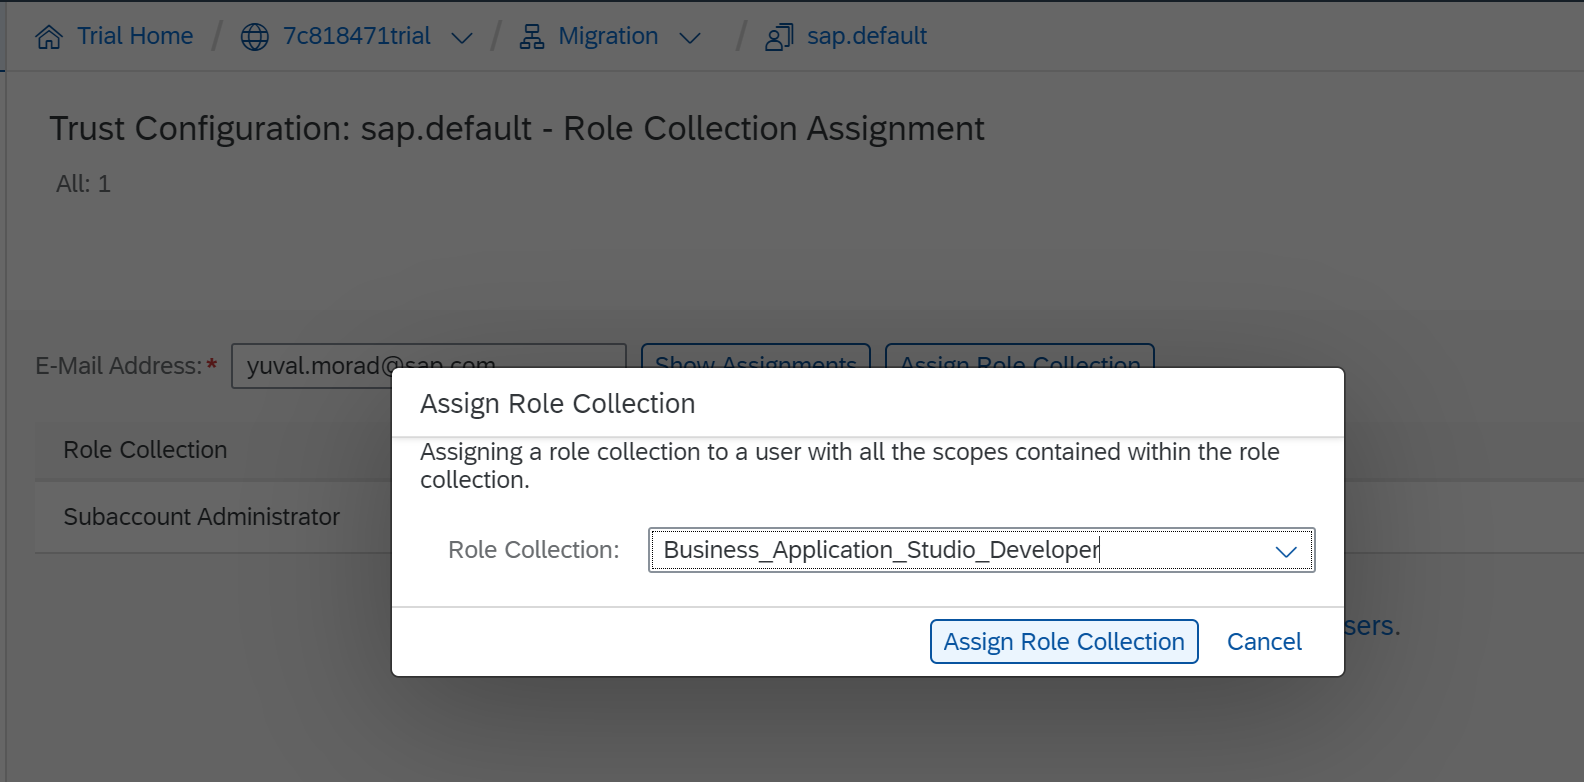
- Assign yourself to a developer role:
- Navigate to Security > Trust Configuration.
- Click the sap.default link.
- Enter your email address.
- Click Assign Role Collection.
- Select "Business_Application_Studio_Developer" from the dialog box.

5. Launch SAP Business Application Studio:
- Navigate to Subscriptions menu and locate the SAP Business Application Studio tile.
- Click Go to Application.
The SAP Business Application Studio Dev Spaces UI opens.

6. Create an SAP Fiori Dev Space:
- Click Create Dev Space.
- Enter a name for the dev space.
- Select the SAP Fiori type (from the left side).
- Click Create Dev Space.
- Launch the dev space by clicking on the dev space name.


7. Import your destination:
- Navigate to your Neo account and export the existing destination required for the SAP Fiori app to your PC.
- Navigate to Connectivity > Destinations in your new subaccount and import the existing destination.
- Make sure that the following properties are set in Additional Properties of the destination:
- HTML5.DynamicDestination = true
- WebIDEEnabled = true
- WebIDEUsage = odata_abap,dev_abap
In case your service is not an abap catalog, add WebIDEUsage = odata_gen
Do NOT maintain both odata_abap and odata_gen as WebIDEUsage. - HTML5.Timeout = 60000
- Make sure that your subaccount is connected to your on-prem destination with
a cloud connector.

Migrating your Project
During migration, you import your existing project, adjust four files and run the application in SAP Business Application Studio.
Import your project
You can clone your project from GIT using the command line in SAP Business Application Studio.
Note: See Connecting to External Systems for more information on using a destination with Cloud Connector as your GIT on-prem setup.
Alternatively, import your project as follows:
- Click File > Open Workspace and create a workspace in the projects folder.
- Export your project (e.g. "onprem" project) from SAP Web IDE Full Stack to your PC.
- Unzip the project on your PC.
- Drag and drop the project to the SAP Business Application Studio.

Adjust your project
Only 4 files should be changed to enable your SAP Fiori app to run on Application Studio:
- Create an “xs-app.json” file under the project's root folder to enable the local run.This file replaces the “neo-app.json” file, which is not required.
- Adapt the “package.json” file with the relevant required dev-dependencies, such as code assist, build, and local run.
- Adapt the “ui5.yaml” file to include the relevant SAPUI5 build tasks.
- Adapt "index.html" to use absolute SAPUI5 URL.
xs-app.json File
- Create the file under the project's root folder (e.g. "onprem") folder.
- Copy the following snippet and enter your destination name. This snippet:
- Adds a route to your "on-prem" destination.
- Adds a route to enable the local run.
{

"authenticationMethod": "none",

"routes":

[

{

"authenticationType": "none",

"csrfProtection": false,

"source": "^/sap/opu/odata/",

"destination": "<YourDestination>"

},

{

"source": "^(.*)$",

"target": "$1",

"service": "html5-apps-repo-rt"

}

]
}
package.json File
If no specific dev-dependencies/scripts are added,
replace the content with the following snippet and adjust the name in bold:
{

  "name": "onprem",

  "version": "0.0.1",

  "devDependencies": {

    "@sapui5/ts-types": "1.71.x",

    "@sap/ui5-builder-webide-extension": "1.0.x",

    "@sap/approuter": "8.1.x",

    "@sap/html5-repo-mock": "1.6.x"

  },

  "scripts": {

    "build": "ui5 build --include-task=generateManifestBundle generateCachebusterInfo",

    "start-local": "node node_modules/@sap/html5-repo-mock/index.js"

  },

  "ui5": {

    "dependencies": [

      "@sap/ui5-builder-webide-extension"

    ]

  }

}
ui5.yaml File
If no specific SAPUI5 build tasks are added, replace the content with the following snippet and adjust the "nameSpace" value in bold:
specVersion: '1.0'

metadata:

  name: onprem

type: application

resources:

  configuration:

    propertiesFileSourceEncoding: UTF-8

builder:

  customTasks:

  - name: webide-extension-task-updateManifestJson

    afterTask: generateVersionInfo

    configuration:

      appFolder: webapp

      destDir: dist

  - name: webide-extension-task-resources

    afterTask: webide-extension-task-updateManifestJson

    configuration:

      nameSpace: ns
index.html File
SAPUI5 bootstrap can refer to relative URL then it will be consumed from ABAP runtime and not from CDN. Adjust the "src" value in bold:
     <script id="sap-ui-bootstrap"

      src= "./resources/sap-ui-core.js"
Delete files
The following files and folders can be deleted:
".che" folder, ".user.project.json", "extensionDocu.properties", "neo-app.json",
"package-lock.json", "readme.txt"

Test your SAP Fiori Application
- Perform an npm install from the terminal.
- Create a run configuration from the run panel.
- Bind your destination in the run configuration.
- Locally run your app accessing your remote service.
Your app is running in a new browser tab.
Build and deploy your SAP Fiori Application
- Perform an npm run build from the terminal.
- Execute "abap-deploy" and answer the questions from the terminal.
Your app is deployed to the ABAP system.
Conclusions
You have accomplished the following tasks:
- Setup SAP Business Application Studio development environment.
- Migrate an SAP Fiori application consuming ABAP on-prem service from SAP Web IDE to SAP Business Application Studio.
- Test the application locally and deploy it to ABAP.
You can continue and learn about SAP Fiori development using SAP Business Application Studio in this blog post.
- SAP Managed Tags:
- SAP Business Application Studio,
- SAP Fiori,
- SAPUI5,
- SAP Web IDE
Labels:
97 Comments
- « Previous
-
- 1
- 2
- Next »
You must be a registered user to add a comment. If you've already registered, sign in. Otherwise, register and sign in.
Labels in this area
-
ABAP CDS Views - CDC (Change Data Capture)
2 -
AI
1 -
Analyze Workload Data
1 -
BTP
1 -
Business and IT Integration
2 -
Business application stu
1 -
Business Technology Platform
1 -
Business Trends
1,661 -
Business Trends
88 -
CAP
1 -
cf
1 -
Cloud Foundry
1 -
Confluent
1 -
Customer COE Basics and Fundamentals
1 -
Customer COE Latest and Greatest
3 -
Customer Data Browser app
1 -
Data Analysis Tool
1 -
data migration
1 -
data transfer
1 -
Datasphere
2 -
Event Information
1,400 -
Event Information
65 -
Expert
1 -
Expert Insights
178 -
Expert Insights
280 -
General
1 -
Google cloud
1 -
Google Next'24
1 -
Kafka
1 -
Life at SAP
784 -
Life at SAP
11 -
Migrate your Data App
1 -
MTA
1 -
Network Performance Analysis
1 -
NodeJS
1 -
PDF
1 -
POC
1 -
Product Updates
4,577 -
Product Updates
330 -
Replication Flow
1 -
RisewithSAP
1 -
SAP BTP
1 -
SAP BTP Cloud Foundry
1 -
SAP Cloud ALM
1 -
SAP Cloud Application Programming Model
1 -
SAP Datasphere
2 -
SAP S4HANA Cloud
1 -
SAP S4HANA Migration Cockpit
1 -
Technology Updates
6,886 -
Technology Updates
408 -
Workload Fluctuations
1
Related Content
- ABAP Cloud Developer Trial 2022 Available Now in Technology Blogs by SAP
- Analyze Expensive ABAP Workload in the Cloud with Work Process Sampling in Technology Blogs by SAP
- New Machine Learning features in SAP HANA Cloud in Technology Blogs by SAP
- When to Use Multi-Off in 3SL in Technology Blogs by SAP
- Kyma Integration with SAP Cloud Logging. Part 2: Let's ship some traces in Technology Blogs by SAP
Top kudoed authors
| User | Count |
|---|---|
| 13 | |
| 10 | |
| 10 | |
| 9 | |
| 7 | |
| 6 | |
| 5 | |
| 5 | |
| 5 | |
| 4 |