
- SAP Community
- Products and Technology
- Technology
- Technology Blogs by SAP
- Show data from a HANA Cloud Odata service in a Fio...
Technology Blogs by SAP
Learn how to extend and personalize SAP applications. Follow the SAP technology blog for insights into SAP BTP, ABAP, SAP Analytics Cloud, SAP HANA, and more.
Turn on suggestions
Auto-suggest helps you quickly narrow down your search results by suggesting possible matches as you type.
Showing results for
former_member43
Contributor
Options
- Subscribe to RSS Feed
- Mark as New
- Mark as Read
- Bookmark
- Subscribe
- Printer Friendly Page
- Report Inappropriate Content
07-08-2020
2:02 PM
In this blog, we will explore how to create a table from scratch in an HTML / Javascript Fiori application and host it on the SAP Cloud Platform.
The table will show data coming from an Odata service registered as a destination on SAP Cloud Platform.
In order to use external services from your Cloud Foundry Node.js application, you need to register such services in the Destinations section of SAP Cloud Platform Cockpit.
Open your subaccoun and select Destinations within the Connectivity tab.
Create a new destination with the following values :
- Name : orderentry
- Type : HTTP
- URL : The Odata service URL you created in "Use xsodata to expose HANA Cloud tables as Odata services", without any parameters. In my case it is https://zbeiqcnqc0hcxzgar-entry-core-xsjs.cfapps.us10.hana.ondemand.com/xsodata/customers.xsodata
- Authentication : NoAuthentication (Add authentication here if you chose to secure your Node.js application when creating it)
Additional properties :
- WebIDEEnabled : true
- WebIDEUsage : odata_gen
Open the SAP Web IDE, right-click your current workspace and create a new project from template.
Choose SAP UI5 Application within the available Cloud Foundry templates.
Give your SAPUI5 application a name and a namespace.
Leave the view type as XML.
Your project gets created as a Multi-Target Application (mta). It contains an app router which receives external requests and route them to the right resource, a UI deployer, and your actual UI.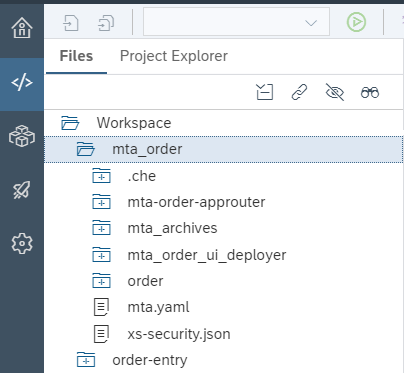
Open the UI folder called "order", and open the file xs-app.json
Here, you must add a route that will lead users to the destination you set in the previous chapter.
In the example below, all users who type a url starting with /orderentry/ will be redirected to the destination "orderentry".
Now, let's define the controller.
Open the file View1.controller.js located in the controller folder.
Here, you can add the logic that will be executed when users access your page.
Add the function getData below onInit :

In the function getData, we perform an ajax call the relative url orderentry/customers?$format=json
The first part of this url "orderentry" is detected as a route in the xs-app.json . It gets redirected to the destination we defined earlier in the SAP Cloud Platform Cockpit.
On success, a model oModel gets created based on the Odata service.
In the next step, we create the User Interface in the View1.view.xml file.
Use this code to create a button and a table in XML. The button calls our function getData when pressed.
The view, model and controller are all defined, now the application is ready to be run.
Select the webapp folder and Run index.html .
The first time you run it, the application will be built and then run.
The application opens in a new folder, and when you click on "Get data", the table gets filled with data.
If the application does not work as expected, use the chrome tools (F12) to check whether the Odata service is being called correctly.
When you are ready to deploy your application, the next step is to build the mta_order folder, and then deploy it to SAP Cloud Platform.
Thank you navinsaran29 for your help in building this app.
The table will show data coming from an Odata service registered as a destination on SAP Cloud Platform.

Expose SAP HANA Cloud data through Odata services
Prerequisites
- Free Trial account of SAP Cloud Platform with HANA Cloud
- This blog follows "Use xsodata to expose HANA Cloud tables as Odata services"
Register a destination
In order to use external services from your Cloud Foundry Node.js application, you need to register such services in the Destinations section of SAP Cloud Platform Cockpit.
Open your subaccoun and select Destinations within the Connectivity tab.
Create a new destination with the following values :
- Name : orderentry
- Type : HTTP
- URL : The Odata service URL you created in "Use xsodata to expose HANA Cloud tables as Odata services", without any parameters. In my case it is https://zbeiqcnqc0hcxzgar-entry-core-xsjs.cfapps.us10.hana.ondemand.com/xsodata/customers.xsodata
- Authentication : NoAuthentication (Add authentication here if you chose to secure your Node.js application when creating it)
Additional properties :
- WebIDEEnabled : true
- WebIDEUsage : odata_gen
Create a UI project
Open the SAP Web IDE, right-click your current workspace and create a new project from template.
Choose SAP UI5 Application within the available Cloud Foundry templates.
Give your SAPUI5 application a name and a namespace.
Leave the view type as XML.
Your project gets created as a Multi-Target Application (mta). It contains an app router which receives external requests and route them to the right resource, a UI deployer, and your actual UI.
Open the UI folder called "order", and open the file xs-app.json
Here, you must add a route that will lead users to the destination you set in the previous chapter.
In the example below, all users who type a url starting with /orderentry/ will be redirected to the destination "orderentry".
{

  "welcomeFile": "/index.html",

  "authenticationMethod": "route",

  "logout": {

    "logoutEndpoint": "/do/logout"

  },

  "routes": [

    {

        "source": "^/orderentry/(.*)$",

        "target": "$1",

        "authenticationType": "none",

        "destination": "orderentry",

        "csrfProtection": false

    },

    {

      "source": "^(.*)$",

      "target": "$1",

      "service": "html5-apps-repo-rt",

      "authenticationType": "xsuaa"

    }


  ]

}
Now, let's define the controller.
Open the file View1.controller.js located in the controller folder.
Here, you can add the logic that will be executed when users access your page.
Add the function getData below onInit :
getData : function(){

            var that = this;

                $.ajax({

                url: "orderentry/customers?$format=json",

                contentType: "application/json",

                type: 'GET',

                dataType: "json",

                async: false,

                success: function (response) {

                    var oModel = new sap.ui.model.json.JSONModel(response.d.results);

                    that.getView().byId("order").setModel(oModel);

                },

                error: function (error) {

                    sap.m.MessageToast.show("Error");

                }

            });

        }
In the function getData, we perform an ajax call the relative url orderentry/customers?$format=json
The first part of this url "orderentry" is detected as a route in the xs-app.json . It gets redirected to the destination we defined earlier in the SAP Cloud Platform Cockpit.
On success, a model oModel gets created based on the Odata service.
In the next step, we create the User Interface in the View1.view.xml file.
Use this code to create a button and a table in XML. The button calls our function getData when pressed.
<mvc:View controllerName="order.order.controller.View1" xmlns:mvc="sap.ui.core.mvc" displayBlock="true" xmlns="sap.m">

	<Shell id="shell">

		<App id="app">

			<pages>

				<Page id="page" title="{i18n>title}">

					<content>

						<Button text="Get Data" press="getData" type="Emphasized"></Button>


						<Table id="order" items="{path: '/'}">

        <columns>

            <Column hAlign="Center" vAlign="Middle">

                <Text text="CUSTOMER ID" />

            </Column>

            <Column hAlign="Center" vAlign="Middle">

                <Text text="CITY ID" />

            </Column>

            <Column hAlign="Center" vAlign="Middle">

                <Text text="COUNTRY ID" />

            </Column>

            <Column hAlign="Center" vAlign="Middle">

                <Text text="REGION ID" />

            </Column>

            <Column hAlign="Center" vAlign="Middle">

                <Text text="CUSTOMER" />

            </Column>

            <Column hAlign="Center" vAlign="Middle">

                <Text text="CITYNAME" />

            </Column>

            <Column hAlign="Center" vAlign="Middle">

                <Text text="COUNTRYNAME" />

            </Column>

            <Column hAlign="Center" vAlign="Middle">

                <Text text="REGIONNAME" />

            </Column>

        </columns>

        <items>

            <ColumnListItem>

                <cells>

                    <Text text="{CUSTOMERID}" />

                    <Text text="{CITYID}" />

                    <Text text="{COUNTRYID}" />

                    <Text text="{REGIONID}" />

                    <Text text="{CUSTOMER}" />

                    <Text text="{CITYNAME}" />

                    <Text text="{COUNTRYNAME}" />

                    <Text text="{REGIONNAME}" />

                </cells>

            </ColumnListItem>

        </items>

    </Table>

					</content>

				</Page>

			</pages>

		</App>

	</Shell>

</mvc:View>
The view, model and controller are all defined, now the application is ready to be run.
Select the webapp folder and Run index.html .
The first time you run it, the application will be built and then run.

The application opens in a new folder, and when you click on "Get data", the table gets filled with data.
If the application does not work as expected, use the chrome tools (F12) to check whether the Odata service is being called correctly.
When you are ready to deploy your application, the next step is to build the mta_order folder, and then deploy it to SAP Cloud Platform.
Thank you navinsaran29 for your help in building this app.
- SAP Managed Tags:
- SAP Fiori,
- SAP HANA Cloud,
- OData
Labels:
4 Comments
You must be a registered user to add a comment. If you've already registered, sign in. Otherwise, register and sign in.
Labels in this area
-
ABAP CDS Views - CDC (Change Data Capture)
2 -
AI
1 -
Analyze Workload Data
1 -
BTP
1 -
Business and IT Integration
2 -
Business application stu
1 -
Business Technology Platform
1 -
Business Trends
1,661 -
Business Trends
88 -
CAP
1 -
cf
1 -
Cloud Foundry
1 -
Confluent
1 -
Customer COE Basics and Fundamentals
1 -
Customer COE Latest and Greatest
3 -
Customer Data Browser app
1 -
Data Analysis Tool
1 -
data migration
1 -
data transfer
1 -
Datasphere
2 -
Event Information
1,400 -
Event Information
64 -
Expert
1 -
Expert Insights
178 -
Expert Insights
281 -
General
1 -
Google cloud
1 -
Google Next'24
1 -
Kafka
1 -
Life at SAP
784 -
Life at SAP
11 -
Migrate your Data App
1 -
MTA
1 -
Network Performance Analysis
1 -
NodeJS
1 -
PDF
1 -
POC
1 -
Product Updates
4,577 -
Product Updates
330 -
Replication Flow
1 -
RisewithSAP
1 -
SAP BTP
1 -
SAP BTP Cloud Foundry
1 -
SAP Cloud ALM
1 -
SAP Cloud Application Programming Model
1 -
SAP Datasphere
2 -
SAP S4HANA Cloud
1 -
SAP S4HANA Migration Cockpit
1 -
Technology Updates
6,886 -
Technology Updates
408 -
Workload Fluctuations
1
Related Content
- Analyze Expensive ABAP Workload in the Cloud with Work Process Sampling in Technology Blogs by SAP
- Annotation in SEGW in Technology Q&A
- CAP Extensibility: Exended Properties displayed in UI but missing in Requests in Technology Q&A
- Developer extendibility for custom table and publish oDATA in Technology Q&A
- Top Picks: Innovations Highlights from SAP Business Technology Platform (Q1/2024) in Technology Blogs by SAP
Top kudoed authors
| User | Count |
|---|---|
| 13 | |
| 10 | |
| 10 | |
| 7 | |
| 6 | |
| 5 | |
| 5 | |
| 5 | |
| 5 | |
| 4 |