
- SAP Community
- Products and Technology
- Human Capital Management
- HCM Blogs by Members
- Enhance Talent Community using Data Capture Form &...
Human Capital Management Blogs by Members
Gain valuable knowledge and tips on SAP SuccessFactors and human capital management from member blog posts. Share your HCM insights with a post of your own.
Turn on suggestions
Auto-suggest helps you quickly narrow down your search results by suggesting possible matches as you type.
Showing results for
former_member68
Explorer
Options
- Subscribe to RSS Feed
- Mark as New
- Mark as Read
- Bookmark
- Subscribe
- Printer Friendly Page
- Report Inappropriate Content
07-07-2020
3:30 PM
In SAP SuccessFactors 2005 (H1 2020) release, SAP has changed the name of SAP SuccessFactors Recruiting Management (RCM) & SAP SuccessFactors Recruiting Marketing (RMK) to SAP SuccessFactors Recruiting – Recruiter Experience & SAP SuccessFactors Recruiting – Candidate Experience respectively. Which mean’s RCM & RMK should not be treated like two separate modules anymore and they should be configured in parallel to provide a better working environment to the customer.
In this blog, we will see how we can improve the candidate’s experience as well as recruiter’s experience in the SAP Recruitment system by enhancing the talent community feature by using the data capture form instead of the standard talent community widget.
A very common practice for which the Talent Acquisition team can use this solutions is that let's say customer wants to start a campaign to target technical resources and they like to send a notification to all the candidate who are already registered with them as well as interested in technical opportunities. Now the team needs to create a marketing mail and send to all the candidate who are part of the Information Technology (IT) talent pool. This way they did not spent time on searching for the candidate as per the criteria because they already have the pool for the same.
Now let's see how we can design same in the system.
Pre-requisites
First Identify the requirement of the customer and understand how they classify the candidates for their current Recruiting Process.
Part 1 - Creating Data Capture Form for Talent Community
Let’s take a scenario in which customer bifurcates the candidate on the basis of job family and they want to send the marketing notification on the same criteria. Along with this they like to capture the candidate’s name, contact info and latest CV/Resume.
Step 1: Navigate to the Data Capture Forms in Tools
Note: If Data Capture Form option is not visible then you have not enabled the Use CRM option in Command Center. Navigation: Site > Site Setup > Setting.
Step 2: Click Add and place any name as per the requirement.
Step 3: Our Data Capture Form should have the below fields,
Click +Add button and add the respective fields.
Data capture form and its basic setup is explained in detail in the below blog.
Blog - Recruiting Marketing – How to customize Data Capture Form
Part 2 – Creating Landing Page for Talent Community and adding its link in the website
If customer want to deliver or showcase a specific message to the candidate then design the Landing page like that otherwise use the standard talent community content and place a good attractive banner on the top and embed the data capture form in the design.
Step 4: Navigate to Landing in Pages and create a new landing page.
Note: If customer wants to capture candidates on the basis on the brand(s) then you need to create the same number of Landing pages as per the requirement.
Step 5: Add images and content to beautify the page. After that, navigate to Data Capture Form widget and add the data capture form that we have created along with the other necessary details.
Now the page will look like something below.
You can setup the data capture form in many different manner and the look and feel of the same can be configured as per the customer branding.
Some examples,
My Data Capture Form - 1 (Customized)
My Data Capture Form - 2 (Customized)
SAP's Data Capture Form (Standard)
Step 6: Now we need to place the link of the Talent Community that we have created somewhere in the Homepage so that candidate can easily find it. Best option are to place on the Landing Banner or in the header.
Again, you have variety of option to place the link. It basically depends on the customer requirement. Best example will be SAP career site. They had placed the link in header as well as in the large image.
One of the another best example will be Cookie Banner so that it appears as the first thing while accessing any page and it also does not interrupt the candidate experience of exploring the site.
Part 3 – Creating Talent Pools for the Talent Community
Our Candidate Experience part is complete. Now we will focus on Recruiter Experience.
We need to create talent pools so that candidates go directly into the talent pools.
Note: You can create Talent Pools or Saved Searches for each job function or you can make categories by clubbing together the similar job functions.
Again, it depends on customer whether they only want to see those candidates who have registered using the Talent Community or they want all the candidates regardless of where they have registered their profile.
We are creating searches so that only those candidates who have registered through data capture form should push to Talent Community.
Step 7: Navigate to KEYWORD AND ITEM SEARCH in Recruiting under Candidates and create a search criterion and save it. Remember we need to do this for each category.
Step 8: Navigate to TALENT POOLS in Recruiting under Candidates and Create Talent Pools as per the Job Function.
Step 9: Add the Saved Search in the Talent Pool.
Detailed information regarding the Talent Pools and Saved Search are available in the below link.
2643661 - Candidate Talent Pool - SuccessFactors Recruiting
2643646 - How to configure Talent Pool Status Set (Pipeline) - Recruiting Management
A sync will run daily that will push the candidates as per the criteria into the respective talent pools and recruiter or any user who have the permission of the same can access the candidates. By this customer can easily send notification in bulk, run campaigns, select candidate for newly raised jobs and many more.
Conclusion
The above solutions will make the career site more interactive and ease the registration process for the candidates. On the other hand, the Recruiter will have categorized candidate buckets as per the Job function. Now the recruiter does not need to search every time while looking for the candidate for a particular opening or campaign. Talent Pool status pipeline will also help recruiter to maintain the track of the candidates. Now Recruiter can also send campaign mails in one go to multiple candidates by selecting the required talent pool. This will save the time of the recruiter.
I hope this blog open new ways of developing solutions to enhance the customer recruitment process and will help to develop new ways to interact as well as attract with the candidates. I will be happy to address any further question in the comments.
Thanks for the read!!
In this blog, we will see how we can improve the candidate’s experience as well as recruiter’s experience in the SAP Recruitment system by enhancing the talent community feature by using the data capture form instead of the standard talent community widget.
A very common practice for which the Talent Acquisition team can use this solutions is that let's say customer wants to start a campaign to target technical resources and they like to send a notification to all the candidate who are already registered with them as well as interested in technical opportunities. Now the team needs to create a marketing mail and send to all the candidate who are part of the Information Technology (IT) talent pool. This way they did not spent time on searching for the candidate as per the criteria because they already have the pool for the same.
Now let's see how we can design same in the system.
Pre-requisites
- Customer should have license of RCM and RMK.
- Candidate Profile Extension is enabled and added to the candidate profile
- Candidate Account Simplification should be enabled and configured.
- Use CRM Should be enabled in the Command Center.
First Identify the requirement of the customer and understand how they classify the candidates for their current Recruiting Process.
Part 1 - Creating Data Capture Form for Talent Community
Let’s take a scenario in which customer bifurcates the candidate on the basis of job family and they want to send the marketing notification on the same criteria. Along with this they like to capture the candidate’s name, contact info and latest CV/Resume.
Step 1: Navigate to the Data Capture Forms in Tools

Note: If Data Capture Form option is not visible then you have not enabled the Use CRM option in Command Center. Navigation: Site > Site Setup > Setting.
Step 2: Click Add and place any name as per the requirement.

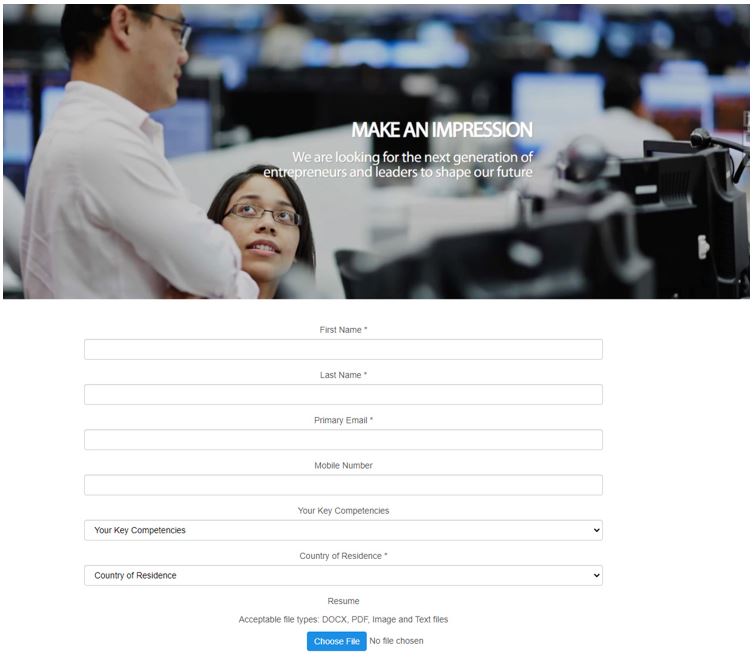
Step 3: Our Data Capture Form should have the below fields,
- First Name (Standard)
- Last Name (Standard)
- Email Address (Standard)
- Mobile Number / Contact Number (Standard)
- Job Family (Custom)
- Resume (Standard)
- Country & Data Privacy Statement. (Standard)
Click +Add button and add the respective fields.

Data capture form and its basic setup is explained in detail in the below blog.
Blog - Recruiting Marketing – How to customize Data Capture Form
Part 2 – Creating Landing Page for Talent Community and adding its link in the website
If customer want to deliver or showcase a specific message to the candidate then design the Landing page like that otherwise use the standard talent community content and place a good attractive banner on the top and embed the data capture form in the design.
Step 4: Navigate to Landing in Pages and create a new landing page.

Note: If customer wants to capture candidates on the basis on the brand(s) then you need to create the same number of Landing pages as per the requirement.
Step 5: Add images and content to beautify the page. After that, navigate to Data Capture Form widget and add the data capture form that we have created along with the other necessary details.

Now the page will look like something below.
You can setup the data capture form in many different manner and the look and feel of the same can be configured as per the customer branding.
Some examples,
My Data Capture Form - 1 (Customized)

My Data Capture Form - 2 (Customized)

SAP's Data Capture Form (Standard)

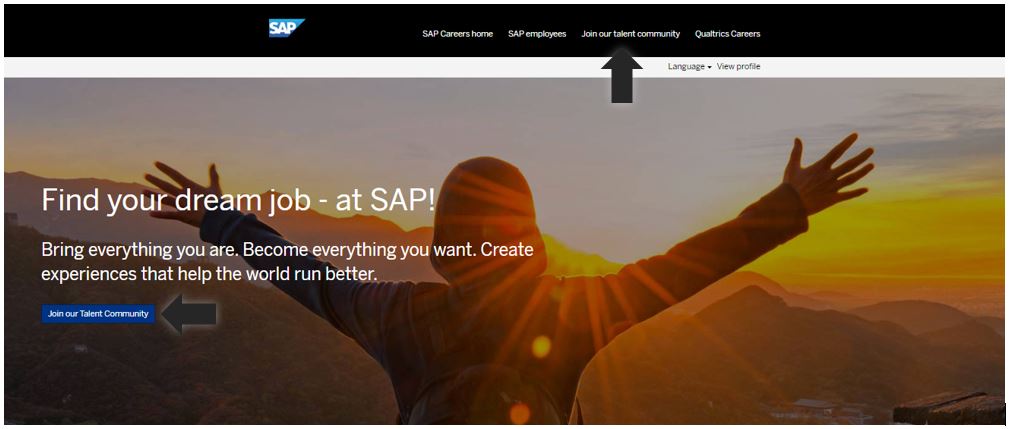
Step 6: Now we need to place the link of the Talent Community that we have created somewhere in the Homepage so that candidate can easily find it. Best option are to place on the Landing Banner or in the header.
Again, you have variety of option to place the link. It basically depends on the customer requirement. Best example will be SAP career site. They had placed the link in header as well as in the large image.
One of the another best example will be Cookie Banner so that it appears as the first thing while accessing any page and it also does not interrupt the candidate experience of exploring the site.

Part 3 – Creating Talent Pools for the Talent Community
Our Candidate Experience part is complete. Now we will focus on Recruiter Experience.
We need to create talent pools so that candidates go directly into the talent pools.
Note: You can create Talent Pools or Saved Searches for each job function or you can make categories by clubbing together the similar job functions.
Again, it depends on customer whether they only want to see those candidates who have registered using the Talent Community or they want all the candidates regardless of where they have registered their profile.
We are creating searches so that only those candidates who have registered through data capture form should push to Talent Community.
Step 7: Navigate to KEYWORD AND ITEM SEARCH in Recruiting under Candidates and create a search criterion and save it. Remember we need to do this for each category.

Step 8: Navigate to TALENT POOLS in Recruiting under Candidates and Create Talent Pools as per the Job Function.
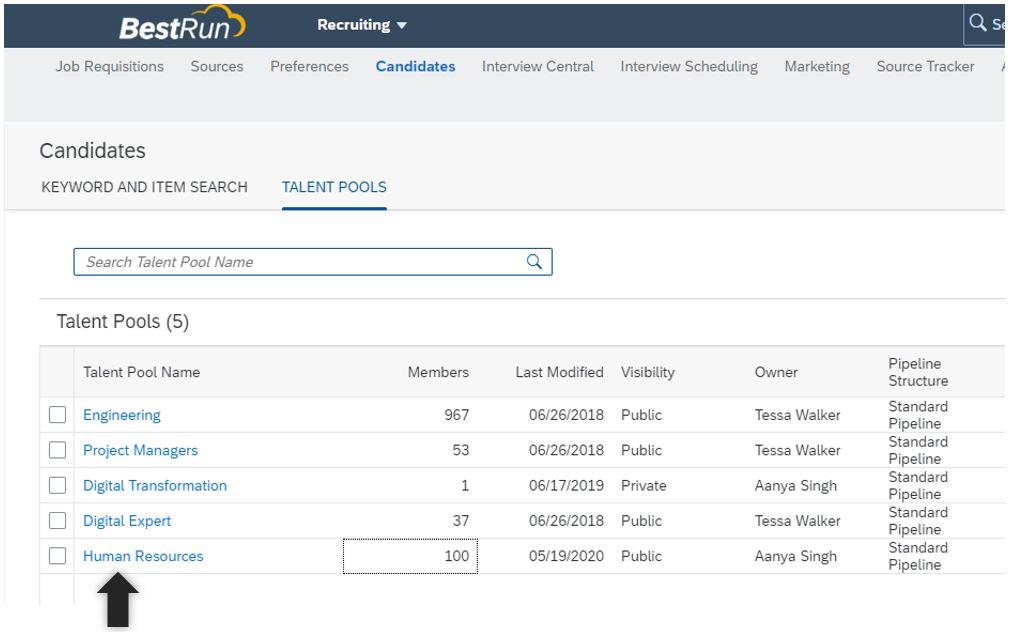
Step 9: Add the Saved Search in the Talent Pool.

Detailed information regarding the Talent Pools and Saved Search are available in the below link.
2643661 - Candidate Talent Pool - SuccessFactors Recruiting
2643646 - How to configure Talent Pool Status Set (Pipeline) - Recruiting Management
A sync will run daily that will push the candidates as per the criteria into the respective talent pools and recruiter or any user who have the permission of the same can access the candidates. By this customer can easily send notification in bulk, run campaigns, select candidate for newly raised jobs and many more.
Conclusion
The above solutions will make the career site more interactive and ease the registration process for the candidates. On the other hand, the Recruiter will have categorized candidate buckets as per the Job function. Now the recruiter does not need to search every time while looking for the candidate for a particular opening or campaign. Talent Pool status pipeline will also help recruiter to maintain the track of the candidates. Now Recruiter can also send campaign mails in one go to multiple candidates by selecting the required talent pool. This will save the time of the recruiter.
I hope this blog open new ways of developing solutions to enhance the customer recruitment process and will help to develop new ways to interact as well as attract with the candidates. I will be happy to address any further question in the comments.
Thanks for the read!!
- SAP Managed Tags:
- SAP SuccessFactors Recruiting,
- SAP Marketing,
- SAP SuccessFactors Recruiting Posting
1 Comment
You must be a registered user to add a comment. If you've already registered, sign in. Otherwise, register and sign in.
Labels in this area
-
1H 2024 Product Release
1 -
2H 2023 Product Release
1 -
ACCRUAL TRANSFER
1 -
Advanced Workflow
1 -
Anonymization
1 -
BTP
1 -
Business Rules
1 -
Canvas Report
1 -
Career Development
1 -
Certificate-Based Authentication
1 -
Cloud Platform Integration
1 -
Compensation
1 -
Compensation Information Management
1 -
Compensation Management
1 -
Compliance
2 -
Content
1 -
Conversational AI
2 -
Custom Data Collection
1 -
custom portlet
1 -
Data & Analytics
1 -
Data Integration
1 -
Dayforce
1 -
deep link
1 -
deeplink
1 -
Delimiting Pay Components
1 -
Deprecation
1 -
Employee Central
1 -
Employee Central Global Benefits
1 -
Employee Central Payroll
1 -
employee profile
1 -
Employee Rehires
1 -
external terminal
1 -
external time events
1 -
Generative AI
2 -
Getting Started
1 -
Global Benefits
1 -
Guidelines
1 -
H2 2023
1 -
HR
2 -
HR Data Management
1 -
HR Transformation
1 -
ilx
1 -
Incentive Management Setup (Configuration)
1 -
Integration Center
2 -
Integration Suite
1 -
internal mobility
1 -
Introduction
1 -
learning
3 -
LMS
2 -
LXP
1 -
Massively MDF attachments download
1 -
Mentoring
1 -
Metadata Framework
1 -
Middleware Solutions
1 -
OCN
1 -
OData APIs
1 -
ONB USA Compliance
1 -
Onboarding
2 -
Opportunity Marketplace
1 -
Pay Component Management
1 -
Platform
1 -
portlet
1 -
POSTMAN
1 -
Predictive AI
2 -
Recruiting
1 -
recurring payments
1 -
Role Based Permissions (RBP)
2 -
SAP CPI (Cloud Platform Integration)
1 -
SAP HCM (Human Capital Management)
2 -
SAP HR Solutions
2 -
SAP Integrations
1 -
SAP release
1 -
SAP SuccessFactors
5 -
SAP SuccessFactors Customer Community
1 -
SAP SuccessFactors OData API
1 -
SAP Workzone
1 -
SAP-PAYROLL
1 -
skills
1 -
Skills Management
1 -
sso deeplink
1 -
Stories in People Analytics
3 -
Story Report
1 -
SuccessFactors
2 -
SuccessFactors Employee central home page customization.
1 -
successfactors onboarding i9
1 -
Table Report
1 -
talent
1 -
Talent Intelligence Hub
2 -
talents
1 -
Tax
1 -
Tax Integration
1 -
Time Accounts
1 -
Workflows
1 -
XML Rules
1
Related Content
- The 1H 2024 Release of SAP SuccessFactors Learning – Release Highlights in Human Capital Management Blogs by Members
- AI shaping the future of HR: Is your organisation ready to embrace the change? in Human Capital Management Blogs by Members
- Is Your Organisation Future Ready ? Beginning the Journey with Skill Development ! in Human Capital Management Blogs by Members
- Talent Intelligence Hub and SAP SuccessFactors Learning in Human Capital Management Blogs by Members
- Talent intelligence hub - 2024 updates and behind the scenes! in Human Capital Management Blogs by SAP
Top kudoed authors
| User | Count |
|---|---|
| 4 | |
| 4 | |
| 2 | |
| 2 | |
| 1 | |
| 1 | |
| 1 | |
| 1 | |
| 1 | |
| 1 |