
- SAP Community
- Products and Technology
- Supply Chain Management
- SCM Blogs by Members
- Creation of Custom Monitor Screen
Supply Chain Management Blogs by Members
Learn about SAP SCM software from firsthand experiences of community members. Share your own post and join the conversation about supply chain management.
Turn on suggestions
Auto-suggest helps you quickly narrow down your search results by suggesting possible matches as you type.
Showing results for
former_member67
Explorer
Options
- Subscribe to RSS Feed
- Mark as New
- Mark as Read
- Bookmark
- Subscribe
- Printer Friendly Page
- Report Inappropriate Content
06-24-2020
9:26 AM
PURPOSE :
Creating New Custom Monitor from standard Monitor for specific warehouse with selected Node .
Step-1
Go to Spro --

- As shown in fig. below create new custom monitor.


- Now After creating new Monitor, go to t-code- /n/scwm/mon and selected new Monitor which we have created.

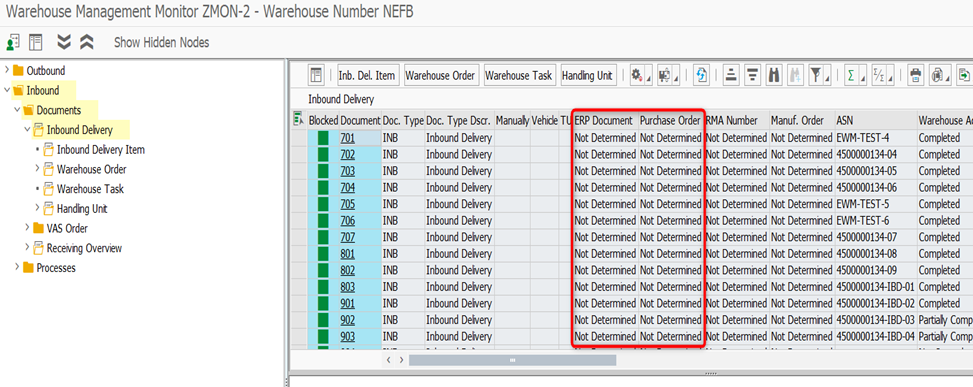
- As you can see in the new monitor, we can see the nodes which we have selected.
- Here in the Inbound delivery report, we can see the ERP Document, Purchase order data are not getting triggered. So, to make it populate in the report we need to do some changes as shown below.
- Change data in the Existing logic: Fill Missing data (ERP Delivery and PO number) in Delivery Header.
- Here we can see in the New Customized Monitor Inbound screen ERP delivery document & PO number is not getting determined.
- Here we need to Copy the Configured Function Module and make the required changes and add against the Node Profile.
- For triggering the data in above mentioned fields, we need to do some Development and Configuration activities.
1.1 Development Activities:
- Identify the Node and its settings.
- Identify the Function Module and Function group.
- Copy the Function Module and make the Changes.
- Identify the Node and its settings

- Identify the Function Module and Function group.
- FM - /SCWM/WHRHEAD_MON
- Here to Identify the Function Group -à go to SE37 (T-code) -à Paste Function Module as shown below—

- Here Click on the Highlighted point (Display Object List)

- Once you click it, you will be seeing Function Group Highlighted.

- Copy the Function Module and make the Changes.
- Now Copy the Function Group from the Standard and rename it to new Function group.

- Now maintain new Function Group by coping the Standard Functional group as shown below.

- Now We need re-name the new Function Module as shown

- Once after creating the New Function Module, we need to activate it.
- Now go to SE37 à Enter the New FM, we have created and click on display
- Here select the New FG à Click on Activate as shown below.
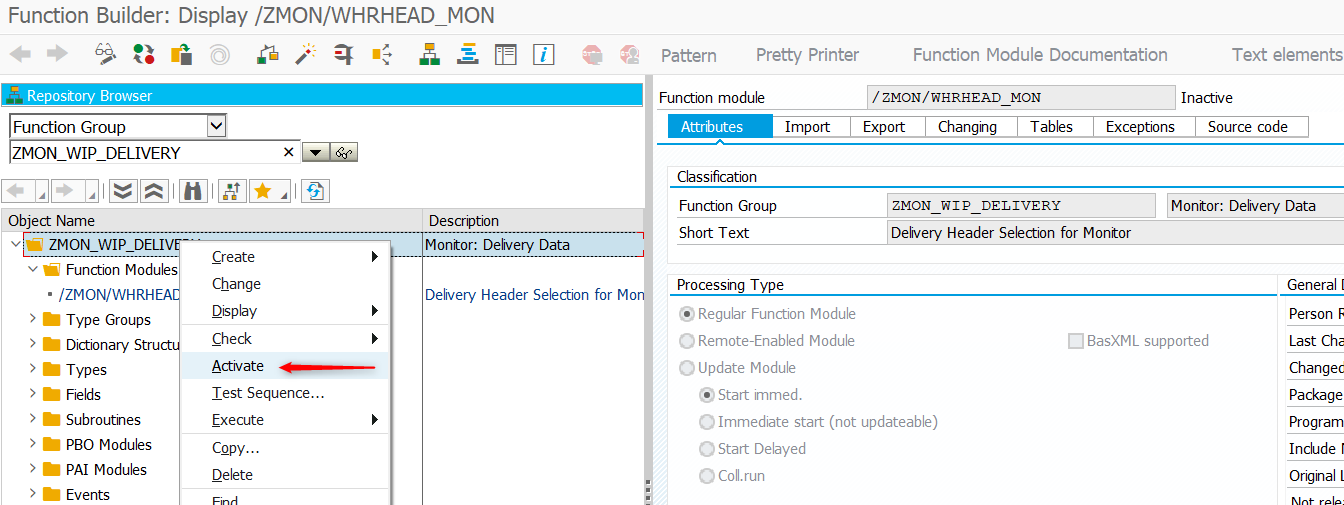
- So now once FG is successfully activated we can see status of FG is changed from Inactive to Active as shown below.

1.2 Configurational Activities:
- Copy the Node.
- Copy the Node profile and Update New Function Module.
- Assign Copied Node profile to Copied Node.
- Copy the Node:
- Here Select the Standard Node and Rename it as shown below.


- Copied Node number is shown below.

- Copy the Node profile and Update New Function Module.
- Now Copy the Standard node profile (P0000085) and create New node profile and Assign the New Function Module which we have created.


- Assign Copied Node profile to Copied Node.
- Here we need to assign New Node profile which we have created and assign it to the Node shown below.

- Now go to SE37 and select the customized Function module & write the program for determining the ERP Doc. and PO Number.

- So now we can see after writing the program for ERP delivery Number and PO number the data is getting populated as shown in Fig. below.

I hope this post would be helpful for everyone.
Thank You.
- SAP Managed Tags:
- SAP Extended Warehouse Management,
- EWM - Goods Movement,
- EWM - Warehouse Order Processing
1 Comment
You must be a registered user to add a comment. If you've already registered, sign in. Otherwise, register and sign in.
Labels in this area
-
aATP
1 -
ABAP Programming
1 -
Activate Credit Management Basic Steps
1 -
Adverse media monitoring
1 -
Alerts
1 -
Ausnahmehandling
1 -
bank statements
1 -
Bin Sorting sequence deletion
1 -
Bin Sorting upload
1 -
BP NUMBER RANGE
1 -
Brazil
1 -
Business partner creation failed for organizational unit
1 -
Business Technology Platform
1 -
Central Purchasing
1 -
Charge Calculation
2 -
Cloud Extensibility
1 -
Compliance
1 -
Controlling
1 -
Controlling Area
1 -
Data Enrichment
1 -
DIGITAL MANUFACTURING
1 -
digital transformation
1 -
Dimensional Weight
1 -
Direct Outbound Delivery
1 -
E-Mail
1 -
ETA
1 -
EWM
6 -
EWM - Delivery Processing
2 -
EWM - Goods Movement
3 -
EWM Outbound configuration
1 -
EWM-RF
1 -
EWM-TM-Integration
1 -
Extended Warehouse Management (EWM)
3 -
Extended Warehouse Management(EWM)
7 -
Finance
1 -
Freight Settlement
1 -
Geo-coordinates
1 -
Geo-routing
1 -
Geocoding
1 -
Geographic Information System
1 -
GIS
1 -
Goods Issue
2 -
GTT
2 -
IBP inventory optimization
1 -
inbound delivery printing
1 -
Incoterm
1 -
Innovation
1 -
Inspection lot
1 -
intraday
1 -
Introduction
1 -
Inventory Management
1 -
Localization
1 -
Logistics Optimization
1 -
Map Integration
1 -
Material Management
1 -
Materials Management
1 -
MFS
1 -
Outbound with LOSC and POSC
1 -
Packaging
1 -
PPF
1 -
PPOCE
1 -
PPOME
1 -
print profile
1 -
Process Controllers
1 -
Production process
1 -
QM
1 -
QM in procurement
1 -
Real-time Geopositioning
1 -
Risk management
1 -
S4 HANA
1 -
S4-FSCM-Custom Credit Check Rule and Custom Credit Check Step
1 -
S4SCSD
1 -
Sales and Distribution
1 -
SAP DMC
1 -
SAP ERP
1 -
SAP Extended Warehouse Management
2 -
SAP Hana Spatial Services
1 -
SAP IBP IO
1 -
SAP MM
1 -
sap production planning
1 -
SAP QM
1 -
SAP REM
1 -
SAP repetiative
1 -
SAP S4HANA
1 -
SAP Transportation Management
2 -
SAP Variant configuration (LO-VC)
1 -
SD (Sales and Distribution)
1 -
Source inspection
1 -
Storage bin Capacity
1 -
Supply Chain
1 -
Supply Chain Disruption
1 -
Supply Chain for Secondary Distribution
1 -
Technology Updates
1 -
TMS
1 -
Transportation Cockpit
1 -
Transportation Management
2 -
Visibility
2 -
warehouse door
1 -
WOCR
1
Related Content
- Automatic E-Mail Alert when Exception in EWM MFS is fired in Supply Chain Management Blogs by Members
- SAP EWM FAQ Series: How to setup monitoring and alerts in Supply Chain Management Blogs by SAP
- Dangerous Goods Check for Transportation with Product Compliance in SAP S/4HANA in Supply Chain Management Blogs by SAP
- The Essential Role of Adverse Media Monitoring in Compliance and Risk Management in Supply Chain Management Blogs by Members
- Premium Hub CoE – DSC Knowledge Bits – Split Outbound Delivery Order in SAP S/4HANA EWM in Supply Chain Management Blogs by SAP
Top kudoed authors
| User | Count |
|---|---|
| 3 | |
| 2 | |
| 2 | |
| 2 | |
| 1 | |
| 1 | |
| 1 | |
| 1 | |
| 1 | |
| 1 |