
- SAP Community
- Products and Technology
- Technology
- Technology Blogs by SAP
- Continuous Integration (CI) Best Practices with SA...
Technology Blogs by SAP
Learn how to extend and personalize SAP applications. Follow the SAP technology blog for insights into SAP BTP, ABAP, SAP Analytics Cloud, SAP HANA, and more.
Turn on suggestions
Auto-suggest helps you quickly narrow down your search results by suggesting possible matches as you type.
Showing results for
michael_jess
Participant
Options
- Subscribe to RSS Feed
- Mark as New
- Mark as Read
- Bookmark
- Subscribe
- Printer Friendly Page
- Report Inappropriate Content
06-15-2020
11:03 AM
Due to popular demand, I am making this guide available again as a blog post. It used to be part of the SAP CI best practices guide collection, which has been moved to a new location. You can find much of the old content, such as an introduction to the topic, here.
Added 2020-06-26: Please note that this guide refers to established technology that is no longer actively being invested in. It aims at addressing the needs of established customers who need to streamline development processes around existing hybrid applications. If you are looking for a ways to provide cross-platform native User Experience, or if you are just getting started with cross-platform app development, we recommend taking a look at the Mobile Development Kit.


Figure 10: Registration screen in the hybrid app

Figure 15: Jenkins Pipeline triggered by Git commit
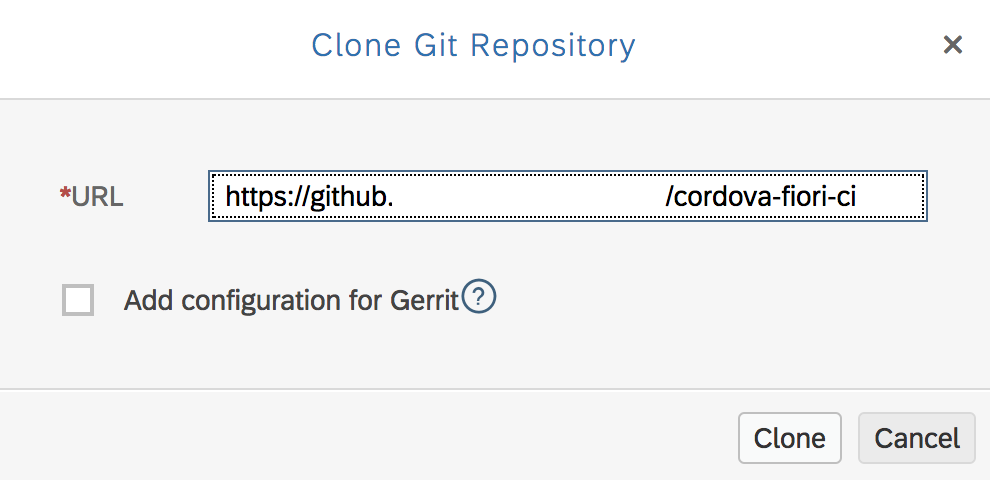
Figure 19: Cloning a Git repository in Web IDE (2)
Added 2020-06-26: Please note that this guide refers to established technology that is no longer actively being invested in. It aims at addressing the needs of established customers who need to streamline development processes around existing hybrid applications. If you are looking for a ways to provide cross-platform native User Experience, or if you are just getting started with cross-platform app development, we recommend taking a look at the Mobile Development Kit.
This guide contains instructions on how to set up Continuous Integration (CI) for Android and iOS Fiori Hybrid app development on a Mac, which is required for iOS builds. For other development options and an introduction to Hybrid app development, please refer to this blog. In addition, if you would like a more generic introduction to CI, please take a look at the overview in our Best Practices guide and at the introduction to CI in the Mobile app development space in the CI guide for native iOS development.
The goal of this guide is to explain the setup of a CI landscape as shown in Figure 1, where whenever a developer makes a change, the project is built and tested automatically, and where the result is an ".apk" (Android) or ".ipa" (iOS) file that is suitable for ad-hoc distribution, i.e. an application binary that can be sent to colleagues for reviews. During development and build, libraries should be centrally and automatically made available as well.

Figure 1: Architecture of the Continuous Integration setup for Fiori Hybrid apps
The setup section gives an overview over one-time setup activities per build server, such as component installation and configuration. Afterwards there is a brief guide on how to upload npm packages from the SAP Mobile Platform SDK, a step that needs to be repeated for each SDK version that should be made available for the build infrastructure. The guide is being concluded by project-specific configuration that will enable the project to be built in the CI infrastructure.
The content has been selected so that it is suitable for CI and/or iOS novices, or so that it can be used for a proof of concept on automation. Advanced readers and people with existing infrastructure may want to skip the initial one-time setup and proceed with the npm section.
Please note that this guide lists specifically the steps required to manually create a packaged Hybrid application that is suitable for deployment to mobile devices and that can potentially be offline-enabled. Scenarios where an application is both being packaged for mobile consumption and being deployed to a Fiori Launchpad for display in Desktop browsers are not included due to reasons detailed in this blog post.
Outline
- Introduction
- Setup
- Shared Setup
- Homebrew and Git
- Cordova
- iOS Development
- Android Development
- Certificates
- Additional Build Node Steps: Jenkins and Artifactory
- Additional Workstation Steps
- SAP Mobile Platform SDK
- Additional iOS Tools
- Shared Setup
- Uploading Kapsel Plugins to npm
- Project setup
2. Setup
2.1 Shared Setup
2.1.1 Homebrew and Git
These setup steps have been described in the CI guide for native iOS development. Please follow the setup steps given there in order to prepare both the build node and the developer machine.
2.1.2 Cordova
In this section, we are going to install the basic dependencies of Cordova. This is required for all Cordova installations, regardless of the targeted operating systems of your mobile application.
2.1.2.1 Java 8
By default, Java 6 is installed on Mac. However, Cordova requires at least version 8, so that we need to upgrade to a newer release using Homebrew:
brew install /caskroom/versions/java8
2.1.2.2 Node.js
nodejs is a JavaScript runtime that allows executing JavaScript code outside the classical browser context, and has become a popular engine for both server-side applications and client-side tooling. Since Cordova is one such tool depending on node, we need to install it with the following command:
$ brew install node@6In order to resolve dependencies in the Node.js ecosystem, we are going to use npm. In the build server setup section, the setup of a private npm registry is explained. Once done, we need to configure both the build server and the developer machine as follows, so that they will be able to fetch dependencies from our private registry:
npm config set registry http://host:port/path/to/npm/registry/Please refer to the documentation of your npm installation, an example being given in the aforementioned server setup section, for the exact URL that is required for your installation.
2.1.2.3 Cordova Command-line Tools
Apache Cordova is a framework for creating mobile applications where the business logic is written using web technology, i.e. HTML, JavaScript and CSS, and that abstracts away the underlying operating system. This is done so that the application can be deployed to multiple mobile operating systems while maintaining only one code base. We are going to use this framework to package our Fiori app for deployment onto mobile devices, hence we need to install it by running:
$ npm i -g cordova@8.0.02.1.3 iOS Development Tools
Please follow the setup steps described in the CI guide for native iOS development in order to install Xcode and required build tools.
2.1.4 Android Development Tools
The Android SDK is a comprehensive set of tooling required for building Android applications, and is required for us to be able to create Android builds of Cordova applications. There are two ways to obtain and install the components required:
2.1.4.1 Installation via Android Studio
These days, Google is increasingly pushing developers to download and install Android Studio. This is a pleasant approach for end users, even though it is not strictly required for Cordova app development. If you decide to take this route, which is also mentioned in the Cordova setup guide for Android, simply download and install Android from the linked Google page. Once this is done, make sure to add the following lines to your "~/.bash_profile":
export ANDROID_HOME=/Users/{YOUR_USER_NAME}/Library/Android/sdk


export PATH=$PATH:$ANDROID_HOME/tools:$ANDROID_HOME/tools/bin:$ANDROID_HOME/platform-tools
2.1.4.2 Installation via Homebrew
As an alternative to the Android Studio installation, the Android SDK can be directly installed via Homebrew. This is especially useful if you are trying to automate deployments, e.g. to build servers:
$ brew cask install android-sdk2.1.4.3 Configuration
In either case, once the Android SDK has been installed, we need to ensure all required SDK components are available for the Cordova build tools. The following handy command uses the Android SDK Manager command-line interface to do so:
sdkmanager "tools" "platform-tools" "build-tools;27.0.3" "emulator" "extras;android;m2repository" "extras;google;m2repository" "platforms;android-26" "sources;android-26" "system-images;android-27;google_apis;x86" "extras;intel;Hardware_Accelerated_Execution_Manager"2.1.4.4 Gradle
Gradle is a popular build tool and dependency manager in the Java ecosystem, and is also used to build Android apps. In addition to the Android SDK, Cordova also requires us to install this in order to be able to build Android applications. Once more, the installation is fairly simple using Homebrew:
$ brew install gradle2.1.5 Certificates
These setup steps have been described in the CI guide for native iOS development. Please follow the setup steps given there in order to prepare both the build node and the developer machine.
2.2 Additional Build Node Steps: Jenkins and Artifactory
These setup steps have been described in the CI guide for native iOS development. Please follow the setup steps given there in order to prepare the build node, while making sure to select the npm repository type during setup. Once done, you will receive additional set-up instructions for both the developer machine and build server in the "Set Me Up" section on the welcome page of Artifactory, as shown in Figure 2.
Figure 2: Set-up instructions for npm in Artifactory
2.3 Additional Workstation Steps
2.3.1 SAP Mobile Platform SDK
The SAP Mobile Platform SDK is our collection of tools and libraries that facilitates integration of Android, Windows and iOS mobile apps with SAP Mobile Platform and SAP Cloud Platform Mobile Services. For this specific guide, it most notably contains the Kapsel SDK, which is a subset specifically tailored to developing applications with Cordova. In order to be able to leverage the Cordova plugins provided by SAP, you will need to download and install it on your developer machine. In Section 3, *Uploading Kapsel Plugins to npm*, we are going to make those plugins available to the build server and ourselves by means of an npm registry.
In order to obtain a copy, simply follow the link given above, log in to SAP Store with your SCN user, click the "Trial Version" button shown in Figure 3 and fill out the request form. An e-mail with download instructions is going to be sent to you.
Once installed, add the following line to "~/.bash_profile" for easier access later on:
export KAPSEL_HOME=~/SAP/MobileSDK3/KapselSD
Figure 3: Obtaining a copy of SAP Mobile Platform SDK
2.3.2 Additional iOS Tools
In order to be able to launch Cordova apps that we build from the Cordova command-line tools, we also need to install the following component:
$ npm install -g ios-deploy3. Uploading Kapsel Plugins to npm
Now that all software has been set up, we can proceed with making the Cordova plugins from Mobile Platform SDK available in our infrastructure. Before being able to upload artifacts to npm, we first need to log in to the registry with a user that has write permissions:
npm loginYou will then be prompted for your credentials. Afterwards, simply run this command, which will upload all Kapsel Cordova plugins to the registry:
for d in $KAPSEL_HOME/plugins/* ; do (cd "$d" && npm publish --registry http://localhost:8081/artifactory/api/npm/npm/) donePlease note that the command may fail for the legacy push plugin, because it has the same ID and version as the newer push implementation. This can be safely ignored.
4. Project setup
In order to create our Hybrid application, we are going to perform the following steps:
- Create a Fiori app from a template in SAP Web IDE
- Create a Cordova app locally
- Export the Fiori app from Web IDE and merge it with the local Cordova project
- Integrate the application with SAP Cloud Platform Mobile Services
- Create a new Git repository for the Hybrid project
- Import the Hybrid project in Web IDE to continue editing
- Create a Jenkins build job that accesses the same Git repository
4.1 Creating a Fiori App in SAP Web IDE
First, we are going to create a Fiori app based on a template in SAP Web IDE. For this guide, we are simply using a regular empty UI5 application as shown in Figures 4 and 5. As project name and application ID, choose "CIExample" and "com.sap.ci.cordova.CIExample", respectively, as shown in Figure 6, so that your project is consistent with the instructions in later sections. On the next screen, go with the default view type and hit "Finish".
Next, right-click your project and select "Export", as shown in Figure 7.
Figure 4: Creating a new project in Web IDE
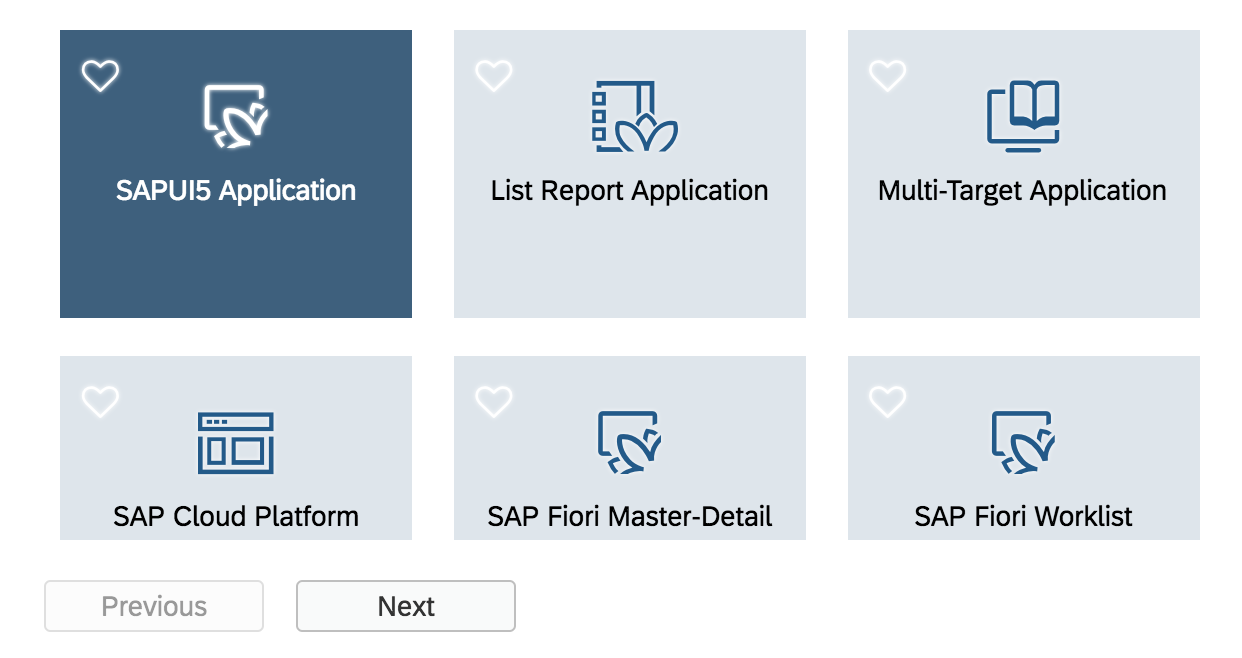
Figure 5: Creating a UI5-based project in Web IDE

Figure 6: Project settings

Figure 7: Exporting the project from Web IDE
4.2 Creating a Fiori Cordova project
Next, we need to create a Cordova project and replace the default webapp inside it with the Fiori app exported from Web IDE. In order to create a new Cordova project, run:
$ cordova create cordova-fiori-ci com.sap.ci.ios.CIExampleWhich creates an app named "cordova-fiori-ci" with the bundle identifier "com.sap.ci.ios.CIExample". Please note that you should use whatever App ID you registered with your Apple Developer program in step 2.4. In this case, we are simply reusing the application identifier we used in the CI guide for native iOS development.
Now we need to add the platforms that we want to support:
$ cordova platform add ios@4.5.4 --save


$ cordova platform add android@7.0.0 --save
The "--save" flag makes sure that platform references are stored in "package.json" and "config.xml", which makes sure that we are later able to restore those project settings on the build server. Now, before we proceed with changing the project too much, you should check if everything is in order and the project is runnable at all:
cordova emulate iosNow that it has been established that everything works fine up to this point, we can exchange the default webapp with the Web IDE export. For that purpose, run:
$ rm -rf www


$ unzip ~/Downloads/com.sap.ci.cordova.zip -d www/


$ mv www/neo-app.json ./neo-app.json
Since the "index.html" page that the Cordova app is displaying now moved from the "www" folder to "www/webapp", we need to adjust "config.xml" accordingly by replacing '<content src="index.html" />' with '<content src="webapp/index.html" />'.
Now we need to adjust "www/webapp/index.html" to make sure UI5 is loaded from the correct path. By default, it will be referenced as follows:
<script id="sap-ui-bootstrap"


src="../../resources/sap-ui-core.js"


...
That means that when deployed to a server, the Fiori app will by default assume UI5 is deployed in a folder on the samew level as the application root folder. However, in the Cordova container, UI5 will actually be included in the app itself and can be found at ``www/resources``. Hence, in order for the app to work in the Cordova container, we need to adjust the UI5 reference as follows:
<script id="sap-ui-bootstrap"


src="../resources/sap-ui-core.js"


...
Finally, for the Fiori application to continue working in the SAP Web IDE preview, we also need to adjust "neo-app.json" so that it looks as follows:
{


"welcomeFile": "/www/webapp/index.html",


"routes": [


{


"path": "/www/resources",


"target": {


"type": "service",


"name": "sapui5",


"entryPath": "/resources"


},


"description": "SAPUI5 Resources"


},


{


"path": "/www/test-resources",


"target": {


"type": "service",


"name": "sapui5",


"entryPath": "/test-resources"


},


"description": "SAPUI5 Test Resources"


}


],


"sendWelcomeFileRedirect": true


}
Now rerun the app via "cordova emulate ios" to verify the project has been configured properly.
4.3 Configuring Mobile Services
Before we proceed with integrating the app with SAP Cloud Platform, please note that if you were following the CI guide for native iOS development, you can simply reuse the application configuration that was created on Mobile Services via the Cloud Platform SDK for iOS Assistant. Otherwise, please refer to Step 2 of the Mobile Development Kit Setup Guide. It will guide you through the steps required to configure a new application that we can use on Mobile Services. Please make sure that in the Security settings of the app, you select "Basic" instead of "SAML", as shown in Figure 8.

Figure 8: Security settings on SAP Cloud Platform Mobile Services
4.4 Integrating with Mobile Services
At this point, we have a working Fiori app running in a cordova container. However, it does not leverage any of the device-native features or SAP Cloud Platform services yet. Therefore, let's add the Kapsel logon plugin and use it to register with Mobile Services. First, we need to add the plugin itself:
$ cordova plugin add kapsel-plugin-logonThen, in "www/webapp/index.html", locate the following code snippet, which attaches the UI5 component to the document:
<script>


sap.ui.getCore().attachInit(function() {


new sap.m.Shell({


app: new sap.ui.core.ComponentContainer({


height : "100%",


name : "com.sap.ci.cordova.CIexample"


})


}).placeAt("content");


});


</script>
In order to make this work with Mobile Services, we need to adjust the application life cycle a little. In essence, we need to make sure that we first register with Mobile Services, and then load the UI5 component as soon as the registration succeeds. For that purpose, replace the script tag with the following, while making sure to adjust "SERVER_CONTEXT.serverHost" and "APP_ID" and with the appropriate values:
<script type="text/javascript" src="../cordova.js"></script>


<script>


(function(window) {


"use strict";


/*


* SAP Cloud Platform Mobile Services application configuration ID


*/


const APP_ID = "com.sap.ci.ios";


/*


* SAP Cloud Platform Mobile Services server settings


* Make sure to only provide the *host*, not the full server URL!


*/


const SERVER_CONTEXT = {


serverHost: "hcpms-d053411trial.hanatrial.ondemand.com",


https: true,


serverPort: 443


};


setEnvironment();


launchApp();


/*


* Utility method setting a global flag which is indicating if the app is running in a Cordova container


* or SAP Web IDE


*/


function setEnvironment() {


// window.cordova: Implies Cordova container.


// EXCEPTIONS:


// window.sap_webide_FacadePreview: Implies Web IDE with Hybrid App Toolkit plugin enabled


// window.sap_webide_companion: Implies Web IDE App Companion


window.isCordovaRuntime = "cordova" in window && !("sap_webide_FacadePreview" in window || "sap_webide_companion" in window);


}


/*


* Utility method that launches the app with or without the Kapsel Logon plugin,


* depending on the environment


*/


function launchApp() {


if(window.isCordovaRuntime) {


launchWithKapsel(APP_ID, SERVER_CONTEXT);


} else launchComponent();


}


/*


* Utility method for launching the UI5 component


*/


function launchComponent() {


sap.ui.getCore().attachInit(function() {


new sap.m.Shell({


app: new sap.ui.core.ComponentContainer({


height : "100%",


name : "com.sap.ci.cordova.CIexample"


})


}).placeAt("content");


});


}


/*


* Utility method for registering with SAP Cloud Platform Mobile Services


* once deviceready has fired and subsequently launching the UI5 component


*/


function launchWithKapsel(appId, serverContext) {


document.addEventListener('deviceready', function() {


sap.Logon.init(function(registrationContext) {


launchComponent();


}, function(e) {


alert("Registration failed: " + e);


console.error(e);


},


appId, serverContext);


}, false);


}


})(window);


</script>
In case you are not sure which "serverHost" to fill, you can find it in the "APIs" section of the application configuration overview page, as shown in Figure 9. When copying the values, please make sure that you do not accidentally copy the "https://" portion of the URL as well since only the host is required, not the full URL.
Now that the integration code is in place, run "cordova emulate ios" again to test the connection to Mobile Services. If everything works properly, you should first see a registration screen, a passcode screen and then the Fiori app itself, in that exact order, as shown in Figures 10 through 12.
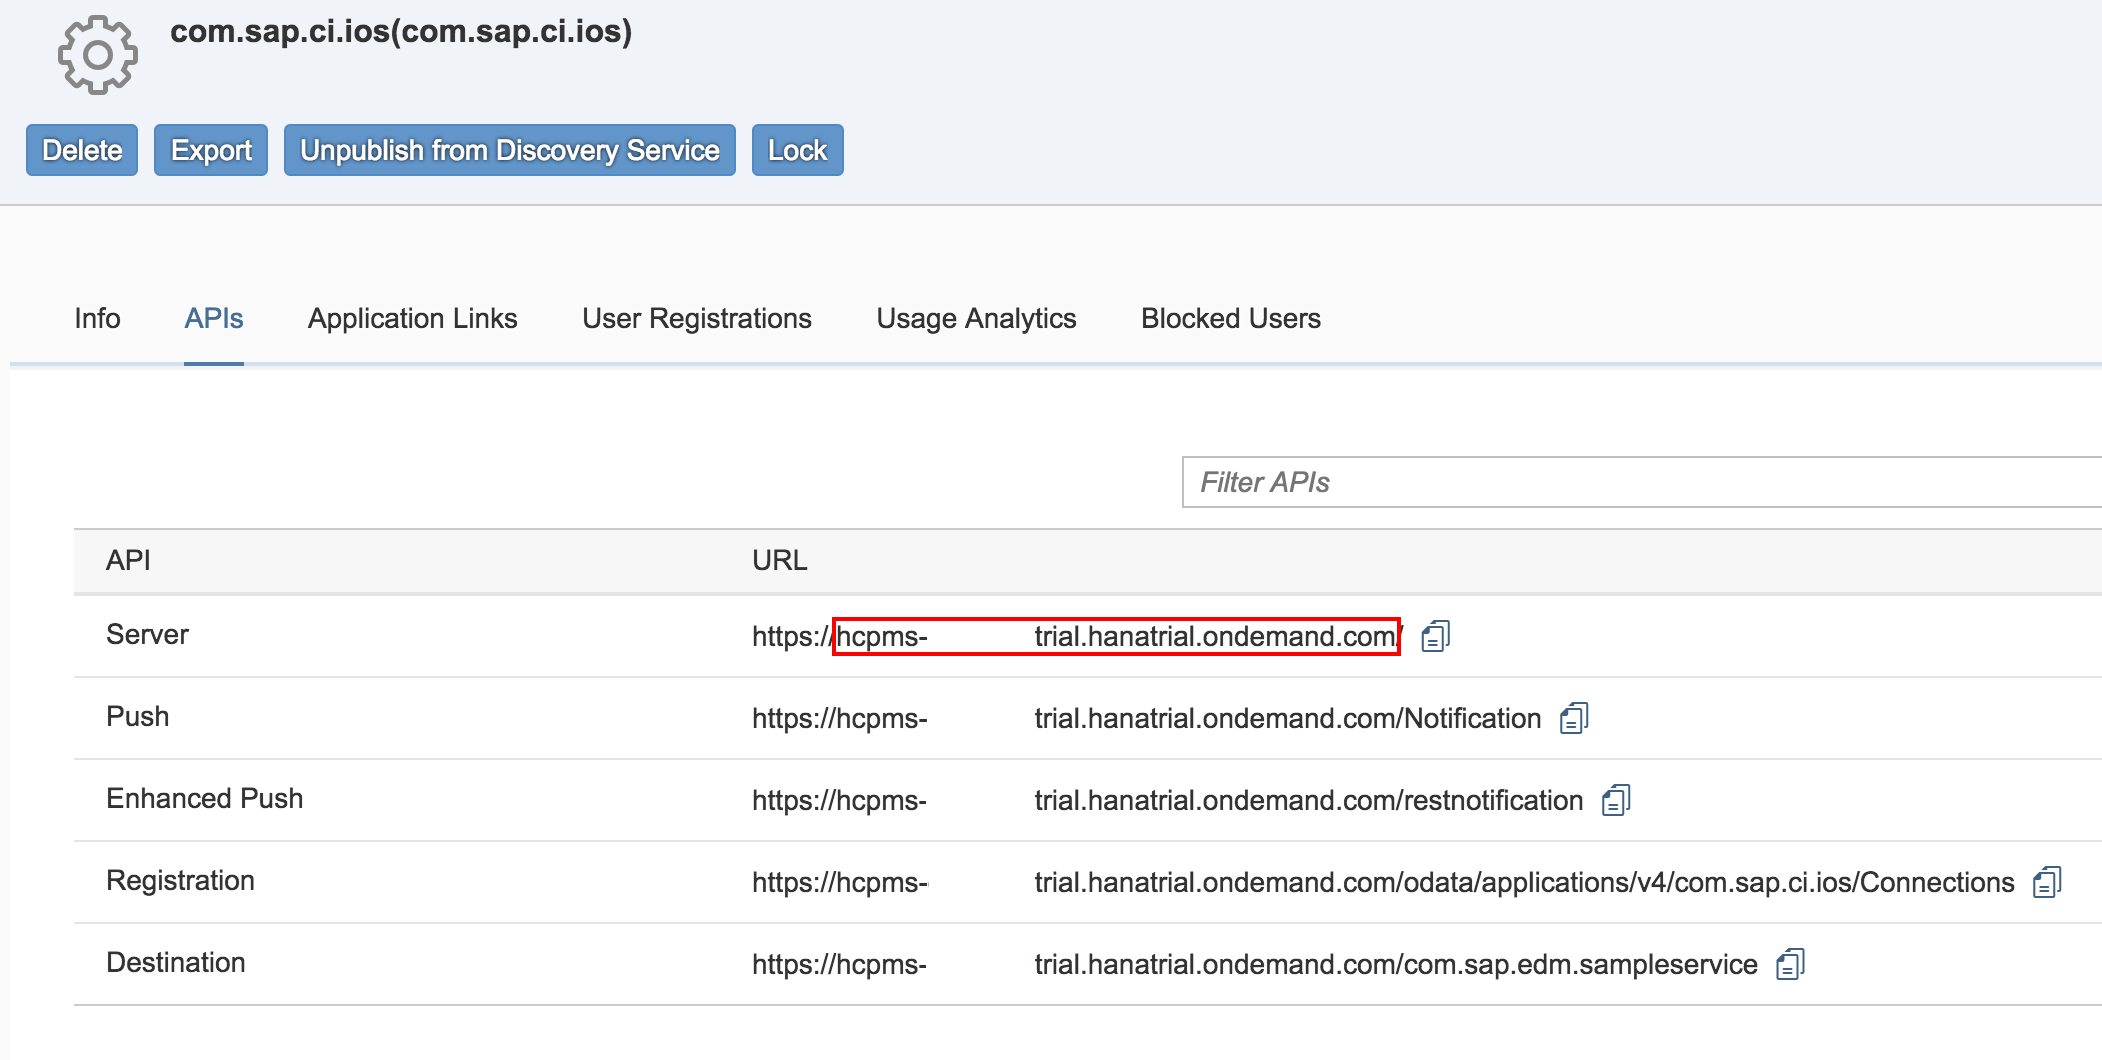
Figure 9: Security settings on SAP Cloud Platform Mobile Services
Figure 10: Registration screen in the hybrid app

Figure 11: Passcode screen in the hybrid app
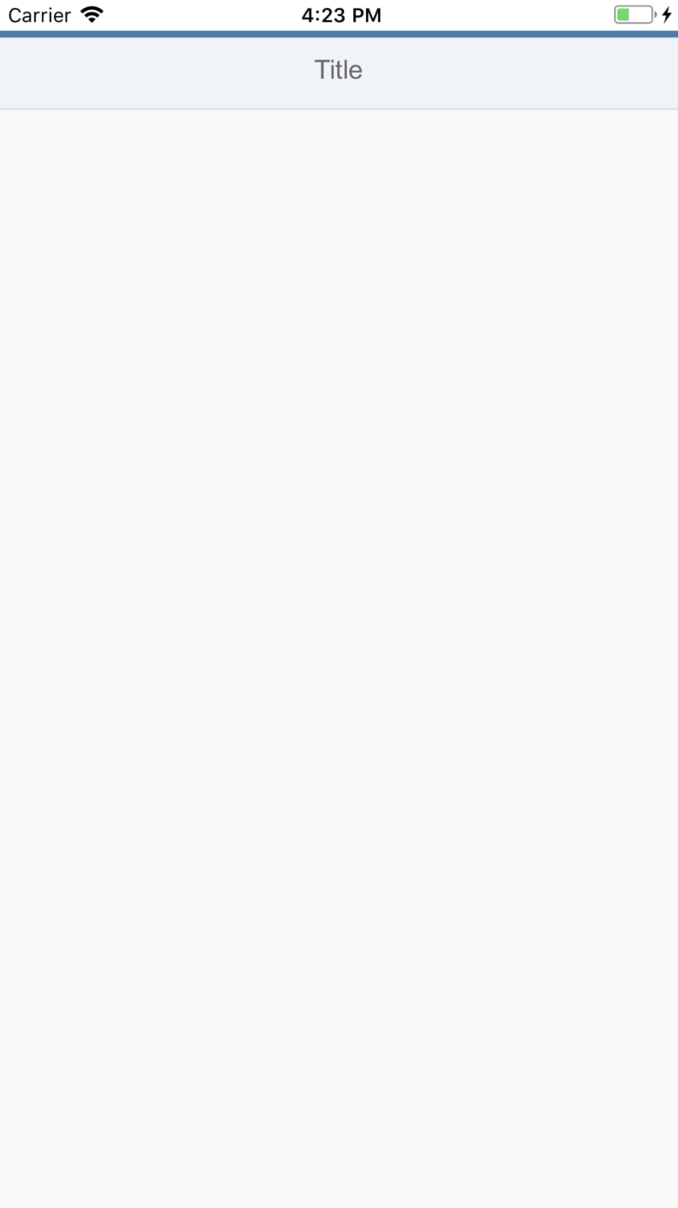
Figure 12: UI5 app running in the Cordova container
4.5 Building for iOS
Now that the Cordova app is integrated with Mobile Services, we can move on to maintaining required to make release builds, which can then be distributed to testers. For that purpose, create a "build.json" file with the following contents, replacing "codeSignIdentity" and "developmentTeam" with the correct values:
{


"ios": {


"debug": {


"codeSignIdentity": "iPhone Developer",


"developmentTeam": "ABCDEFGHIJ",


"packageType": "development"


},


"release": {


"codeSignIdentity": "iPhone Developer",


"developmentTeam": "ABCDEFGHIJ",


"packageType": "ad-hoc"


}


}


}
In case you are unsure, the team ID can be found on the Apple Developer Membership page, as shown in Figure 13. With this build configuration file in place, we can check if a local build succeeds
$ cordova build ios --device --buildConfig=build.json --buildFlag="-allowProvisioningUpdates"Please note that as of the time of writing, there is a documented alternative to using "--buildFlag": Setting "automaticProvisioning: true" in "build.json". This appears to be broken in "cordova-ios 4.5.4", but may be working in a future release.

Figure 13: Apple Developer team ID
4.6 Building for Android
Once Android Studio and the Android SDK have been set up, building debuggable applications suitable for testing is comparably easy. Simply run:
cordova build androidand a debug-enabled binary will be generated that can be distributed to testers.
4.7 Versioning Code with Git
Next, we need to initialize a Git repository in the Cordova project, so that we can track changes:
cd cordova-fiori-ci


git init
In order to not inflate the repository with superfluous generated files, add a ".gitignore" file. We can leverage the community-maintained service gitignore.io for that purpose:
$ curl https://www.gitignore.io/api/node%2Cmacos%2Capachecordova > .gitignoreFinally, we should add the following Fiori-specific lines that will make sure we do not accidentally check in UI5 build artifacts:
# Fiori


www/node_modules


www/dist


# Only if you do not want to have your own UI5 version under source control


www/resources
Concerning the "www/resources" entry, it is generally acceptable to add it to your project for now and revisit it should you run into issues. Please see the next section - Managing UI5 - for a discussion of the alternatives.
Last but not least, configure your Git remote and upload a first version of your project. The exact instructions should be displayed e.g. in Github, or wherever you created your Git repository. They should look approximately like this. Please note that in this example, we are assuming you configured your Git for SSH, as recommended in the Git setup guide:
$ git remote add origin git@host:path/to/repo.git


$ git add .


$ git commit -am "Initial commit"
4.8 Managing UI5
Before we proceed with finalizing the setup, there are two options to discuss when dealing with UI5 resources: Taking a fallback version shipped with the Mobile Platform SDK, or manually managing a specific UI5 distribution. The former approach leverages the fact that the Kapsel SDK comes with the "kapsel-plugin-ui5", which is added by default if you add "kapsel-plugin-logon". When being added to the project, it checks the "www/resources" path, i.e. the default location of UI5 in packaged Hybrid applications, and if no such folder can be found, then it adds a minified UI5 distribution to the project which can be used by your web app as well. The caveat here is that you do not have fine-grained control over the UI5 version supplied. The alternative is to manually manage UI5. This can be done by either simply adding it under source control (which would require to omit the "www/resources" entry from ".gitignore"), or to leverage a dependency manager tool, such as "npm", to add a specific UI5 distribution to your project during build time. In this tutorial, we are going to stick with the fallback version added by the Kapsel SDK for the sake of simplicity.
4.9 Creating the Jenkins Build Job
Now we are getting to the final step - configuring our basic build job in Jenkins. In this guide, we are going to create a Pipeline by means of a so-called Jenkinsfile, which we can add to our project just as a regular source code artifact. The advantage is that this to include the knowledge and steps required to build a project within the project itself, rather than externally to it in some server configuration. Secondly, we can version such pipelines, which is a great way to evolve build scripts together with the project. First, please follow the instructions in Section 4.5 of the CI guide for native iOS development to create a new Pipeline project in your Jenkins instance, but make sure to also add "Clean before checkout" in the "Additional Behaviors" section, as shown in Figure 14. Then create a file called "Jenkinsfile" in the project root directory with the following contents:
pipeline {


agent any


stages {


stage('Build UI5') {


steps {


dir('www') {


sh 'npm install'


sh 'grunt'


}


}


}


stage('Prepare Cordova') {


steps {


sh 'cordova prepare'


}


}


stage('Build iOS') {


steps {


sh 'cordova build ios --device --buildConfig=build.json --buildFlag="-allowProvisioningUpdates"'


sh 'find . -name "*.ipa"'


}


}


stage('Build Android') {


steps {


sh 'cordova build android'


}


}


}


}
Now, in your Cordova project root, run
$ git add Jenkinsfile


$ git commit Jenkinsfile -m "Adding Pipeline"


$ git push -u origin master
In your Jenkins web interface, you should now see a new build pop up under the left-hand menu, as shown in Figure 15. Wait for it to complete, which can take a few minutes. Eventually, you should find that the build succeeded, including references to a generated ".ipa" and ".apk" file in your workspace. The easiest way to verify this is taking a look at the logs of the corresponding job stage and check for the messages displayed in Figures 16 and 17. If everything is in order, you can now install your very first CI-built Android and iOS hybrid Fiori app onto your phones.

Figure 14: Jenkins Pipeline configuration
Figure 15: Jenkins Pipeline triggered by Git commit

Figure 16: Logs of successful iOS build showing .ipa file location

Figure 17: Logs of successful Android build showing .apk file location
4.10 Development from Web IDE
Since the project we created is maintained in Git, we can check it out in SAP Web IDE and continue the UI5 app development there. While it is possible to leverage Web IDE UI5 app support, the build server can take care of packaging it into a Cordova container. In order to do so, simply right-click your Web IDE workspace and select the "Git" > "Clone Repository" option from the context menu as shown in Figure 18. In the next screen, input your Git repository URL, as shown in Figure 19, and select "Clone". You will be prompted for your credentials and subsequently, the hybrid project is added to your workspace, where you can run and edit it as usual.

Figure 18: Cloning a Git repository in Web IDE (1)
Figure 19: Cloning a Git repository in Web IDE (2)
Next Steps
You can read through the remaining guides in order to proceed with advanced automation topics such as Git-related workflows (e.g. branching strategies and code reviews) and setting up pipelines. In addition, we recommend proceeding with the Mobile Services Documentation in order to learn how to integrate additional features such as online and offline backend data access, logging capabilities, and push notifications. If you would like to learn more about our cloud-based build tooling, there is a blog explaining on how to create and offline-enable a Fiori app in SAP Web IDE using the Cloud Bui....
- SAP Managed Tags:
- SAP Mobile Services,
- Android,
- iOS,
- Mobile
Labels:
6 Comments
You must be a registered user to add a comment. If you've already registered, sign in. Otherwise, register and sign in.
Labels in this area
-
ABAP CDS Views - CDC (Change Data Capture)
2 -
AI
1 -
Analyze Workload Data
1 -
BTP
1 -
Business and IT Integration
2 -
Business application stu
1 -
Business Technology Platform
1 -
Business Trends
1,658 -
Business Trends
93 -
CAP
1 -
cf
1 -
Cloud Foundry
1 -
Confluent
1 -
Customer COE Basics and Fundamentals
1 -
Customer COE Latest and Greatest
3 -
Customer Data Browser app
1 -
Data Analysis Tool
1 -
data migration
1 -
data transfer
1 -
Datasphere
2 -
Event Information
1,400 -
Event Information
66 -
Expert
1 -
Expert Insights
177 -
Expert Insights
299 -
General
1 -
Google cloud
1 -
Google Next'24
1 -
Kafka
1 -
Life at SAP
780 -
Life at SAP
13 -
Migrate your Data App
1 -
MTA
1 -
Network Performance Analysis
1 -
NodeJS
1 -
PDF
1 -
POC
1 -
Product Updates
4,577 -
Product Updates
345 -
Replication Flow
1 -
RisewithSAP
1 -
SAP BTP
1 -
SAP BTP Cloud Foundry
1 -
SAP Cloud ALM
1 -
SAP Cloud Application Programming Model
1 -
SAP Datasphere
2 -
SAP S4HANA Cloud
1 -
SAP S4HANA Migration Cockpit
1 -
Technology Updates
6,873 -
Technology Updates
427 -
Workload Fluctuations
1
Related Content
- Configuring SAP CI/CD pipeline for Deploying ReactJS application in Cloud Foundry in Technology Q&A
- SAP Signavio is the highest ranked Leader in the SPARK Matrix™ Digital Twin of an Organization (DTO) in Technology Blogs by SAP
- SAP Partners unleash Business AI potential at global Hack2Build in Technology Blogs by SAP
- Unify your process and task mining insights: How SAP UEM by Knoa integrates with SAP Signavio in Technology Blogs by SAP
- 10+ ways to reshape your SAP landscape with SAP Business Technology Platform - Blog 5 in Technology Blogs by SAP
Top kudoed authors
| User | Count |
|---|---|
| 40 | |
| 25 | |
| 17 | |
| 14 | |
| 8 | |
| 7 | |
| 7 | |
| 7 | |
| 6 | |
| 6 |