
- SAP Community
- Products and Technology
- Technology
- Technology Blogs by SAP
- Build Log-based integration with SAP Data Intellig...
Technology Blogs by SAP
Learn how to extend and personalize SAP applications. Follow the SAP technology blog for insights into SAP BTP, ABAP, SAP Analytics Cloud, SAP HANA, and more.
Turn on suggestions
Auto-suggest helps you quickly narrow down your search results by suggesting possible matches as you type.
Showing results for
andy_yin
Explorer
Options
- Subscribe to RSS Feed
- Mark as New
- Mark as Read
- Bookmark
- Subscribe
- Printer Friendly Page
- Report Inappropriate Content
06-15-2020
2:16 PM
Log-based integration
Log-based integration is getting popular for integrating different data systems. By capturing the changes in a database and continually apply the same changes to derived data systems, the data in the derived systems is match with the data in the database as long as the message ordering of changed data stream is preserved. The derived data systems are consumers of the changed data stream, as illustrated in below figure.
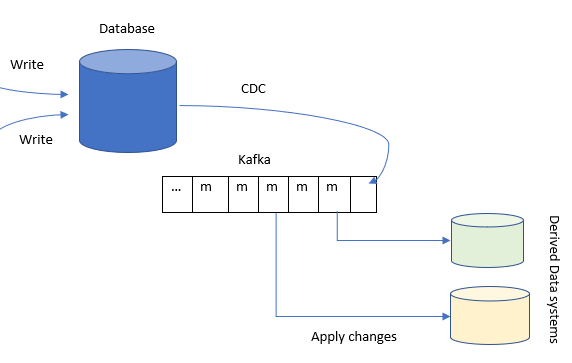
The derived data systems in practice might be indexes, caches, analytics systems, etc.
In order to build a log-based integtation, we need two critical tools:
- A CDC tool for capturing database changes.
- A message broker for persisting messages stream while preserving the message ordering.
In this tutorial, we want to explore how to achieve data integration between database and various other derived data systems using a log-based approach in SAP Data Intelligence.
CDC
Change data capture(CDC) is the process of observing all data changes written to a database and extracting them in a form in which they can be replicated to other systems.
SAP Data Intelligence 3.0 introduced the table Replicator operator which allows capturing delta changes for different databases. Table Replicator operator effectively implements the CDC using an approach of trigger-based replication.
Kafka
Apache Kafka is a message broker which persists the messages it receives. It provides a total ordering of the messages inside each partition. SAP Data Intelligence has built-in Kafka operators which allows us to use a Kafka cluster.
Next, we will see how to leverage these two operators to implement a concrete integration scenario.
Preparation
We prepare a Hana database table, and its schema is illustrated as below.

The table content is illustrated as below.

For simplicity, we only use factitious data for demonstration purpose. The table initially contains 6 records.
The scenario involves two tasks.
- An initial loading of the data in source table to a target file in Data Intelligence local file system.
- Continuously capture source table changes(Delta extraction), publish the change messages into a Kafka topic and let derived systems consume those changes.
We will create separate graphs for these two tasks.
Initial loading
The following figure illustrates the initial loading graph:

The Table replicator operator configuration is illustrated as below.

The important configuration parameters are marked in red box.
Note that the deltaGrapMode is set to Manual. This ensures the graph would complete its execution as soon as the initial loading completed. Otherwise, the graph would run indefinitely to track further delta changes.
Now run the graph, and verify the target file has been generated once the graph runs complete.

Open the file and verify the table content has been replicated successfully.

Note that delta record provides a row type like Insert (I), Update (U), Delete (D), Before Image (B), Unknown (X), and so on. In our case of initial loading, the row type is I which means insert record. The row type in the message is named as DI_OPERATION_TYPE.
Our initial loading task has been finished successfully. Next, let's turn to the Delta extraction task.
Delta extraction
The following figure illustrates the Delta extraction graph:

Let's take an overview of the dataflow sequence.
- The constant generator operator(1) will trigger the Table Replicator to begin the CDC delta tracking.
- The Table Replicator operator (2) will replicate the database changes to a target file like what happens in the initial loading.
- The JS operator (3) will remove the '/vrep' prefix from the target file path. The prefix was added by Table Replicator operator which will prevent the downstream Read File operator from finding the file if we do not remove it.
- The Read File operator (4) will read the target file content and send it to downstream JS operator.
- The JS operator (5) will parse the received file content and send the parsed messages into Kafka topic.
- The Kafka Producer operator (6) will receive the incoming messages and publish them into the specified topic on the Kafka cluster.
- The Kafka Consumers (7, 😎 receive the messages from the topic on the Kafka cluster.
- The Connected Wiretap operators (9, 10) act as the derived data system consume and apply the received messages.
Now let's look at the configuration of some operators.
Table Replicator
Its configuration is illustrated as below.
![]()
Note that the deltaGrapMode is set to "Polling Interval", and the maxPollingInterval is set to "60". This ensures the graph would run indefinitely to track delta changes, and Table Replicator will polling the delta changes within one minute.
The "Remove path prefix" JS operator
$.setPortCallback("input",onInput);


function onInput(ctx,s) {

    var msg = {};


    msg.Attributes = {};

    for (var key in s.Attributes) {

        msg.Attributes[key] = s.Attributes[key];

    }


    msg.Body = s.Body.replace(/^\/vrep/, '');

    $.output(msg);

}
It simply removes the "/vrep" prefix from the received message body which contains the target file path.
The "Parse & send changes JS operator
Its script code is shown as below.
$.setPortCallback("input",onInput);


function isByteArray(data) {

    switch (Object.prototype.toString.call(data)) {

        case "[object Int8Array]":

        case "[object Uint8Array]":

            return true;

        case "[object Array]":

        case "[object GoArray]":

            return data.length > 0 && typeof data[0] === 'number';

    }

    return false;

}


function onInput(ctx,s) {

    var inbody = s.Body;

    var inattributes = s.Attributes;


    var msg = {};

    msg.Attributes = {};

    for (var key in inattributes) {

        msg.Attributes[key] = inattributes[key];

    }


    // convert the body into string if it is bytes

    if (isByteArray(inbody)) {

        inbody = String.fromCharCode.apply(null, inbody);

    }


    var lines = inbody.split(/\r\n/);


    if (typeof inbody === 'string') {

        // if the body is a string (e.g., a plain text or json string),

        msg.Attributes["js.action"] = "parseFile";


        var readOffset = 1;

        var dataCols = lines[0].split(',');

        var o_inter = {};

        var fields = [];


        lines.slice(readOffset).forEach(function(line) {

            if(line.length !== 0){

                fields = line.split(',')

                dataCols.forEach(function(c, i) {

                    o_inter[c] = fields[i];


                });

                ++readOffset;

                msg.Body = o_inter;

                $.output(msg);

           }

        });

    }

    else {

        // if the body is an object (e.g., a json object),

        // forward the body and indicate it in attribute js.action

        msg.Body = inbody;

        msg.Attributes["js.action"] = "noop";

        $.output(msg);

    }

}
It parses the received file content line by line. And each line represents a message and will be immediately sent to the downstream operator.
Kafka Producer
Its configuration is illustrated as below.

Kafka Consumer 1
Its configuration is illustrated as below.

Kafka Consumer 2

Note that the "Group ID" configuration are different for the two consumers. This is important since we want to achieve fan-out messaging. That is, a single Kafka partition consumed by multiple consumers, each maintaining its own message offset.
Now we can start run the graph by clicking the run button. Next we will start to write to source table through insert, update and delete operations and observe how the changes will be replicated into the derived systems.
Insert
Let's insert one record into the source table by running the below SQL statement.
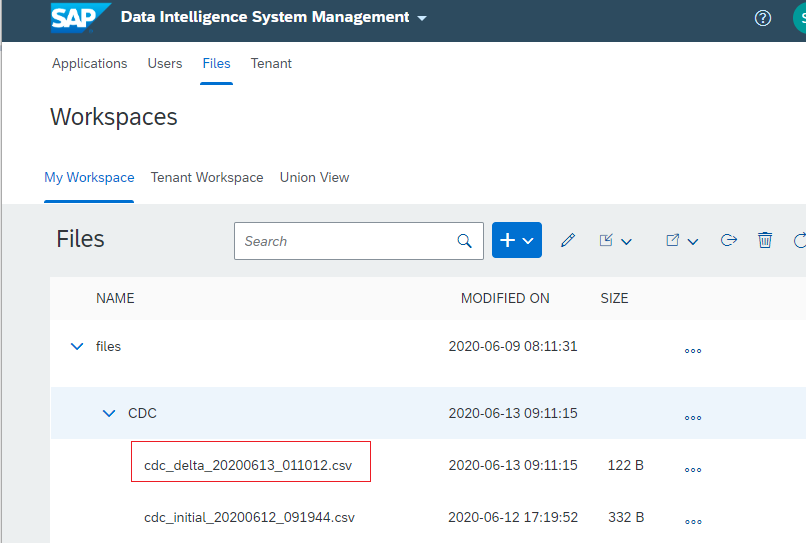
INSERT INTO "TRIALEDITION1"."HANA_SOURCE" VALUES (7, 3, 40)Go to Data Intelligence Local file system work spaces, check and verify the target file has been generated, as below figure illustrated.
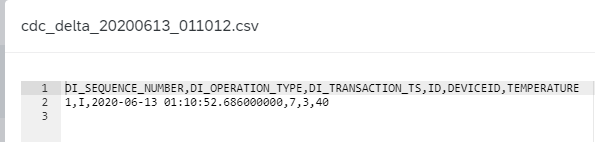
Open that file and verify the message for the inserted record has been replicated to the target file successfully, as below figure illustrated.
Finally, we open the change consumer wiretap UI to check its output, as below figure illustrated.

Update
Let's update one record in the source table by running the below SQL statement.
UPDATE "TRIALEDITION1"."HANA_SOURCE" SET TEMPERATURE = TEMPERATURE+ 1 WHERE ID = 1Check and verify the target file has been generated, as below figure illustrated.

Verify the messages for the updated record have been replicated to the target file successfully, as below figure illustrated.

Note that for Update statement, its change is composed by two messages. Their row types are Before Image (B) and Update (U) respectively.
The Change consumer wiretap UI output is as below figure illustrated.

Delete
Let's delete one record in the source table by running the below SQL statement.
DELETE FROM "TRIALEDITION1"."HANA_SOURCE" WHERE ID = 7Check and verify the target file has been generated, as below figure illustrated.

Verify the change message for the deleted record has been replicated to the target file successfully, as below figure illustrated.

The Change consumer wiretap UI output is as below figure illustrated.

Summary
This tutorial shows how it is easy to build a data integration pipeline to keep different data systems in sync using SAP Data Intelligence's built-in operators. Hope this will helpful for you to get started with your own journey on SAP Data Intelligence.
- SAP Managed Tags:
- SAP Data Intelligence,
- Big Data
Labels:
39 Comments
You must be a registered user to add a comment. If you've already registered, sign in. Otherwise, register and sign in.
Labels in this area
-
ABAP CDS Views - CDC (Change Data Capture)
2 -
AI
1 -
Analyze Workload Data
1 -
BTP
1 -
Business and IT Integration
2 -
Business application stu
1 -
Business Technology Platform
1 -
Business Trends
1,661 -
Business Trends
87 -
CAP
1 -
cf
1 -
Cloud Foundry
1 -
Confluent
1 -
Customer COE Basics and Fundamentals
1 -
Customer COE Latest and Greatest
3 -
Customer Data Browser app
1 -
Data Analysis Tool
1 -
data migration
1 -
data transfer
1 -
Datasphere
2 -
Event Information
1,400 -
Event Information
64 -
Expert
1 -
Expert Insights
178 -
Expert Insights
273 -
General
1 -
Google cloud
1 -
Google Next'24
1 -
Kafka
1 -
Life at SAP
784 -
Life at SAP
11 -
Migrate your Data App
1 -
MTA
1 -
Network Performance Analysis
1 -
NodeJS
1 -
PDF
1 -
POC
1 -
Product Updates
4,578 -
Product Updates
323 -
Replication Flow
1 -
RisewithSAP
1 -
SAP BTP
1 -
SAP BTP Cloud Foundry
1 -
SAP Cloud ALM
1 -
SAP Cloud Application Programming Model
1 -
SAP Datasphere
2 -
SAP S4HANA Cloud
1 -
SAP S4HANA Migration Cockpit
1 -
Technology Updates
6,886 -
Technology Updates
397 -
Workload Fluctuations
1
Related Content
- 10+ ways to reshape your SAP landscape with SAP BTP - Blog 4 Interview in Technology Blogs by SAP
- 10+ ways to reshape your SAP landscape with SAP Business Technology Platform – Blog 4 in Technology Blogs by SAP
- Integrate an external task system to Cloud ALM. in Technology Q&A
- Integration object creation with one to one relation with same item type. in Technology Q&A
- Top Picks: Innovations Highlights from SAP Business Technology Platform (Q1/2024) in Technology Blogs by SAP
Top kudoed authors
| User | Count |
|---|---|
| 11 | |
| 11 | |
| 10 | |
| 9 | |
| 7 | |
| 7 | |
| 7 | |
| 7 | |
| 6 | |
| 5 |