
- SAP Community
- Products and Technology
- Technology
- Technology Blogs by SAP
- Build your WeChat Work Mobile Micro App With SAP M...
Technology Blogs by SAP
Learn how to extend and personalize SAP applications. Follow the SAP technology blog for insights into SAP BTP, ABAP, SAP Analytics Cloud, SAP HANA, and more.
Turn on suggestions
Auto-suggest helps you quickly narrow down your search results by suggesting possible matches as you type.
Showing results for
former_member59
Explorer
Options
- Subscribe to RSS Feed
- Mark as New
- Mark as Read
- Bookmark
- Subscribe
- Printer Friendly Page
- Report Inappropriate Content
06-14-2020
10:09 AM
What is Micro App
An SAP Mobile Services Micro App is the application that you can build & deploy to SAP Business Technology Platform (SAP BTP) and integrating with 3rd social app platform, such as WeChat work, DingTalk, etc.
Now Users are already able to create WeChat Work (or WeCom) type Micro App in SAP Mobile Services (Cloud Foundry). In such an application, users could receive / push different kind of messages from WeChat Work client, and build their own business logic in the SAP BTP application. This provides a way to integrate 3rd party social app platform with SAP systems via SAP Mobile Services.
The full documentation for SAP Mobile Services Micro App can be found in SAP Help Portal: Configuring Micro Apps
This article is an End-to-End solution tutorial for integrating WeChat Work into SAP Mobile Services and will show you how to configure and create your own WeChat Work Micro App in SAP Mobile Services (Cloud Foundry) step by step.
Please also note that currently Micro App feature for now is only available in China.
Before start, you should have your WeChat Work admin account and SAP Mobile Services CF account ready. And I assume you already have basic knowledge about Java, REST API development and basic SAP BTP Cloud Foundry concept.
Step 1. Create your WeChat Work App Configuration
Firstly, you'll need to create a WeChat Work application in WeChat admin page.
In this admin page, go to "App Management" and create your own App using "+ Create an App".
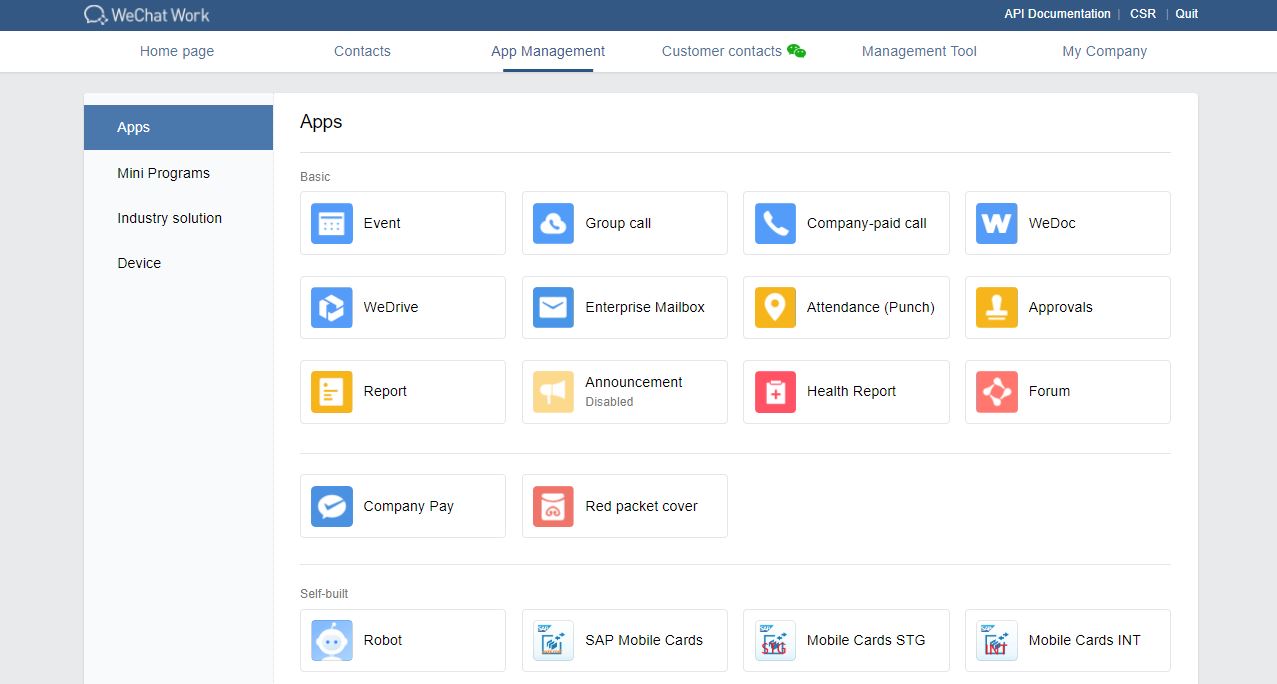
Then enter your app logo, app name, select your allowed users (must), descriptions and create the app with button.

After the app is created, you'll see following app admin page. Please note that this is only a virtual app (a WeChat Work App configuration), you need to integrate these WeChat Work configuration data into SAP Mobile Services and your real CF application. To do this, you need to fetch some critical values from WeChat work app admin page:
- AgentID: This is an auto-generated unique ID for your WeChat Work app in your account. You can get this value from the above screenshot highlighted part 1.
- App Secret: This is the auto-generated app secret for your WeChat Work app. You can get this value from the above screenshot highlighted part 2.
- CorpId: The Corp id for your WeChat Work enterprise id. You can easily get this corp id from the header tab "My Company" of WeChat Work admin page.
- Token and EncodingAESKey: Token and EncodingAESKey are used to allowed your CF application to receive WeChat messages from WeChat Work client. To generate Token and EncodingAESKey, click on "API enabled to receive messages" of Receive messages tab (see highlighted part 3 of above screenshot), then you'll see following fields.
 Generate token and EncodingAESKey manually by clicking "Acquire randomly" buttons (see highlighted part 1 and 2).Note: Regarding the message receiving URL, we'll deal with it later. Please copy & paste your Token and EncodingAESKey to somewhere else since those information could miss after you click the Back or Cancel button.
Step 2. Create your Mobile Services Application Configuration
Now open your SAP Mobile Services Cockpit and go to "Micro App" tab from the left menu: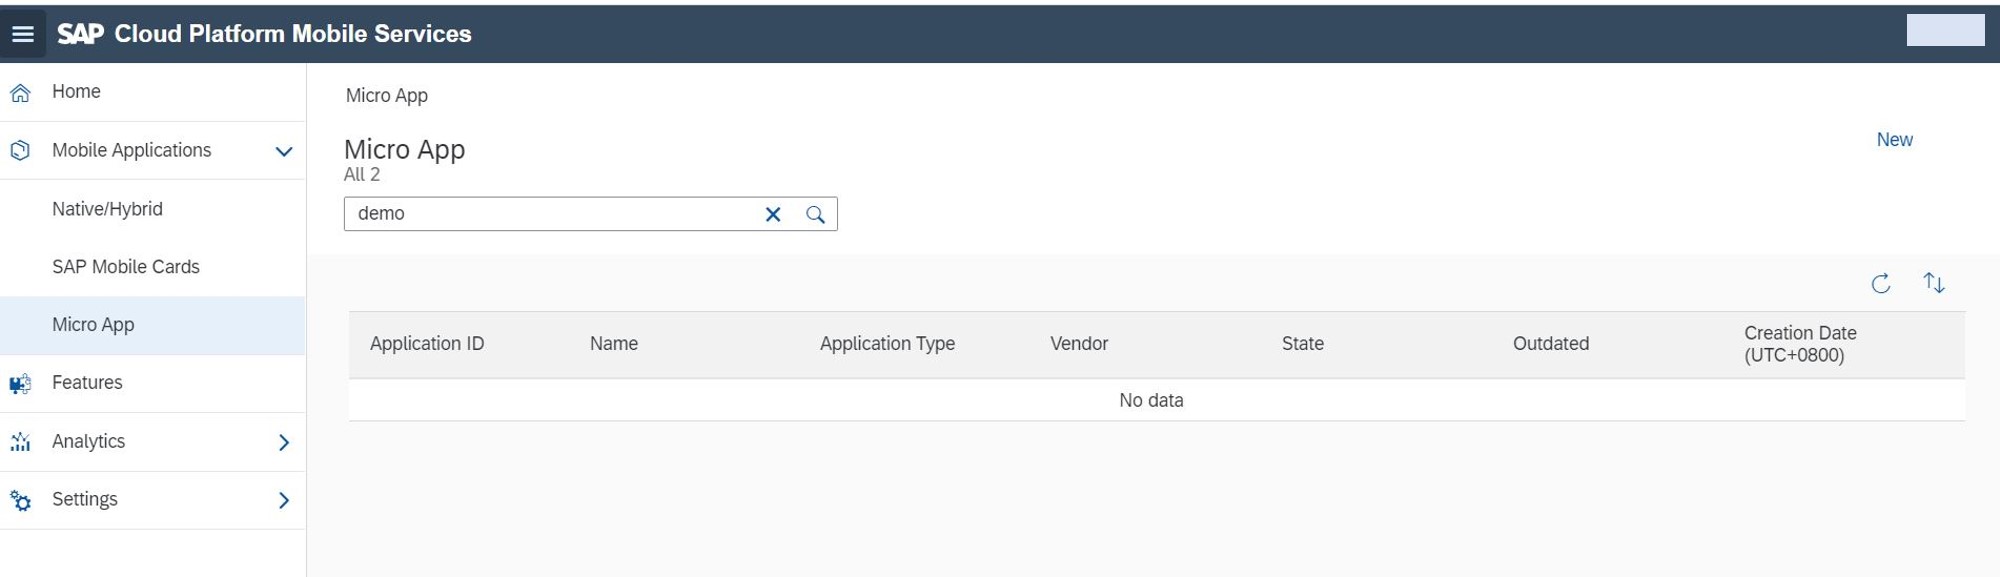 You can create your application with "New" button. In the Mobile Services application creating window, please enter the application ID, application name, WeChat Work account Corp ID (from Step 1), WeChat Work app Agent Id (also from Step 1)
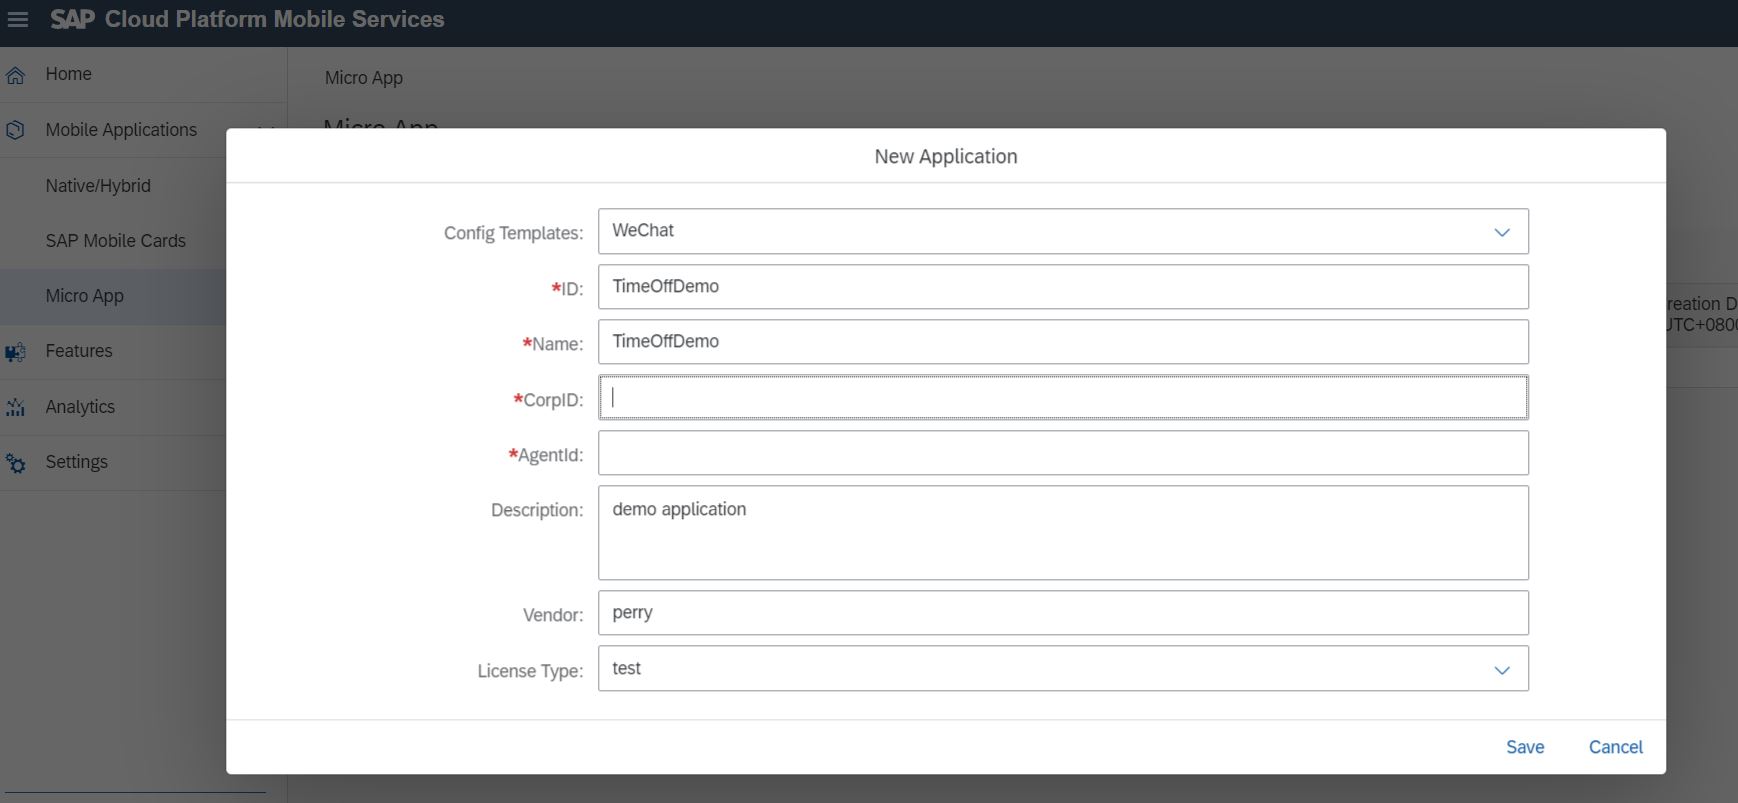 After the Mobile Services application is created and ready, you need to configure "Mobile Micro App" and "Mobile Connectivity" under the Assigned Features to make it work.
Please note that this Mobile Services application is also a virtual configuration, you need to integrate this application with real CF application and WeChat work app configuration together.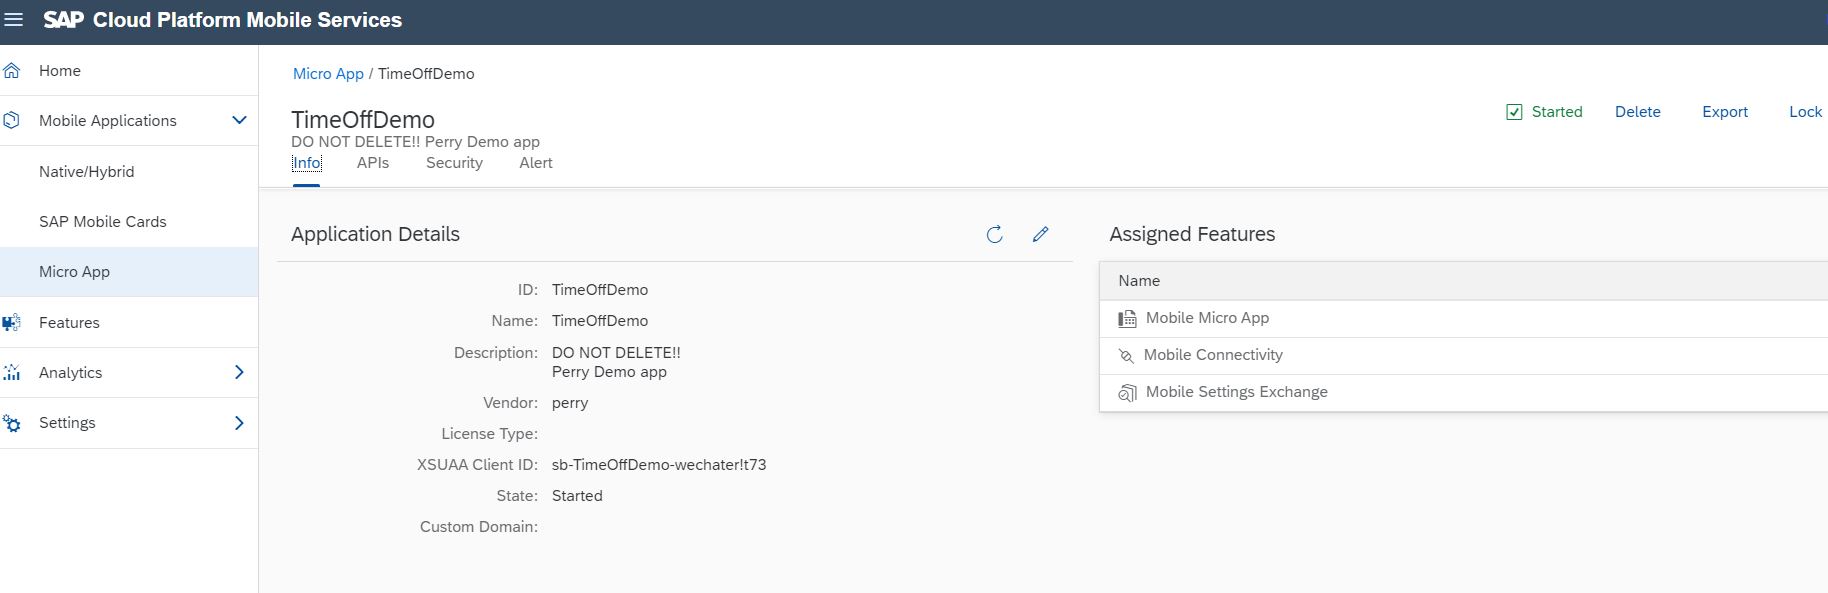 In the "Mobile Micro App" configuration page, you need to enter the App Secret, Token and EncodingAESKey which we saved from WeChat Work admin page from Step 1.
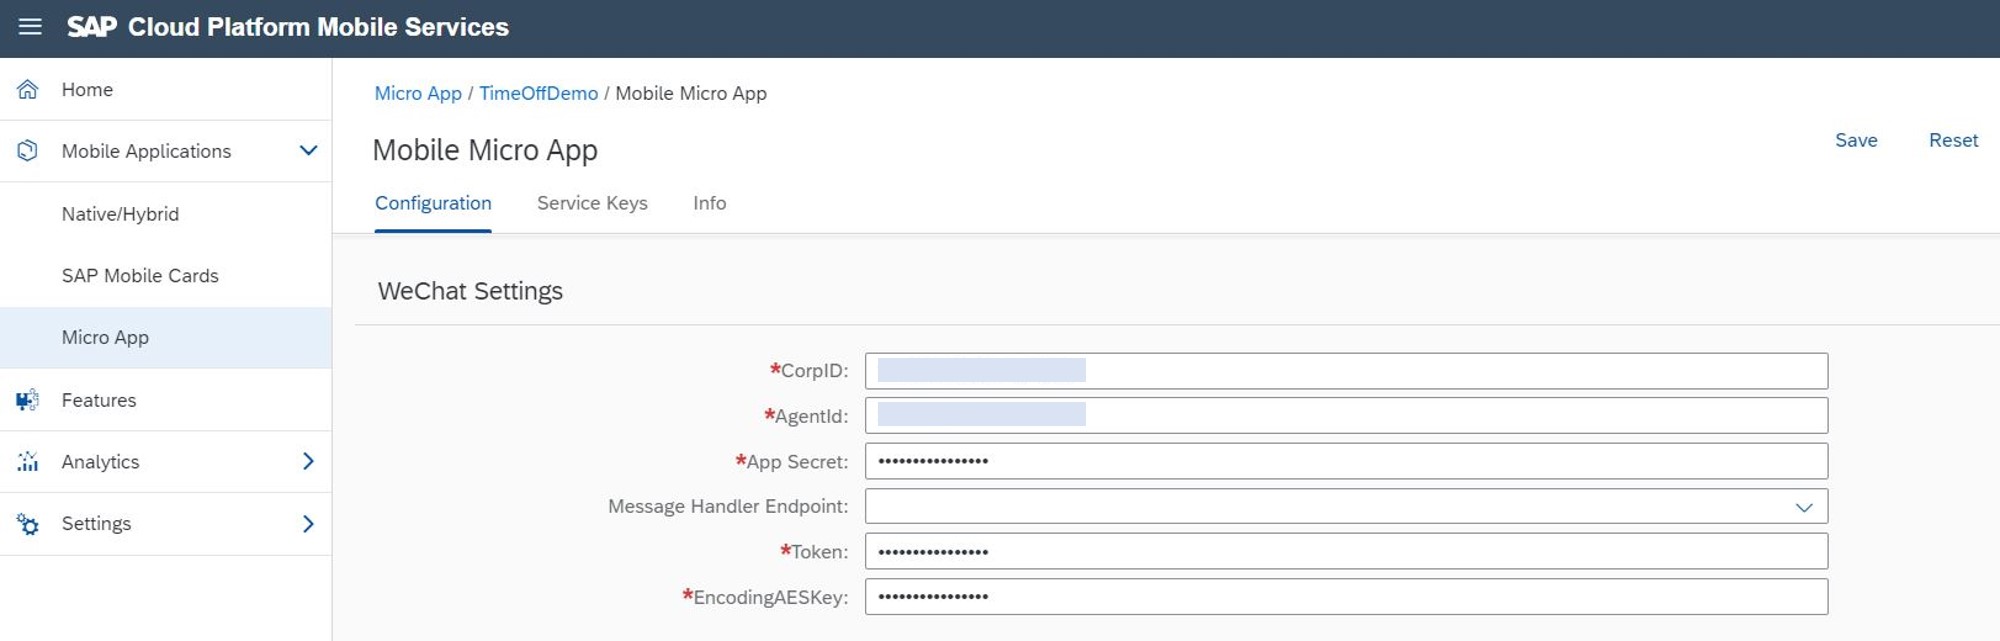 In the "Service Keys" tab, please manually create a push service key (auto-generated random key string) with "+" button:
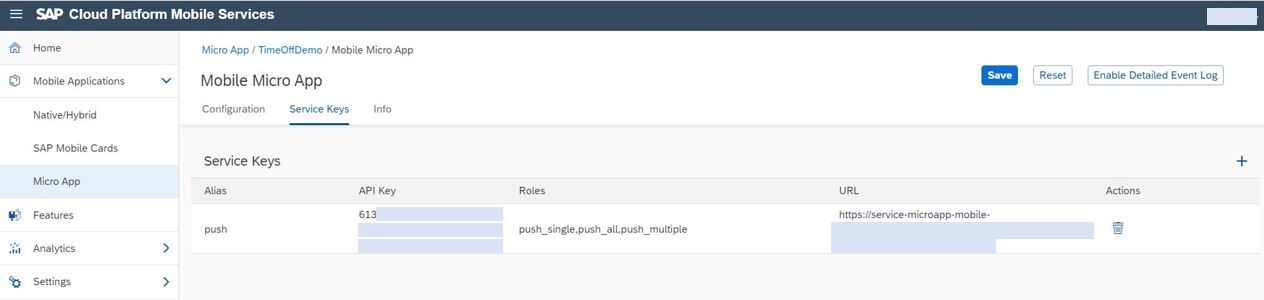 This service key is extremely important for you in your Java application deployed to CF later if you want to use the WeChat message push feature. See more service keys introduction here.
You can get the WeChat message push API from the "APIs" tab of the mobile services application just like following picture (API - WeChat Push). You need to call this API with service key header and JSON message payload which will be discussed in next step.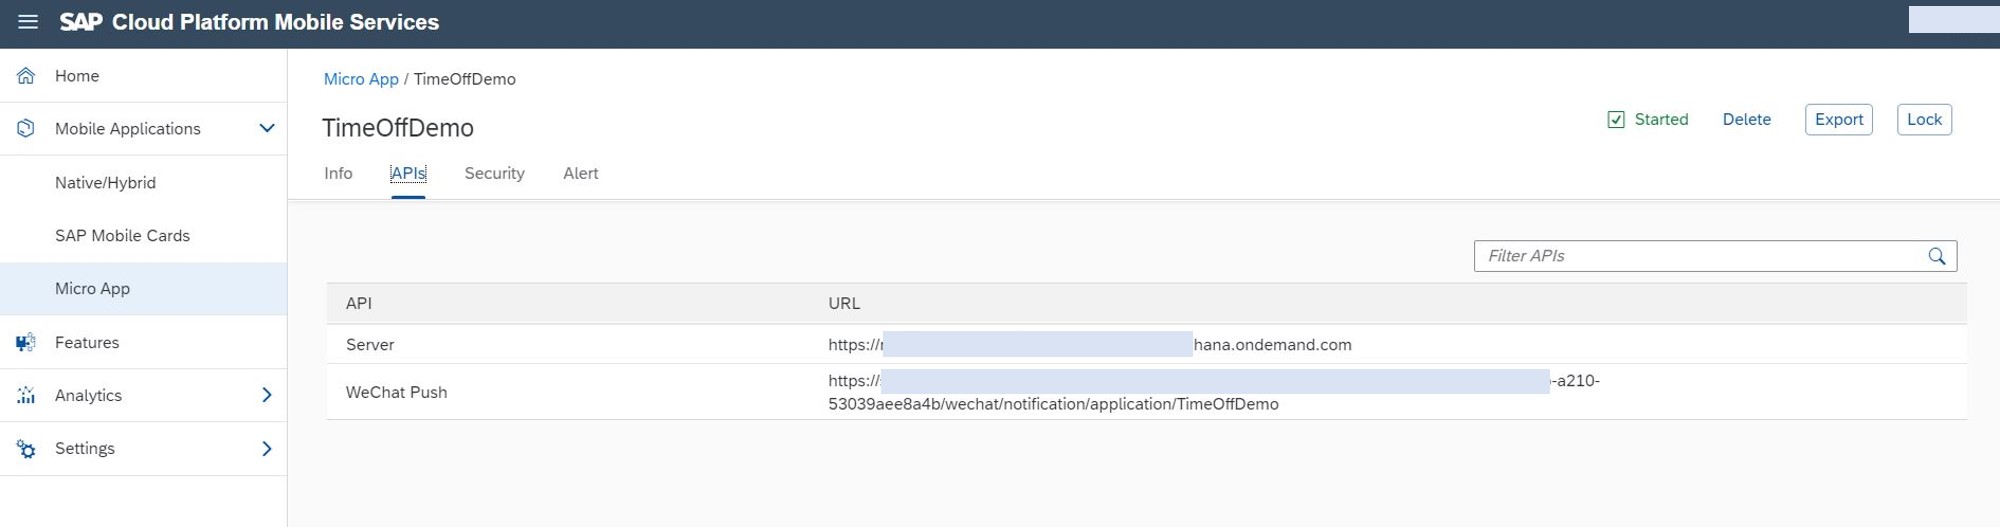
Note: Regarding the "Message Handler Endpoint" field in "Mobile Micro App" configuration and "Mobile Connectivity" endpoint configuration, We'll set this later after we deployed the real application to SAP BTP CF.
Step 3. Create your own business application and Deploy to SAP BTP CF
Now you can create your real business application on Cloud Foundry. You can use many ways here to create your application, e.g. SAP WebIDE, SAP Business Application Studio, or any other IDE you like.
PS: So far the Mobile Services Microapp extension for SAP Business Application Studio is already available, if you want to use SAP Business Application Studio to build Micro app, please see this blog post:
Using SAP Business Application Studio to build WeChat Work Micro App With SAP Mobile Services
This section will only focus on building Micro App using SAP WebIDE.
The following picture simply shows how the WeChat work integrates with SAP BTP via SAP Mobile Services MicroApp:
 Here I use SAP WebIDE to create a Simple Java Spring Boot "TimeOff" application as an example. Before start, we need to enable the WebIDE Mobile Services extension, SAP is supporting micro app features in this extension to help developers on faster development of micro apps.
 After that you will be able to create Blank WeChat Micro App in Mobile Services extension (I named it "TimeOffDemo" here), and configure the Cloud Foundry Endpoint/Org/Space, and your Mobile Services application id which was created in Step 2.
 Once the project is created and ready, you can right click on the project TimeOffDemo and create a new Java Module. To make the development easier, Mobile Services extension provides a Micro App Message Handler module here which contains most of the basic WeChat message handling Java code.
 In the project, we saw the com.sap.microapp.messaging package is already auto-generated which contains basically most of the required WeChat message handling functions. Here are some explanation for the main packages:

- com.sap.microapp.messaging.controller: This contains the most important Controller (Portal) for the Java application. As we can see from the above screenshot, there is a default "/OnMessage" controller here, it is used to communicate with WeChat Work Server through Mobile Services , and receives XML WeChat messages sent from WeChat Work Server.The XML format is following the doc of WeChat Work API Doc for message receiving (Chinese doc). A simple WeChat message receive/response format and the the WeChat message consume flow is shown as below.
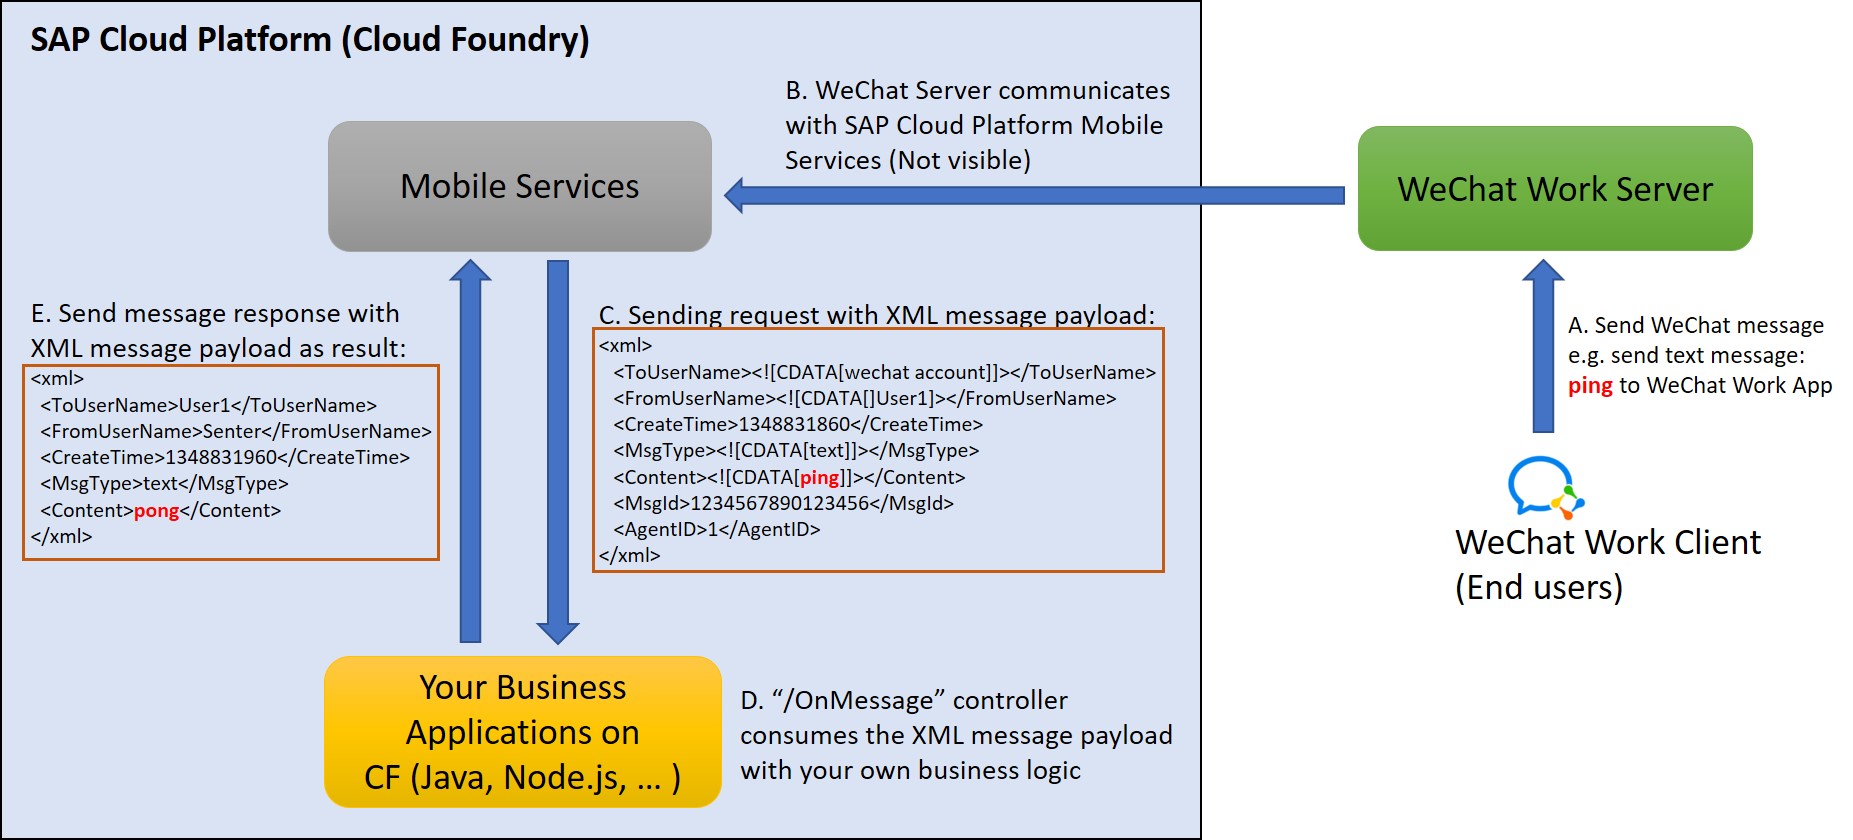 As example, your end user sent a "ping" text from WeChat Work app, then your CF business application receive the XML payload, parse it and send back a "pong" as response. Other message types rather than text message are all supported in Mobile Services, such as picture, video, voice, etc. Note: You may want to push the result back to your end users and inform them that your business handling is success or not, to do so, return back your customized XML message payload as Response Body in the "/OnMessage" controller. (see step E in the above picture, the response followed the totally same XML format as incoming message in step C)
 - com.sap.microapp.messaging.model: This package contains the WeChat Messages model to store the incoming/outcoming XML format Message. (All field names follow the WeChat API Doc)
- com.sap.microapp.messaging.service and com.sap.microapp.messaging.timeoff: The Default business logic is put in com.sap.microapp.messaging.service which consumes the message and pushes an echo string back to the client. In this Demo, I created some own business logic in the com.sap.microapp.messaging.timeoff and some UI index/display pages for TimeOff App so that we are able to create/approve/check leave requests in the Java application by both WeChat chatting and UI. Considering the Rest API development, I provide following request mapping:
- "/welcome" (GET) to provide welcome text just for testing
- "/OnMessage" (POST) to receive WeChat XML message as discussed
- "/leaverequest" (POST/PUT/GET) to provide APIs to create/update/retrieve leave requests. Those APIs are mainly called in my UI page, e.g. call "/timeoff/leaverequest" to create request through Mobile Services:
$.ajax({
url: "/timeoff/leaverequest",
contentType: "application/json;charset=UTF-8",
data: JSON.stringify(postData),
type: "POST",
success: function(result){ //... },
error: function(jqXHR, textStatus, errorThrown) {}
});
Besides the message receives/response feature, Mobile Services also provides WeChat message push notification feature. To call the push API, use the push API URL mentioned in Step 2 with setting the service key to "X-API-Key" header. Mobile Services supports pushing different kinds of WeChat message to end users, such as simple text, markdown text, text card, WeChat news, etc. And also supporting upload file, picture, video, voice and push the those to users.
To push the WeChat Work notification, you need to build your JSON payload, the example format is like following:
// push simple text to user P000001

{

    "notification": {

        "wechat": {

            "createtime": "2019-12-17T06:24:26.451Z",

            "text": {

                "content": "hello world!"

            },

            "msgtype": "text"

        }

    },

    "users": ["P000001"]

}


// upload base64 encoded file and push it to user P000001

{

    "notification": {

        "wechat": {

            "createtime": "2019-12-17T06:52:23.417Z",

            "file": {

                "media_file_encoded": "data:application/x-zip-compressed;base64,XXXXXXXXXX",

                "media_file_name": "abc.zip"

            },

            "msgtype": "file"

        }

    },

    "users": ["P000001"]

}Note: The full documentation regarding WeChat push API and WeChat message receiving is already documented in Micro App APIs for WeChat.
After the you implement your business logic, you can deploy your project to SAP BTP Cloud Foundry as CF application. In WebIDE Mobile Services extension, it provides a simple button to deploy to Mobile Services as CF application:
 In the "Deploy Micro App" wizard, Select your Mobile Services application created from Step 2. You don't need to check "Publish to Mobile service" here because we will manually create Mobile Services endpoints later which is more flexible.
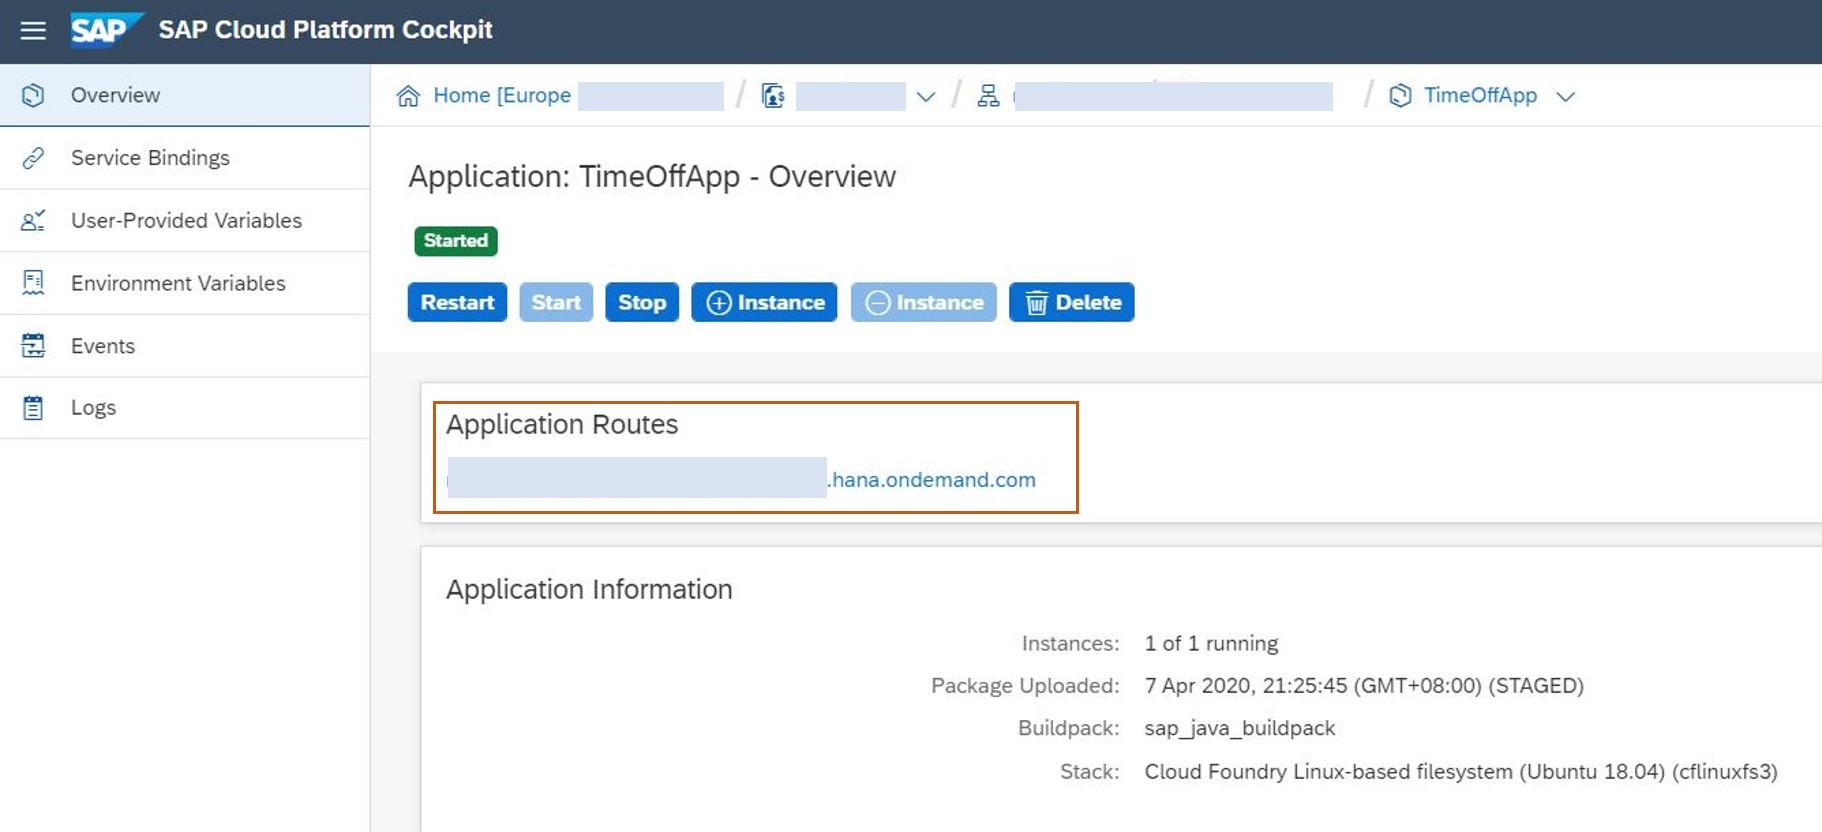
Once the deployment is finished, you should see your real application running in your SAP BTP Cloud Foundry space:
 This is a Java application, it talks to WeChat Server and Mobile Services together to accomplish your business requirement, e.g. process receiving WeChat message from end users, push different kinds of WeChat messages to end users, etc.
What is a CF application and How to maintain it is out of scope of this tutorial. The CF application routes as marked in the following picture is the main entrance of this Java application.
Step 4. Config and run your WeChat application
Before running the application, there are still some steps to be processed to get WeChat communication work (as mentioned in Step 1 and Step 2)
Firstly, open your SAP Mobile Services Cockpit and go to "Mobile Connectivity" configuration, and create the required destination endpoints:
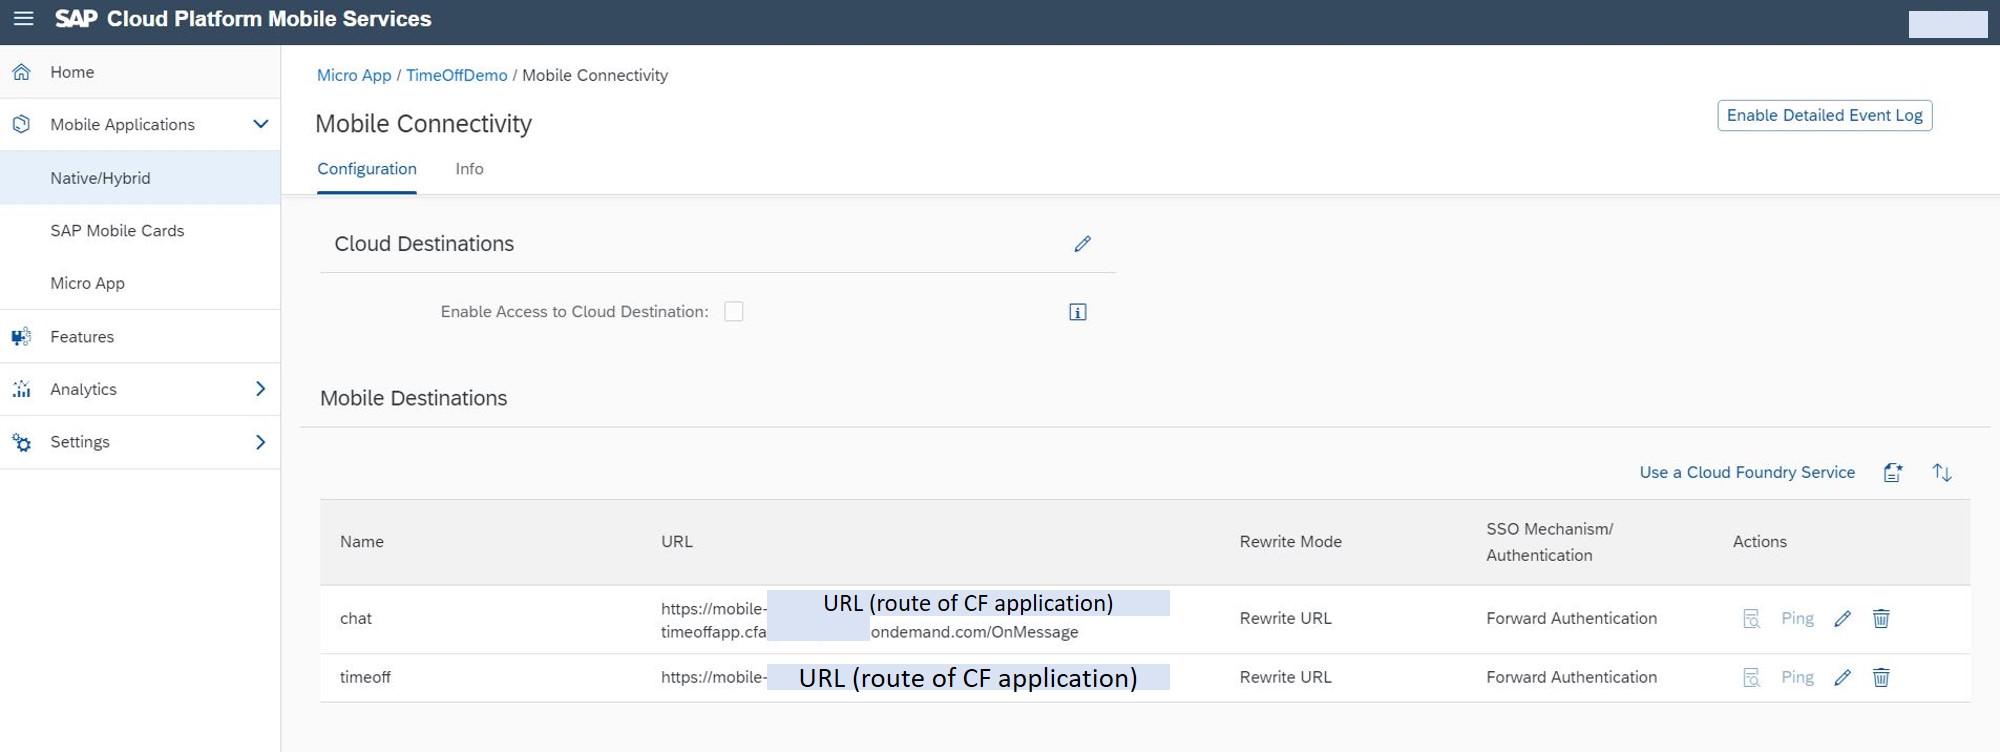 you need to create at least the destination to receive WeChat message from WeChat Server, here in my application, it is named "chat", and the URL is <CF application routes>/OnMessage which matches the message receiving controller (CF application routes is marked in the end of Step 3). I also created a "timeoff" destination which is equal to the CF application routes, this is used for UI JavaScript code handling to make the HTTP call.
And that is why you should call your CF application Rest API "/leaverequest" using request URL like: <Mobile Services Server API>/timeoff/leaverequest
Actually all of those Server API URL can be retrieved from the Micro App application "APIs" tab of Mobile Services Cockpit. Note: For both destinations, the authentication type should be "Forward Authentication".
Then, go to the "Mobile Micro App" and complete the last empty field "Message Handler Endpoint", select the destination "chat" you just created, and the micro app message handler URL will be auto-generated for you:
 Afterwards, go back to WeChat Work admin page of your WeChat application, Add trusted domain name for your SAP Mobile Services application by clicking "Apply for domain name verification". This is an important step because we need to let WeChat Work trust our Mobile Services domains otherwise you'll see some errors like "domain is not trusted" when accessing the TimeOff demo. The trusted domain URL to be filled can be fetched from the "Server API" from SAP Mobile Services Cockpit MicroApp application "APIs" tab.
 Last, go to the "API enabled to receive messages" and fill in the URL configuration of "Receive messages via API":
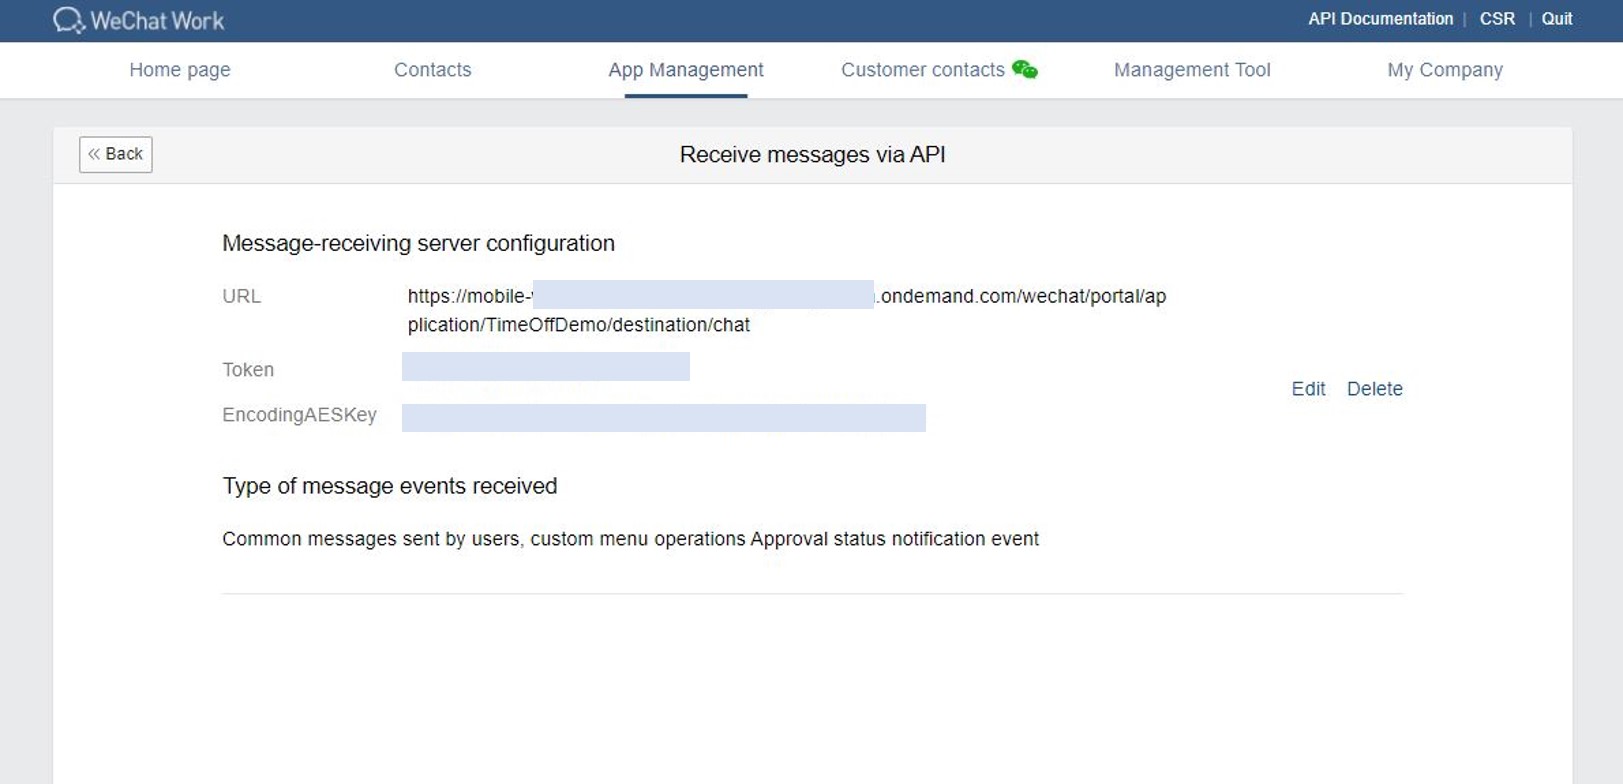 Paste the Token and EncodingAESKey you created from the Step 1, paste the micro app message handler URL to the "URL" field, and then click "Save".
If you see that "save is successful", Congratulations ! you are all set for the integration configuration of SAP Mobile Services and WeChat Work.
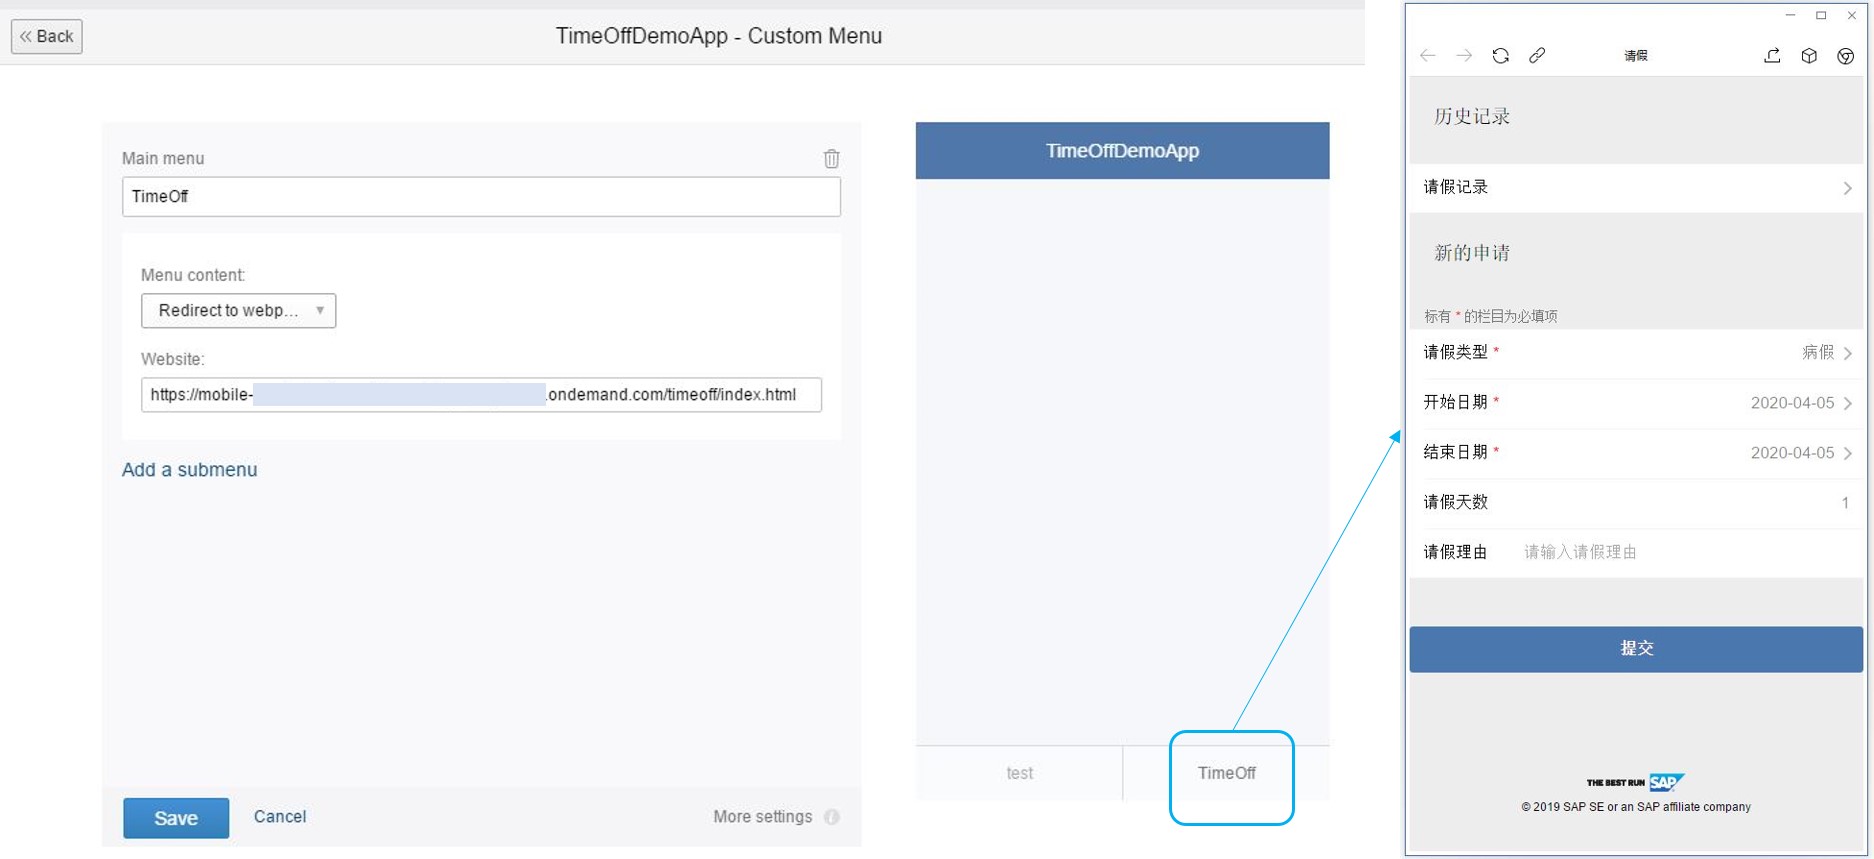
How my demo works is shown in the left part of follow picture:
 My App TimeOffApp receives "create" WeChat messages from WeChat Work end users and creates a leave request in back-end. Then I can communicate with TimeOffApp through chatting, e.g. setting start/end date of leave request, or reason of the request, etc. After entering "submit", the TimeOffApp will notify the approver of the TimeOff that any leave request is created (see right part of the picture). After the approver approves the request, TimeOffApp send a text-card message to the requester as result notification.
I also created a index page in TimeOffApp for requester to create leave request in UI page, based on the WeChat Work feature, you can configure a homepage button to open any index pages in WeChat Application Admin page, e.g. the TimeOff button to open TimeOffApp UI homepage:
Summary
To create and deploy Cloud Foundry application and integrates with SAP Mobile Services Micro App and WeChat Work, you need to:
- Create and configure WeChat Work application in WeChat Work admin page.
- Create and configure SAP Mobile Services Micro App application, including:
- configure Micro App with WeChat application information
- generate service key for WeChat push feature
- create destinations pointing to your Cloud Foundry application
- Create your Cloud Foundry application (e.g. a Spring Boot Java project) which implements:
- the WeChat message receiving controller module
- WeChat notification push modules
- other business logic of your application
Feedback & Support
Please contact the following project owner if you have any questions:
jian-dong.pei@sap.com
Labels:
3 Comments
You must be a registered user to add a comment. If you've already registered, sign in. Otherwise, register and sign in.
Labels in this area
-
ABAP CDS Views - CDC (Change Data Capture)
2 -
AI
1 -
Analyze Workload Data
1 -
BTP
1 -
Business and IT Integration
2 -
Business application stu
1 -
Business Technology Platform
1 -
Business Trends
1,661 -
Business Trends
86 -
CAP
1 -
cf
1 -
Cloud Foundry
1 -
Confluent
1 -
Customer COE Basics and Fundamentals
1 -
Customer COE Latest and Greatest
3 -
Customer Data Browser app
1 -
Data Analysis Tool
1 -
data migration
1 -
data transfer
1 -
Datasphere
2 -
Event Information
1,400 -
Event Information
64 -
Expert
1 -
Expert Insights
178 -
Expert Insights
270 -
General
1 -
Google cloud
1 -
Google Next'24
1 -
Kafka
1 -
Life at SAP
784 -
Life at SAP
11 -
Migrate your Data App
1 -
MTA
1 -
Network Performance Analysis
1 -
NodeJS
1 -
PDF
1 -
POC
1 -
Product Updates
4,578 -
Product Updates
323 -
Replication Flow
1 -
RisewithSAP
1 -
SAP BTP
1 -
SAP BTP Cloud Foundry
1 -
SAP Cloud ALM
1 -
SAP Cloud Application Programming Model
1 -
SAP Datasphere
2 -
SAP S4HANA Cloud
1 -
SAP S4HANA Migration Cockpit
1 -
Technology Updates
6,886 -
Technology Updates
395 -
Workload Fluctuations
1
Related Content
- What’s New in SAP Analytics Cloud Release 2024.08 in Technology Blogs by SAP
- ad-hoc analysis on BW Querys in SAP Analytics Cloud on iOS mobile devices in Technology Q&A
- Consuming SAP with SAP Build Apps - Connectivity options for low-code development - part 2 in Technology Blogs by SAP
- Unlocking Full-Stack Potential using SAP build code - Part 1 in Technology Blogs by Members
- Sneak Peek in to SAP Analytics Cloud release for Q2 2024 in Technology Blogs by SAP
Top kudoed authors
| User | Count |
|---|---|
| 11 | |
| 10 | |
| 10 | |
| 9 | |
| 8 | |
| 7 | |
| 7 | |
| 7 | |
| 7 | |
| 6 |