
- SAP Community
- Products and Technology
- Enterprise Resource Planning
- ERP Blogs by Members
- Payroll Control Center: Configuration Workbench (C...
Enterprise Resource Planning Blogs by Members
Gain new perspectives and knowledge about enterprise resource planning in blog posts from community members. Share your own comments and ERP insights today!
Turn on suggestions
Auto-suggest helps you quickly narrow down your search results by suggesting possible matches as you type.
Showing results for
Advisor
Options
- Subscribe to RSS Feed
- Mark as New
- Mark as Read
- Bookmark
- Subscribe
- Printer Friendly Page
- Report Inappropriate Content
06-11-2020
9:34 AM
Since its inception, SAP marketed Payroll Control Center as a tool that simplifies the overall payroll process and changes the way payroll is processed, and it did. However, for a consultant setting up PCC was not an easy task. Navigating through IMG, several prerequisites, frequent changes, and outdated user guides made it even difficult. With the introduction of "PCC: Configuration Workbench," I believe that has changed.
In this blog, I will talk about a few prerequisites and set up PCC using the new configuration Workbench (CWB). Without further ado, let us jump right into it.
Prerequisites:
help.sap.com gives configuration workflow for both existing and new customers, including the recommended approach. See it here.
Overview of PCC Configuration Workbench:
This workbench can be called through the transaction code PYC_CONF_WB or accessed through Tools -> Payroll Control Center -> Configuration Workbench
Look and feel wise there is nothing fancy and looks similar to ABAP Development Workbench. There are a few things I want to highlight for understanding the layout, navigation, and set up of PCC using the workbench.
On the top left side of the screen are different objects. Available objects here are 1) Validation Rule 2) Analytics Chart 3) Analytics 4) Step Template 5) Policy Type 6) Process Type (#5 and #6 will be shown as Policy and Process if HCM_LOC_CI_92 is not activated).
Two useful functionalities of CWB are "Validate" and "Where-Used."
Validate will ensure there are no errors before saving the new object type Where-used List finds where an object is used. For example, select a validation rule and see which Policy is using it. See the below screenshot.
How to create a Policy Type using CWB and "Manage Policies" using Simplification Configuration
Step 1: Copy an existing "Policy Type" by selecting "Policy Type" from the dropdown. The below screenshot shows a copy of policy type Y_POLICIES.
Step 2: Go to the IMG path to see how the policy type created with CWB is also updated in another view of "Policy Type." Check the Inst. Selection Parameters and Time Selection Parameters (In case the policy is NOT visible in simplification configuration).
Step 3: Go to the EC system and navigate to the "Payroll" and "Manage Policies" tab.
Click on the "+" icon at the bottom right-hand corner to create a new policy type. Note that the policy types visible below are from "PolicyTypes" from the CWB.
Give the policy a name and start adding the standard validation rules or the validation rules built/copied using the workbench (CWB).
The below screenshot shows the selection of validation rules for the policy.
The final step, Use the "Validate" button to make sure there are no errors and "Save" your new Policy.
Now let us add newly set up Policy to a process.
Step 1: Copy an existing "Process Type" by selecting "Process Type" and selecting SAP delivered process types. Use Display/Change, Copy, and Validate buttons on CWB.
Enter name, country, category of the type of process (Monitoring, Production Payroll, Off-cycle), and most importantly, the right period parameter to show your payroll are in the front end configuration. See below screenshot on how CWB and Payroll area selection under Manage Process are related.

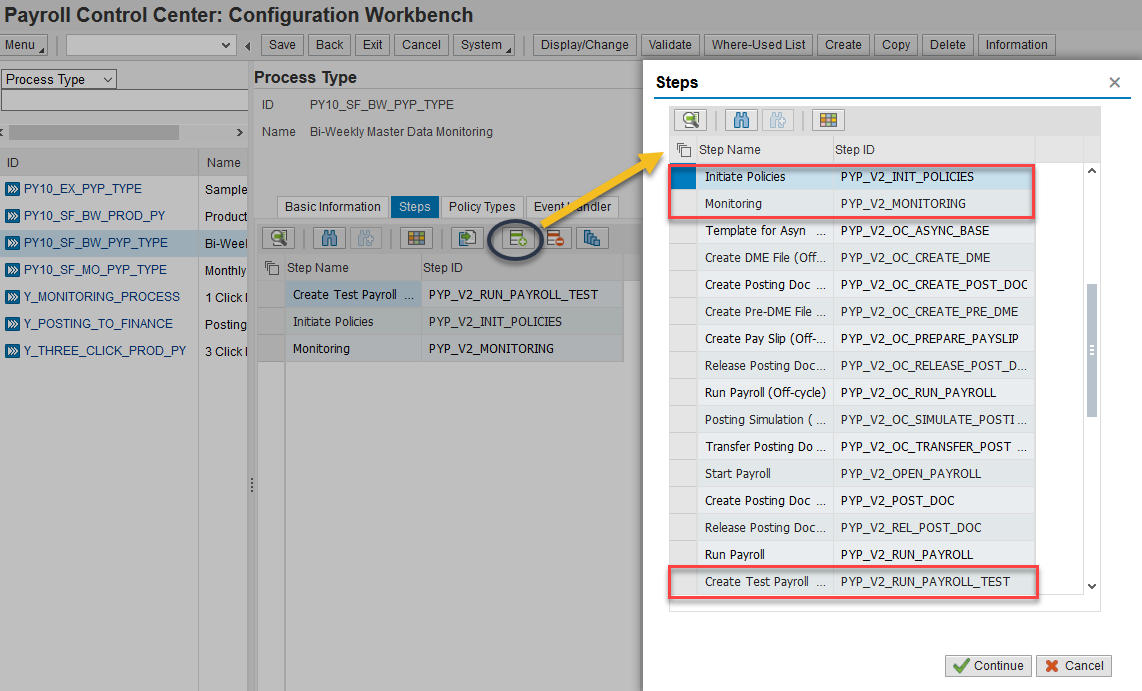
Step 2: Add steps to be included in the process. Our steps included a) Create Test Payroll b) Initiate Policies and c) Monitoring.
The below screenshot shows how to add steps to a process type. If needed, create steps by selecting "Step Template" from the CWB.
There are a couple of things that need attention.

Step 3: Add "Policy Types" for the "Process Type" you just created. The other policy types were left as-is remove them as needed.
Step 4: Add Event Handler step (Read notes(F1) on event handler for more information). In short, the Event handler identifies master data changes and automatically validates against validations. Check out this blog/video on Event Listener functionality.
Step 5: Go to the EC system and navigate to the "Payroll" and "Manage Processes" tab to create a new process.
Give a name to the process and select the payroll area (The dropdown here depends on the period parameter you provided in CWB).
Step 3 in Manage Processes is to select policies. Selecting Test Policy - Demo I created in the previous step, but the drop-down here depends on the selected policy types in CWB set up under process types.
Select pay periods, Validate, and Save.
Concluding this blog without repeating My Process, My Alerts, etc,. which has not changed much. Finally, see the below notes.
1) CWB functionality is a brand new introduction (at the time this blog was first written) with Component HRCUS 608 SP-Level 80 released on May 14th, 2020. So, full functionality has not been tested yet. I will try updating the blog if I notice any changes to the information provided here in the blog.
2) Several blogs linked have the old configuration screens, so please replace those configuration screens with the new CWB functionality.
3) There will be further improvements and new additions from SAP, so keep an eye out on the latest releases and changes. The best place to look for the latest guide is help.sap.com/cloud4hr.
In this blog, I will talk about a few prerequisites and set up PCC using the new configuration Workbench (CWB). Without further ado, let us jump right into it.
Prerequisites:
- Bring the system to at least support pack 80 the release 608 (This is the latest release as of June 10th, 2020).

- Activate business function HCM_LOC_CI_107. (Refer to this blog for additional details on activating a business function, EC Setup, ECP OData configurations, and batch user creation required for PCC set up but not covered in this blog). Note: HCM_LOC_CI_107 has several other business functions as prerequisites, so all of them will be activated.
![]()
- After the system is updated, there are individual decisions that a customer needs to make to use PCC: Configuration Workbench (CWB) depending on whether you are a New PCC Customer or an Existing PCC Customer.
help.sap.com gives configuration workflow for both existing and new customers, including the recommended approach. See it here.
- We fall into a "New Customer" category, so I have followed the recommended approach of activating CWB plus PCC Simplified Configuration (HCM_LOC_CI_92).
![]()
Overview of PCC Configuration Workbench:
This workbench can be called through the transaction code PYC_CONF_WB or accessed through Tools -> Payroll Control Center -> Configuration Workbench

Look and feel wise there is nothing fancy and looks similar to ABAP Development Workbench. There are a few things I want to highlight for understanding the layout, navigation, and set up of PCC using the workbench.
Layout and Navigation:
On the top left side of the screen are different objects. Available objects here are 1) Validation Rule 2) Analytics Chart 3) Analytics 4) Step Template 5) Policy Type 6) Process Type (#5 and #6 will be shown as Policy and Process if HCM_LOC_CI_92 is not activated).
Two useful functionalities of CWB are "Validate" and "Where-Used."
Validate will ensure there are no errors before saving the new object type Where-used List finds where an object is used. For example, select a validation rule and see which Policy is using it. See the below screenshot.

PCC Set up:
How to create a Policy Type using CWB and "Manage Policies" using Simplification Configuration
Step 1: Copy an existing "Policy Type" by selecting "Policy Type" from the dropdown. The below screenshot shows a copy of policy type Y_POLICIES.

Step 2: Go to the IMG path to see how the policy type created with CWB is also updated in another view of "Policy Type." Check the Inst. Selection Parameters and Time Selection Parameters (In case the policy is NOT visible in simplification configuration).

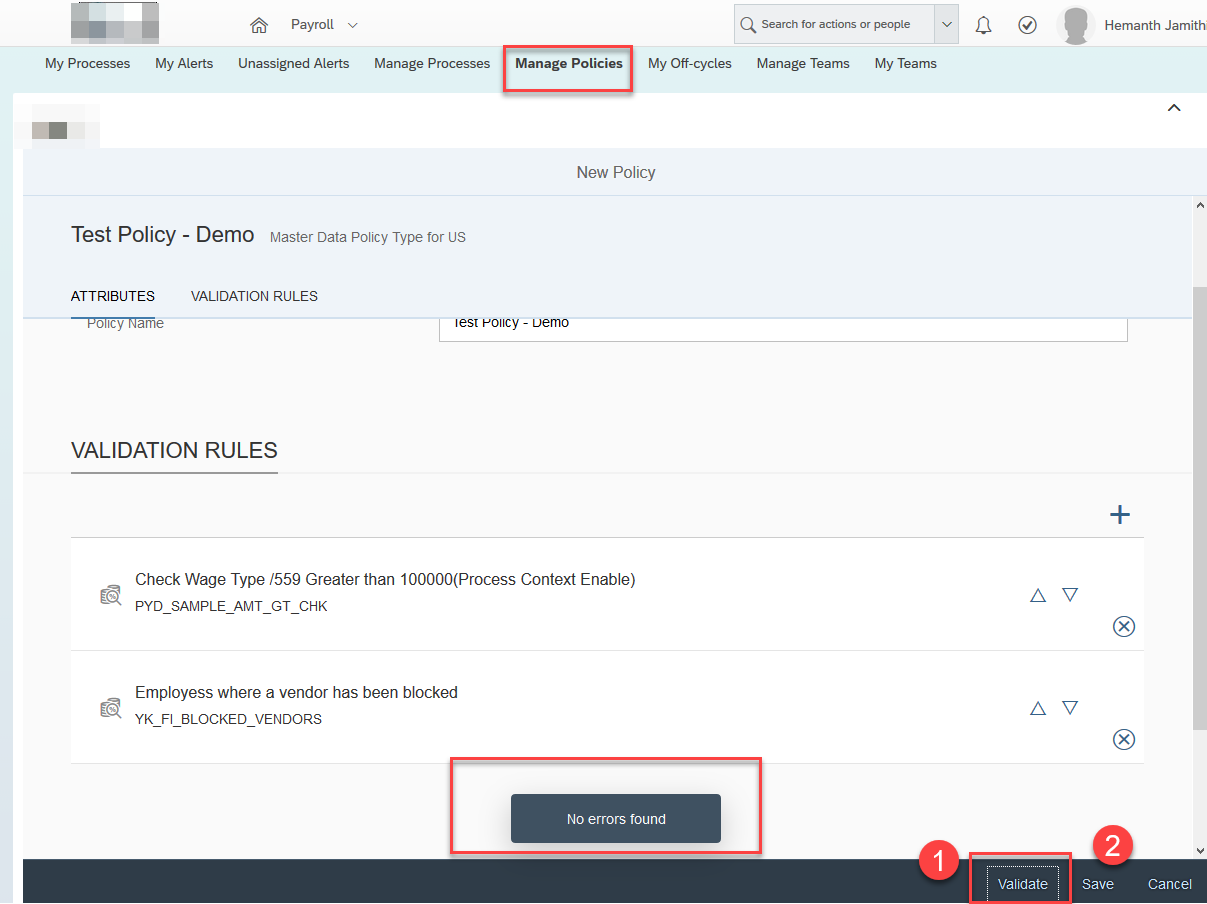
Step 3: Go to the EC system and navigate to the "Payroll" and "Manage Policies" tab.

Click on the "+" icon at the bottom right-hand corner to create a new policy type. Note that the policy types visible below are from "PolicyTypes" from the CWB.

Give the policy a name and start adding the standard validation rules or the validation rules built/copied using the workbench (CWB).

The below screenshot shows the selection of validation rules for the policy.

The final step, Use the "Validate" button to make sure there are no errors and "Save" your new Policy.
Now let us add newly set up Policy to a process.
How to create a Process using CWB and Simplification Configuration
Step 1: Copy an existing "Process Type" by selecting "Process Type" and selecting SAP delivered process types. Use Display/Change, Copy, and Validate buttons on CWB.

Enter name, country, category of the type of process (Monitoring, Production Payroll, Off-cycle), and most importantly, the right period parameter to show your payroll are in the front end configuration. See below screenshot on how CWB and Payroll area selection under Manage Process are related.
Step 2: Add steps to be included in the process. Our steps included a) Create Test Payroll b) Initiate Policies and c) Monitoring.
The below screenshot shows how to add steps to a process type. If needed, create steps by selecting "Step Template" from the CWB.
There are a couple of things that need attention.
- Double click on the step to see additional details for that step.
- Add the program name and create a custom variant for that program before adding it to the step ID.
- Customize the process step to start or confirm automatically.
Step 3: Add "Policy Types" for the "Process Type" you just created. The other policy types were left as-is remove them as needed.

Step 4: Add Event Handler step (Read notes(F1) on event handler for more information). In short, the Event handler identifies master data changes and automatically validates against validations. Check out this blog/video on Event Listener functionality.

Step 5: Go to the EC system and navigate to the "Payroll" and "Manage Processes" tab to create a new process.
Give a name to the process and select the payroll area (The dropdown here depends on the period parameter you provided in CWB).
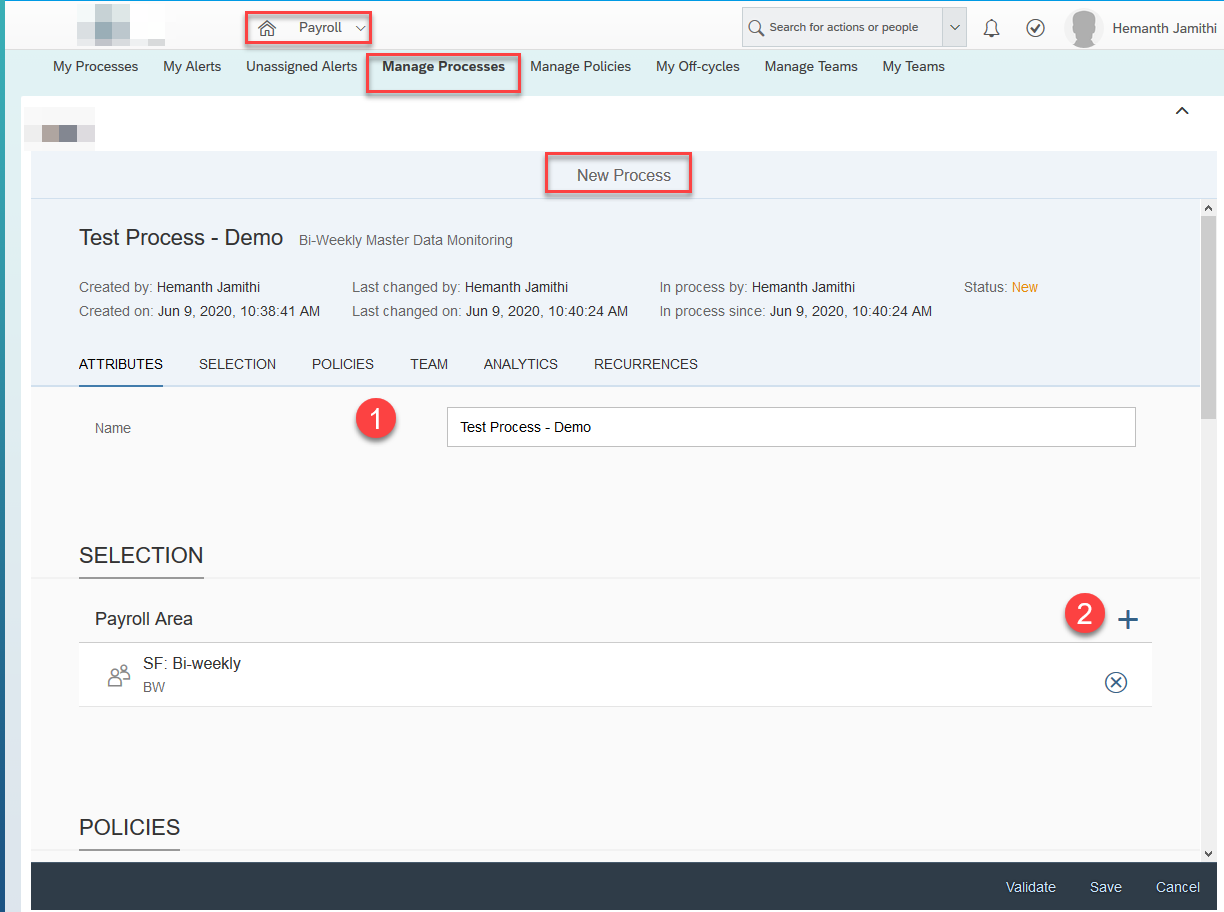
Step 3 in Manage Processes is to select policies. Selecting Test Policy - Demo I created in the previous step, but the drop-down here depends on the selected policy types in CWB set up under process types.


Select pay periods, Validate, and Save.


Standard analytics are used in this blog but with the workbench, create own analytics, analytic charts, or even own validation rules as needed. Check out this blog, which provides details on how to create new validation rules.
Concluding this blog without repeating My Process, My Alerts, etc,. which has not changed much. Finally, see the below notes.
1) CWB functionality is a brand new introduction (at the time this blog was first written) with Component HRCUS 608 SP-Level 80 released on May 14th, 2020. So, full functionality has not been tested yet. I will try updating the blog if I notice any changes to the information provided here in the blog.
2) Several blogs linked have the old configuration screens, so please replace those configuration screens with the new CWB functionality.
3) There will be further improvements and new additions from SAP, so keep an eye out on the latest releases and changes. The best place to look for the latest guide is help.sap.com/cloud4hr.
- SAP Managed Tags:
- SAP SuccessFactors Employee Central Payroll,
- HCM Payroll,
- HCM Payroll USA
14 Comments
You must be a registered user to add a comment. If you've already registered, sign in. Otherwise, register and sign in.
Labels in this area
-
"mm02"
1 -
A_PurchaseOrderItem additional fields
1 -
ABAP
1 -
ABAP Extensibility
1 -
ACCOSTRATE
1 -
ACDOCP
1 -
Adding your country in SPRO - Project Administration
1 -
Advance Return Management
1 -
AI and RPA in SAP Upgrades
1 -
Approval Workflows
1 -
Ariba
1 -
ARM
1 -
ASN
1 -
Asset Management
1 -
Associations in CDS Views
1 -
auditlog
1 -
Authorization
1 -
Availability date
1 -
Azure Center for SAP Solutions
1 -
AzureSentinel
2 -
Bank
1 -
BAPI_SALESORDER_CREATEFROMDAT2
1 -
BRF+
1 -
BRFPLUS
1 -
Bundled Cloud Services
1 -
business participation
1 -
Business Processes
1 -
CAPM
1 -
Carbon
1 -
Cental Finance
1 -
CFIN
1 -
CFIN Document Splitting
1 -
Cloud ALM
1 -
Cloud Integration
1 -
condition contract management
1 -
Connection - The default connection string cannot be used.
1 -
Custom Table Creation
1 -
Customer Screen in Production Order
1 -
Data Quality Management
1 -
Date required
1 -
Decisions
1 -
desafios4hana
1 -
Developing with SAP Integration Suite
1 -
Direct Outbound Delivery
1 -
DMOVE2S4
1 -
EAM
1 -
EDI
3 -
EDI 850
1 -
EDI 856
1 -
edocument
1 -
EHS Product Structure
1 -
Emergency Access Management
1 -
Energy
1 -
EPC
1 -
Financial Operations
1 -
Find
1 -
FINSSKF
1 -
Fiori
1 -
Flexible Workflow
1 -
Gas
1 -
Gen AI enabled SAP Upgrades
1 -
General
1 -
generate_xlsx_file
1 -
Getting Started
1 -
HomogeneousDMO
1 -
IDOC
2 -
Integration
1 -
Learning Content
2 -
LogicApps
2 -
low touchproject
1 -
Maintenance
1 -
management
1 -
Material creation
1 -
Material Management
1 -
MD04
1 -
MD61
1 -
methodology
1 -
Microsoft
2 -
MicrosoftSentinel
2 -
Migration
1 -
mm purchasing
1 -
MRP
1 -
MS Teams
2 -
MT940
1 -
Newcomer
1 -
Notifications
1 -
Oil
1 -
open connectors
1 -
Order Change Log
1 -
ORDERS
2 -
OSS Note 390635
1 -
outbound delivery
1 -
outsourcing
1 -
PCE
1 -
Permit to Work
1 -
PIR Consumption Mode
1 -
PIR's
1 -
PIRs
1 -
PIRs Consumption
1 -
PIRs Reduction
1 -
Plan Independent Requirement
1 -
Premium Plus
1 -
pricing
1 -
Primavera P6
1 -
Process Excellence
1 -
Process Management
1 -
Process Order Change Log
1 -
Process purchase requisitions
1 -
Product Information
1 -
Production Order Change Log
1 -
purchase order
1 -
Purchase requisition
1 -
Purchasing Lead Time
1 -
Redwood for SAP Job execution Setup
1 -
RISE with SAP
1 -
RisewithSAP
1 -
Rizing
1 -
S4 Cost Center Planning
1 -
S4 HANA
1 -
S4HANA
3 -
Sales and Distribution
1 -
Sales Commission
1 -
sales order
1 -
SAP
2 -
SAP Best Practices
1 -
SAP Build
1 -
SAP Build apps
1 -
SAP Cloud ALM
1 -
SAP Data Quality Management
1 -
SAP Maintenance resource scheduling
2 -
SAP Note 390635
1 -
SAP S4HANA
2 -
SAP S4HANA Cloud private edition
1 -
SAP Upgrade Automation
1 -
SAP WCM
1 -
SAP Work Clearance Management
1 -
Schedule Agreement
1 -
SDM
1 -
security
2 -
Settlement Management
1 -
soar
2 -
Sourcing and Procurement
1 -
SSIS
1 -
SU01
1 -
SUM2.0SP17
1 -
SUMDMO
1 -
Teams
2 -
User Administration
1 -
User Participation
1 -
Utilities
1 -
va01
1 -
vendor
1 -
vl01n
1 -
vl02n
1 -
WCM
1 -
X12 850
1 -
xlsx_file_abap
1 -
YTD|MTD|QTD in CDs views using Date Function
1
- « Previous
- Next »
Related Content
- SAP S/4HANA Cloud Private Edition | 2023 FPS01 Release – Part 1 in Enterprise Resource Planning Blogs by SAP
- Enhancements, evolutions, and enabled innovations across SAP’s Public Sector solution portfolio in Enterprise Resource Planning Blogs by SAP
- How to determine Default Item Category in Sales Documents with Flexibility in Enterprise Resource Planning Blogs by SAP
- SAP S/4HANA Cloud Public Edition 2402亮点前瞻:销售话题 in Enterprise Resource Planning Blogs by SAP
- Sales in SAP S/4HANA Cloud Public Edition 2402 in Enterprise Resource Planning Blogs by SAP
Top kudoed authors
| User | Count |
|---|---|
| 5 | |
| 2 | |
| 2 | |
| 2 | |
| 2 | |
| 2 | |
| 2 | |
| 1 | |
| 1 | |
| 1 |