Introduction
In this blog post you will learn how to create and store environments, variables, and settings, and thus make the configurable scripts with the SAP Intelligent RPA Cloud Factory (aka SAP iRPA).
Purpose
This approach gives the flexibility to change the variables (credential or text) whenever required without changing the script. Therefore, it is very useful when credentials and URL (or other text information such as login language) are required at runtime without hardcoding.
Product
SAP Intelligent RPA version used: Desktop Studio 1.0.8.36
How it works
The below scenario is well suited when Environments are available from the debug mode.
 Steps in action
1. Variable creation
Steps in action
1. Variable creation
There are following two types of variables in the Cloud Factory Environment

1.1. Credential: Use to store a username and a password
1.2. Text: Use to store a simple value (such as URL or login language)
 1.3.
1.3. Create and store the environments and variables as per the requirement


Here, there are following three variables created,
- system URL,
- store system credential, and
- system login language (this is not being used in this demo)
2. Desktop Agent setting
Select the environment in which the variables are created.

3. Workflow creation
The declaration can be kept either outside the scenario step or inside, i.e. both ways it is possible.
3.1 Variable declaration as Out of Scenario (recommended) – the declaration is out of scenario therefore declared variables will be accessible independent of steps execution.
 3.2
3.2 Variable declaration as a Scenario Step – the declaration is local therefore declared variables will be accessible when declaration steps are executed.
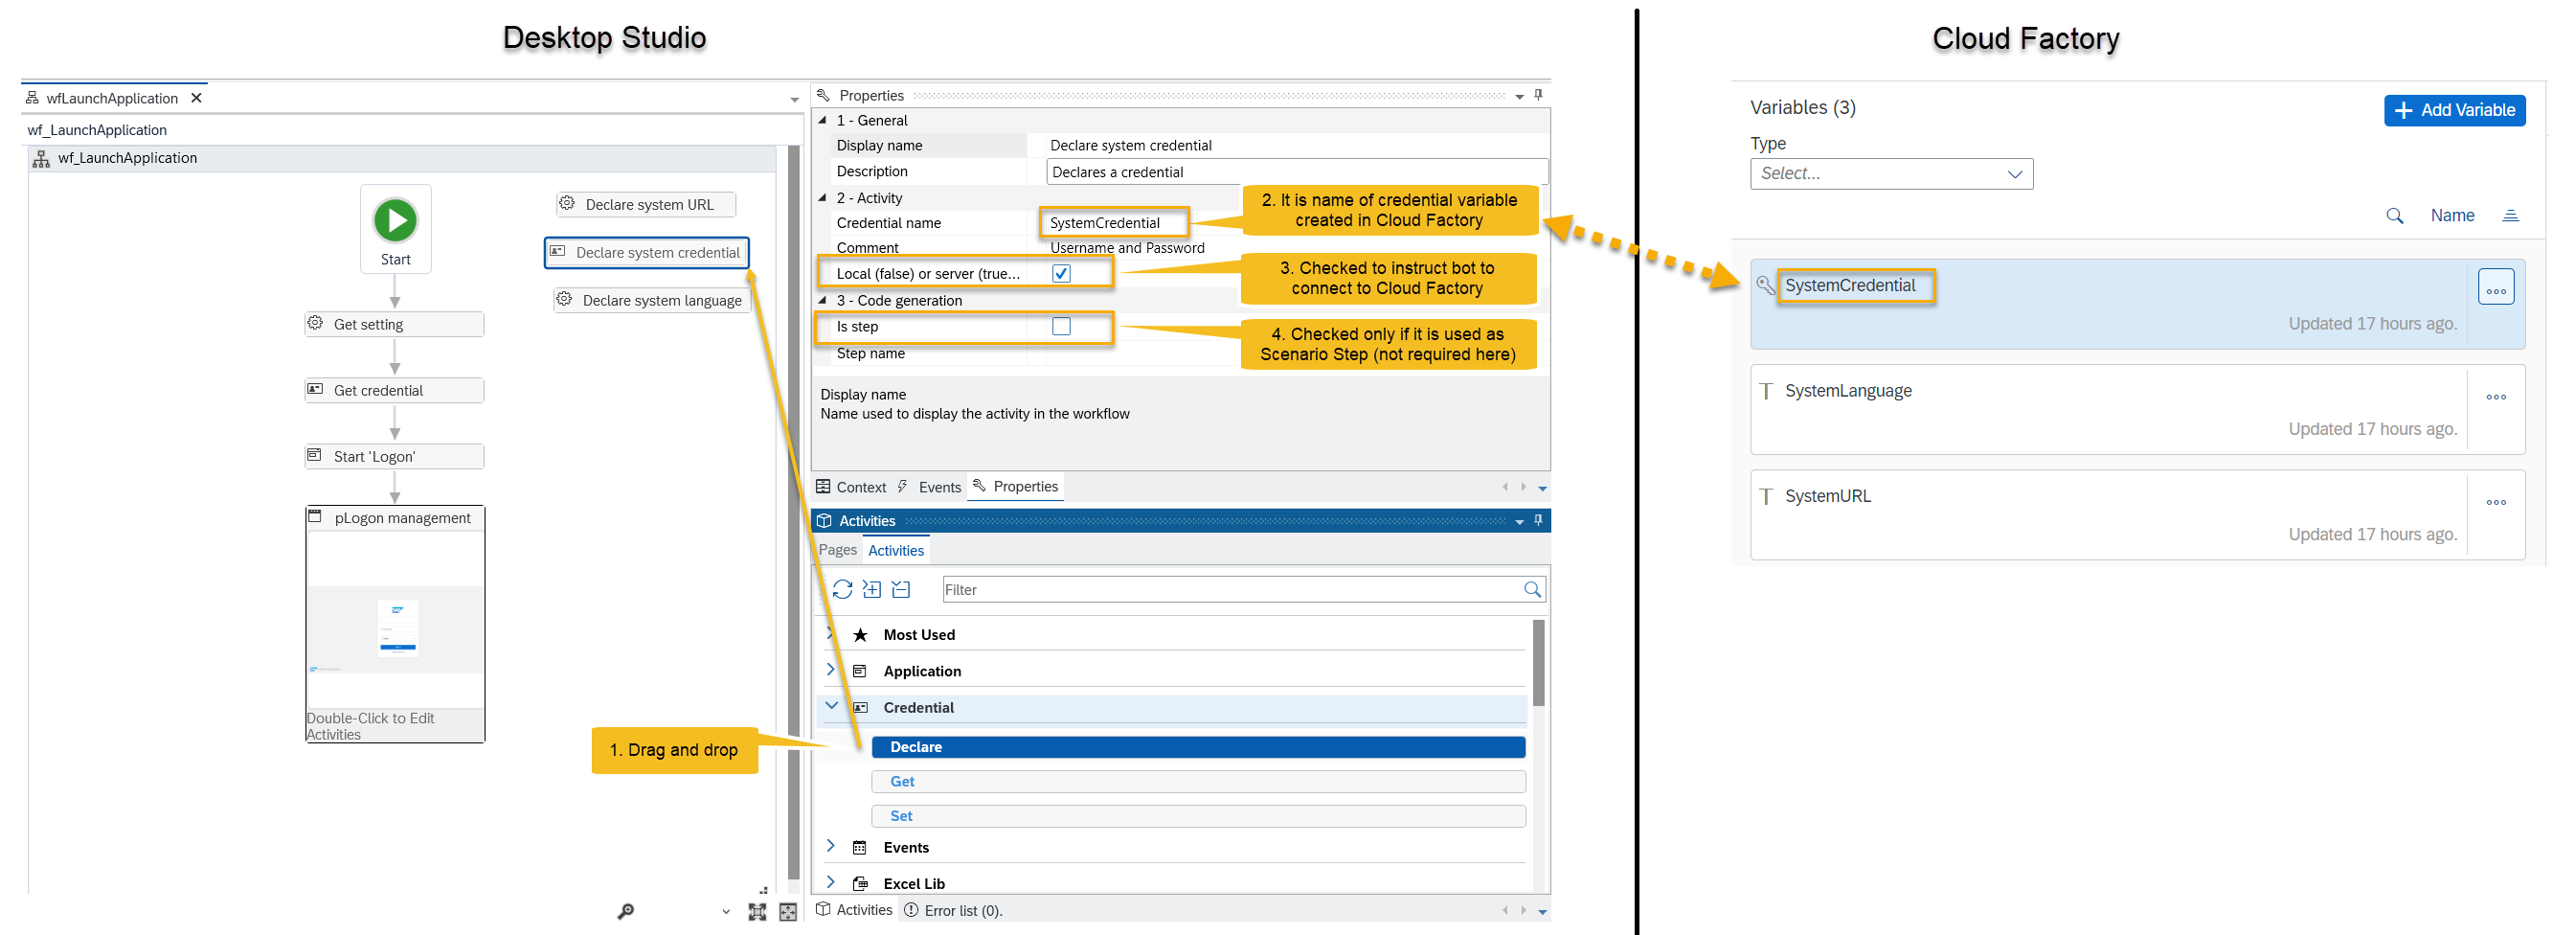
 4. Variable declaration within the workflow
4.1.
4. Variable declaration within the workflow
4.1. Credential declaration
 4.2.
4.2. Setting declaration (handling Text Variable)
 Generated code:
//---------------------------------------------------

// Declare system URL

//---------------------------------------------------

ctx.workflow('wf_LaunchApplication', 'eb0723d7-dd22-4093-ab04-c2561a664b79') ;

// Declare system URL


ctx.setting({ SystemURL: {

	comment: "My setting for URL",

	server: true

}});


//---------------------------------------------------

// Declare system credential

//---------------------------------------------------

ctx.workflow('wf_LaunchApplication', '053411d2-6176-476c-9527-a6e1ccb2f512') ;

// Declare system credential


ctx.cryptography.credential({ SystemCredential: {

	comment: "Username and Password",

	server: true

}});


//---------------------------------------------------

// Declare system language

//---------------------------------------------------

ctx.workflow('wf_LaunchApplication', 'eb0723d7-dd22-4093-ab04-c2561a664c98') ;

// Declare system language


ctx.setting({ SystemLanguage: {

	comment: "Login Language",

	server: true

}});
5. Retrieving variable value within the workflow
5.1. Get credential value
5.1.2. Create variable to store the data at runtime (rootData.URL, rootData.username and rootData.password)
Note: Local data declaration can also be used such as sc.localData.credential.user and sc.localData.credential.password


Generated code:

// ----------------------------------------------------------------

//   Step: Get_credential

// ----------------------------------------------------------------

Logon.step({ Get_credential: function(ev, sc, st) {

	var rootData = sc.data;

	ctx.workflow('wf_LaunchApplication', '24ae4149-b225-4d53-afb7-04e0e4367f7c') ;

	// Get credential


	ctx.cryptography.credentials.SystemCredential.get(function(code, label, credential) {

		if (code == e.error.OK) {

			// TODO : set login/password here

			rootData.username = credential.userName.get();

			rootData.password = credential.password.get();


		  ctx.log("Username:" + rootData.username);

			ctx.log("Password:" + rootData.password);

			sc.endStep(); // Start_Logon

			return;

		}

	});

}});
5.2. Get setting value (Text Variable)


// ----------------------------------------------------------------

//   Step: Get_setting

// ----------------------------------------------------------------

Logon.step({ Get_setting: function(ev, sc, st) {

	var rootData = sc.data;

	ctx.workflow('wf_LaunchApplication', '6f806c6c-e08d-45fc-a07d-d7f0f1ac2079') ;

	// Get setting


	ctx.settings.SystemURL.get(function(code, label, setting) {

		if (code == e.error.OK) {

			// get value from setting.value

			rootData.URL = setting.value;


			ctx.log("URL:" + rootData.URL);

			sc.endStep(); // Get_credential

			return;

		}

	});

}});
5.3. Launching URL:

// ----------------------------------------------------------------

//   Step: Start_Logon

// ----------------------------------------------------------------

Logon.step({ Start_Logon: function(ev, sc, st) {

	var rootData = sc.data;

	ctx.workflow('wf_LaunchApplication', '15b60db0-e383-4833-b2b2-931ad8896e15') ;

	// Start 'Logon'

	Logon.navigator = e.navigator.Chrome;

	Logon.start(rootData.URL,null,null,e.launchFlag.ShowMaximized);

	sc.endStep(); // pLogon_management

	return;

}});
Conclusion
Now you should be able to create and store environments, variables and settings, and thus make the configurable scripts or your SAP iRPA project.
