
- SAP Community
- Products and Technology
- Enterprise Resource Planning
- ERP Blogs by SAP
- S/4HANA 1909 FPS1 Fully-Activated Appliance custom...
Enterprise Resource Planning Blogs by SAP
Get insights and updates about cloud ERP and RISE with SAP, SAP S/4HANA and SAP S/4HANA Cloud, and more enterprise management capabilities with SAP blog posts.
Turn on suggestions
Auto-suggest helps you quickly narrow down your search results by suggesting possible matches as you type.
Showing results for
Product and Topic Expert
Options
- Subscribe to RSS Feed
- Mark as New
- Mark as Read
- Bookmark
- Subscribe
- Printer Friendly Page
- Report Inappropriate Content
06-04-2020
3:34 AM
This blog covers installation of (1) SAP S/4HANA server and (2) SAP NW JAVA / ADS server as shown in the graphic below. The installation is based on file restore and is different from the standard installs using SWPM.
Please refer to S/4HANA SQUARE ONE for other blogs
In this blog the procedure is simplified for hostname change and SID change. Also if you want to change instance number the command, screens show where you can change the instance number. This would make sense if your network cannot accommodate the unique hostname and SID. Also if it is a more permanent installation you may like to change SID and hostname.
If you want to do standard installation with no change in hostname and sid please refer to other blog In this blog the procedure is simplified for standard installation with NO HOSTNAME OR SID CHANGE. The advantage with this is that you don't have to do many of the steps related to SID change and it does make sense if you will be installing the instance temporarily.
This blog is based on a fresh installation of SUSE Linux for SAP OS without having any previous SAP instances created and deleted. I did not have to pre install hostagent, etc. There are mount points/links to be setup as shown in the right place in the directory structure. The steps in the guides provided with SAP Note 2041140 could be used as a reference in case there are issues specific to your environment. Just follow the steps below to install both systems shown in red square below:
 Please find below the main note for ordering the appliance:
2041140 - Order an SAP pre-assembled Best Practices software appliance (as partner or customer)
PART1: SOFTWARE DOWNLOAD
Please download the software media from https://launchpad.support.sap.com/#/softwarecenter
SAP S/4HANA => SAP S/4HANA 1909 => S/4HANA FULLY-ACTIVATED APPLIANCE => SAP S/4HANA 1909 FPS01 FA APPL

Download the 51054391_* files and SWPM20SP05_8-80003424.SAR on SAP S/4HANA Server.
Download the 51054392, SWPM10SP28_7-20009701.SAR and 51050829_JAVA_part 1 & 2 - NW 7.5 Java based SW Comp on the SAP NW JAVA / ADS server.
PART2: INSTALL SAP S/4HANA
STEP 1: PREPARE SYSTEM Prepare Linux Server as below for the appliance. The values in Used column below show the minimum size needed. For /sapmnt provide min 30GB, /hana/data space - min 360GB, /hana/log - 35GB. I have used /sapmedia - 161GB temporary separate mount that can be removed later. Also as you see below although you may want to change the database SID, you need to initially mount the filesystem as HDB and then it is shown where to change the mount to any other SID like HDD as an example in this blog.
 TIP: The /sapmedia filesystem could be external mount. To save this space, the files could be downloaded to /hana/data/HDB and deleted as they are being extracted. In this case it would be good to extract dbdata files first.
Plan the change of SID, hostname, instance number. Please refer to the notes below for reserved SIDs SAP Note 1979280 - Reserved SAP System Identifiers (SAPSID) with Software Provisioning Manager and hostnames SAP Note 611361 - Hostnames of SAP ABAP Platform servers
The table below shows standard SID and hostnames and what we are changing it to.

The /etc/hostname and /etc/host file is below. If you are changing hostname for db and sap add the standard and new nostname for DB but for SAP only provide new hostname. Also for J2E include the new hostname only as thi sis on separate instance. The standard hostname can be removed later.

STEP 2: EXTRACT FILES Extract files 51054391_* in /sapmedia
sid-hdd-s4d:/sapmedia# unzip 51054391_1.ZIP

sid-hdd-s4d:/sapmedia# unzip 51054391_2.ZIP

sid-hdd-s4d:/sapmedia# unzip 51054391_3.ZIP

sid-hdd-s4d:/sapmedia# unzip 51054391_4.ZIP
Allow approx 2 hours for extraction.
We will install Central system with DB and App on same server. Please move all *.tgz-* files to /sapmedia/51054391_1/SAPS4HANA1909FPS01SAPHANADB20basedonSAPNetweaverASABAP754_1
cd /sapmedia/51054391_1/SAPS4HANA1909FPS01SAPHANADB20basedonSAPNetweaverASABAP754_1


mv /sapmedia/51054391_?/SAPS4HANA1909FPS01SAPHANADB20basedonSAPNetweaverASABAP754_?/*.tgz-* .
In the next step we will extract the above *.tgz files but please note the directories size is as follows so you can provide ample space:

Please use command below to extract the database related archives:
sid-hdd-s4d:/sapmedia/# cd 51054391_1/SAPS4HANA1909FPS01SAPHANADB20basedonSAPNetweaverASABAP754_1


cat dblog.tgz-* | tar -zpxvf - -C /
 Similarly extract the remaining files:
cat dbexe.tgz-* | tar -zpxvf - -C /


cat dbdata.tgz-* | tar -zpxvf - -C /
It takes about an hour for extraction.
Below two Application related archives may be extracted on a separate app server for distributed installation. These files will be extracted under /sapmnt/S4H and /usr/sap/S4H so if you are changing the SID, then you will have to first extract to SID-S4H and then create links to your own SID like S4D
Then extract the files:


sid-hdd-s4d:/usr/sap #cd 51054391_1/SAPS4HANA1909FPS01SAPHANADB20basedonSAPNetweaverASABAP754_1


cat usrsap.tgz-* | tar -zpxvf - -C /

cat sapmnt.tgz-* | tar -zpxvf - -C /
STEP 3: GET PASSWORDS Download the file below and open the file in Internet Explorer to note passwords:
/sapmedia/51054391_1/SAPS4HANA1909FPS01SAPHANADB20basedonSAPNetweaverASABAP754_1/SAP_Software_Appliance.xml

STEP 4: REGISTER DATABASE Please note that although we want to rename database SID from HDB to HDD we need to execute the below command to have the system and id's registered as HDB first.
Execute HANA database specific steps as below:
sid-hdd-s4d: #/hana/shared/HDB/hdblcm/hdblcm --action=register_rename_system
TIP: Places where you need to enter data is indicated, rest all are default options


This should bring up the database processes as below
sid-hdd-s4d: #/usr/sap/hostctrl/exe/sapcontrol -nr 02 -function GetProcessList

STEP 5: RENAME DATABASE HOST Specify the new database hostname as per below:
sid-hdd-s4d: #/hana/shared/HDB/hdblcm/hdblcm --action=rename_system --hostmap=vhcalhdbdb=vhcalhdddb
STEP 6: RENAME MOUNT POINTS First shutdown hana database and host agent.
sid-hdd-s4d:/install # /usr/sap/hostctrl/exe/sapcontrol -nr 02 -function StopSystem


sid-hdd-s4d:/install # /usr/sap/hostctrl/exe/sapcontrol -nr 02 -function StopService
You can take a full OS backup at this point and rename mount points /hana/shared/HDD; /hana/data/HDD; /hana/log/HDD; /sapmnt/S4D; /usr/sap/S4D. The old standard mount points do not have to exist. You can remove the db old hostname vhcalhdbdb and also reboot the system to ensure consistency in config. After reboot ensure all new renamed mount points are valid.
IMPORTANT: Do not rename /hana/shared/HDD/HDB02.
Then execute the command for database SID rename:
sid-hdd-s4d: # cd /hana/shared/HDD/hdblcmsid-hdd-s4d: /hana/shared/HDD/hdblcm # ./hdblcm --action=register_rename_system
You can also rename the instance number with the command below:
sid-hdd-s4d: #/hana/shared/HDD/hdblcm/hdblcm --action=rename_system --number=<new instance number>


TIP: At this point it is necessary to install the HANA database license as the database will be started in restricted mode.
STEP 5: EXTRACT SWPM Extract SWPM in folder /install. Use the SAPCAR already available to extract.
sid-hdd-s4d:/install #/sapmnt/S4D/exe/uc/linuxx86_64/SAPCAR -xvf /sapmedia/SWPM20SP05_8-80003424.SAR
STEP 6: RENAME SAP SYSTEM Rename instance using sapinst
sid-hdd-s4d:/install # ./sapinst SAPINST_USE_HOSTNAME=vhcals4dci SAPINST_ACCEPT_INTERNAL_SIGNATURE=true SAPINST_SLP_MODE=falseCopy below URL into chrome browser to start sapinst rename process:
https://sid-hdd-s4d.dummy.nodomain:4237/sapinst/docs/index.html
In SAPINST select System Rename => Standard System => SAP System Rename
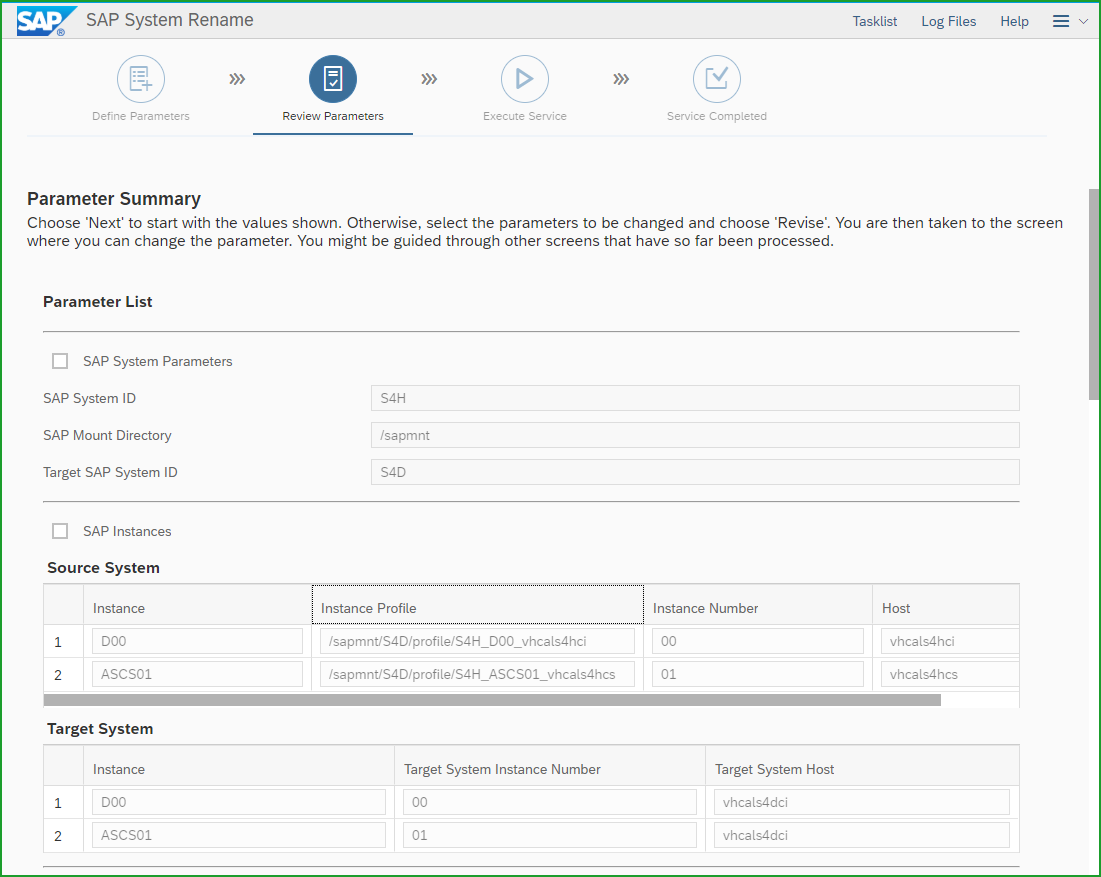
At screen SAP System Parameters enter Source System S4H and Target System S4D:
Click on Next. 
At the screen Prerequisite Checker Results accept or fix the Prerequisite check results.
Click on Next. No if you dont want to repeat the test
At the screen SAP Instance Parameters accept or change the Target System Instance Numbers.
Click on Next. 
At the screen SAP HANA Database Connectivity enter Instance Number 02 and Password Welcome99. Click on Next.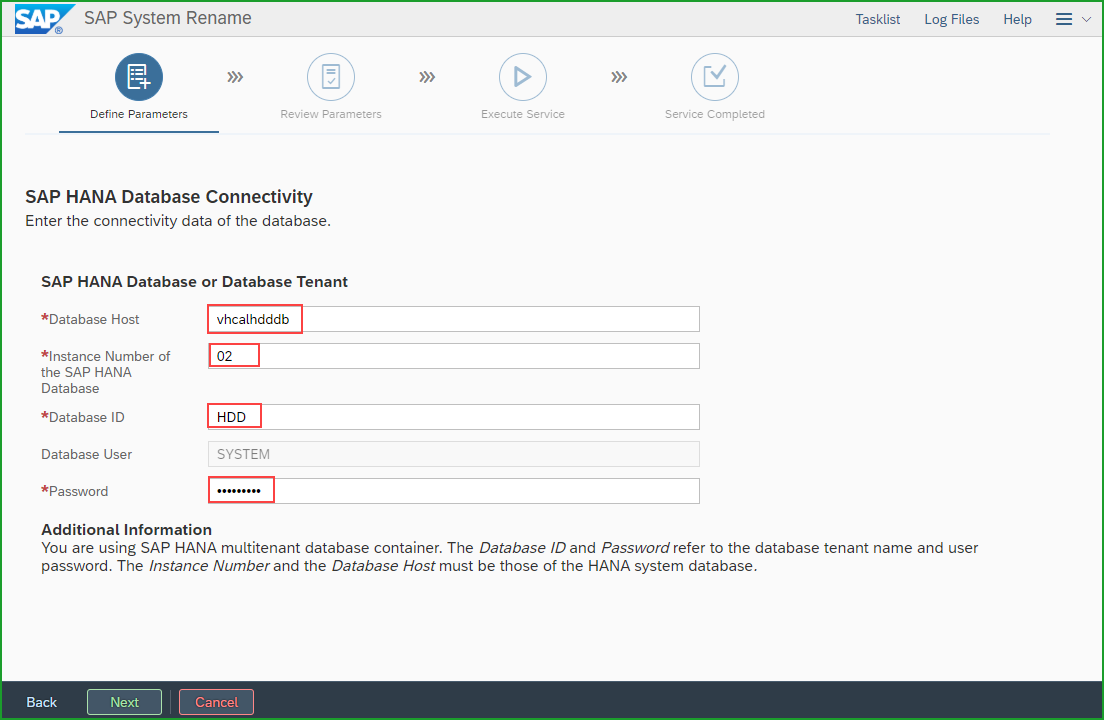
If you don't install HANA DB license you will get error below. Install license using HANA Studio and continue. License is required if there is a database SID change..
At the screen SAP HANA Database Parameter you can change Schema User , DBACOCKPIT and SYSTEM password. Please note it is also optional to change the schema user SAPHANADB password along with DBACOCKPIT and SYSTEM users.
At the screen Database Schema accept schema SAPHANADB password and confirm Schema password Xxxxxxxn click on Next.
At the screen Rename Tenant Database click on Next
At the screen Secure Storage for Database Connection select HANA Secure User tore (hdbuserstore) click on Next

At the screen Operating System Users accept master password or enter password Xxxxxxxn
At the screen Secure Storage Key Generation accept radio button – Individual Key (Recommended for Productive Systems) On the Next
At next screen Warning click OK
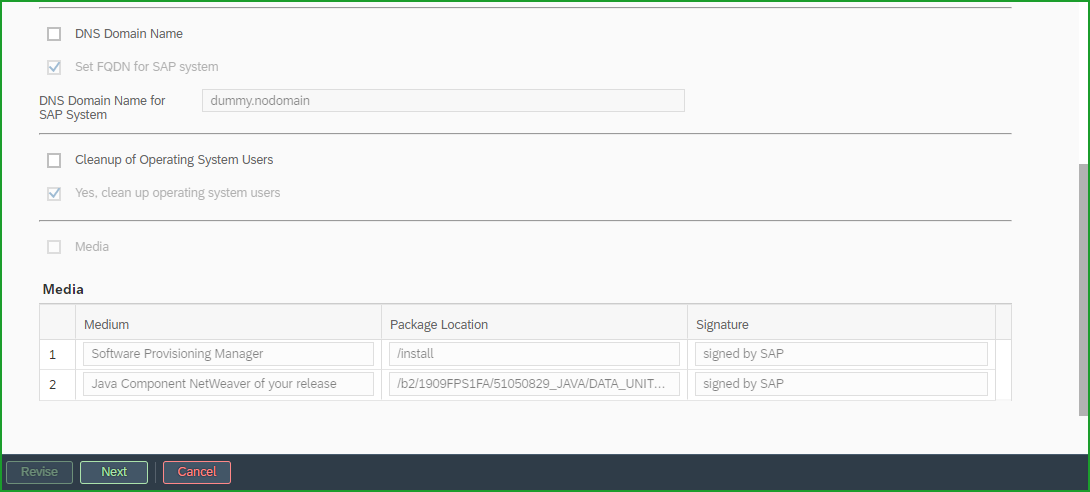
At the screen DNS Domain Name checkmark Set FQDN for SAP System and enter domain name dummy.nodomain Click on Next
At the screen Install License Key keep unchecked Install License Key. Click on Next
TIP: It is much easier to install the license by providing the file than doing it later through the appolication.
At next screen Cleanup of Operating System Users checkmark on Yes cleanup os users and click on Next
Here is the Parameter Summary Click on Next to confirm and begin the installation.

 TIP: In case you get this ERROR:

RESOLUTION: Follow SAP Note 2800204 - SSFX-0362: Value file "-" does not start with the UTF-8 byte order mark
Ensure the environment variable LC_CTYPE of the user running sapinst is set as LC_CTYPE=en_US.
Stop the current sapinst and restart it. Continue with the existing option.
You may get message below for rename of profile parameter.
 After sapinst process is finished you can manually start the SAP instance S4D
sid-hdd-s4d:/install # /usr/sap/hostctrl/exe/sapcontrol -nr 01 -function StartSystem ALL

sid-hdd-s4d:/install # /usr/sap/hostctrl/exe/sapcontrol -nr 00 -function StartSystem ALL
After instance is started and confirmed you can delete the sapmedia folder and remove temporary links to S4H as well as temporary hostnames.
Standard users are as follows:
HANA DB – Instance 02 SYSTEM /<Master Password> or as you changed in above
Web Dispatcher access : bpinst/Welcome1
STEP 7: POST STEPS Follow steps from guide attached to SAP Note 2041140 - First Steps for on-premise installations.pdf => Section 5 Technical Post-deployment Activities
Adapt HANA connections in DBACOCKPIT (nothing was required to be done here).
Host name / port in table HTTPURLLOC using tcode httpurlloc
Adapt RFC Connections
ABAP connections:
• LOCAL_RFC
• S4DCLNT100, S4DCLNT200, S4DCLNT400
• S4D_RFC
HTTP connections:
• ADS (pointing to the JAVA server after PART3: INSTALL SAP NW JAVA /ADS)
• LOCAL_HTTP
• LOCAL_HTTPS
• S4FIN_HTTPS
SAP Enable Now Web Assistant enter tCode /UI2/FLP_CUS_CONF

Adapt the Fiori notification URL. enter tCode /UI2/FLP_SYS_CONF

Adapt Enterprise Search
Apply product license keys
Install software product license key: Technical restrictions may apply if you don’t install the license. Use the link to obtain license key.
HANA DB license key can be installed via HANA Studio (Preferences -> License)
In SAP S/4HANA 1909 the license key is installed via SAP logon tCode SLICENSE
Further post-installation checks
Install SAP client tools on your local computers
You can take a full backup and remove the temporary links that were setup for S4H
In client 000 fix transport configuration. Enter tCode SE06 and reinstall CTS transport system, Change originals to S4D, Delete old TMS config, delete old versions of transport routes
Adapt any SAP parameters due to changed SID
The database should be with log mode overwrite and you may like to change that as needed.Please carry out the the other basis steps that are usually done with SID change/System refresh :
SPAD - Spool Administration
SCC4 - Client Administration - Logical System
RZ10- Instance profiles
SP01 - Spool delete old spool requests
PART3: INSTALL SAP NW JAVA / ADS
STEP 1: PREPARE SYSTEM Prepare Linux Server as below for the appliance. The values in Used column below show the minimum size needed. Total filesystem needed is min 50GB for installation.

Plan the change of SID, hostname, instance number. Please refer to the notes below for reserved SIDs SAP Note 1979280 – Reserved SAP System Identifiers (SAPSID) with Software Provisioning Manager and hostnames SAP Note 611361 – Hostnames of SAP ABAP Platform servers
The table below shows standard SID and hostnames and what we are changing it to.
The /etc/hostname and /etc/host file is below:

STEP 2: EXTRACT FILES Extract files 51054392.ZIP in /sapmedia
sid-j2d:/sapmedia# unzip 51054391.ZIPWe will install Java instance from files in /sapmedia/51054392/SAPNetWeaver750SP16ASJAVAwithAdobeDocumentServices_1
cd /sapmedia/51054392/SAPNetWeaver750SP16ASJAVAwithAdobeDocumentServices_1
In the next step we will extract the above *.tgz files but please note the directories size is as follows so you can provide ample space:

These files will be extracted under /sapmnt/J2E; /usr/sap/J2E and /sybase/J2E. After these are extracted you can rename the filesystem or remount with changed mount points.
sid-j2d:/sapmedia# cat dblog.tgz-*  | tar -zpxvf - -C /

sid-j2d:/sapmedia# cat dbexe.tgz-*  | tar -zpxvf - -C /


sid-j2d:/sapmedia# cat dbdata.tgz-* | tar -zpxvf - -C /

sid-j2d:/sapmedia# cat sapmnt.tgz-* | tar -zpxvf - -C /


sid-j2d:/sapmedia# cat usrsap.tgz-* | tar -zpxvf - -C /
STEP 3: GET PASSWORDS Download the file below and open the file in Internet Explorer to note passwords:
/sapmedia/51054392/SAPNetWeaver750SP16ASJAVAwithAdobeDocumentServices_1/SAP_Software_Appliance.xml

STEP 4: RENAME MOUNT POINTS You can take a full OS backup at this point and rename mount points or directories to /sybase/J2D; /sapmnt/J2D; /usr/sap/J2D. The old standard mount points do not have to exist. After reboot ensure all new renamed mount points are valid.
STEP 5 EXTRACT SWPM Extract SWPM in folder /install. Use the SAPCAR already available to extract.
sid-j2d:/install #/sapmnt/J2D/exe/uc/linuxx86_64/SAPCAR -xvf /sapmedia/SWPM10SP28_7-20009701.SAR
STEP 6 RENAME SAP SYSTEM Rename instance using sapinst
sid-j2d:/install # ./sapinst SAPINST_USE_HOSTNAME=vhcalj2dci SAPINST_ACCEPT_INTERNAL_SIGNATURE=true SAPINST_SLP_MODE=falseCopy below URL into chrome browser to start sapinst rename process:
https://sid-j2d.dummy.nodomain:4237/sapinst/docs/index.html
In SAPINST select System Rename => Standard System => SAP System Rename

At the screen Software Integrity click on Next
At screen SAP System Parameters enter Source System J2E and Target System J2D:
Click on Next.

At the screen Prerequisite Checker Results accept or fix the Prerequisite check results.
Click on Next. No if you dont want to repeat the test
At the screen SAP Instance Parameters accept or change the Target System Instance Numbers.
Click on Next.
 At the screen Operating System Users accept master password or enter password Xxxxxxxn
At the screen Operating System User for SAP Database Administrator enter the password for sybj2d and User ID and Click on Next
At the screen SAP ASE Database System Parameters accept or change ports and Click on Next
 At the screen Database User Pasawords enter the passwords for user sa, sapsa, sapsso, SAPSR3DB which is Welcome99. Click on Next
At the screen DNS Domain Name checkmark Set FQDN for SAP System and enter domain name dummy.nodomain Click on Next
At the screen Media Browser select the media Package Location and Click on Next
At next screen Cleanup of Operating System Users checkmark on Yes cleanup os users and click on Next
Here is the Parameter Summary Click on Next to confirm and begin the installation.


![]()
After about 10mins, the installation process will stop at this point.

Please take note and proceed.
After the sapinst installation is complete, you can manually start/stop the SAP Java instance J2D using old startsap / stopsap commands
sid-j2d:/install # su - j2dadm

sid-j2d:j2dadm > startsap
To access JAVA server as SAP Netweaver Adminstrator the URL is:
https://sid-j2d.dummy.nodomain:50000/nwa
Standard users are as follows:
JAVA Administrator – Adminitstrator / <Master Password> ;
Java user BPINST/Welcome1
STEP 7: POST STEPS Follow steps from guide attached to SAP Note 2041140 - First Steps for on-premise installations.pdf - Section 5 Technical Post-deployment Activities
Apply product license keys
Install software product license key: Technical restrictions may apply if you don’t install the license. Use the link to obtain license key. SAPNetweaver 7.5 J2EE license key has to be installed via SAP Netweaver Administrator
Further post-installation checks
Adapt any SAP parameters due to changed SID
After instance is started and confirmed you can delete the sapmedia folder.
SUPPORT TICKETS:
If you have any difficulty downloading the media open OSS message using component XX-SER-SAPSMP-SWC. If you have issues with technical deployment open message with component BC-INS-SRN.
OTHER REFERENCES:
SAP S/4HANA Fully-Activated Appliance: Create your SAP S/4HANA system in a fraction of the usual set...
SAP S/4HANA 1909 Fully Activated Appliance: Known Issues
Blog with known issues in the SAP S/4HANA 1809 appliances (constantly updated)
SAP S/4HANA Fully-Activated Appliance: Demo Guides
2041140 - Order an SAP pre-assembled Best Practices software appliance (as partner or customer)
Thank you. Hope you enjoyed the installation.
Mahesh Sardesai
Product Expert – S/4HANA

- SAP Managed Tags:
- SAP Cloud Appliance Library,
- SAP S/4HANA
Labels:
23 Comments
You must be a registered user to add a comment. If you've already registered, sign in. Otherwise, register and sign in.
Labels in this area
-
Artificial Intelligence (AI)
1 -
Business Trends
363 -
Business Trends
21 -
Customer COE Basics and Fundamentals
1 -
Digital Transformation with Cloud ERP (DT)
1 -
Event Information
461 -
Event Information
23 -
Expert Insights
114 -
Expert Insights
151 -
General
1 -
Governance and Organization
1 -
Introduction
1 -
Life at SAP
415 -
Life at SAP
2 -
Product Updates
4,685 -
Product Updates
205 -
Roadmap and Strategy
1 -
Technology Updates
1,502 -
Technology Updates
85
Related Content
- S/4 HANA appliance activation in Enterprise Resource Planning Q&A
- FP2402 New Installation in Enterprise Resource Planning Q&A
- Quick Start guide for PLM system integration 3.0 Implementation/Installation in Enterprise Resource Planning Blogs by SAP
- Leased assets in Enterprise Resource Planning Q&A
- SAP ERP Functionality for EDI Processing: UoMs Determination for Inbound Orders in Enterprise Resource Planning Blogs by Members
Top kudoed authors
| User | Count |
|---|---|
| 5 | |
| 4 | |
| 4 | |
| 3 | |
| 3 | |
| 3 | |
| 2 | |
| 2 | |
| 2 | |
| 2 |