
- SAP Community
- Products and Technology
- Technology
- Technology Blogs by SAP
- UI Data Protection - Report Generation and Masking...
Technology Blogs by SAP
Learn how to extend and personalize SAP applications. Follow the SAP technology blog for insights into SAP BTP, ABAP, SAP Analytics Cloud, SAP HANA, and more.
Turn on suggestions
Auto-suggest helps you quickly narrow down your search results by suggesting possible matches as you type.
Showing results for
Advisor
Options
- Subscribe to RSS Feed
- Mark as New
- Mark as Read
- Bookmark
- Subscribe
- Printer Friendly Page
- Report Inappropriate Content
05-23-2020
12:03 PM
Introduction
Quick Viewer (SQVI) is a Report Generation tool. It has been designed for users with little or no knowledge of ABAP. It generates simple reports as per business need, without the need for any ABAP coding. It is quick and easy to use tool for quick collection of data from S/4HANA system.
Objective
In this blog post, we will learn the process of creating a custom report using Quick Viewer (SQVI) and apply masking in query output.
Creating Custom Report
After logging into SAP System, enter transaction SQVI.

Enter Report Name as "YEMPLIST" in the Quick View field and click on "Create" button

Enter "Title" as "Employee List", select "Data Source" as "Table join", Choose mode as "Basis Mode" - To create list directly without design or "Layout Mode" - To design list, and click on "Continue".

Click on "Insert Table" (Shift+F1)

Enter Table name as PA0000 and click on "Continue"

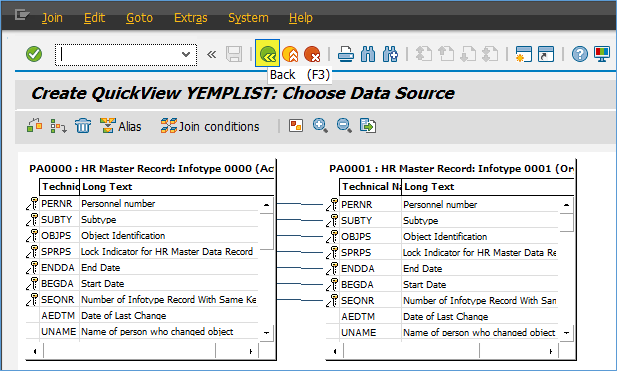
Again click on "Insert Table" (Shift+F1) and enter Table name as "PA0001" which is to be linked to previous table "PA0000".

SAP automatically proposes joins based on data type of the field. Join condition is represented as horizontal line connecting the fields of the database tables.

Once completed all table linking then click on "Back" button.
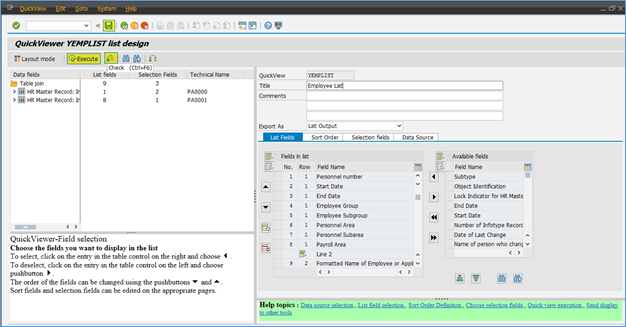
Now expand the table which is showing left side.
There are two columns - "List Fields" and "Selection Fields".
Selection Fields means in selection screen what fields required. These fields will be displayed in input selection screen.
List Fields means output format.

Here, we have selected following fields as "Selection Fields" which will be used as selection parameter -
PA0000-STAT2
PA0000-ENDDA
PA0001-ABKRS

and following fields as "List Fields" which will be displayed as output when the report will be executed -
PA0000-PERNR
PA0001-ENDDA
PA0001-BEGDA
PA0001-WERKS
PA0001-PERSG
PA0001-PERSK
PA0001-BTRTL
PA0001-ABKRS
PA0001-ENAME

If you want a field as Input and Output both, then select both the check-boxes.
Once selection is complete, check the consistency by clicking on "Check" (Ctrl+F6) and save the query.
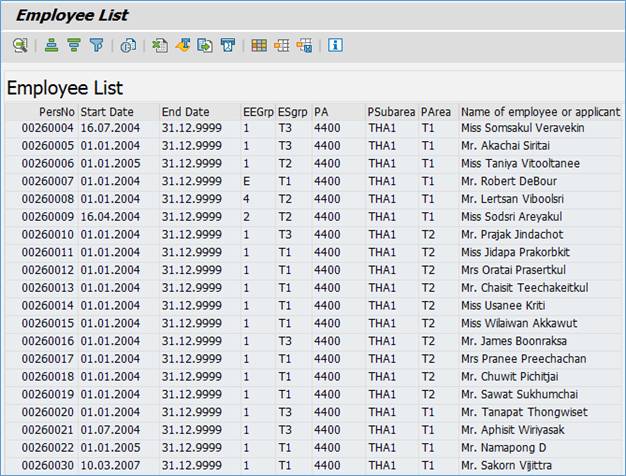
Click on "Execute" (F8) in order to execute the query.
Provide input parameters in selection and click on "Execute" (F8).

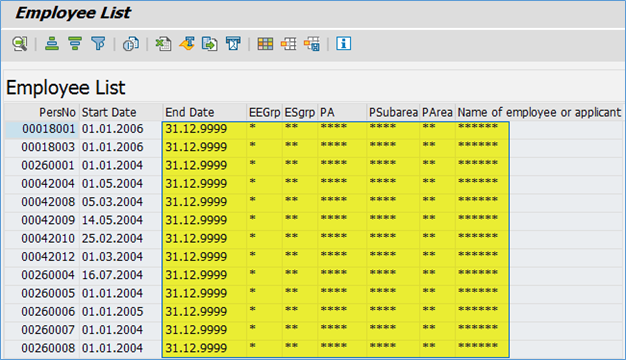
Report Output will be displayed as:
Converting Quick Views to T-Code
Click on menu "System", click on option "Status" and copy "Program Name".

Execute transaction "SE93"
Enter "Transaction Code" as "YHR_EMPLY" and Click on "Create" button

Enter "Short Text" as "Employee List"
Select option "Program and selection screen (report transaction)"
Click on "Continue" button

Paste the copied program name in "Program Name" field and click on "Save" button

Specify the "Package Name" or flag it as a Local Object and click on "Save" button.


Now, we can use T-Code "YHR_EMPLY" for executing this report.
Masking Configuration in SQVI
Now, we will configure masking for Employee Group, Employee Subgroup, Personnel Area, Personnel Subarea, Payroll Area, and Name of Employee fields.
A PFCG Role will be used for the authorization check which will allow users with the specified role to view the field value. If a user does not have this role, it means the user is not authorized and data will be protected either through masking, clearing, or disabling the field.
Prerequisite
Product “UI data protection masking for SAP S/4HANA” is used in this scenario to protect sensitive data at field level and must be installed in the S/4HANA system.
The product is a cross-application product which can be used to mask/protect any field in SAP GUI, SAPUI5/SAP Fiori, CRM Web Client UI, and Web Dynpro ABAP.
Configuration to achieve masking
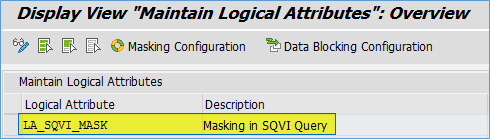
Logical Attribute is a functional modelling of how any attribute such as Social Security Number, Bank Account Number, Amounts, Pricing information, Quantity etc. should behave with masking.
Configure Logical Attribute
Follow the given path:
SPRO -> SAP NetWeaver -> UI Data Protection Masking for SAP S/4HANA -> Maintain Metadata Configuration -> Maintain Logical Attributes
Masking in SQVI Query
Maintain Technical Address
In this step, we will associate the Technical Address of the fields to be masked with the Logical Attributes.
Follow the given path:
SPRO -> SAP NetWeaver -> UI Data Protection Masking for SAP S/4HANA -> Maintain Metadata Configuration -> Maintain Technical Address
Follow below mentioned steps:
Under “GUI Table Field Mapping”, maintain technical address for following fields.

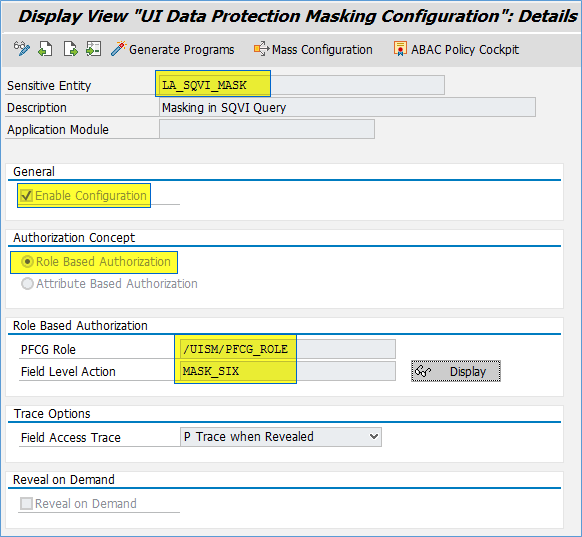
Maintain Field Level Security and Masking Configuration
Here, we will define how masking will behave with the logical attribute that we created in above step.
Follow the given path:
SPRO -> SAP NetWeaver -> UI Data Protection Masking for SAP S/4HANA -> Data Protection Configuration -> Maintain Field Level Security and Masking Configuration
Follow below mentioned steps:
- Click on “New Entries” button
- Enter “Sensitive Entity” as “LA_SQVI_MASK” and press “Enter” key. “Description” and “Application Module” will get populated in corresponding fields
- Check “Enable Configuration” check-box
- Select “Role Based Authorization” option
- Enter “PFCG Role” as “/UISM/PFCG_ROLE“. In this example, we have used a blank role “/UISM/PFCG_ROLE”. Customers can use any role as per their requirement.
- Enter “Field Level Action” as “MASK_SIX”
- Click on “Save” button
Result

Conclusion
In this blog post, we have learnt the process of creating a custom report using Quick Viewer (SQVI) and apply masking in query output.
Labels:
You must be a registered user to add a comment. If you've already registered, sign in. Otherwise, register and sign in.
Labels in this area
-
ABAP CDS Views - CDC (Change Data Capture)
2 -
AI
1 -
Analyze Workload Data
1 -
BTP
1 -
Business and IT Integration
2 -
Business application stu
1 -
Business Technology Platform
1 -
Business Trends
1,661 -
Business Trends
88 -
CAP
1 -
cf
1 -
Cloud Foundry
1 -
Confluent
1 -
Customer COE Basics and Fundamentals
1 -
Customer COE Latest and Greatest
3 -
Customer Data Browser app
1 -
Data Analysis Tool
1 -
data migration
1 -
data transfer
1 -
Datasphere
2 -
Event Information
1,400 -
Event Information
65 -
Expert
1 -
Expert Insights
178 -
Expert Insights
280 -
General
1 -
Google cloud
1 -
Google Next'24
1 -
Kafka
1 -
Life at SAP
784 -
Life at SAP
11 -
Migrate your Data App
1 -
MTA
1 -
Network Performance Analysis
1 -
NodeJS
1 -
PDF
1 -
POC
1 -
Product Updates
4,577 -
Product Updates
330 -
Replication Flow
1 -
RisewithSAP
1 -
SAP BTP
1 -
SAP BTP Cloud Foundry
1 -
SAP Cloud ALM
1 -
SAP Cloud Application Programming Model
1 -
SAP Datasphere
2 -
SAP S4HANA Cloud
1 -
SAP S4HANA Migration Cockpit
1 -
Technology Updates
6,886 -
Technology Updates
408 -
Workload Fluctuations
1
Related Content
- SAP HANA Cloud Vector Engine: Quick FAQ Reference in Technology Blogs by SAP
- CAP LLM Plugin – Empowering Developers for rapid Gen AI-CAP App Development in Technology Blogs by SAP
- Trustable AI thanks to - SAP AI Core & SAP HANA Cloud & SAP S/4HANA & Enterprise Blockchain 🚀 in Technology Blogs by Members
- SAP Datasphere - Space, Data Integration, and Data Modeling Best Practices in Technology Blogs by SAP
- Deliver Real-World Results with SAP Business AI: Q4 2023 & Q1 2024 Release Highlights in Technology Blogs by SAP
Top kudoed authors
| User | Count |
|---|---|
| 13 | |
| 11 | |
| 10 | |
| 9 | |
| 9 | |
| 7 | |
| 6 | |
| 5 | |
| 5 | |
| 5 |