
- SAP Community
- Products and Technology
- Technology
- Technology Blogs by SAP
- SAP Intelligent Robotic Process Automation & SAP C...
Technology Blogs by SAP
Learn how to extend and personalize SAP applications. Follow the SAP technology blog for insights into SAP BTP, ABAP, SAP Analytics Cloud, SAP HANA, and more.
Turn on suggestions
Auto-suggest helps you quickly narrow down your search results by suggesting possible matches as you type.
Showing results for
Product and Topic Expert
Options
- Subscribe to RSS Feed
- Mark as New
- Mark as Read
- Bookmark
- Subscribe
- Printer Friendly Page
- Report Inappropriate Content
05-22-2020
2:00 AM
Introduction:
I have used SAP Intelligent Robotic process automation to create a record which automates a SAP UI5 Application. This is same app which was built in the previous step using SAP Cloud Application Programming Model. This app is running on LOCALHOST on my desktop and wanted to see SAP Intelligent Robotic Process Automation bot in action which will help to automate the tasks.
Index for Development Details:
Introduction, Prototype briefing, Details of Technical Implementation of SAP Intelligent Robotic Process Automation, SAP HANA Graph on ABAP Platform for SAP S/4HANA 1909 and SAP Conversational AI are mentioned in the following Blog Posts.
Index for Development Details:
Details of Technical Implementation of SAP Intelligent Robotic Process Automation, SAP HANA Graph on ABAP Platform for SAP S/4HANA 1909 and SAP Conversational AI are mentioned in the following Blog Posts.
I will update the below index with the blog post links, once they are published.
Blog Post 1: https://blogs.sap.com/2020/05/21/sap-intelligent-robotic-process-automation-sap-conversational-ai-sa...
Section 0: Introduction and Prototype briefing
Section 1: Building SAP UI5 application using SAP Cloud Application Programming Model
Section 2: Adding SAP Conversational AI Chatbot to the SAP UI5 Application
In this Blog Post 2:
Section 3: Building a SAP Intelligent Robotic Process Automation Project and Debug
Section 4: Deploying SAP Intelligent Robotic Process Automation Project on Cloud and Execute
Blog Post 3: https://blogs.sap.com/2020/05/26/sap-conversational-ai-sap-hana-graph-sap-cloud-platform-odata-provi...
Section 5: Exploring SAP HANA Graph, built using CDS and AMDP
Section 6: SAP Cloud Platform OData Provisioning
Blog Post 4: https://blogs.sap.com/2020/05/26/sap-sap-intelligent-robotic-process-automation-sap-conversational-a...
Section 7: Triggering SAP Intelligent Robotic Process Automation bot using SAP Conversation AI Chatbot
Section 8: Reading data from SAP S/4HANA on-premise systems using SAP Conversation AI Chatbot
Section 9: Integrating SAP Conversation AI Chatbot to Amazon Alexa
Section 10: Output
Section 3: Building a SAP Intelligent Robotic Process Automation Project and Debug
Steps to perform on Desktop Studio:
There are 3 sections:
Highlighted blocks are important for every Page and UI element that we need to capture.
Double Click on field and associate the selected item, choose criteria.
2. Workflow: Create a workflow
Create workflow, add “start application” drag and drop the pages.
Link the pages like the way it needs to be executed.
Make sure to define fields for your Context.
Next Step:
Double Click on “Start Application” – Assign and Application.
Next Step:
Select the page, the button which needs to be clicked.
Assign required activities.
Next Step:
Select the Second page, select the input fields and use SET activity and for button its CLICK activity.
Next Step:
Go to workflow, Double click on workflow, go to properties, define Input/Output.
3. Scripts:
The following code will help, if the bot needs to be executed in Chrome.
“MainPage” will be the name of the captured page above XXXX.start();
Next Step:
The following code is where I have added, so that these values can be filled in Debug Mode.
Next Step:
Final Check: Check whether everything is in Green and click on BUILD.
Debugging:
Shut down the Remote Agent.
Select DEBUG option in Desktop studio.
Click on the “Test” to start debugging
Last step: Go to FILE, export PROJECT.
Section 4: Deploying SAP Intelligent Robotic Process Automation Project on Cloud and Execute:
I have imported the Project to SAP Intelligent Robotic Process Automation Factory
Go to SAP Cloud Platform, Go to Subscriptions, Choose SAP Intelligent Robotic Process Automation, Go to Application
All the highlighted steps needs to be done.
First, Click on Projects-> New Project.
Import the project which was exported to the Desktop from the Studio.
Once the project is imported, Cross check the Highlighted Blocks. Specially the I/O.
If the INPUTS are blank, then go back to the Desktop Studio and assign Inputs/Outputs.
If all good, Save and Generate Package.
Next Step:
Once the Package is generated, Go to the Packages Tab:
We can check the package build version and Remote Agent Version. Please refer to standard documentation for compatibility chart.
Next Step:
Go to the AGENT Tab -> AGENT GROUPS -> New Agent Group
Give a “NAME” and click “ADD NODE”.
Give your HOSTNAME, if you don’t know your laptop hostname.
Go to COMMAND PROMPT, type “hostname”, fill the hostname.
Check SAP Standard Documentation for creating AGENTS. Copied from Standard Documentation.
Few Important Observations:
If the Remote Agent is in PAUSED STATE (even after trigger the bot and REMOTE AGENT is not executing the JOB). It might happen that Remote Agent will be in PAUSED STATE when IDLE, but will change the status when the job is scheduled.
If Agent Groups are wrong, REMOTE AGENT will be in PAUSED STATE. Also make sure that the REMOTE AGENT is “BACKGROUND – UNATTENDED”.
Next Step:
Go to the Next tab: Environments:
Click on New Environment and add AGENT.
Assign the AGENT which was created.
Go to the Packages, select the package that was generated and Deploy.
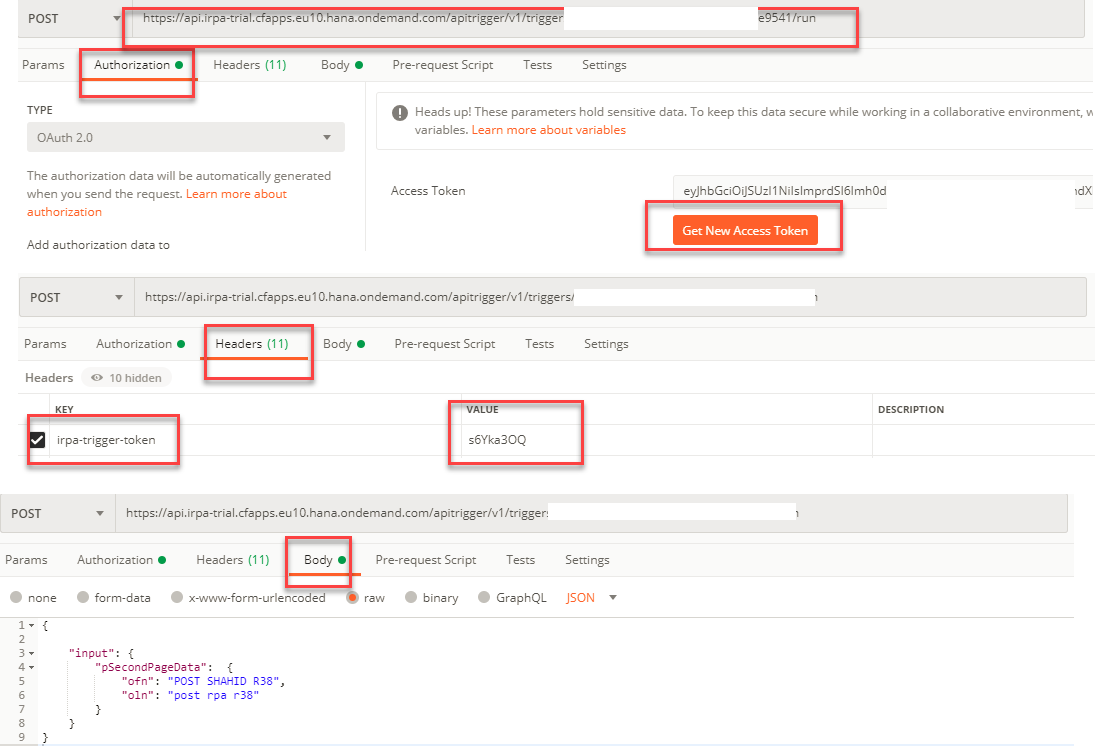
Click on triggers, I have created an API trigger.
Next Step:
Refer to SAP Documentation for trigger this API via POSTMAN.
https://help.sap.com/viewer/c836fab4182e45548b6c6c6d0d0a9146/Cloud/en-US/347ba172a8e64f1c8544f460264...
Result:
Next Step: Verify status of the Jobs
Go to SAP Intelligent Robotic Process Automation Factory >> Go to Monitoring Tab
Result: Record Created
Conclusion:
This is just my first impression; this opens up a lot of possibilities in automating the regular tasks. SAP Intelligent Robotic Process Automation can capture SAP GUI, SAP UI5, load data from excel. There are few other options which I haven’t explored. They can be easily integrated with SAP Conversation AI. This is more like bot talking to another bot, SAP Intelligent Robotic Process Automation bot can trigger other jobs. This can enable to automate and orchestrate a series of jobs.
I have used SAP Intelligent Robotic process automation to create a record which automates a SAP UI5 Application. This is same app which was built in the previous step using SAP Cloud Application Programming Model. This app is running on LOCALHOST on my desktop and wanted to see SAP Intelligent Robotic Process Automation bot in action which will help to automate the tasks.
Index for Development Details:
Introduction, Prototype briefing, Details of Technical Implementation of SAP Intelligent Robotic Process Automation, SAP HANA Graph on ABAP Platform for SAP S/4HANA 1909 and SAP Conversational AI are mentioned in the following Blog Posts.
Index for Development Details:
Details of Technical Implementation of SAP Intelligent Robotic Process Automation, SAP HANA Graph on ABAP Platform for SAP S/4HANA 1909 and SAP Conversational AI are mentioned in the following Blog Posts.
I will update the below index with the blog post links, once they are published.
Blog Post 1: https://blogs.sap.com/2020/05/21/sap-intelligent-robotic-process-automation-sap-conversational-ai-sa...
Section 0: Introduction and Prototype briefing
Section 1: Building SAP UI5 application using SAP Cloud Application Programming Model
Section 2: Adding SAP Conversational AI Chatbot to the SAP UI5 Application
In this Blog Post 2:
Section 3: Building a SAP Intelligent Robotic Process Automation Project and Debug
Section 4: Deploying SAP Intelligent Robotic Process Automation Project on Cloud and Execute
Blog Post 3: https://blogs.sap.com/2020/05/26/sap-conversational-ai-sap-hana-graph-sap-cloud-platform-odata-provi...
Section 5: Exploring SAP HANA Graph, built using CDS and AMDP
Section 6: SAP Cloud Platform OData Provisioning
Blog Post 4: https://blogs.sap.com/2020/05/26/sap-sap-intelligent-robotic-process-automation-sap-conversational-a...
Section 7: Triggering SAP Intelligent Robotic Process Automation bot using SAP Conversation AI Chatbot
Section 8: Reading data from SAP S/4HANA on-premise systems using SAP Conversation AI Chatbot
Section 9: Integrating SAP Conversation AI Chatbot to Amazon Alexa
Section 10: Output
Section 3: Building a SAP Intelligent Robotic Process Automation Project and Debug
- Prerequisite: Subscribe to SAP Intelligent Robotic Process Automation service in SAP Cloud Platform. Please refer to the link mentioned in “references” section. A detail Blog Post for enabling SAP Intelligent Robotic Process Automation by Vijay Sharma.
- Open SAP Intelligent Robotic Process Automation Desktop Studio, create a “Project” and add “Application”
- A pop-up will be opened, I have captured both the pages of my application. Refer to the highlighted UI elements from the screenshot above.
Steps to perform on Desktop Studio:
There are 3 sections:
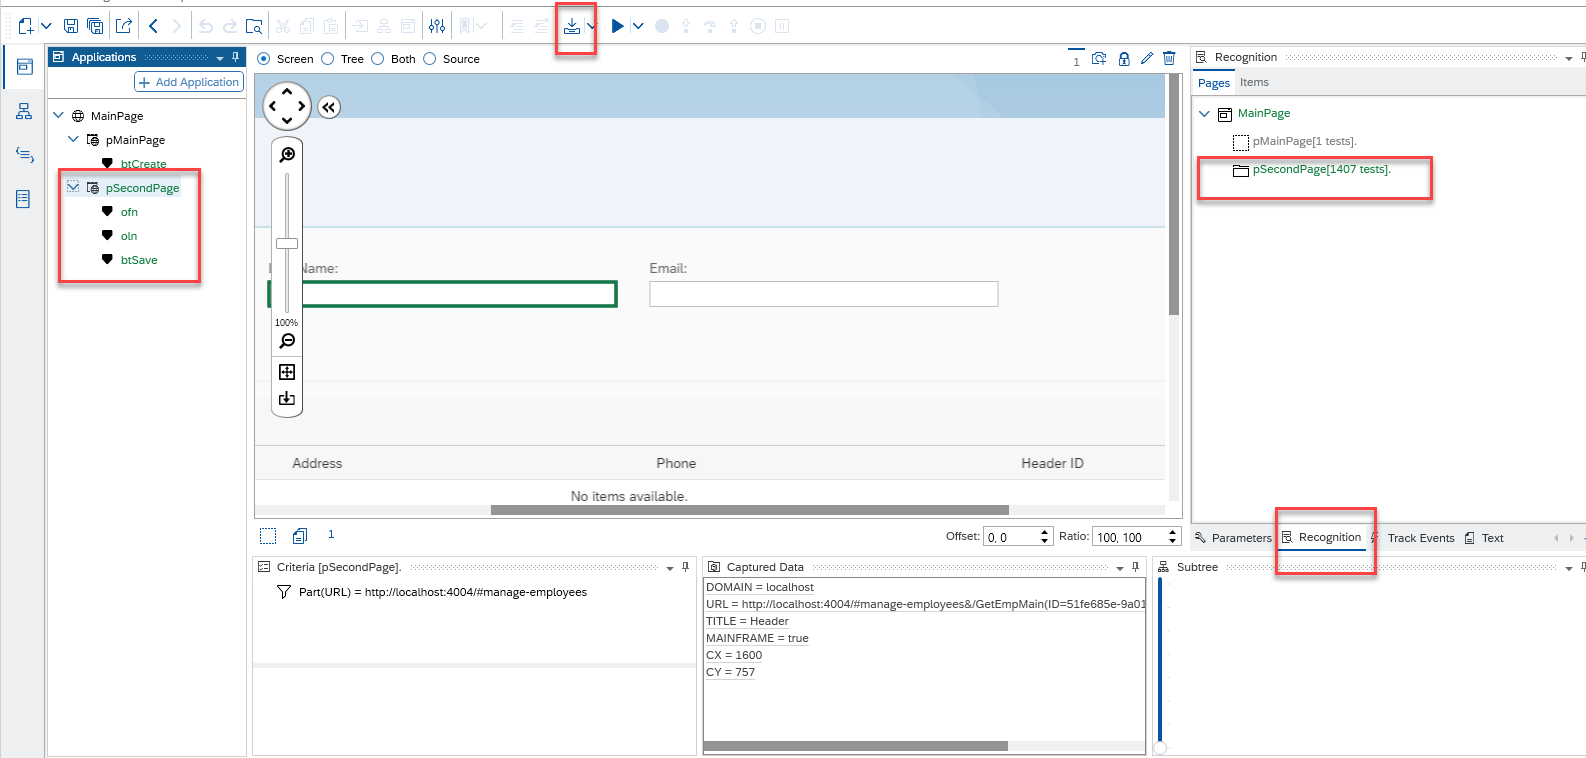
- Applications: Here we need to capture the capture the Page/UI elements.


Highlighted blocks are important for every Page and UI element that we need to capture.
Double Click on field and associate the selected item, choose criteria.
2. Workflow: Create a workflow

Create workflow, add “start application” drag and drop the pages.
Link the pages like the way it needs to be executed.
Make sure to define fields for your Context.
Next Step:

Double Click on “Start Application” – Assign and Application.
Next Step:
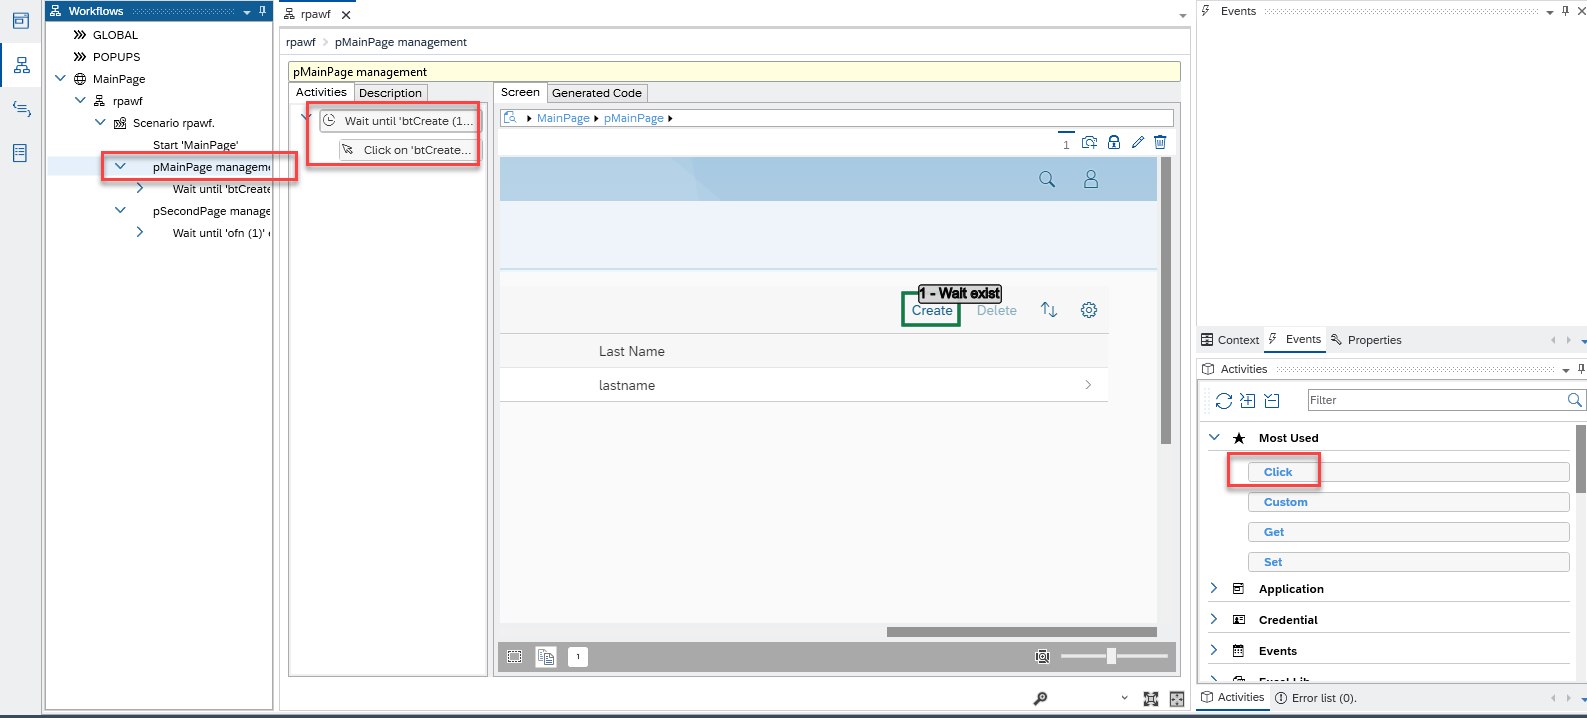
Select the page, the button which needs to be clicked.
Assign required activities.
Next Step:

Select the Second page, select the input fields and use SET activity and for button its CLICK activity.
Next Step:
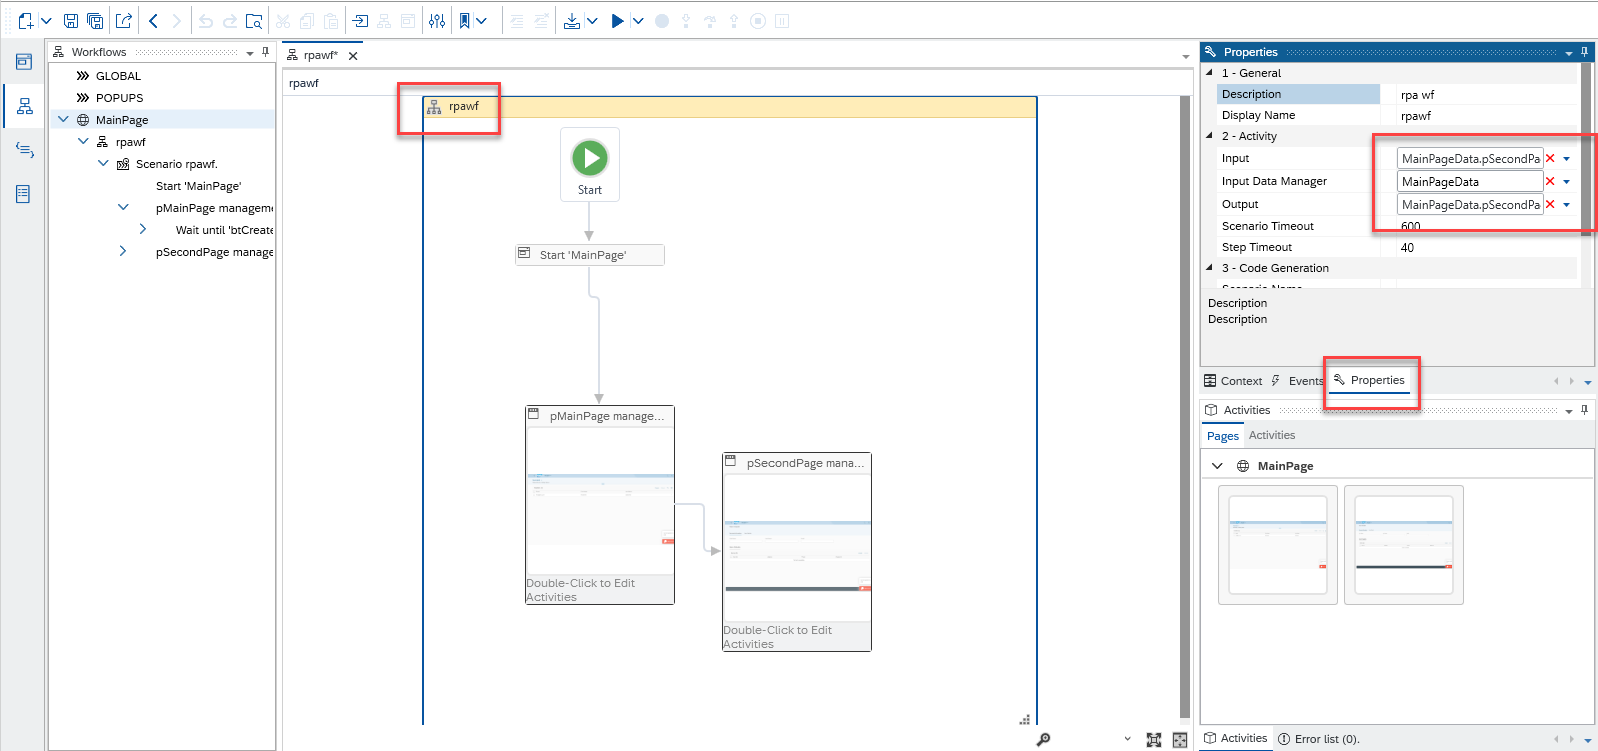
Go to workflow, Double click on workflow, go to properties, define Input/Output.
3. Scripts:
The following code will help, if the bot needs to be executed in Chrome.
MainPage.navigator = e.navigator.Chrome;“MainPage” will be the name of the captured page above XXXX.start();
MainPage.step({ Start_MainPage: function(ev, sc, st) {

        var rootData_MainPageData = sc.data;

        ctx.workflow('rpawf', '7fb2d71b-6466-4b23-9c73-6de8a9d34fbb') ;

        MainPage.navigator = e.navigator.Chrome;

        // Start 'MainPage'

        MainPage.start();

        sc.endStep(); // pMainPage_management

        return;

}});
Next Step:
The following code is where I have added, so that these values can be filled in Debug Mode.
GLOBAL.events.START.on(function (ev) {

        if (ctx.options.isDebug) {

                        // Add item in systray menu.

                        systray.addMenu('', 'rpawf', 'Test rpawf', '', function (ev) {

                      var rootData_MainPageData = ctx.dataManagers.rootData_MainPageData.create();


                                        // Initialize your data here.

                                        MainPage.scenarios.rpawf.start(rootData_MainPageData);

                                        rootData_MainPageData.pSecondPageData.ofn = "some name";

                                        rootData_MainPageData.pSecondPageData.oln = "some name"

                        });

        }

});
Next Step:
Final Check: Check whether everything is in Green and click on BUILD.
Debugging:
Shut down the Remote Agent.
Select DEBUG option in Desktop studio.
Click on the “Test” to start debugging

Last step: Go to FILE, export PROJECT.
Section 4: Deploying SAP Intelligent Robotic Process Automation Project on Cloud and Execute:
I have imported the Project to SAP Intelligent Robotic Process Automation Factory
Go to SAP Cloud Platform, Go to Subscriptions, Choose SAP Intelligent Robotic Process Automation, Go to Application
All the highlighted steps needs to be done.
First, Click on Projects-> New Project.
Import the project which was exported to the Desktop from the Studio.


Once the project is imported, Cross check the Highlighted Blocks. Specially the I/O.
If the INPUTS are blank, then go back to the Desktop Studio and assign Inputs/Outputs.
If all good, Save and Generate Package.
Next Step:
Once the Package is generated, Go to the Packages Tab:


We can check the package build version and Remote Agent Version. Please refer to standard documentation for compatibility chart.
Next Step:
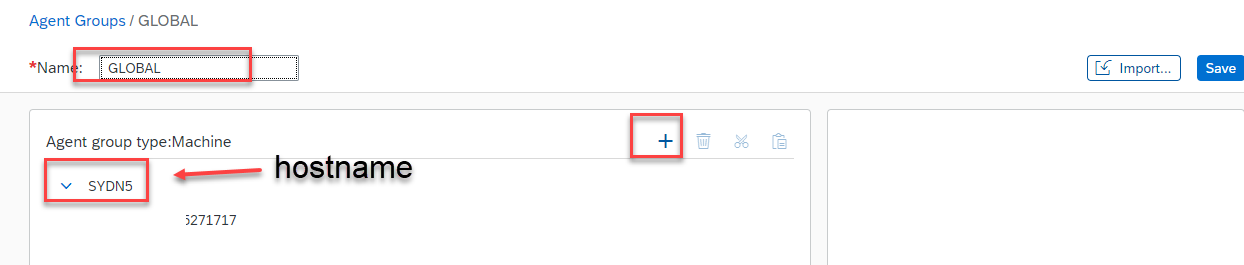
Go to the AGENT Tab -> AGENT GROUPS -> New Agent Group
Give a “NAME” and click “ADD NODE”.
Give your HOSTNAME, if you don’t know your laptop hostname.
Go to COMMAND PROMPT, type “hostname”, fill the hostname.
Check SAP Standard Documentation for creating AGENTS. Copied from Standard Documentation.
- the computer name on which the agent is installed
- the login name of the person who will connect to the agent, SYSTEM NAME and USER
Few Important Observations:
If the Remote Agent is in PAUSED STATE (even after trigger the bot and REMOTE AGENT is not executing the JOB). It might happen that Remote Agent will be in PAUSED STATE when IDLE, but will change the status when the job is scheduled.
If Agent Groups are wrong, REMOTE AGENT will be in PAUSED STATE. Also make sure that the REMOTE AGENT is “BACKGROUND – UNATTENDED”.
Next Step:
Go to the Next tab: Environments:
Click on New Environment and add AGENT.
Assign the AGENT which was created.
Go to the Packages, select the package that was generated and Deploy.

Click on triggers, I have created an API trigger.
Next Step:
Refer to SAP Documentation for trigger this API via POSTMAN.
https://help.sap.com/viewer/c836fab4182e45548b6c6c6d0d0a9146/Cloud/en-US/347ba172a8e64f1c8544f460264...
Result:

Next Step: Verify status of the Jobs
Go to SAP Intelligent Robotic Process Automation Factory >> Go to Monitoring Tab

Result: Record Created

Conclusion:
This is just my first impression; this opens up a lot of possibilities in automating the regular tasks. SAP Intelligent Robotic Process Automation can capture SAP GUI, SAP UI5, load data from excel. There are few other options which I haven’t explored. They can be easily integrated with SAP Conversation AI. This is more like bot talking to another bot, SAP Intelligent Robotic Process Automation bot can trigger other jobs. This can enable to automate and orchestrate a series of jobs.
Labels:
You must be a registered user to add a comment. If you've already registered, sign in. Otherwise, register and sign in.
Labels in this area
-
ABAP CDS Views - CDC (Change Data Capture)
2 -
AI
1 -
Analyze Workload Data
1 -
BTP
1 -
Business and IT Integration
2 -
Business application stu
1 -
Business Technology Platform
1 -
Business Trends
1,658 -
Business Trends
91 -
CAP
1 -
cf
1 -
Cloud Foundry
1 -
Confluent
1 -
Customer COE Basics and Fundamentals
1 -
Customer COE Latest and Greatest
3 -
Customer Data Browser app
1 -
Data Analysis Tool
1 -
data migration
1 -
data transfer
1 -
Datasphere
2 -
Event Information
1,400 -
Event Information
66 -
Expert
1 -
Expert Insights
177 -
Expert Insights
295 -
General
1 -
Google cloud
1 -
Google Next'24
1 -
Kafka
1 -
Life at SAP
780 -
Life at SAP
13 -
Migrate your Data App
1 -
MTA
1 -
Network Performance Analysis
1 -
NodeJS
1 -
PDF
1 -
POC
1 -
Product Updates
4,577 -
Product Updates
341 -
Replication Flow
1 -
RisewithSAP
1 -
SAP BTP
1 -
SAP BTP Cloud Foundry
1 -
SAP Cloud ALM
1 -
SAP Cloud Application Programming Model
1 -
SAP Datasphere
2 -
SAP S4HANA Cloud
1 -
SAP S4HANA Migration Cockpit
1 -
Technology Updates
6,873 -
Technology Updates
419 -
Workload Fluctuations
1
Related Content
- Start page of SAP Signavio Process Insights, discovery edition, the 4 pillars and documentation in Technology Blogs by SAP
- Hack2Build on Business AI – Highlighted Use Cases in Technology Blogs by SAP
- 10+ ways to reshape your SAP landscape with SAP Business Technology Platform – Blog 4 in Technology Blogs by SAP
- Recap - SAP ALM at SAP Insider Las Vegas 2024 in Technology Blogs by SAP
- Elevating Customer Engagement: Harnessing the Power of SAP Chatbots for a Personalized Experience in Technology Blogs by Members
Top kudoed authors
| User | Count |
|---|---|
| 35 | |
| 25 | |
| 17 | |
| 13 | |
| 8 | |
| 7 | |
| 6 | |
| 6 | |
| 6 | |
| 6 |