
- SAP Community
- Products and Technology
- CRM and Customer Experience
- CRM and CX Blogs by Members
- SAP Marketing Cloud – Display Custom Fields with L...
CRM and CX Blogs by Members
Find insights on SAP customer relationship management and customer experience products in blog posts from community members. Post your own perspective today!
Turn on suggestions
Auto-suggest helps you quickly narrow down your search results by suggesting possible matches as you type.
Showing results for
former_member64
Explorer
Options
- Subscribe to RSS Feed
- Mark as New
- Mark as Read
- Bookmark
- Subscribe
- Printer Friendly Page
- Report Inappropriate Content
05-20-2020
11:12 PM
One of the most common requirements for extensibility in today’s world is to have custom fields and tables for any object. Although SAP Marketing Cloud does provide the extensibility option to create custom fields on the Accounts/Contacts Screen, it does not provide an out of the box option to create Custom tables or allow extensibility of custom fields in tabular format on Accounts/Contacts Screen.
Moreover, the ability to create segmentation based on various attributes plays a vital role in any digital marketing initiative.
SAP Marketing Cloud does provide us the option to create Segmentation or Target Groups based on any individual attribute value of a Contact or Account, for e.g. we can create segmentation based on any single attribute like salary or age or hobby or customer type or customer status or zip code etc. But we don’t have enough flexibility in the product to segment based on the attributes which are linked to each other or have a linear relationship with each other.
Today, I will take you through a step-by-step guide to achieve both these functionalities i.e. display a tabular format on the Account/Contacts screen and create segmentation based on these tabular fields which have a linear relationship with each other, by just using the SAP Marketing Cloud tenant and not requiring any integration with any of the external platforms like SAP IDE, Kyma etc.
Step1: Create a Custom Business Object
Step2: Make the Custom Business Object available on the UI
Step3: Create a Communication Arrangement for the Custom Business Object, to use the OData API of the Custom BO for importing data.
Step4: Add the Custom Business Object to the Accounts Screen.
Step5: Add the Custom Business Object to Segmentation Model
This article introduced you to the step-by-step guide to :-
Moreover, the ability to create segmentation based on various attributes plays a vital role in any digital marketing initiative.
SAP Marketing Cloud does provide us the option to create Segmentation or Target Groups based on any individual attribute value of a Contact or Account, for e.g. we can create segmentation based on any single attribute like salary or age or hobby or customer type or customer status or zip code etc. But we don’t have enough flexibility in the product to segment based on the attributes which are linked to each other or have a linear relationship with each other.
Today, I will take you through a step-by-step guide to achieve both these functionalities i.e. display a tabular format on the Account/Contacts screen and create segmentation based on these tabular fields which have a linear relationship with each other, by just using the SAP Marketing Cloud tenant and not requiring any integration with any of the external platforms like SAP IDE, Kyma etc.
Step1: Create a Custom Business Object
- Go to the section ‘Extensibility’ on the SAP Marketing Cloud home page and select the tile ‘Custom Business Object’.

- Click on the “New” Button. In the pop-up that appears, enter the Name of the Custom Business Object and click on “Create”.

- In the “General Information” tab, select all the checkboxes in the “Features” section, as shown below. Selecting these checkboxes will help to display the Custom Business Object on the UI and also helps in generating an OData API for the Custom Business Object.

- Go to the Nodes Section and click on the “New” button to create a SubNode for the Custom Business Object. Give a name to the SubNode. Note: - This SubNode will be helpful when we will create a mashup to include the Custom Business Object on the Accounts Screen.

- Go to the “Fields” Section. Here you will see some fields auto generated by SAP. These fields are created because we have selected the “System Administrative Data” and “Data Access Management” checkboxes in the “General Information” section of the Custom Business Object.

- Click on the New Button to add the desired fields to the Parent Node. Note: - In order to include the Custom Business Object Fields in the Segmentation Profile(All Accounts), it is mandatory to have the Account ID field (i.e. the ID field of the object corresponding to the segmentation profile) as well as the Account Origin field (i.e. the Origin field of the object corresponding to the segmentation profile) in the Root object of the Custom Business Object. Apart from these fields you can add other fields as per your requirement. Here, I have created only 2 of the mandatory fields in the parent node, and will include the other fields in the Sub Node. Also, I have marked the Account ID as my key field.

- You can change the Type of the Field and change the properties like field length, make the field read only etc.

- Now we will add some fields to the Sub Node. Click on the SubNode tab on the Left, and then click on the “New” Button to add fields to the SubNode.

- Our Custom Business Object is Now Ready. Click on the “Save Draft” Button on the bottom right Corner, and then click on “Publish” to publish the custom business object.

Step2: Make the Custom Business Object available on the UI
- Once the Custom Business Object is published, again go to the “General Information” section of the Custom Business Object. You will now see a new Hyperlink in the Features section as “Maintain Catalogs”. Click on the hyperlink to maintain Custom Catalog.

- Click on the “Add” button to add a Business Catalog for the Custom Business Object. Here I am adding “Marketing – Contact and Account Profile”. You can add any Business Catalog which is relevant for your Custom Business Object. Only the users who will have authorization for the assigned Business Catalog will be able to the Custom Business Object in the UI.


- Once the desired business catalogs are added, select the business catalog and click on the “Publish” button.

- Navigate to the home page. Now we can see a new Tile and App created for the Custom Business Object, under the Contact and Account Profile (no Apps) section.

Step3: Create a Communication Arrangement for the Custom Business Object, to use the OData API of the Custom BO for importing data.
- Go to the App “Custom Communication Scenarios” under the section “Extensibility”.

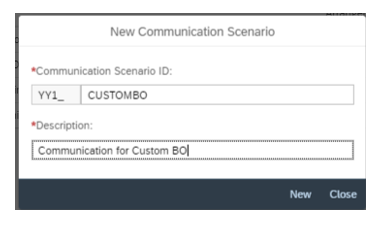
- Click on the ‘New’ Button to add a new communication scenario. In the pop-up that appears enter a scenario ID and a description.

- In the next window, click on the “+” button to add the Custom Business Object for which the communication needs to be created.

- Select our newly created Custom Business Object and click on OK.

- Now Publish this Inbound Service.

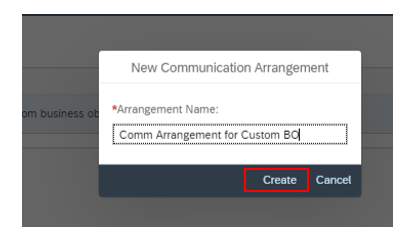
- Once published, click on the “Create Arrangement” button to create a Communication arrangement for the newly created communication scenario. In the pop-up that appears give an Arrangement Name and click on “Create”.

- Enter the “Communication System” and click on the “Save” button to create a new communication arrangement. The URL for the OData API is now generated and can be used to import data into the Custom Business Object.

Step4: Add the Custom Business Object to the Accounts Screen.
- Pre-requisites:
- Create a custom field on the Spotlighting Accounts Screen which will store the SAP UUID of the Parent Node of the Custom Business Object (Here I have created a custom field called YY1_CBOUUID_MCP). This step is needed in order to filter the values in the Custom Business Object based on the Account ID dynamically. i.e. The Custom Business Object as an App will contain the data for all the accounts. But when we open an account and go to the section for our Custom Business Object, it should show the values only for the corresponding account ID.
Note: - Every time a parent node of the Custom Business Object is created, a unique SAP UUID is generated for the parent node at the backend. This value of the SAP UUID needs to be populated in the custom field for SAP UUID (YY1_CBOUUID_MCP), which can be populated using the standard Account API, via CPI.
2. Also, add some entries into the Custom Business Object. This can be done using the API for the Custom Business Object, using CSV or manually.

- Open the newly created App – SampleBO from the home page and click on the arrow on the right corner of any of the Parent Node entry, to navigate to the SubNode.

- Copy the URL of the SubNode entry.

- Open any Account from the Spotlighting Accounts App. Click on the “Person” icon on the top right corner and Click on “Extensions”.

- Click on the “+” button in the top right corner to add a new extension.

- In the pop-up that appears, select the Extension Type as “Section” and give a name to your section (here I have named it as Custom Section).
- For the URL to be entered in the Extension, a small change needs to be made in the URL of the SubNode that we copied above, in order to make the URL dynamic. In the URL, replace the value of the UUID with the name of the custom field that we created on the Spotlighting Accounts screen to store the SAP UUID i.e. YY1_CBOUUID_MCP. So, our new URL will look like this

- Click on Save.

- We now see that a new section – “Custom Section” has been added to our Accounts screen.

- If we go into the Custom Section, we will see only the entries corresponding to the current Account ID i.e. 652473

- Incase, we want to remove the headers of the Custom Business Object in the “Custom Section” of Accounts screen, we can change the URL in the Extension to following: -

- This is how our “Custom Section” in the accounts screen will look like then.

- We also have the option to remove the Change Document Section by using the Adapt UI in the SampleBO App Screen.

Step5: Add the Custom Business Object to Segmentation Model
- Go to the “Marketing Extensibility” App under the section “Extensibility and Adaptability for Marketing” on the home page.

- Select “Assign to Segmentation” under “Custom Business Object”.

- Click on the “+” button in the left corner, to add your Custom Business Object.

- Select your Custom Business Object Name from the F4 help, and the relevant Segmentation Object where you would want to add the Custom business object to.
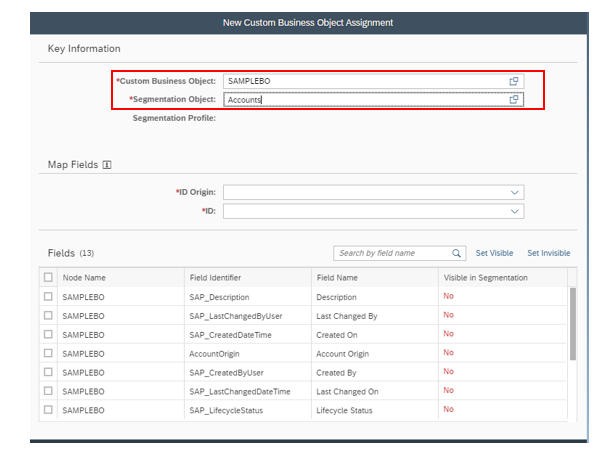
- Under the Map fields section, map the ID Origin Field to the “Account Origin” field of the Custom Business Object and the ID field to the “Account ID” field of the Custom Business Object.

- Now we can select the fields that we want to make visible in the Segmentation Profile, and set those fields to “Set Visible”, and “Save” the changes.

- The fields are now visible in the Segmentation Profile “All Accounts”.

- Similar steps can be followed to add the Custom Business Object fields to another Segmentation Object, for e.g. Contacts (Segmentation Profile – All Contacts).
- Now we can segment based on the attributes of the Custom Business Object, and this segmentation can be based on each & every record/line item level of the Custom Business Object, rather than treating all the 5 attributes as different filtering parameters.

Conclusion
This article introduced you to the step-by-step guide to :-
- Create a Custom Business Object with subnode.
- Display the Custom Business Object (i.e. custom fields in tabular format) on the Accounts/Contacts screen, as a new Custom Section.
- Create Communication Arrangement to import data into the Custom Business Object using OData API, via CPI.
- Make the Fields of the Custom Business Object (with linear relationship with each other) available in Segmentation Profile.
- SAP Managed Tags:
- SAP Marketing Cloud
23 Comments
You must be a registered user to add a comment. If you've already registered, sign in. Otherwise, register and sign in.
Labels in this area
-
ABAP
1 -
API Rules
1 -
CRM
1 -
Custom Key Metrics
1 -
Customer Data
1 -
Determination
1 -
Determinations
1 -
Introduction
1 -
KYMA
1 -
Kyma Functions
1 -
open SAP
1 -
Sales and Service Cloud Version 2
1 -
Sales Cloud v2
1 -
SAP
1 -
SAP Community
1 -
SAP CPQ
1 -
SAP CRM Web UI
1 -
SAP Customer Data Cloud
1 -
SAP Customer Experience
1 -
SAP Integration Suite
1 -
SAP Sales Cloud v2
1 -
SAP Service Cloud v2
1 -
SAP Service Cloud Version 2
1 -
Service Cloud v2
1 -
Validation
1 -
Validations
1
Related Content
- CRM Basic Technical Info for ABAPers in CRM and CX Blogs by Members
- Campaign Build - Segmentation Best Practice in CRM and CX Blogs by SAP
- Introduction to Permission Marketing in CRM and CX Blogs by SAP
- SAP Commerce Cloud Q4 ‘23 Release Highlights in CRM and CX Blogs by SAP
- SAP Marketing Cloud Release 2402 is Here! in CRM and CX Blogs by SAP