Stay up-to-date on the latest developments and product news about intelligent customer experience and CRM technologies through blog posts from SAP experts.
On Wednesday 6th March we presented the latest Customer Data Cloud Webinar with the focus on how to use bring your own identity ( IOT & BYOI ). The presenters of the session were:
Ratul Shah – Senior Product Marketing Manager, SAP Customer Data Cloud
Ed Knight – Technical Architect, SAP Customer Data Cloud
Ibrahim Ga’al – Lead Technical Consultant, SAP Customer Data Cloud
In this webinar, I demonstrated how you can seamless link your Customer Data Cloud profile with your Google Account with the help of OIDC. If you were unable to attend the live session.
This blog post will be focused on detailing the steps required to link your Customer Data Cloud profile with your Google account using the Google Assistant.
Why should I link my account?
I believe providing your users a personal experience is key to building successful applications. Customer Data Cloud allows you to build richer experiences for your users.
You can retrieve your users' preferences and interests. For example, your user’s food or music preference or preferred communications channel.
Use case
In this webinar, I described this scenario below.
Step 1
The user begins the journey visiting the Electronic Store powered by SAP Commerce Cloud on he’s phone.
He finds what he’s looking for and adds it to he’s shopping cart.
Step 2
After being home for some time he remembers he was shopping on he’s way home.
Step 3
He speaks to he’s Google Assistant-enabled device to ask what’s in he’s shopping cart.
This use case above demonstrates how you can leverage Customer Data Cloud.
To achieve a seamless rich user experience across devices.
User agrees to link accounts by typing or saying yes
2
Google opens your authorization endpoint in the user’s browser. If the flow started on a voice-only device for an Action, Google would transfer the execution to a phone.
3
The user signs in (if not signed in already) and grants Google permission to access their data with your API if they haven’t already granted permission.
4
Your service creates an authorization code and returns it to Google by redirecting the user’s browser back to Google with the authorization code attached to the request.
5
Google sends the authorization code to your token exchange endpoint, which verifies the authenticity of the code and returns an access token and a refresh token.
The access token is a short-lived token that your service accepts as credentials to access APIs.
The refresh token is a long-lived token that Google can store and use to acquire new access tokens when they expire.
In my demo, I showcase how you can utilise the user’s consent managed inside Customer Data Cloud to enable access for voice actions to view the shopping cart.
To do that I’ve defined a custom claim which contains the consent for the shopping cart access.
Step 2: Create RP(Relying Party)
In this scenario, the RP is our Google Actions App
Here you’ll find the Client ID & Secret which you’ll need when configuring the Google Actions App Account Linking configuration.
I’ve also checked the following supported response types
Token
Code
You also have the flexibility to define the Access Token Lifetime. I’ve set this to the default value in my example.
Click OP Metadata to view ODIC Endpoints
Add RP URL
Next you must whitelist the google actions app redirect URL.
This option will trigger OIDC flow and allow the user to interact with your OP login page.
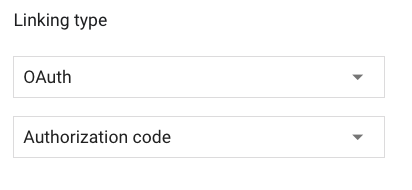
Step 3: Select Linking type
Next select OAuth & Authorization code.
Step 4: Add OP(OpenID Provider) Details
The following details can be retrieved from the Customer Data Cloud console.
The Client & Secret if you remember is located in the RP we previously created inside Customer Data cloud. I’ve referenced above in the section Create RP(Relying Party).
Step 5: Add Scopes
Test
You can now test the OIDC Flow within the simulator.
You’ll need to select “Phone” to allow the user to interact with the OP login page.
Conclusion
This brings an end to our blog post which discusses how to integrate an IoT device that supports the Google assistant with Customer Data Cloud.
To learn more about Customer Data Cloud, please sign up for our next webinar on the 28th of May.