This is a submission of the
Enhance your bot building with templates blog post series.
In this blog post, I will explain how to customize the data in the Email template and send the mail.
Introduction :
Most of the BOTS would require sending an automated Customized email to the users with the specific email template.
I would introduce you to an efficient way of sending a customized email.
In this blog, you will learn
1. Sending an Email.
2. Customize the Email using the template.
3.Add an attachment to the Email.
4. Preview an Email.
Prerequisites:
1.Desktop Studio:1.0.8.36
2.MS Office
3. Prepare your Customized Email Content.
Steps to prepare the HTML content of Email template.
Below is the Email Template which has to be customized.

Let's consider the scenario of customizing the Name, Email ID and the number of deals in the Email.
1. If the Email template is readily available(provided by the customer) the HTML content of the email can be copied using the below options.
Message->Actions-->Other Actions-->View Source

To simplify the task of building the HTML content right from scratch, I am taking the HTML Content from outlook as the reference.
If required, we need to modify a bit of content.
2. Copy the HTML content.
Create a Folder in C drive C:\Users\Public\IRPA_projects\DynamicEmail\Data.(The path can be changed)
Create a new text file. I have named it as
Mailbody.txt. Please make a note of the text file name since We will be using it in our Workflow. Paste the HTML email content to a text file.
Add special characters at the place where the data has to be customized as shown below.
Here we are customizing Name and number of deals.

3. Add an image to the Email.
If your image is already available in base64 format when you had copied the HTML content, you can skip the below steps.
To insert images in the content of an HTML email you have to use the binary code of your image.
The first thing to do is to encode your image in base64. You can find many sites that do this but here is an example:
https://www.base64-image.de/
Save your image and upload it in the URL to t the base64 code.
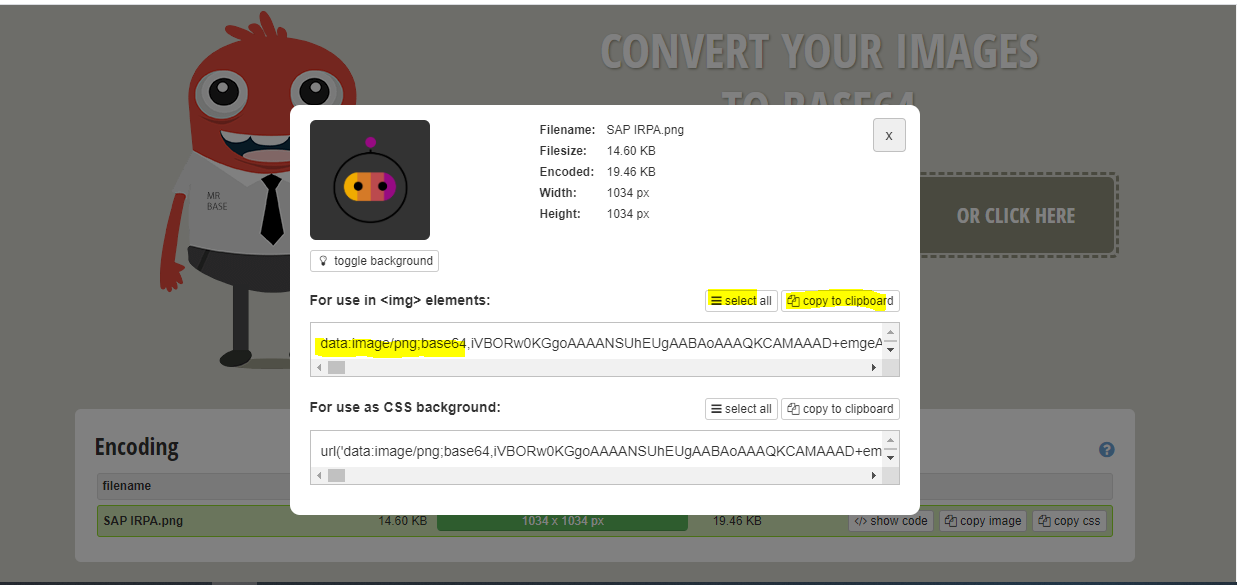
Once this is done, you have to copy the base64 code and paste it in the HTML of the email.
Add the below code and mention the height and width of the image.

The construction of the Email template is completed.
Steps to follow
1. Create a project and a workflow.
Create a new project. Create a new workflow using Workflow perspective.
2. Include the Outlook Library to the project.
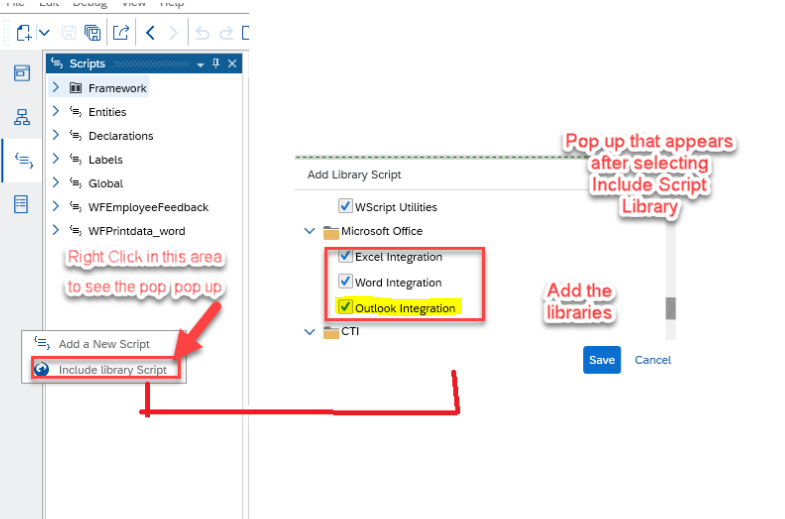
3. Add the activities from the Outlook Lib.
As the first step in the workflow, include the Activity
Init Outlook to initialize Outlook Library.
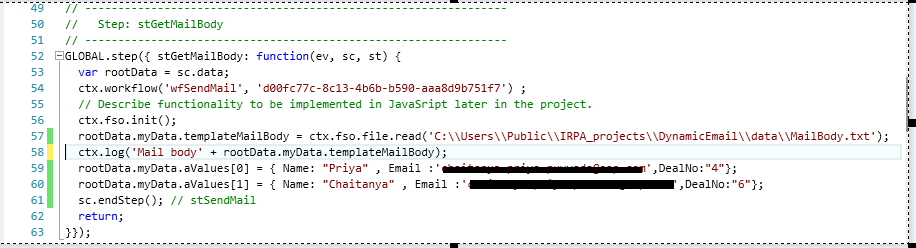
4. Get the Email body
Add an activity
Custom to include Custom logic. I have named the step a
getMailBody.
Read the content from the file
MailBody.txt (file which we have constructed the Email template) using FSO(File System Object)Libray.
FSO library is a collection of functions for accessing and manipulating File System Objects.
Create a variable(templateMailBody) in the context to store the content of the text file.
ctx.fso.init();

rootData.myData.templateMailBody = ctx.fso.file.read'C:\\Users\\Public\\IRPA_projects\\DynamicEmail\\data\\MailBody.txt');
Create a variable aValues in the context and tick the checkbox to make the variable as an array.
Prepare your array as below.
5.Send Email.
Add the activity
Custom to add manual code.
I have named the step as
Sendmail.
Read the array and replace the dynamic values i.e Name ,Email and number of deals as shown in below code snippet.
var attachmentLocation = "C:\\Users\\Public\\IRPA_projects\\DynamicEmail\\data\\MailBody.txt";

	for (var i = 0;i<rootData.myData.aValues.length;i++){

		rootData.myData.sMailBody = rootData.myData.templateMailBody.replace('####', rootData.myData.aValues[i].Name);

		rootData.myData.sMailBody = rootData.myData.sMailBody.replace('$$$$', rootData.myData.aValues[i].DealNo);

		ctx.log('Mail body after replacing ####' + rootData.myData.sMailBody);

		ctx.log('Completed reading the MailBody.txt');

		ctx.outlook.mail.create({ To: rootData.myData.aValues[i].Email, Subject: 'Email Template' }); //, Body:" .... the body ..." });

		ctx.outlook.mail.setBodyHtml(0, rootData.myData.sMailBody);

		//ctx.outlook.mail.attach(0, attachmentLocation);//sends the attachment

		ctx.outlook.mail.send(0);

		//ctx.outlook.mail.show(0); //Helps to test without sending the actual mail


	}

	ctx.outlook.end();

Functions Used:
1.
Create
Creates a new mail with the recipients and Subject.
Parameters like CC and BCC can also be added.
Refer to the Desktop developer guide for documentation
2.SetBodyMail.
Sets the body of the email.
Index refers to the mail index of the working mail collection.
3. Send
Sends the mail.
Index refers to the mail index of the working mail collection
4.Show.
Shows the email .
Helps to test without sending the actual mail
5.Attach
Sends an attachment in an email.
6.End the scenario
Add an activity
End Scenario to end the workflow.
The final workflow looks as below:

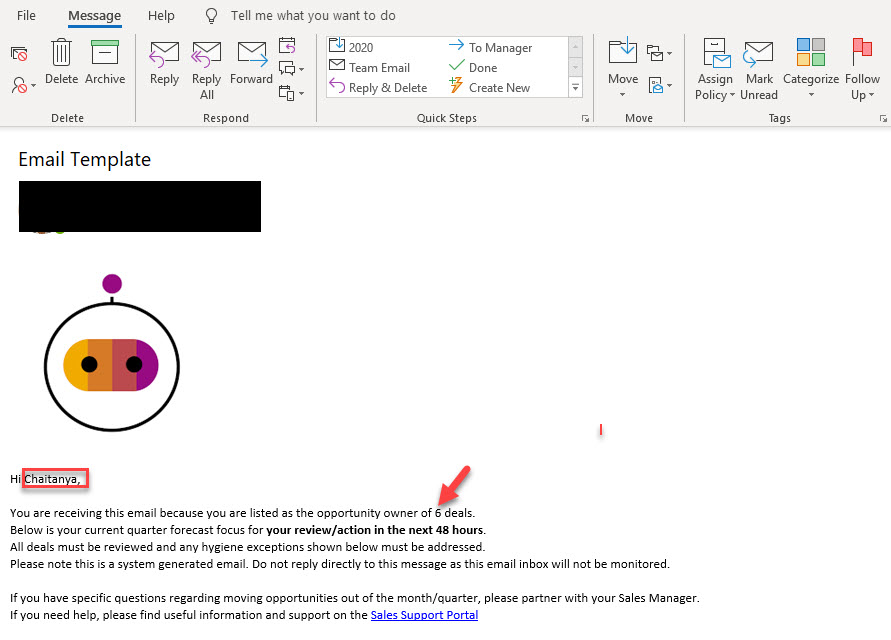
Output:
The Email template has been customized and the Emails are sent to the specific Email ID's.

Conclusion
This blog post should help you to understand the use of the 'Outlook Library’ and how send an email with specific email template.
