
- SAP Community
- Products and Technology
- Technology
- Technology Blogs by SAP
- SAP Intelligent RPA: Exception Handling (SAPGUI Co...
Technology Blogs by SAP
Learn how to extend and personalize SAP applications. Follow the SAP technology blog for insights into SAP BTP, ABAP, SAP Analytics Cloud, SAP HANA, and more.
Turn on suggestions
Auto-suggest helps you quickly narrow down your search results by suggesting possible matches as you type.
Showing results for
former_member63
Participant
Options
- Subscribe to RSS Feed
- Mark as New
- Mark as Read
- Bookmark
- Subscribe
- Printer Friendly Page
- Report Inappropriate Content
05-15-2020
9:02 AM
Introduction
This is a submission of the Enhance your bot building with templates blog post series.
In this blog post i will talk about the Status Bar Messages and how to use them for error handling in SAP Intelligent RPA.
Status Bar Messages are part of most of the SAP GUI processes and it is important to integrate the handling of them in the automation to avoid a failed execution of the bot.
To better understand Status Bar Messages and the way to can use them, I will use as an example the process of creating a Structure Data type in the ABAP Dictionary, using transaction SE11.
Content
- What are Status Bar Messages?
- Scenario description
- Prerequisites
- Steps to follow
- Conclusion
What are Status Bar Messages and how can we use them?
Status Bar Messages are information about the actions that we are doing in SAP GUI. They can be visible at the very bottom of the screen and consist of 4 components:
- ID - is the Message class in which it was defined;
- Number - is the message number in the Message Class in which it was defined;
- Type - the type of information that it represents;
- Text - the text message that can be read in the Status Bar;
The most important part of the Status Bar Messages, and also the one that i will base my handling on, is the type. We have 5 type of Status Bar Messages, and those are:
- Error
- Warning
- Success
- Information
- Abort
Depending on the type of the message we are receiving, our process can act different than we might expect. It is important to know when those messages can appear and how to process them, in order to know when and how to handle them.
For example, if we get a Success message, our process won't be different. But if we get a Warning message, we might have to press on the Enter key to continue; or if we get an Error message, we might not be able to complete the process. In some cases there is possible to get different messages of the same type, in which we also have to use the Text message in order to know how to handle the situation. But in my example i will keep it simple and I will show you how you can handle them based only on the type.
Scenario description
My example scenario consists of the following steps:
- Reading an Excel files that contains the Structures and the details needed to be created;
- Open SAP Logon;
- Login in ERO System ID;
- Open SE11 transaction
- Open a Loop ( the following steps will be executed for each structure found in the Excel file);
- Fill the Data Type text field with the Structure name(from Excel file);
- Click on Create button;
- Handle Status Bar Messages using Switch Output activity;
- Select Structure as the data type I want to create;
- Complete the mandatory fields for Structure Creation;
- Activate the new object;
- Go back to SE11 page;
- End of loop;
In the Excel file I introduced one Structure already created. For this iteration, after step 7., i will get an Error message that won't allow me to continue. The handling of Status Bar Messages helps us to manage the workflow so that when the bot encounters this situation, the execution won't stop, but will skip to next iteration to the step 6.
In this tutorial i will only cover the steps included in the Loop.
Prerequisites
SAP Logon 7.6 or higher;
Desktop Studio 1.0.9.16;
Steps to follow
To see directly how we manage the Status Bar messages, skip to step 7.
- Read the Excel file;
- Set the right Context;
- Capture SAP Logon application;
- Capture the pages and the elements on each page;
- Create activities to login in SAP Logon and access SE11;
- Start a loop
- Add activities to create a structure
- Read the Status Bar messages;
- Add Output activities based on the Status Bar message type;
- Implements a Switch Output Scenario based on output in step 10.
- Create a pattern for each Output Scenario possible;
- End the Loop;
1. Read the Excel file
If you don't know to read Excel files, please read this blog post first:
SAP Intelligent RPA: Read Data from Excel: Fixed Header
In my example, i am reading the following table:

2. Set the right Context

In the StatusMessage folder we will store data about the Status Bar Messages that will be read in step 7. The rest of the items in the DataCreation folder I will store data read from the Excel file.
3. Capture SAP Logon application
When capturing SAP Logon applications and pages, I used UIAutomation Technology. It is recommended to use this type of Technology when working with SAP GUI.
4. Capture the pages and the elements on each page
Capture each element, on each page in the application, that will be used in the workflow. Most importantly in out example, capture the Status Bar in SE11 transaction:

5. Create activities to login in SAP Logon and access SE11
Add the necessary activities to get to SE11 transaction.

6. Start a Loop
The Loop structure contains 3 elements:
- Start Loop: to determine the start of the loop;
- Exit Loop( can be used at the beginning or the end 😞 to check the condition to exit the loop;
- Loop to start: to limit the steps that should be executed in the loop;
In my example i chose to use ‘Exit Loop’ activity at the beginning:

‘Exit loop’ requires as parameter the condition based on which the bot will end the loop: in my example, i want to exit the loop when the iterator, sc.localData.Startloop(is automatically created) will reach the same value as the number of rows to be read from the file.
7.Add activities to create a structure
In SE11, on pABAPDictionaryInit page, we add the activities necessary for creating a Structure ABAP object.

In the next step we add steps to read the Status Bar Messages on the same page.
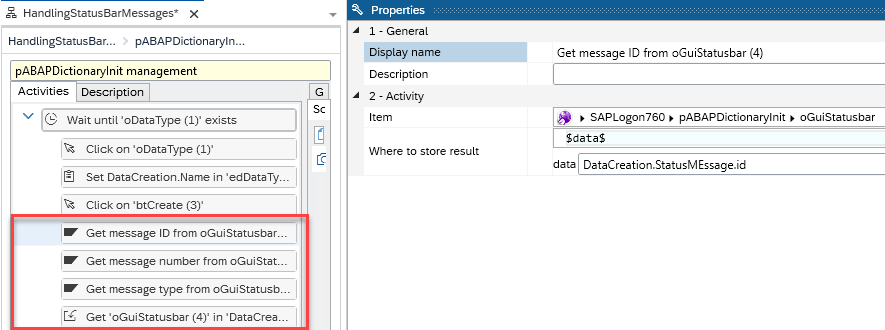
8. Read the Status Bar Messages
Because we used UIAutomation as Technology, Desktop Studio gives us access to the dedicated SAP GUI Activities Library.
If you right click on the Status Bar message on the page, you can access the activities available for this type of element.
Go to Advanced -> SAP GUI -> GuiStatusBar -> you will see the activities for it:

Add all three activities and store the values in the variables inside the Context Structure in StatusMEssage folder:
- messagety
- msgNo
- id
In the end add a Get() activity on the Status Bar and store the text message in msg variable in StatusMEssage folder:
9. Add Output activities based on the Status Bar Message type
In this step we will add a series of If conditions on the Message Type that we read from Status Bar. For each true condition,I will output the value of the message type.
All If conditions and Output activities will be grouped in a Sequence:

Inside we will add all the If conditions and Output activities:

See below the If condition and the Output parameters for 'Error' case:


10. Implement a Switches output Scenario
Now that we set an output for each of the 5 Message types from the Status Bar, we have to create a pattern for each of those scenarios. For that, we have to add a Switches output activity from the Flow category.

11.Create a pattern for each Output Scenario possible
When using a Switches output activity, it is mandatory to create a pattern for each of the output values defined in step 9. Each pattern will be labeled and followed based on that output:

Each pattern must contain the necessary steps that need to be done when encountering that scenario.
For example, when getting a Warning message, i added a KeyStroke activity on the Enter key( the display Warning message is optional).
If a Success, the flow must contains the steps to complete the process of Structure Creation.
If we get an Information, i chose first to display the messages in the log, and then continue with the steps from Success.
In case of an Abort message, i chose to end the Scenario, so the pattern follows to the END scenario step.
And last, in case of an Error message, i chose to link it to the Loop to start block activity, in order to get to the next iteration, and creation of the next object.

Conclusion
Each pattern for each type of the Status Bar message depends entirely on the process that you are automating and can be handled using different scenarios. It is up to every developer to decide the steps necessary to handle each situation.
The intention of this blog post is to show you how to handle the Status Bar Messages using the Switches Output activities.
- SAP Managed Tags:
- SAP Intelligent Robotic Process Automation
Labels:
1 Comment
You must be a registered user to add a comment. If you've already registered, sign in. Otherwise, register and sign in.
Labels in this area
-
ABAP CDS Views - CDC (Change Data Capture)
2 -
AI
1 -
Analyze Workload Data
1 -
BTP
1 -
Business and IT Integration
2 -
Business application stu
1 -
Business Technology Platform
1 -
Business Trends
1,658 -
Business Trends
91 -
CAP
1 -
cf
1 -
Cloud Foundry
1 -
Confluent
1 -
Customer COE Basics and Fundamentals
1 -
Customer COE Latest and Greatest
3 -
Customer Data Browser app
1 -
Data Analysis Tool
1 -
data migration
1 -
data transfer
1 -
Datasphere
2 -
Event Information
1,400 -
Event Information
66 -
Expert
1 -
Expert Insights
177 -
Expert Insights
294 -
General
1 -
Google cloud
1 -
Google Next'24
1 -
Kafka
1 -
Life at SAP
780 -
Life at SAP
13 -
Migrate your Data App
1 -
MTA
1 -
Network Performance Analysis
1 -
NodeJS
1 -
PDF
1 -
POC
1 -
Product Updates
4,577 -
Product Updates
340 -
Replication Flow
1 -
RisewithSAP
1 -
SAP BTP
1 -
SAP BTP Cloud Foundry
1 -
SAP Cloud ALM
1 -
SAP Cloud Application Programming Model
1 -
SAP Datasphere
2 -
SAP S4HANA Cloud
1 -
SAP S4HANA Migration Cockpit
1 -
Technology Updates
6,873 -
Technology Updates
419 -
Workload Fluctuations
1
Related Content
- Single Sign On to SAP Cloud Integration (CPI runtime) from an external Identity Provider in Technology Blogs by SAP
- Activating Embedded AI – Intelligent GRIR Reconciliation in Technology Blogs by SAP
- SAP Datasphere - Space, Data Integration, and Data Modeling Best Practices in Technology Blogs by SAP
- What are the use cases of SAP Datasphere over SAP BW4/HANA in Technology Q&A
- Why does a "Database Login" window appear when using Crystal Reports 2020? in Technology Q&A
Top kudoed authors
| User | Count |
|---|---|
| 35 | |
| 25 | |
| 14 | |
| 7 | |
| 7 | |
| 6 | |
| 6 | |
| 5 | |
| 4 | |
| 4 |