
- SAP Community
- Products and Technology
- Human Capital Management
- HCM Blogs by SAP
- Simplifying Rolling Out Payout/Cashout Feature for...
Human Capital Management Blogs by SAP
Get insider info on HCM solutions for core HR and payroll, time and attendance, talent management, employee experience management, and more in this SAP blog.
Turn on suggestions
Auto-suggest helps you quickly narrow down your search results by suggesting possible matches as you type.
Showing results for
former_member17
Active Participant
Options
- Subscribe to RSS Feed
- Mark as New
- Mark as Read
- Bookmark
- Subscribe
- Printer Friendly Page
- Report Inappropriate Content
05-07-2020
2:09 AM
![]()
In my earlier blog, I shared with you all how we have enhanced our existing payout functionality in Employee Central Time to allow employees to create payout requests, support workflows and add business validations to make to the functionality more robust. We have also simplified and enhanced the experience to create the payout requests in the system. Rolling out new software features to your organization always seem like a daunting task, but through this blog, I will want to simplify this process for you and provide you all the information you need for rolling out the payout feature to your employees effortlessly. If your company policy and guidelines allow your employees to cashout unused time account balances, you can easily implement this using SuccessFactors Employee Central Time Off by following my step by step instructions on how to configure payout/cashout for your Time Accounts. Follow me!!
Preparation!!!
Before you roll out any feature, the first step is to gather your requirements and prepare for the rollout. You should document your company payout policy, business process and detailed guidelines for allowing employees to cash out their time balances keeping in mind your company culture, local laws and regulations. Here are the few questions you need to answer for before you begin configuration for this feature:
Which Time Accounts are Eligible ?
All companies have multiple time accounts for employees, though not all time accounts can be eligible for cashing out unused time balances. For example, an annual leave and compensatory time can be eligible for payouts though sick time may not be. So it is really important for you to know which time accounts will be eligible before you begin configuration.
Will you be sending the Time Balance (in hours/days) or the Total Amount of the Payout to Payroll
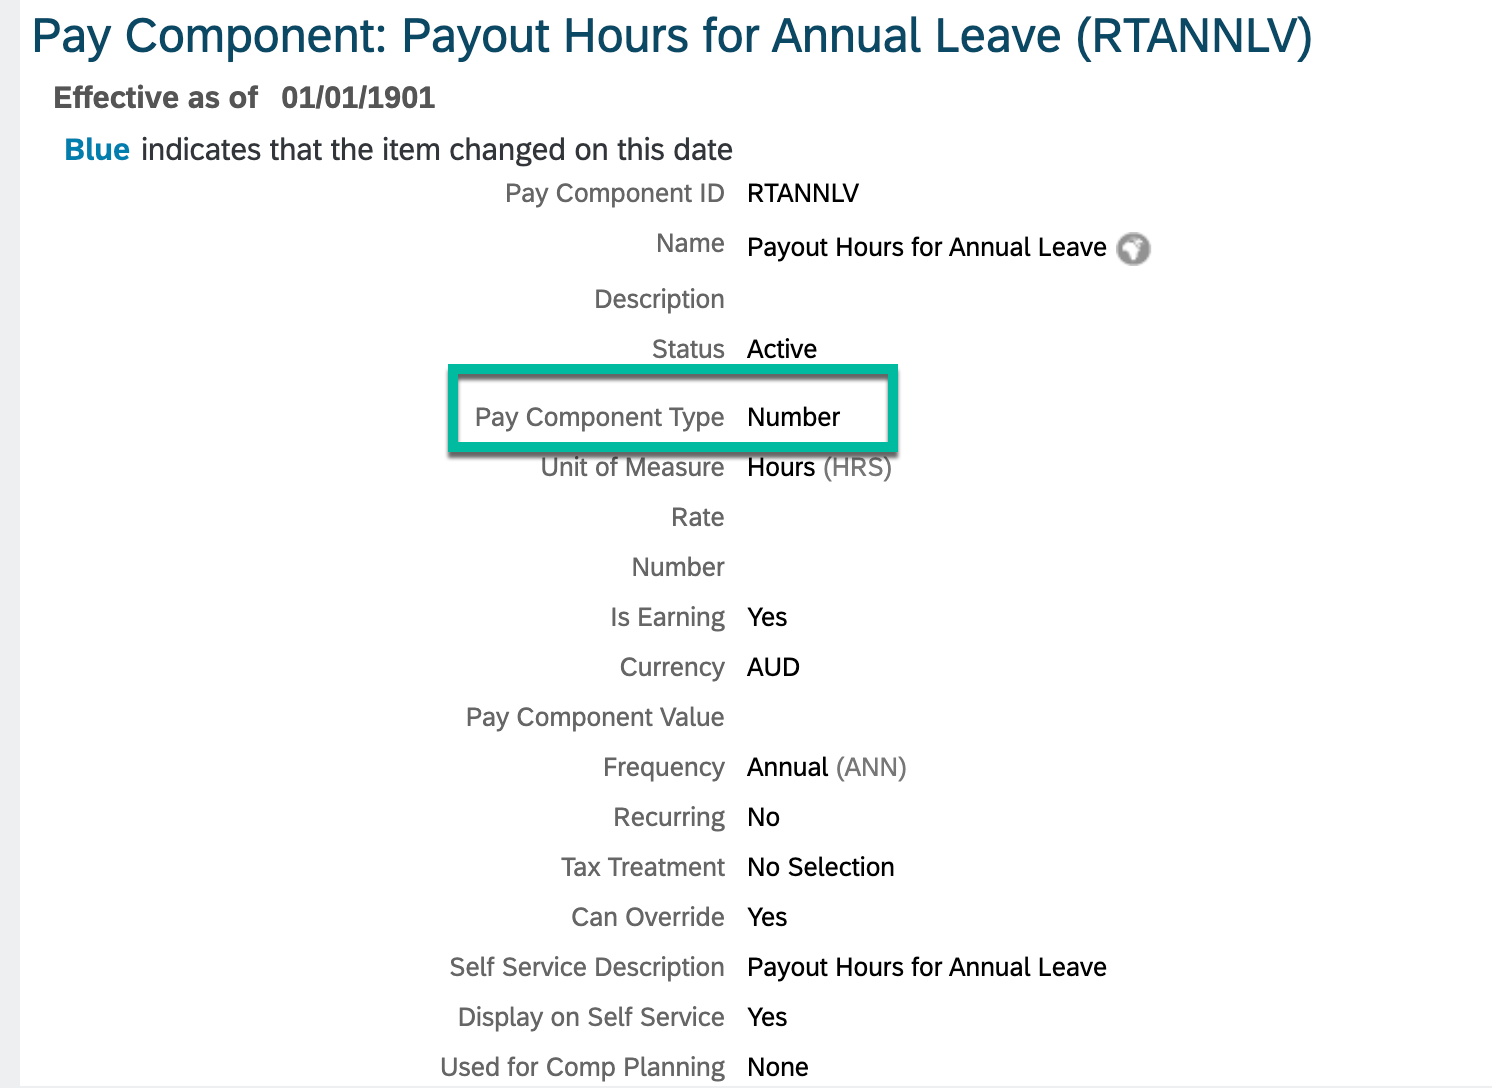
This is one of the most important questions you need an answer for, if you will to send the total amount of payout or number of hours/days on time account balance for payout to payroll. This decision will determine the pay component type while setting up a pay component in Employee Central for paying out unused time to your employees. For sending amount you need to setup an amount type pay component and to send balance in hours/days to payroll, you have to setup a pay component of type number. This pay component is what is added to the spot bonus or one time payment portlet in EC once payout is approved.
Who will be responsible for creating payouts?
As of our most recent release b2005, payouts can be created by employees or their managers using the new self-service UI (self service scenario).
One of the most important consideration for payout is who will be responsible for creating the payouts. Will you want your employees to request payouts using self service UI, or will it just be admin using time admin workbench and will admins/managers be allowed to create payouts during termination (termination scenario) using manager self-service> Termination UI.
Business Specific Validations
These are all the checks and validations that you will like to do before an employee or an admin can request a payout on a time account based on your company policy and guidelines for time account balances. You can create these specific validations, as per your company policy, by creating business rules using the new rule scenario (Time Account Payout Validations) delivered in b2005
Business Process for Payouts
Your final preparation is defining your business process for payouts for each scenario. Who need to approve the payouts, who needs to be notified? In short ,what will be your workflow approval process for each time account? Will it be the same or will it be different?
Once you have answered all of the above, configuring your time accounts for payouts can be done in a snap.
Step 1: Setting the Building Blocks of a Payout Profile for Time Accounts.
There are a few configurations that need to be in place before we begin setting the time accounts for payout. The first step is to set up Pay Components, Pay Component Groups and Work Schedule,
Pay Components Setup
Depending on whether you want to send amount or number of hours/days to payroll, you will setup either an amount type or a number type pay component. To setup the pay components, navigate to Admin Center> Tool Search> Type Manage Organization, Pay and Job Structures
Number Type Pay Component
Amount Type Pay Component

To read more about setting up Pay Components, please follow this documentation link here.
For calculating the payout amount in Employee Central Time, it is also required to setup a pay component group, that will usually be equal to the annualized base salary of an employee which is required to calculate the amount of payout in EC.
Pay Component Group Setup

It is also required to populate the average annual, monthly, weekly, daily working hours on the work schedule assigned to the employee on their job information. Without the above two, the amount cannot be calculated and you will get an error when a user is creating payouts.
Work Schedule Setup
For setting up average fields on work schedule, navigate to Admin Center> Tools Search> Manage Data> Select Work Schedule in the drop down and search for employee's work schedule code. You have to maintain the highlighted fields in the work schedule of the employee to calculate the amount of payout.

Step 2: Setting up your Business Process for Payouts
Once you have your outlined your business process for Payouts as to who will initiate the payouts, who will the approvers be and who all need a notification when the request is approved, you are ready to configure your business process by setting up workflows.
Workflow Setup
To setup workflow, outline who needs to approve the payouts and in which order and who needs to be notified or just add comments. Once you have defined your business process, Navigate to Admin Center> Tool Search> Type Manage Organization, Pay and Job Structures> Create New > Workflow Configuration

Business Rule for Workflows:
You also need to setup a Business Rule that will trigger the workflow where you can setup your own conditional criteria for triggering the workflow. This condition should be true for the workflow to be triggered.

This rule will need to be added to onSave event of Time Account Payout Object.

Step 3: Setting up Validation Rules
Based on your company policy and guidelines, you may need to have certain validations triggered before a payout request is submitted. For example, you want your employees to request payouts not exceeding 40 hours. You can create business rules for enabling your company specific validations by using the new Rule Scenario (Time Account Payout Validation)

You can use the Payout Validation Rule Scenarios to create as many business validations as you like.
Step 4: Setting up Payout Profiles
Once all of above Setup is done, you are ready to create the Payout Profiles. This is a new object that has been delivered in b2005. Prior to this, Pay Components to be used for payout and termination were setup directly in Time Account Type.
You can create one payout profile for every time account that is eligible for payout or you can create one payout profile and reuse it for all time accounts. On the payout profile, you define pay components that will be used for creating spot bonus, add a workflow configuration that will be used to trigger the workflow, add instructional text that will be show on self service UI and add validations rules created previously to trigger your business specific validations at the time of creating payouts.
For ‘Request payout’ link to be available on termination UI, please assign a pay component to ‘Pay Component on Termination’ field on your payout profile.
Payout Profile Configuration

Please review this section of the documentation that walks you through how to set it up in more detail
Step 5: Setup Payout Eligibility on Time Account Type
The next step is to set the payout eligibility for your time accounts to be eligible for payouts by setting up Payout Eligibility field on Time Account Type.
There are three values for the payout eligibility field on Time Account Type:
1: Eligible: This should be used when you want admins to request payouts using time admin workbench or during termination.
.2: Eligible for Self Service: This is to be used when you will like employees, managers and admin to request payout on this time account and also during termination.
3: Not Eligible: Self Explanatory
You will also have to select an appropriate payout profile.

Allow Payout for Simulation field is used for Termination Scenario so that payout can be done for simulated time account balance on termination as of future termination date.
Please note: For backward compatibility (b2005 and before), we have retained payout fields on Time Account Type and you can continue to have your admins request payouts and also to have it available for termination using payout configuration fields on time account type. But you are required to use payout profile, if you will like to configure workflow, business validations as per your company policy guidelines and to enable it for self service.
Step 6: Setting up Payout Permissions for user roles
This is final setup for you to start using payout functionality for time accounts.
For Setting up for Payout Permissions for Admin users, refer to the section on Assigning Administrator Permissions section of Time Account Payouts documentation.
For setting up Payout Permissions for self-service users, refer to the section on Assigning User Permissions section of Time Account Payouts documentation
In b2005 we have added a new permission for ‘Create Payout in Self-Service’ under time management user permission for enabling payouts for your employee population.
You are now Ready to roll out Payout functionality for your organization.
Once these three steps are completed you are ready to roll out self service functionality or payouts for time accounts to your users. Thanks so much for reading this blog. If you have any questions/feedback, feel free to add it in the comments section below.
- SAP Managed Tags:
- SAP SuccessFactors Employee Central,
- SAP Leave Request
Labels:
14 Comments
You must be a registered user to add a comment. If you've already registered, sign in. Otherwise, register and sign in.
Labels in this area
-
1H 2023 Product Release
3 -
2H 2023 Product Release
3 -
Business Trends
104 -
Business Trends
4 -
Cross-Products
13 -
Event Information
75 -
Event Information
9 -
Events
5 -
Expert Insights
26 -
Expert Insights
19 -
Feature Highlights
16 -
Hot Topics
20 -
Innovation Alert
8 -
Leadership Insights
4 -
Life at SAP
67 -
Life at SAP
1 -
Product Advisory
5 -
Product Updates
499 -
Product Updates
39 -
Release
6 -
Technology Updates
408 -
Technology Updates
9
Related Content
- New 1H 2024 SAP Successfactors Time (Tracking) Features in Human Capital Management Blogs by SAP
- Calculate Quota Baseline with Standard Calculation Type in SAP Territory and Quota in Human Capital Management Blogs by SAP
- First Half 2024 Release: What’s New in SAP SuccessFactors HCM in Human Capital Management Blogs by SAP
- Working Time Account v TOIL Account in Time Sheet in Human Capital Management Q&A
- Simplifying Employee and Manager Experiences with Employee Central Quick Actions in Human Capital Management Blogs by SAP
Top kudoed authors
| User | Count |
|---|---|
| 4 | |
| 3 | |
| 3 | |
| 2 | |
| 2 | |
| 2 | |
| 2 | |
| 2 | |
| 2 | |
| 2 |