
- SAP Community
- Products and Technology
- Technology
- Technology Blogs by Members
- Consume on-premise SAP NetWeaver Java services fro...
Technology Blogs by Members
Explore a vibrant mix of technical expertise, industry insights, and tech buzz in member blogs covering SAP products, technology, and events. Get in the mix!
Turn on suggestions
Auto-suggest helps you quickly narrow down your search results by suggesting possible matches as you type.
Showing results for
todor_petrov
Contributor
Options
- Subscribe to RSS Feed
- Mark as New
- Mark as Read
- Bookmark
- Subscribe
- Printer Friendly Page
- Report Inappropriate Content
04-28-2020
9:18 AM
Hello World! I guess this is how each programming language learning path starts. Independent of the language of choice the semantics of what needs to be done are quite similar, you just have to find the right command to output text to the screen and voila - the two magic words appear and you are all in! Now what? You browse the web for numerous tutorials, which tell you to do this and that, and not to do the other 500 things that came to your mind known as bad practices. You are getting the grasp of it and you become better every day. Eventually you reach the point where you need to program a service that will be consumed by another system.
Oh, excuse me for the slow intro, but it's important to understand the history of events and if you already haven't given up to this moment, then now is definitely not the right time to do so, since we are jumping into the specifics:)
It turns out you couldn't wait for another 10 or 20 years and you were not born a Millennial, nor a Generation Z kid. Good or bad, it is a matter of opinion, but the fact is that your brand new service is written in Java and not just any kind of Java, but Java 8. OMG, does that exist at all?!? - you might wonder. Well it does, and pretty much a whole platform depends on it - The SAP NetWeaver Java. If this is the first time you hear something like this exists in the SAP world, then the rest of the read would be more like a science-fiction book, but if you enjoy that genre, please do continue. For all the others, who are already hooked to the idea of consuming Java on-premise services in the cloud, you know what to do. Read on!
For the sake of not having a novel with 3 chapters likе "The sons of Great Bear", we will assume that you already are that good that you managed to write and test your service on-premise and it is delivering the results you expect or in other words - working like a charm. Since you also read a minimum of 100 blog posts and tutorials on the topic, you already know that a service that will be consumed from another system should never be left unprotected. The next assumption we will make is that even Java semi-gods like the cloud at least a bit. So you also developed a simple app in SAP Cloud Foundry, which will consume your Java service and use the delivered data to do miracles.
So that we don't get lost in the translation, below is the architecture of the solution:
In the current example our application on the SAP Cloud Foundry (CF) Account is a SAPUI5 app, therefore we will expose a REST service, which supports both GET and POST requests.
As shown in the architecture picture we will use the cloud connector to establish a secure connection between the cloud and on-premise. There are quite a few blog posts on how to install Cloud connector, so we will just assume that you already did that and you connected your CF subaccount to it. The next step would be to create a connection to the SAP NetWeaver Java server:
Within the Internal host field, provide the full qualified name of your NetWeaver Java server. It is a good practice to use a different name for the virtual host (something simple you can refer to later in the cloud). You can keep the same port as the internal port or you can change that as well. This really depends on the security guidelines of your company. The rest of the settings should be as shown on the screenshot. Important to mention is that we should establish the connection using the secure protocol HTTPS, which automatically means that your SAP NetWeaver Java should be HTTPS enabled. You can easily check if this is the case by following the below easy steps:
Back to the cloud connector. Once you create the connection, you can check if it is reachable - if so, you should get a similar screen:
Now it's time to open the resources, which you would like to expose from your on-premise system. The best practice here is to expose the absolute minimum you need, so I guess the URL Path "/" would be the worst thing you can do in your professional life. OK, we are past the mentoring, you are a Java semi-god, let's not forget that. Since you already tested your REST service, you should know very well the path to access it. Well, just remove the host and port in front and put the rest in the available resources:
The red marked rectangle is important, since if your app is more sophisticated than just displaying a "Hello World!" message, you definitely would like to point to the root of the REST API and then select the second radio button -> "Path and all sub-paths". After you save, a quick check on the status column should show green.
Last step, for now, in the cloud connector would be to sync the trust configuration for the principal propagation:
This should be enough for now within the cloud connector, let's jump in the Cloud Foundry account to setup our destination:
The above screenshot should bother you....at least a bit. First the communication protocol is http and second the Authentication is BasicAuthentication. Two things you read multiple times not to do. Let me explain. If you have created destinations in the past within Cloud Foundry, then you perfectly know that there is no "HTTPS" type in the dropdown of the destination creation and the reason for this is that it is up to you to make sure that your URL is using the proper protocol for the communication. OK, but here even our URL is http. This is because communication from the cloud to on-premise that goes over the cloud connector is always encrypted! There is no way around it. Now a few words on the authentication. The above was set just for test purposes. In a productive scenario I would highly recommend to use the option from the screenshot below:
At the end of this blog post I will explain shortly how this can work with your app in SAP Cloud Foundry and IAS.
The last step before testing our app connectivity would be to configure its xs-app.json. Below you will see an example of our configuration, but please do not take it for granted, since there are so many variations to it, I will mark out the important lines with red rectangles:
It is important to set the "authenticationMethod" to "route" and within the routes to point out the source, which you used during the consumption of the service in your SAPUI5 and the name of the destination we created a few steps back. We will talk about the "csrfProtection" flag a bit later in the blog post. Just accept for now that it is set to "false".
So much configuration and fumbling around without any result yet. Well guess what, we are not even scratching the surface:) You can easily verify that by trying to run the app, which tries to consume your on-premise Java REST service - it successfully finds the destination you created, it connects to the cloud connector, but then for some reason your connection to the SAP NetWeaver Java server fails. The answer here is simple and it lies in the configuration we have done in the beginning in the cloud connector. The selected principal type was X.509 certificate, but wait...we have setup BasicAuthentication in the cloud destination, so how would that work?!?
Time for a quick theory detour:) Cloud connector has a special way of communicating with the SAP NetWeaver Java. It relies on short-lived X.509 certificates. The flow is as follows ->
The theory behind sounds just a bit simpler than the actual realization. That is why I won't leave you hanging here and we will go through the needed steps in order to have a successful call to SAP NetWeaver Java from the cloud connector.
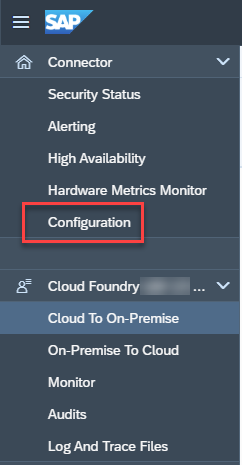
First step is to establish a trustful certificate authority in the cloud connector. With the correct sub-account selected, click on the Configuration menu:
Then we navigate to the On Premise tab and there we will find 4 key sub-sections: "System certificate", "Trust Store", "CA Certificate" and "Principal Propagation". The first three are important for issuing the short-lived certificate, while the last one is the one that defines what attributes will be included in the certificate, which later will be used to authenticate to SAP NetWeaver Java.
The setup could look like this: (keep in mind that this is just a test scenario setup)
For a simple non-productive scenario, you can follow this help.sap.com page, which explains how to generate your own certificates under a Linux environment:
https://help.sap.com/viewer/70ac991a4f734773b1892a8d0d45eabc/Cloud/en-US/590e173911084f17b73caff26f7... - Create a self-signed root CA
https://help.sap.com/viewer/70ac991a4f734773b1892a8d0d45eabc/Cloud/en-US/713d30fa7aa346f39896acd1229... - Create intermediate certificates
You will need the intermediate certificates for the cloud connector and the root CA for the SAP NetWeaver Java server.
For productive scenarios, I highly recommend to connect with your security officers, who can assist you with all of the above certificates, so that you won't have to generate them yourself.
The Subject pattern marked in the red rectangle defines the fields, from which you will read the data later in SAP NetWeaver Java. For this setup, we will use only the email field, which means that in order for the mapping in Java UME to be successful, each user should have a correctly maintained email.
Talking about the java backend, let's take the root CA and import it there, since it will be needed so that those short-lived certificates from Cloud connector are trusted. Within the SSL configuration menu of the NetWeaver administrator, we have already checked that the SSL port is enabled and working. However there was one more detail to that screenshot, which is important - the column "Keystore View Name". It points to the correct key store where we need to import the root CA.
Once we know that, we can search for "Certificates" in the NWA search and pick the "Key storage" configuration option:
Search for the same name that was mentioned in the SSL config and add the root CA there using the Import Entry button as shown on the screenshot below:
Now trust is established and the short-lived certificates from Cloud connector will be accepted by the NetWeaver Java server, however that is not all.
We need to define an authentication schema for our application, which provides the REST service. To do that, we need to again navigate within the NWA by searching for "authentication":
If we plan to have multiple apps, which provide such RESTful services to other systems, then it makes sense to create a policy, which we can apply to each application, instead of re-entering all the information from scratch. If you are doing this just for test purposes, then it would be sufficient to maintain the configuration just once. In both cases, we first have to clean the filter, which is added by default from the "Type" column, in order to see all policy configuration names:
Once the filter is deleted and you press Enter, a much longer list of items will load in the table. Search for your application name (using the filter on top of each column), which provides the REST service and click on Edit:
What login modules you will add to your app depends on the usage you have planned for it. For our scenario the only mandatory login module is the ClientCertLoginModule. It also comes with a couple of rules, which instruct it from which attribute to retrieve the user, which will be mapped to the Java UME.
Once this step is done, we are ready to test the cloud application. GET requests should be working without any issues. POST requests, on the other hand might prove to be more challenging. This is because normally POST requests have one additional level of protection - CSRF token exchange. So what you have to do is first get a valid token from SAP NetWeaver Java with a proper GET call for the purpose and then include the response of that very same GET call in a follow-up POST call. To be able to achieve this in our scenario, you should keep one very important thing in mind - within the xs-app.json of your cloud application do not set the parameter "csrfProtection" to true. I know it doesn't sound logical, but this parameter has a whole other purpose than what you might think. Setting it to true will actually overwrite your logic and the csrf token you sent will be removed from the request, ending up in a 403 request to the backend. If you keep the above recommendation, your POST requests should work as well. If not, check out the debugging section below.
In such a complex landscape passing through so many components, it is always handy to know where to look for potential problems. Below I will list a few of the tools that came quite handy during the debugging phase.
If you would like to use the above scenario productive, you should set the cloud destination authentication to a principal propagation scenario. In this case, however, you will have a different type of challenge -> e.g. how you will have the same users between your on-premise SAP NetWeaver Java server and the cloud. Thankfully, the solution to this lies in another cloud service - Identity Authentication Service, or shortly IAS. It allows you to switch the authentication mechanism for your application and instead of authenticating to SAP ID as identity provider, your users can authenticate directly to your SAP NetWeaver Java server. This way, you can always be sure that any user, who is allowed to login is also available in your backend Java system.
Congratulations, you have reached the next level (i mean the one after semi-god, of course)! I know it was a long journey, but I hope you believe it was worth it! And always remember, no level is the last one! Learning is an ever-ongoing process! Stay safe and stay on the constant learning path!
As a last note, I would like to thank everyone who contributed their knowledge and time and made this blog post a reality!
Oh, excuse me for the slow intro, but it's important to understand the history of events and if you already haven't given up to this moment, then now is definitely not the right time to do so, since we are jumping into the specifics:)
It turns out you couldn't wait for another 10 or 20 years and you were not born a Millennial, nor a Generation Z kid. Good or bad, it is a matter of opinion, but the fact is that your brand new service is written in Java and not just any kind of Java, but Java 8. OMG, does that exist at all?!? - you might wonder. Well it does, and pretty much a whole platform depends on it - The SAP NetWeaver Java. If this is the first time you hear something like this exists in the SAP world, then the rest of the read would be more like a science-fiction book, but if you enjoy that genre, please do continue. For all the others, who are already hooked to the idea of consuming Java on-premise services in the cloud, you know what to do. Read on!
For the sake of not having a novel with 3 chapters likе "The sons of Great Bear", we will assume that you already are that good that you managed to write and test your service on-premise and it is delivering the results you expect or in other words - working like a charm. Since you also read a minimum of 100 blog posts and tutorials on the topic, you already know that a service that will be consumed from another system should never be left unprotected. The next assumption we will make is that even Java semi-gods like the cloud at least a bit. So you also developed a simple app in SAP Cloud Foundry, which will consume your Java service and use the delivered data to do miracles.
So that we don't get lost in the translation, below is the architecture of the solution:

(diagram was created by the author)
In the current example our application on the SAP Cloud Foundry (CF) Account is a SAPUI5 app, therefore we will expose a REST service, which supports both GET and POST requests.
As shown in the architecture picture we will use the cloud connector to establish a secure connection between the cloud and on-premise. There are quite a few blog posts on how to install Cloud connector, so we will just assume that you already did that and you connected your CF subaccount to it. The next step would be to create a connection to the SAP NetWeaver Java server:

Within the Internal host field, provide the full qualified name of your NetWeaver Java server. It is a good practice to use a different name for the virtual host (something simple you can refer to later in the cloud). You can keep the same port as the internal port or you can change that as well. This really depends on the security guidelines of your company. The rest of the settings should be as shown on the screenshot. Important to mention is that we should establish the connection using the secure protocol HTTPS, which automatically means that your SAP NetWeaver Java should be HTTPS enabled. You can easily check if this is the case by following the below easy steps:
- Login to your NW Java server -> http://<host>:<port>/nwa
- Within the NetWeaver Administrator, search for 'SSL' in the Search field on the top right:

- If you have SSL Access Points with status Green, then you are good to go:

- If the green status is not so green, then I suggest you contact your BASIS team to set this up for you. If you happen to be the BASIS team, then good luck with setting this up yourself:)
- Also make sure that the Client Authentication Mode is marked as "Request"
Back to the cloud connector. Once you create the connection, you can check if it is reachable - if so, you should get a similar screen:

Now it's time to open the resources, which you would like to expose from your on-premise system. The best practice here is to expose the absolute minimum you need, so I guess the URL Path "/" would be the worst thing you can do in your professional life. OK, we are past the mentoring, you are a Java semi-god, let's not forget that. Since you already tested your REST service, you should know very well the path to access it. Well, just remove the host and port in front and put the rest in the available resources:

The red marked rectangle is important, since if your app is more sophisticated than just displaying a "Hello World!" message, you definitely would like to point to the root of the REST API and then select the second radio button -> "Path and all sub-paths". After you save, a quick check on the status column should show green.
Last step, for now, in the cloud connector would be to sync the trust configuration for the principal propagation:

This should be enough for now within the cloud connector, let's jump in the Cloud Foundry account to setup our destination:

The above screenshot should bother you....at least a bit. First the communication protocol is http and second the Authentication is BasicAuthentication. Two things you read multiple times not to do. Let me explain. If you have created destinations in the past within Cloud Foundry, then you perfectly know that there is no "HTTPS" type in the dropdown of the destination creation and the reason for this is that it is up to you to make sure that your URL is using the proper protocol for the communication. OK, but here even our URL is http. This is because communication from the cloud to on-premise that goes over the cloud connector is always encrypted! There is no way around it. Now a few words on the authentication. The above was set just for test purposes. In a productive scenario I would highly recommend to use the option from the screenshot below:

At the end of this blog post I will explain shortly how this can work with your app in SAP Cloud Foundry and IAS.
The last step before testing our app connectivity would be to configure its xs-app.json. Below you will see an example of our configuration, but please do not take it for granted, since there are so many variations to it, I will mark out the important lines with red rectangles:

It is important to set the "authenticationMethod" to "route" and within the routes to point out the source, which you used during the consumption of the service in your SAPUI5 and the name of the destination we created a few steps back. We will talk about the "csrfProtection" flag a bit later in the blog post. Just accept for now that it is set to "false".
So much configuration and fumbling around without any result yet. Well guess what, we are not even scratching the surface:) You can easily verify that by trying to run the app, which tries to consume your on-premise Java REST service - it successfully finds the destination you created, it connects to the cloud connector, but then for some reason your connection to the SAP NetWeaver Java server fails. The answer here is simple and it lies in the configuration we have done in the beginning in the cloud connector. The selected principal type was X.509 certificate, but wait...we have setup BasicAuthentication in the cloud destination, so how would that work?!?
Time for a quick theory detour:) Cloud connector has a special way of communicating with the SAP NetWeaver Java. It relies on short-lived X.509 certificates. The flow is as follows ->
- The incoming call from the cloud enters the Cloud connector
- Cloud connector checks the data of the person that was authenticated in the cloud and thanks to an established trust store and certification authority, transforms it into a X.509 short-lived certificate, which is then forwarded along with the rest of the request to the SAP NetWeaver Java server
- On the other hand, SAP NetWeaver Java checks if the certificate is issued by a trusted authority and if so, tries to map the provided data to a user, which exists in Java UME.
- Once successful, all roles, groups and actions available to the user in UME are fully active and available to perform operations within the on-premise server
The theory behind sounds just a bit simpler than the actual realization. That is why I won't leave you hanging here and we will go through the needed steps in order to have a successful call to SAP NetWeaver Java from the cloud connector.
First step is to establish a trustful certificate authority in the cloud connector. With the correct sub-account selected, click on the Configuration menu:
Then we navigate to the On Premise tab and there we will find 4 key sub-sections: "System certificate", "Trust Store", "CA Certificate" and "Principal Propagation". The first three are important for issuing the short-lived certificate, while the last one is the one that defines what attributes will be included in the certificate, which later will be used to authenticate to SAP NetWeaver Java.
The setup could look like this: (keep in mind that this is just a test scenario setup)

For a simple non-productive scenario, you can follow this help.sap.com page, which explains how to generate your own certificates under a Linux environment:
https://help.sap.com/viewer/70ac991a4f734773b1892a8d0d45eabc/Cloud/en-US/590e173911084f17b73caff26f7... - Create a self-signed root CA
https://help.sap.com/viewer/70ac991a4f734773b1892a8d0d45eabc/Cloud/en-US/713d30fa7aa346f39896acd1229... - Create intermediate certificates
You will need the intermediate certificates for the cloud connector and the root CA for the SAP NetWeaver Java server.
For productive scenarios, I highly recommend to connect with your security officers, who can assist you with all of the above certificates, so that you won't have to generate them yourself.
The Subject pattern marked in the red rectangle defines the fields, from which you will read the data later in SAP NetWeaver Java. For this setup, we will use only the email field, which means that in order for the mapping in Java UME to be successful, each user should have a correctly maintained email.
Talking about the java backend, let's take the root CA and import it there, since it will be needed so that those short-lived certificates from Cloud connector are trusted. Within the SSL configuration menu of the NetWeaver administrator, we have already checked that the SSL port is enabled and working. However there was one more detail to that screenshot, which is important - the column "Keystore View Name". It points to the correct key store where we need to import the root CA.
Once we know that, we can search for "Certificates" in the NWA search and pick the "Key storage" configuration option:

Search for the same name that was mentioned in the SSL config and add the root CA there using the Import Entry button as shown on the screenshot below:

Now trust is established and the short-lived certificates from Cloud connector will be accepted by the NetWeaver Java server, however that is not all.
We need to define an authentication schema for our application, which provides the REST service. To do that, we need to again navigate within the NWA by searching for "authentication":

If we plan to have multiple apps, which provide such RESTful services to other systems, then it makes sense to create a policy, which we can apply to each application, instead of re-entering all the information from scratch. If you are doing this just for test purposes, then it would be sufficient to maintain the configuration just once. In both cases, we first have to clean the filter, which is added by default from the "Type" column, in order to see all policy configuration names:
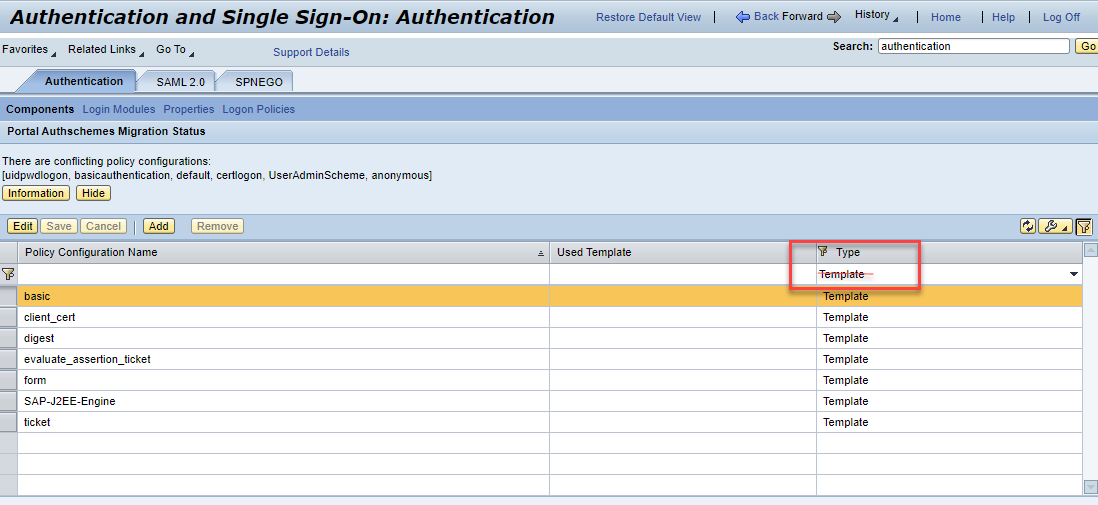
Once the filter is deleted and you press Enter, a much longer list of items will load in the table. Search for your application name (using the filter on top of each column), which provides the REST service and click on Edit:

What login modules you will add to your app depends on the usage you have planned for it. For our scenario the only mandatory login module is the ClientCertLoginModule. It also comes with a couple of rules, which instruct it from which attribute to retrieve the user, which will be mapped to the Java UME.
Once this step is done, we are ready to test the cloud application. GET requests should be working without any issues. POST requests, on the other hand might prove to be more challenging. This is because normally POST requests have one additional level of protection - CSRF token exchange. So what you have to do is first get a valid token from SAP NetWeaver Java with a proper GET call for the purpose and then include the response of that very same GET call in a follow-up POST call. To be able to achieve this in our scenario, you should keep one very important thing in mind - within the xs-app.json of your cloud application do not set the parameter "csrfProtection" to true. I know it doesn't sound logical, but this parameter has a whole other purpose than what you might think. Setting it to true will actually overwrite your logic and the csrf token you sent will be removed from the request, ending up in a 403 request to the backend. If you keep the above recommendation, your POST requests should work as well. If not, check out the debugging section below.
Debugging
In such a complex landscape passing through so many components, it is always handy to know where to look for potential problems. Below I will list a few of the tools that came quite handy during the debugging phase.
- SAP Cloud Foundry
- It is always a good idea to keep an eye on the Logs generated from your cloud app. The information you are looking for there would be if your setup is correct, so that the app can find the correct destination to the on-premise server
- SAP Cloud Connector
- Once you are sure that the destination is found and your call has reached the cloud connector, then you can check the Log and Trace Files of your sub-account communication.
- If those do not provide enough information, maybe it is worth enabling the Payload Trace, so you can check exactly what information reaches the cloud connector:

- SAP NetWeaver Java
- Since the platform has been around for more than 15 years, there are plenty of tools for troubleshooting. Let's say that if you reached the point where all your calls pass through the previous steps correctly, but fail in SAP NW, your problem is easily solvable, by just revising once more the steps in this tutorial.
- If however, this doesn't bring you forward, then you can explore the following tools:
- The NWA log viewer and more precisely two of its views:
- Developer Traces
- Authentication Logs
- If again, this doesn't help, then there is one quite well hidden tool, which full functionality is revealed only when accessed through an alias in the URL:
http://<host>:<port>/tshw
- The troubleshooting wizard is normally available through NWA in the Troubleshooting tab, but there you do not have the possibility to add your own packages for tracing.
- However, if you open the tool directly with the alias above, you get an additional option, which let's you configure the packages you can monitor:
- The NWA log viewer and more precisely two of its views:

- More on the Troubleshooting wizard can be found in this SAP Note -> https://launchpad.support.sap.com/#/notes/1332726
Productive setup with IAS
If you would like to use the above scenario productive, you should set the cloud destination authentication to a principal propagation scenario. In this case, however, you will have a different type of challenge -> e.g. how you will have the same users between your on-premise SAP NetWeaver Java server and the cloud. Thankfully, the solution to this lies in another cloud service - Identity Authentication Service, or shortly IAS. It allows you to switch the authentication mechanism for your application and instead of authenticating to SAP ID as identity provider, your users can authenticate directly to your SAP NetWeaver Java server. This way, you can always be sure that any user, who is allowed to login is also available in your backend Java system.
Congratulations, you have reached the next level (i mean the one after semi-god, of course)! I know it was a long journey, but I hope you believe it was worth it! And always remember, no level is the last one! Learning is an ever-ongoing process! Stay safe and stay on the constant learning path!
As a last note, I would like to thank everyone who contributed their knowledge and time and made this blog post a reality!
- SAP Managed Tags:
- SAP Connectivity service,
- NW Java Web Services,
- SAP Business Technology Platform
1 Comment
You must be a registered user to add a comment. If you've already registered, sign in. Otherwise, register and sign in.
Labels in this area
-
"automatische backups"
1 -
"regelmäßige sicherung"
1 -
"TypeScript" "Development" "FeedBack"
1 -
505 Technology Updates 53
1 -
ABAP
14 -
ABAP API
1 -
ABAP CDS Views
2 -
ABAP CDS Views - BW Extraction
1 -
ABAP CDS Views - CDC (Change Data Capture)
1 -
ABAP class
2 -
ABAP Cloud
2 -
ABAP Development
5 -
ABAP in Eclipse
1 -
ABAP Platform Trial
1 -
ABAP Programming
2 -
abap technical
1 -
absl
2 -
access data from SAP Datasphere directly from Snowflake
1 -
Access data from SAP datasphere to Qliksense
1 -
Accrual
1 -
action
1 -
adapter modules
1 -
Addon
1 -
Adobe Document Services
1 -
ADS
1 -
ADS Config
1 -
ADS with ABAP
1 -
ADS with Java
1 -
ADT
2 -
Advance Shipping and Receiving
1 -
Advanced Event Mesh
3 -
AEM
1 -
AI
7 -
AI Launchpad
1 -
AI Projects
1 -
AIML
9 -
Alert in Sap analytical cloud
1 -
Amazon S3
1 -
Analytical Dataset
1 -
Analytical Model
1 -
Analytics
1 -
Analyze Workload Data
1 -
annotations
1 -
API
1 -
API and Integration
3 -
API Call
2 -
API security
1 -
Application Architecture
1 -
Application Development
5 -
Application Development for SAP HANA Cloud
3 -
Applications and Business Processes (AP)
1 -
Artificial Intelligence
1 -
Artificial Intelligence (AI)
5 -
Artificial Intelligence (AI) 1 Business Trends 363 Business Trends 8 Digital Transformation with Cloud ERP (DT) 1 Event Information 462 Event Information 15 Expert Insights 114 Expert Insights 76 Life at SAP 418 Life at SAP 1 Product Updates 4
1 -
Artificial Intelligence (AI) blockchain Data & Analytics
1 -
Artificial Intelligence (AI) blockchain Data & Analytics Intelligent Enterprise
1 -
Artificial Intelligence (AI) blockchain Data & Analytics Intelligent Enterprise Oil Gas IoT Exploration Production
1 -
Artificial Intelligence (AI) blockchain Data & Analytics Intelligent Enterprise sustainability responsibility esg social compliance cybersecurity risk
1 -
ASE
1 -
ASR
2 -
ASUG
1 -
Attachments
1 -
Authorisations
1 -
Automating Processes
1 -
Automation
2 -
aws
2 -
Azure
1 -
Azure AI Studio
1 -
Azure API Center
1 -
Azure API Management
1 -
B2B Integration
1 -
Backorder Processing
1 -
Backup
1 -
Backup and Recovery
1 -
Backup schedule
1 -
BADI_MATERIAL_CHECK error message
1 -
Bank
1 -
BAS
1 -
basis
2 -
Basis Monitoring & Tcodes with Key notes
2 -
Batch Management
1 -
BDC
1 -
Best Practice
1 -
bitcoin
1 -
Blockchain
3 -
bodl
1 -
BOP in aATP
1 -
BOP Segments
1 -
BOP Strategies
1 -
BOP Variant
1 -
BPC
1 -
BPC LIVE
1 -
BTP
12 -
BTP Destination
2 -
Business AI
1 -
Business and IT Integration
1 -
Business application stu
1 -
Business Application Studio
1 -
Business Architecture
1 -
Business Communication Services
1 -
Business Continuity
1 -
Business Data Fabric
3 -
Business Partner
12 -
Business Partner Master Data
10 -
Business Technology Platform
2 -
Business Trends
4 -
CA
1 -
calculation view
1 -
CAP
3 -
Capgemini
1 -
CAPM
1 -
Catalyst for Efficiency: Revolutionizing SAP Integration Suite with Artificial Intelligence (AI) and
1 -
CCMS
2 -
CDQ
12 -
CDS
2 -
Cental Finance
1 -
Certificates
1 -
CFL
1 -
Change Management
1 -
chatbot
1 -
chatgpt
3 -
CL_SALV_TABLE
2 -
Class Runner
1 -
Classrunner
1 -
Cloud ALM Monitoring
1 -
Cloud ALM Operations
1 -
cloud connector
1 -
Cloud Extensibility
1 -
Cloud Foundry
4 -
Cloud Integration
6 -
Cloud Platform Integration
2 -
cloudalm
1 -
communication
1 -
Compensation Information Management
1 -
Compensation Management
1 -
Compliance
1 -
Compound Employee API
1 -
Configuration
1 -
Connectors
1 -
Consolidation Extension for SAP Analytics Cloud
2 -
Control Indicators.
1 -
Controller-Service-Repository pattern
1 -
Conversion
1 -
Cosine similarity
1 -
cryptocurrency
1 -
CSI
1 -
ctms
1 -
Custom chatbot
3 -
Custom Destination Service
1 -
custom fields
1 -
Customer Experience
1 -
Customer Journey
1 -
Customizing
1 -
cyber security
3 -
cybersecurity
1 -
Data
1 -
Data & Analytics
1 -
Data Aging
1 -
Data Analytics
2 -
Data and Analytics (DA)
1 -
Data Archiving
1 -
Data Back-up
1 -
Data Flow
1 -
Data Governance
5 -
Data Integration
2 -
Data Quality
12 -
Data Quality Management
12 -
Data Synchronization
1 -
data transfer
1 -
Data Unleashed
1 -
Data Value
8 -
database tables
1 -
Datasphere
3 -
datenbanksicherung
1 -
dba cockpit
1 -
dbacockpit
1 -
Debugging
2 -
Defender
1 -
Delimiting Pay Components
1 -
Delta Integrations
1 -
Destination
3 -
Destination Service
1 -
Developer extensibility
1 -
Developing with SAP Integration Suite
1 -
Devops
1 -
digital transformation
1 -
Documentation
1 -
Dot Product
1 -
DQM
1 -
dump database
1 -
dump transaction
1 -
e-Invoice
1 -
E4H Conversion
1 -
Eclipse ADT ABAP Development Tools
2 -
edoc
1 -
edocument
1 -
ELA
1 -
Embedded Consolidation
1 -
Embedding
1 -
Embeddings
1 -
Employee Central
1 -
Employee Central Payroll
1 -
Employee Central Time Off
1 -
Employee Information
1 -
Employee Rehires
1 -
Enable Now
1 -
Enable now manager
1 -
endpoint
1 -
Enhancement Request
1 -
Enterprise Architecture
1 -
ETL Business Analytics with SAP Signavio
1 -
Euclidean distance
1 -
Event Dates
1 -
Event Driven Architecture
1 -
Event Mesh
2 -
Event Reason
1 -
EventBasedIntegration
1 -
EWM
1 -
EWM Outbound configuration
1 -
EWM-TM-Integration
1 -
Existing Event Changes
1 -
Expand
1 -
Expert
2 -
Expert Insights
2 -
Exploits
1 -
Fiori
14 -
Fiori Elements
2 -
Fiori SAPUI5
12 -
Flask
1 -
Full Stack
8 -
Funds Management
1 -
General
1 -
General Splitter
1 -
Generative AI
1 -
Getting Started
1 -
GitHub
8 -
Grants Management
1 -
GraphQL
1 -
groovy
1 -
GTP
1 -
HANA
6 -
HANA Cloud
2 -
Hana Cloud Database Integration
2 -
HANA DB
2 -
HANA XS Advanced
1 -
Historical Events
1 -
home labs
1 -
HowTo
1 -
HR Data Management
1 -
html5
8 -
HTML5 Application
1 -
Identity cards validation
1 -
idm
1 -
Implementation
1 -
input parameter
1 -
instant payments
1 -
Integration
3 -
Integration Advisor
1 -
Integration Architecture
1 -
Integration Center
1 -
Integration Suite
1 -
intelligent enterprise
1 -
iot
1 -
Java
1 -
job
1 -
Job Information Changes
1 -
Job-Related Events
1 -
Job_Event_Information
1 -
joule
4 -
Journal Entries
1 -
Just Ask
1 -
Kerberos for ABAP
8 -
Kerberos for JAVA
8 -
KNN
1 -
Launch Wizard
1 -
Learning Content
2 -
Life at SAP
5 -
lightning
1 -
Linear Regression SAP HANA Cloud
1 -
Loading Indicator
1 -
local tax regulations
1 -
LP
1 -
Machine Learning
2 -
Marketing
1 -
Master Data
3 -
Master Data Management
14 -
Maxdb
2 -
MDG
1 -
MDGM
1 -
MDM
1 -
Message box.
1 -
Messages on RF Device
1 -
Microservices Architecture
1 -
Microsoft Universal Print
1 -
Middleware Solutions
1 -
Migration
5 -
ML Model Development
1 -
Modeling in SAP HANA Cloud
8 -
Monitoring
3 -
MTA
1 -
Multi-Record Scenarios
1 -
Multiple Event Triggers
1 -
Myself Transformation
1 -
Neo
1 -
New Event Creation
1 -
New Feature
1 -
Newcomer
1 -
NodeJS
2 -
ODATA
2 -
OData APIs
1 -
odatav2
1 -
ODATAV4
1 -
ODBC
1 -
ODBC Connection
1 -
Onpremise
1 -
open source
2 -
OpenAI API
1 -
Oracle
1 -
PaPM
1 -
PaPM Dynamic Data Copy through Writer function
1 -
PaPM Remote Call
1 -
PAS-C01
1 -
Pay Component Management
1 -
PGP
1 -
Pickle
1 -
PLANNING ARCHITECTURE
1 -
Popup in Sap analytical cloud
1 -
PostgrSQL
1 -
POSTMAN
1 -
Process Automation
2 -
Product Updates
4 -
PSM
1 -
Public Cloud
1 -
Python
4 -
python library - Document information extraction service
1 -
Qlik
1 -
Qualtrics
1 -
RAP
3 -
RAP BO
2 -
Record Deletion
1 -
Recovery
1 -
recurring payments
1 -
redeply
1 -
Release
1 -
Remote Consumption Model
1 -
Replication Flows
1 -
research
1 -
Resilience
1 -
REST
1 -
REST API
2 -
Retagging Required
1 -
Risk
1 -
Rolling Kernel Switch
1 -
route
1 -
rules
1 -
S4 HANA
1 -
S4 HANA Cloud
1 -
S4 HANA On-Premise
1 -
S4HANA
3 -
S4HANA_OP_2023
2 -
SAC
10 -
SAC PLANNING
9 -
SAP
4 -
SAP ABAP
1 -
SAP Advanced Event Mesh
1 -
SAP AI Core
8 -
SAP AI Launchpad
8 -
SAP Analytic Cloud Compass
1 -
Sap Analytical Cloud
1 -
SAP Analytics Cloud
4 -
SAP Analytics Cloud for Consolidation
3 -
SAP Analytics Cloud Story
1 -
SAP analytics clouds
1 -
SAP API Management
1 -
SAP BAS
1 -
SAP Basis
6 -
SAP BODS
1 -
SAP BODS certification.
1 -
SAP BTP
21 -
SAP BTP Build Work Zone
2 -
SAP BTP Cloud Foundry
6 -
SAP BTP Costing
1 -
SAP BTP CTMS
1 -
SAP BTP Innovation
1 -
SAP BTP Migration Tool
1 -
SAP BTP SDK IOS
1 -
SAP Build
11 -
SAP Build App
1 -
SAP Build apps
1 -
SAP Build CodeJam
1 -
SAP Build Process Automation
3 -
SAP Build work zone
10 -
SAP Business Objects Platform
1 -
SAP Business Technology
2 -
SAP Business Technology Platform (XP)
1 -
sap bw
1 -
SAP CAP
2 -
SAP CDC
1 -
SAP CDP
1 -
SAP CDS VIEW
1 -
SAP Certification
1 -
SAP Cloud ALM
4 -
SAP Cloud Application Programming Model
1 -
SAP Cloud Integration for Data Services
1 -
SAP cloud platform
8 -
SAP Companion
1 -
SAP CPI
3 -
SAP CPI (Cloud Platform Integration)
2 -
SAP CPI Discover tab
1 -
sap credential store
1 -
SAP Customer Data Cloud
1 -
SAP Customer Data Platform
1 -
SAP Data Intelligence
1 -
SAP Data Migration in Retail Industry
1 -
SAP Data Services
1 -
SAP DATABASE
1 -
SAP Dataspher to Non SAP BI tools
1 -
SAP Datasphere
9 -
SAP DRC
1 -
SAP EWM
1 -
SAP Fiori
3 -
SAP Fiori App Embedding
1 -
Sap Fiori Extension Project Using BAS
1 -
SAP GRC
1 -
SAP HANA
1 -
SAP HCM (Human Capital Management)
1 -
SAP HR Solutions
1 -
SAP IDM
1 -
SAP Integration Suite
9 -
SAP Integrations
4 -
SAP iRPA
2 -
SAP LAGGING AND SLOW
1 -
SAP Learning Class
1 -
SAP Learning Hub
1 -
SAP Master Data
1 -
SAP Odata
2 -
SAP on Azure
2 -
SAP PartnerEdge
1 -
sap partners
1 -
SAP Password Reset
1 -
SAP PO Migration
1 -
SAP Prepackaged Content
1 -
SAP Process Automation
2 -
SAP Process Integration
2 -
SAP Process Orchestration
1 -
SAP S4HANA
2 -
SAP S4HANA Cloud
1 -
SAP S4HANA Cloud for Finance
1 -
SAP S4HANA Cloud private edition
1 -
SAP Sandbox
1 -
SAP STMS
1 -
SAP successfactors
3 -
SAP SuccessFactors HXM Core
1 -
SAP Time
1 -
SAP TM
2 -
SAP Trading Partner Management
1 -
SAP UI5
1 -
SAP Upgrade
1 -
SAP Utilities
1 -
SAP-GUI
8 -
SAP_COM_0276
1 -
SAPBTP
1 -
SAPCPI
1 -
SAPEWM
1 -
sapmentors
1 -
saponaws
2 -
SAPS4HANA
1 -
SAPUI5
5 -
schedule
1 -
Script Operator
1 -
Secure Login Client Setup
8 -
security
9 -
Selenium Testing
1 -
Self Transformation
1 -
Self-Transformation
1 -
SEN
1 -
SEN Manager
1 -
service
1 -
SET_CELL_TYPE
1 -
SET_CELL_TYPE_COLUMN
1 -
SFTP scenario
2 -
Simplex
1 -
Single Sign On
8 -
Singlesource
1 -
SKLearn
1 -
Slow loading
1 -
soap
1 -
Software Development
1 -
SOLMAN
1 -
solman 7.2
2 -
Solution Manager
3 -
sp_dumpdb
1 -
sp_dumptrans
1 -
SQL
1 -
sql script
1 -
SSL
8 -
SSO
8 -
Substring function
1 -
SuccessFactors
1 -
SuccessFactors Platform
1 -
SuccessFactors Time Tracking
1 -
Sybase
1 -
system copy method
1 -
System owner
1 -
Table splitting
1 -
Tax Integration
1 -
Technical article
1 -
Technical articles
1 -
Technology Updates
14 -
Technology Updates
1 -
Technology_Updates
1 -
terraform
1 -
Threats
2 -
Time Collectors
1 -
Time Off
2 -
Time Sheet
1 -
Time Sheet SAP SuccessFactors Time Tracking
1 -
Tips and tricks
2 -
toggle button
1 -
Tools
1 -
Trainings & Certifications
1 -
Transformation Flow
1 -
Transport in SAP BODS
1 -
Transport Management
1 -
TypeScript
2 -
ui designer
1 -
unbind
1 -
Unified Customer Profile
1 -
UPB
1 -
Use of Parameters for Data Copy in PaPM
1 -
User Unlock
1 -
VA02
1 -
Validations
1 -
Vector Database
2 -
Vector Engine
1 -
Visual Studio Code
1 -
VSCode
1 -
Vulnerabilities
1 -
Web SDK
1 -
work zone
1 -
workload
1 -
xsa
1 -
XSA Refresh
1
- « Previous
- Next »
Related Content
- It has never been easier to print from SAP with Microsoft Universal Print in Technology Blogs by Members
- Single Sign On to SAP Cloud Integration (CPI runtime) from an external Identity Provider in Technology Blogs by SAP
- SAP PI/PO migration? Why you should move to the Cloud with SAP Integration Suite! in Technology Blogs by SAP
- Group Reporting Data Collection integration with SAP S4 HANA in Technology Blogs by Members
- How to Connect a S/4HANA Cloud Private Edition System to SAP Start in Technology Blogs by SAP
Top kudoed authors
| User | Count |
|---|---|
| 8 | |
| 5 | |
| 5 | |
| 4 | |
| 4 | |
| 4 | |
| 4 | |
| 3 | |
| 3 | |
| 3 |