
- SAP Community
- Products and Technology
- Financial Management
- Financial Management Blogs by SAP
- SAC / BPC Projects and Solution Manager
Financial Management Blogs by SAP
Get financial management insights from blog posts by SAP experts. Find and share tips on how to increase efficiency, reduce risk, and optimize working capital.
Turn on suggestions
Auto-suggest helps you quickly narrow down your search results by suggesting possible matches as you type.
Showing results for
Product and Topic Expert
Options
- Subscribe to RSS Feed
- Mark as New
- Mark as Read
- Bookmark
- Subscribe
- Printer Friendly Page
- Report Inappropriate Content
04-23-2020
2:59 PM
Introduction
It's not often you find SAC, BPC, ACTIVATE METHODOLOGY and SAP SOLUTION MANAGER in one sentence. <--- but there it is!
The exciting part about that sentence is that because Solution Manager, as a central instance, sees the overall system landscape and contains libraries of best practice business processes as well as libraries of configuration units it can automatically configure a system based on your business modelling and this can also be extended to solutions such as SAC, BPC, BW etc.
Solution Manager, in an ERP context, is able to compare its best practice content with live systems and provide a rating of how closely a system complies to the standard and exactly in which areas the deviations occur, which is useful information when upgrading.
Imagine that instead of downloading SAC Content Innovation (CI), which is a pre-packaged best practice accelerator that you still need to perform a fit/gap analysis on, you went directly to Solution Manager and selected standard business process steps (or created your own) and then generated an SAC model based on your own solution design documentation. Changing configuration would be driven by changing your solution documentation and requirements.
In other words we are moving from Solution Documentation to Solution Modelling. This is why a Solution Manager business process model is more than a business process documented in MS-Word.
It is quite common practice now to push plan data from SAC / BPC to S4 in order to use S4 functionality to process allocation- and distribution rules and then push the plan data back to the persisted plan model. So the business processes and data modelling of S4 and solutions like SAC and BPC are overlapping more and more and we are sure to see even tighter integration in the future.
The result is that we need to become familiar with the implementation methodologies that are going to drive this move toward generating configuration from design.
Topics to be covered
In a prior blog I discussed the documentation of SAC and BPC projects using Solution Manager to go as far as SCOPING the project using USE CASES as well as documenting the detailed business requirements to the point of capturing REQUIREMENTS on Solution Manager:
SAC / BPC Solution Design, Activate methodology and Solution Manager
In this blog I'd like to go through the steps for managing a SAC or BPC project according to the ACTIVATE project methodology using Solution Manager.
Create a project
In SAP ACTIVATE project methodology there are 5 project phases:
- Discover & Prepare
- Explore
- Realize
- Deploy
- Run
SAP ACTIVATE project methodology is an AGILE methodology which means that the entire solutions functional- and technical specifications do not need to be complete before the REALIZE / BUILD phase begins. If a WATERFALL project methodology was used step 2 would have been a BLUEPRINT PHASE which would include a BUSINESS BLUEPRINT and a TECHNICAL DESIGN document as deliverables with a sign-off procedure in order to move from step 2 to 3. However, in an AGILE project methodology we only require a SCOPE (approved) and FUNCTIONAL SPECIFICATIONS (not necessarily approved) to move from 2 to 3 and then the REALIZE phase is structured into very short delivery steps called SPRINTS which are typically 4-6 weeks each. The SPRINTS roll up into WAVES which make up the REALIZE phase.

So within a SPRINT the following tasks must be completed:
- Approve Functional Specifications (if not already done)
- Specify and approve technical design
- Build
- Transport build items to test environment
- Unit test (peer review) - can be informal
Designing SPRINTS are flexible to the point that although all these steps (1-5) need to be completed by the end of the WAVE they don't all need to be present in every sprint cycle. So for example, the last sprint in a wave could be designed for unit testing covering steps 4-6 while all other sprints are only for building steps 1-3.
Within the WAVE the following tasks must be completed:
- Complete Single Functional Tests (SFT)
- Complete User acceptance Tests (UAT)
Open the PROJECT MANAGEMENT Fiori tile:

Select CREATE PROJECT at the bottom right of the screen and complete the input fields including the selection of the FOCUSED BUILD template for single projects.

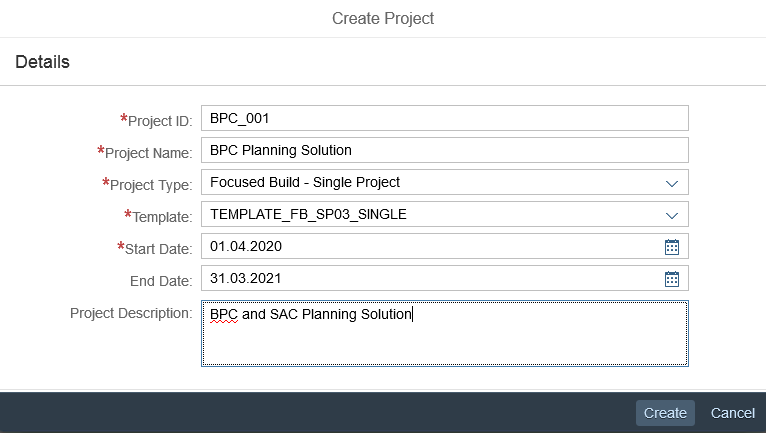
A project is created using the template and creates 4 WAVES each containing 3 SPRINT cycles. For our example we will only use 1 WAVE and 2 SPRINTS so delete the unnecessary steps and edit each row so the dates for each phase and cycle are spread over the year.

You'll notice that there are columns for WORK PACKAGE and WORK ITEM which is what we will use to link the project to the solution documentation and distribute development work to the development team.
At this stage we have the Solution Documentation specified down to REQUIREMENTS and the PROJECT is created so now we need to link the two together.
How to link the project to the requirements
The project uses WORK PACKAGES to link to the solution documentations REQUIREMENTS. The WORK PACKAGE represents all the work to be performed at a WAVE level. Once the WORK PACKAGE is created you can assign the work to developers on your project by means of WORK ITEMS which are performed at the SPRINT level. You can bundle multiple requirements into a WORK PACKAGE and split WORK PACKAGES into as many WORK ITEMS as you want.
So in our example we are taking a single BUSINESS PROCESS STEP for capturing sales prices which contains 3 requirements (2 Input Templates + 1 Planning Function) and we will assign all 3 to a single WORK PACKAGE but then we will split the work package into 2 WORK ITEMS to be developed over 2 SPRINT CYCLES i.e. 1 work item for the user interface and 1 work item for the business rules.
Go to the Solution Documentation business process for BPC and select the process step "REV010" and then click on the link for the 3 REQUIREMENTS that we created (previous blog, see link above). Notice that we have approached the linking process from the solution documentation side but you can also approach it from the project side, create a work package and select the available requirements.

A list of REQUIREMENTS is displayed already filtered for the business process step and in the bottom right corner you'll see the menu item for creating the WORK PACKAGE. However, before we can do this the requirements must change STATUS from DRAFT to APPROVED.

This allows the business analyst to start collecting REQUIREMENTS and keep them in DRAFT status while they work on them without the team being confused about the final deliverables. Often at the start of the EXPLORE phase while scoping is in process the numbering and requirements will change very often.
So select the 3 requirements and select "GO TO MASS CHANGE" from the REQUIREMENTS menu option and change the STATUS to APPROVED.


Now you can select the WORK PACKAGE menu option and select "CREATE". Add all 3 requirements to the newly created work package. An automatic reference is made in the long description of the work package to the details of the requirements. You can now select which PROJECT and which WAVE in the project the WORK PACKAGE relates to. You'll also notice that the work package flags the check boxes for WRICEF items which relate to the requirements.

Once the work package is created and you return to the requirements list you will see that the WORK PACKAGE document number and title are now connected to the requirements.

If we open our project we see that there is 1 work package available for WAVE 1 but still no work items yet for the SPRINT cycles.

On our SOLUTION READINESS DASHBOARD we can see all the relevant information for our newly created project.
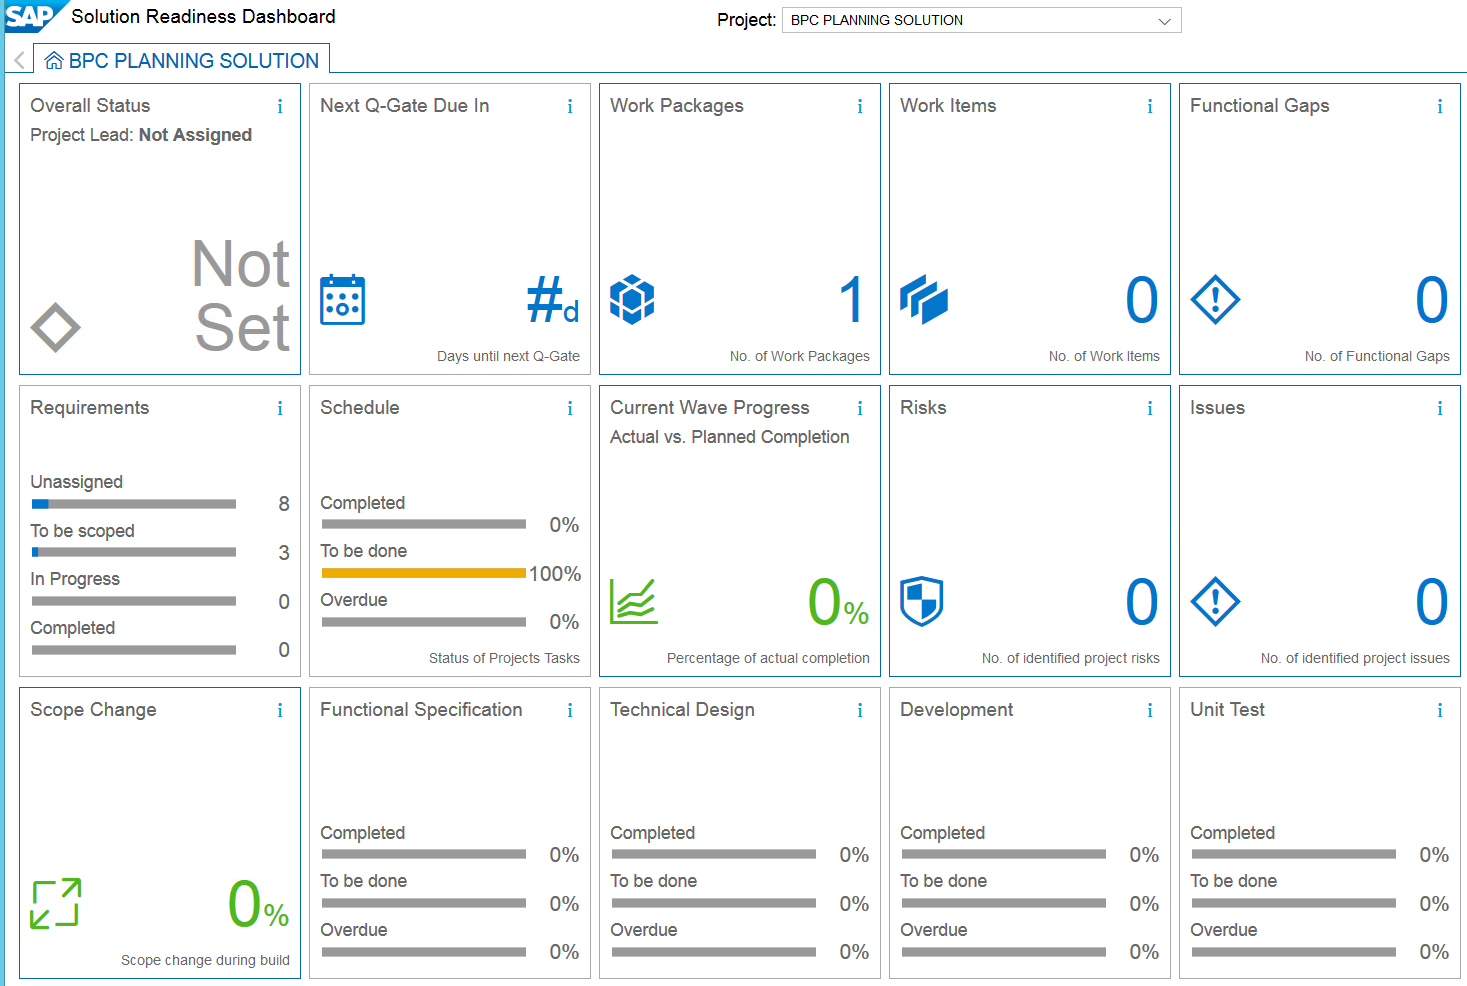
- The project has not started yet so the overall status is "not set" and no quality gate days are available yet
- There is 1 work package and no work items
- No functional gaps, risks, issues, or unit tests for the project yet
- There are 8 unassigned requirements - these are solution wide so can relate to other projects
- There are 3 requirements that need to be scoped which means they belong to a work package but need to be assigned to WORK ITEMS
- None of the requirements are being developed (in progress) or completed yet
- Schedule - the project has not started so 100% still needs to be done
- The functional specs and technical design are still outstanding
Creating WORK ITEMS for the developers
WORK ITEMS distribute the development of REQUIREMENTS which are contained in a WORK PACKAGE (at WAVE level) to developers at the SPRINT level.
The FIORI launchpad contains a tile for accessing work packages directly so you can navigate to the newly created work package and if you select the "RELATIONS" icon you will see the 3 requirements that are related to the work package.
Now we want to create WORK ITEMS for the developers and assign them to the SPRINT cycles and this process is called SCOPING. At the bottom right of the screen in the menu option change the status of the work package from CREATED to SCOPING. You'll notice that the work package status changes to scoping and the status of the requirements within the work packages changes from APPROVED to IN REALIZATION.


You are now able to add the WORK ITEMS using the SCOPE icon.

You are now able to create as many WORK ITEMS as you want and of relevance here is that you can select from GC (General Change) or NC (Normal Change) work items. We use NC when we want to link the work item to the transport management system but in our example we will manage the project disconnected from the transport landscape.

In our example we have now chosen to develop the user interface in SPRINT 1 which consists of 2 BPC Input Workbooks for sales pricing each containing various worksheets and then develop the business rules in SPRINT 2 which will perform some basic price escalations and simple discount and VAT calculations to obtain the final periodic monthly pricing for our revenue plan.

On the SOLUTION READINESS DASHBOARD we can now see that the REQUIREMENTS have moved from "TO BE SCOPED" to "IN PROGRESS". We can also see that we now have 2 WORK ITEMS assigned to the project.

Work items which are still in the SCOPING phase are still in DESIGN mode. You are able to delete the work items and add new ones in this mode and have not generated a document number yet for the individual work items. The work package needs to be put into "HANDOVER TO DEVELOPMENT" status in order to generate a work item document number and move from the DESIGN phase to DEVELOPMENT phase.
Moving WORK ITEMS to the DEVELOPMENT TEAM
Now that we are ready to approve the SCOPE the system will check that the correct documentation is provided for each WORK ITEM and the system has been configured to check for two documents on the WORK ITEM:
- Functional specifications specifically in the template format for WRICEF items
- Single Functional Test document
This check is configurable in Solution Manager and up until now it was not mandatory to force any structure on the solution documentation process. We might have uploaded many documents to the business process step or maybe we provided no documents and only completed the business process diagram itself but now that we want to approve the WORK ITEM the system has been configured to insist that at least these two documents are provided before continuing.
So before continuing the document status will reflect an error and prevent approval.

In the DOCUMENTS tab you are now able to select which document(s) should be linked to the WORK ITEM to meet the criteria. You can assign more than one document to each required type by simply clicking the ASSIGN button. Since the document type is already known there is nothing else to do, just simply identify which documents should be selected for the WI.

Now you are able to FINALIZE the SCOPE and change the work package status.


On changing status you see the two new documents for WORK ITEMS which will be used for development.

Now on the project plan we can see the work package and the work items with hyperlinks to the details.
Fun fact: You'll see 3 work packages and might have been expecting 1 but during the setup I linked the project to a system release that was locked for transport from design to development and ended up creating another 2 work packages to correct the problem. However, when you drill down into the work packages you see the 2 rejected work packages and the 1 released work package.

Conclusion
In conclusion I've covered:
- A motivation for Solution Manager - Design driving automated configuration
- Explaining SAP ACTIVATE methodology compared to a waterfall project implementation methodology
- Some insights into the workings of Solution Manager's FOCUSED BUILD add-on particularly because the screens are so colourful and cool to work with and maybe you have not been exposed to them before
Labels:
3 Comments
You must be a registered user to add a comment. If you've already registered, sign in. Otherwise, register and sign in.
Labels in this area
Related Content
- Manage dates-driven planning processes with SAP Analytics Cloud in Financial Management Blogs by SAP
- Scale Up Subscription Initiatives with SAP Billing and Revenue Innovation Management in Financial Management Blogs by SAP
- SAP ECC Conversion to S/4HANA - Focus in CO-PA Costing-Based to Margin Analysis in Financial Management Blogs by SAP
- SAP Treasury Interest Rate Instrument to manage Long Term Loan for a Project in Financial Management Q&A
- Grants Management Part 1 in Financial Management Blogs by Members
Top kudoed authors
| User | Count |
|---|---|
| 6 | |
| 3 | |
| 2 | |
| 2 | |
| 2 | |
| 1 | |
| 1 | |
| 1 | |
| 1 | |
| 1 |