
- SAP Community
- Products and Technology
- Enterprise Resource Planning
- ERP Blogs by SAP
- Live Connection with SAP HANA Service on SAP Cloud...
Enterprise Resource Planning Blogs by SAP
Get insights and updates about cloud ERP and RISE with SAP, SAP S/4HANA and SAP S/4HANA Cloud, and more enterprise management capabilities with SAP blog posts.
Turn on suggestions
Auto-suggest helps you quickly narrow down your search results by suggesting possible matches as you type.
Showing results for
former_member13
Explorer
Options
- Subscribe to RSS Feed
- Mark as New
- Mark as Read
- Bookmark
- Subscribe
- Printer Friendly Page
- Report Inappropriate Content
04-19-2020
7:48 PM
Purpose
You can evaluate your company’s suppliers to obtain a basis for your business relationship with them and to optimize your supply base. Based on the feedback you gather through questionnaires, you obtain a scorecard for each supplier evaluated. The scorecard helps you to assess a supplier’s strengths and shortcomings and to initiate measures for improvement. Evaluation scorecards also enable you to easily compare suppliers within a peer group.
Ultimately, a combined real-time view across operational and questionnaire-based scores provides a holistic view of your supplier’s performance.
Story Flow Summary
This blog is in continuation to my previous blog on S/4HANA Cloud connection with SAP Data Intelligence. You can refer the following blogs for more details:
This blog will focus on establishing live connection from SAP HANA Service on SAP CF to SAP Analytic Cloud. S/4HANA Cloud Operational Data for supplier would be saved into SAP HANA Service as shown in my two previous blogs. live connection of SAP analytic Cloud with SAP HANA would show the real time analytics on the supplier evaluation.
Below are the steps to perform to establish live connections between SAP HANA Service on SAP Cloud Foundry to SAP Analytic Cloud tenant,
Below are the steps to perform this step,
1. Services required
a. SAP HANA DB as a service in SAP Cloud Foundry (SCP)
b. SAP Analytics Cloud
c. SAML 2 Identity Provider (IdP)
2. Install Required Tools
a. Download and install SAP Cloud Foundry CLI
b. Download and install SAP Cloud Foundry CLI Plugin MTA
c. Download and install Oracle JDK 8
d. Download and install Apache Maven
e. Download and install Node.js Node.Js
f. Verify that NPM is installed
g. Set NPM for the sap registry modules
3. Create HANA HDI Container – SAP WebID and SAP CF
4. Create Synonym for the View/Table in the Classic schema on HANA DB
5. Create Calculation View in HDI – HANA DB
6. Map Hana JWT IDP users to the External SAML IDP users – HANA DB Classic
7. Add New trust configuration in the SAP CF
8. Setup SCP Cloud Foundry SSO and SAC SSO with the QA IDP – IdP, SAP CF and SAC
9. Deploy Analytics Adapter – SAP CF
10. Setup Trust between XSUAA and HANA Database Container – SAP CP
11. Grant Permissions and Setup Roles – HANA DB
12. Create Hana Live Data Connection in SAP Analytics Cloud – SAC
Step1: Services required
Below list of services are required,
1. SAP HANA DB as a service in SAP Cloud Foundry (SCP)
2. SAP Analytics Cloud
3. SAML 2 Identity Provider (IdP)
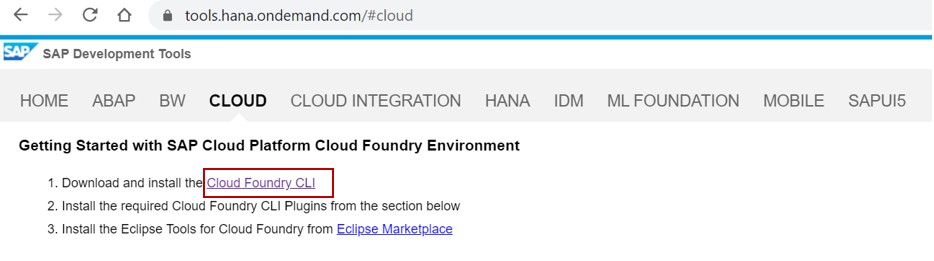
Step2: Install Required Tools
1. Go to https://tools.hana.ondemand.com/#cloud and click on the Cloud Foundry CLI link marka as below for SAP Cloud Platform. Download and extract file in local folder and execute the same.
2. Open command prompt and Run CF command to validate CF CLI
3. Please watch the video to install CF CLI step by step https://www.youtube.com/watch?v=s7LJ7bbYMpQ&index=14&list=PLkzo92owKnVyh290bEmKED11Gcdkyoi7w
4. MTA plugin would be required since MTA app would be deployed for HANA Analytic Adapter deployed on SAP Cloud Foundry. Download and extract it to local system. There are new Cloud MTA Build Tool available for the MTA Build which need to refer May 31, 2020 onwards.

5. Run the command cf install-plugin <name.exe> in the command prompt and click enter.

6. Watch you tube video and follow step by step https://www.youtube.com/watch?v=s7LJ7bbYMpQ&index=14&list=PLkzo92owKnVyh290bEmKED11Gcdkyoi7w
7. Download and install Oracle JDK 8 or SAP JDK 8: https://tools.hana.ondemand.com/#cloud
8. verify in command prompt that JDK is ready example: javac --version
9. Download and install Apache Maven: https://maven.apache.org/download.cgi
10. verify in the command prompt that Maven is ready by keyword : mvn --version
11. Download and install Node.js: https://nodejs.org/en/download/
12. verify that Node.js is ready by keyword in command prompt: node --version
a) Verify that NPM (Node Package Manager) is installed
Note: NPM is distributed with Node.js – which means that when you download Node.js, you automatically get NPM installed on your computer. example: npm --version
b) Set NPM for the sap registry modules with the command:
npm config set @Sap:registry https://npm.sap.com
Step3: Create HANA HDI Container
1. Below picture describe well about the component details to require live connection between HANA Service on cloud and SAP Analytic Cloud

2. HANA Service on SAP CF is seen below under service HANA-DB. Created. Click on the Dashboard button under actions columns.

3. Open HANA Database explorer as below and open SQL Console.

4. Open URL https://github.com/saphanaacademy/SAPHANAService to get the code to Create use, role and grant external access to user

5. Code to Create User and Role to granting access to external service
---
CREATE USER MYDATA_GRANTOR PASSWORD Password1 NO FORCE_FIRST_PASSWORD_CHANGE;
CREATE ROLE "<SCHEMANAME>::external_access_g";
GRANT SELECT, SELECT METADATA ON SCHEMA MYDATA TO "<SCHEMANAME>::external_access_g" WITH GRANT OPTION;
CREATE ROLE "<SCHEMANAME>::external_access";
GRANT SELECT, SELECT METADATA ON SCHEMA MYDATA TO "<SCHEMANAME>::external_access";
GRANT "<SCHEMANAME>::external_access_g", "<SCHEMANAME>::external_access" TO MYDATA_GRANTOR WITH ADMIN OPTION;
---
6. Once above code is executed into the SQL Console of HANA DB then proceed with Creation of User Provided Service in CF where HANA Service is created.
7. Go to SAP Cloud Foundry account and space. Click on the user provided service and click on new Instance. Add instance name, user credentials. Please keep proper password and username as below details are just for the reference.

8. User Provided service can be created in SAP CF CLI by below command:
cf cups mydata-schema -p "{"user":"MYDATA_GRANTOR", "password":"Password1", "schema":"MYDATA", "tags":["hana"]}"
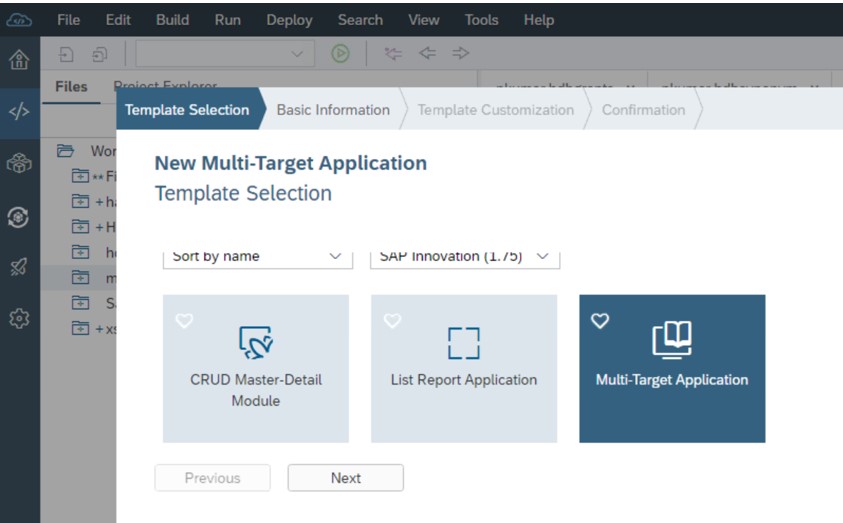
9. Below steps describes to how to create HANA HDI Container and then create synonyms for the view created in HANA Service. Calculation view would be created which are then exposed to SAP Analytic Cloud for the analytics.
Go to SAP WebIDE and click on File from menu. Select Multi Target Application template after selection of New and then project from template.

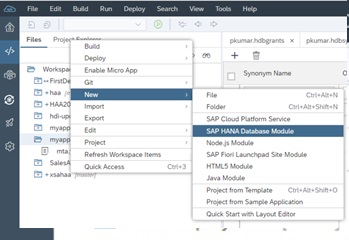
10. MTA Template app myapp1 created after then right click on the project folder and select “SAP HANA Database Module”.

11. Click on mta.yaml file and modify the code accordingly with reference of below code


12. Code Snippet for the YAML File
ID: myapp
_schema-version: '2.1'
version: 0.0.4
modules:
- name: mydb
type: hdb
path: mydb
requires:
- name: hdi_mydb
properties:
TARGET_CONTAINER: '~{hdi-container-name}'
- name: mydata-schema
resources:
- name: hdi_mydb
properties:
hdi-container-name: ${service-name}
type: com.sap.xs.hdi-container
- name: mydata -schema
type: org.cloudfoundry.existing-service
parameters:
service-name: mydata -schema
13. Right Click on the project and build the same.

14. Below message would be displayed after success full build

15. Follow below steps to create hdbgrant file and add below codes in hdbgrants file


Code Snippet:
{
"mydata-schema": {
"object_owner": {
"roles": [
"<SCHEMANAME>::external_access_g"
] },
"application_user": {
"roles": [
"<SCHEMANAME>::external_access"
] } } }
16. Build the hdbgrant file

Step4: Create Synonym for the View/Table in the Classic schema on HANA DB
1. Create the synonyms for the HANA DB tables as per below steps


2. Add Below code and save

3. Now schema name would appear

4. Build the synonyms

Step5: Create Calculation View in HDI – HANA DB
1. Create Calculation view to enable it into the SAC

2. Give name for the calculation view

3. Add the Data Source in the calculation view

4. Add the mappings as per the requirement

5. Build the file for the calculation view

6. Right click on the project and click on Deploy and then Deploy to SAP Cloud Platform


7. Go to SAP Cloud Platform Cockpit and open the space in the SAP Cloud Foundry account. Click on the Service instance where an HANA Service instance would be created under plan HDI_SHARED in below screen and bind application would be mydb(name given in the MTA application in SAP WebIDE).

8. Service instance has application reference of mydb as below screen shot

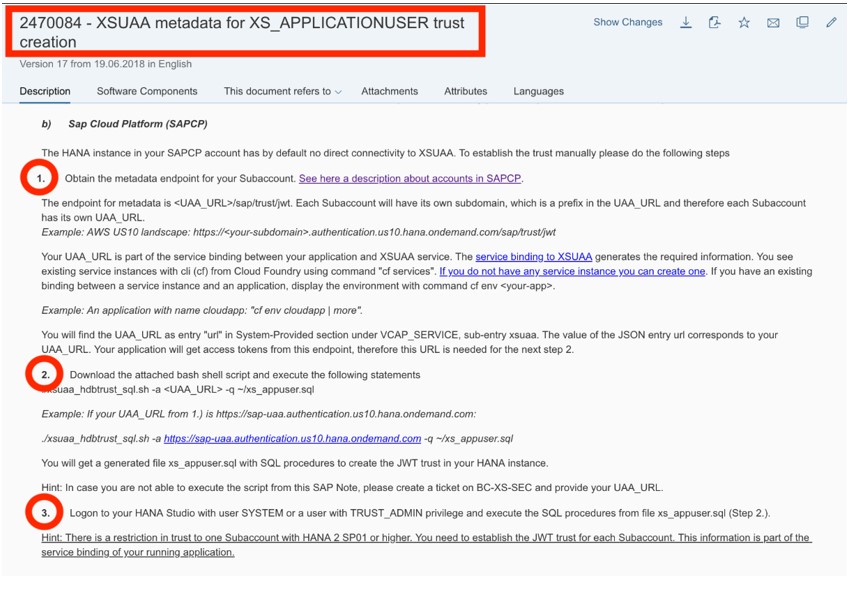
Step 6: Map Hana JWT IDP users to the External SAML IDP users – HANA DB Classic
1. Map Hana JWT IDP users to the External SAML IDP users – HANA DB Classic
Follow sap note https://launchpad.support.sap.com/#/notes/2470084 Solution → b → b → execute steps 1, 2, 3
2. Go to Attachment and download the “xsuaa_trust.zip” as in below screen shot. Run the git bash command as per step 2 mentioned in the OSS note and would return a file name “xs.appuser.sql”.
3. Open the file and copy it and paste it into HANA Service DB SQL Console.

4. Copy below code and add into the SQL Console.sql in HANA DB and execute


5. After execution of copied code, it will create a procedure to update JWT tables below. After execution click on public synonyms as below. Open tables JWT_PROVIDERS, CERTIFICATES, PSE_CERTIFICATES and PSES as below screens.


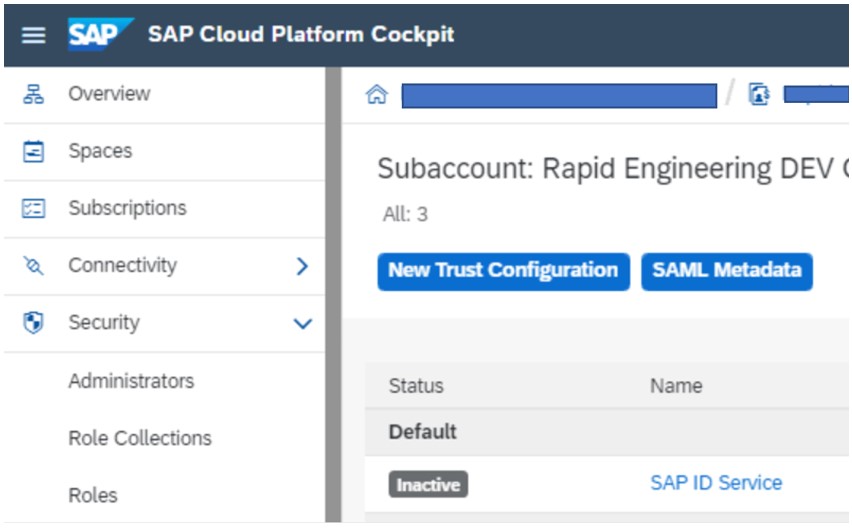
Step7: Add New trust configuration in the SAP CF
1. Download the SAML 2.0 metadata from your IDP and save it in your folder.
In the SAP Cloud Platform cockpit, go to your subaccount >>> Security >>> Trust Configuration and create a New Trust Configuration
2. A popup will appear wherein click on upload button.

3. After click on upload button, it will browse for the metadata file. Select the metadata file of Identity provider downloaded from identity authentication service.

4. After uploading the metadata, click on the parse to verify the content.

5. Once parse then Save button would be enabled to save the changes. Click on Save button and new trust configuration would be created as below, activate the trust configuration and make it default.

Step8: Setup SCP Cloud Foundry SSO and SAC SSO with the QA IDP – IdP, SAP CF and SAC
1. Once trust configuration is created into the SAP Cloud Foundry then open the Identity Authentication service tenant (Identity Provider). These steps may differ based on the tenant available to you but adding custom application would be similar. In my case there are two custom application created to setup SSO,
1. SAP Cloud Foundry to Identity authentication service tenant
2. SAP Analytic Cloud to Identity authentication service tenant

2. Click on SAP Analytic Cloud Live application and the click on SAML 2.0 Configuration

3. Upload the metadata downloaded from SAP Analytic Cloud tenant

4. Click on the subject name identifier

5. Change Basic Attribute to E-Mail as below screen

6. Now repeat the steps for another application SAP Cloud Platform

7. Upload metadata downloaded from SAP Cloud Foundry account using URL

8. Click on Subject Name Identifier

9. Change the basic attribute to E-Mail as below screen shot

10. Now got to SAP Analytic Cloud tenant and click on System->Administration

11. Verify if user login into SAC tenant is System_Owner, if not then change it to System_Owner(Only system owner can change the Roles to System_Owner)

12. Click on the security tab and select radio button SAML Single Sign-On(SSO)

13. Click on upload button to upload the metadata downloaded from

14. Select the metadata downloaded from Identity authentication service for trust configuration is set up into SAP Cloud Foundry

15. Select user attribute Email from the dropdown

16. Add the email ID in the login credential, remember email ID would the one by which user login into SAP Cloud foundry.

17. Select the Required Radio button and click on the Save button to complete the SSO set up

Step9: Deploy Analytics Adapter – SAP CF
1. Deploy Analytics Adapter with reference to the HDI Container created
Clone and application from GitHub of SAP HANA Academy https://github.com/saphanaacademy/haa

2. After downloading the file, it will look like below structure in local folder.

3. Download Multi-Target Application Archive Builder from https://tools.hana.ondemand.com/#cloud
Note: As of version 1.1.20, the Multi-Target Application Archive Builder is deprecated. The tool will be available until May 31, 2020.
A new and improved tool is already available. Learn about the Cloud MTA Build Tool https://sap.github.io/cloud-mta-build-tool/

4. Download the file “mta_archive_builder-1.1.20.zip” and extract it into a folder. Copy the file “mta_archive_builder” and save into the haa folder with name “mta”.

5. After adding renamed MTA into the local folder, it will look like below.

6. Open Link https://tools.hana.ondemand.com/#hanatools and download file “xsahaa-release-1.5.10-release.zip”.

7. Extract the file and copy file “java-xsahaa.war” from extracted folder to the “haahaa-javatarget” folder as below


8. Same HDI details can be found by CF CLI by command “cf s”.
Next step to edit the mta.yaml file.
i. Replace the placeholder <hdi-container> with the HDI name. in above screen shot it is hdi_mydb.
ii. Replace the placeholder for <sac-host> with SAC core URL
iii. Delete the SAP_JWT_TRUST_ACL and TENANT_HOST_PATTERN if no default multitenancy enabled
9. Below code pested,
ID: haa
_schema-version: '2.0'
version: 0.0.1
modules:
- name: haa-java
type: java
path: haa-java
parameters:
memory: 1024M
buildpack: sap_java_buildpack
properties:
TARGET_RUNTIME: tomee
JBP_CONFIG_RESOURCE_CONFIGURATION: "['tomee/webapps/ROOT/WEB-INF/resources.xml': {'xsahaa-hdi-container':'hdi_mydb'}]"
USE_NAMED_USER: true
SECONDARY_ROUTING_PERCENT: 0
provides:
- name: haa-java
properties:
url: ${default-url}
requires:
- name: haa-uaa
- name: hdi_mydb
- name: haa
type: nodejs
path: haa-entry
parameters:
memory: 512M
buildpack: nodejs_buildpack
requires:
- name: haa-uaa
- name: haa-java
group: destinations
properties:
name: haa-java
url: ~{url}
forwardAuthToken: true
timeout: 600000
properties:
CORS: '[{"uriPattern": "^/sap/bc/ina/(.*)$", "allowedOrigin": [{"host":"<SAC_URL>", "protocol":"https"}], "allowedMethods": ["GET", "POST", "OPTIONS"], "allowedHeaders": ["Origin", "Accept", "X-Requested-With", "Content-Type", "Access-Control-Request-Method", "Access-Control-Request-Headers", "Authorization", "X-Sap-Cid", "X-Csrf-Token"], "exposeHeaders": ["Accept", "Authorization", "X-Requested-With", "X-Sap-Cid", "Access-Control-Allow-Origin", "Access-Control-Allow-Credentials", "X-Csrf-Token", "Content-Type"]}]'
INCOMING_CONNECTION_TIMEOUT: 600000
resources:
- name: haa-uaa
type: com.sap.xs.uaa
parameters:
path: ./xs-security.json
- name: hdi_mydb
type: org.cloudfoundry.existing-service

10. Change Tenant Mode to “dedicated”.
Login into SAP CF account by CF CLI by command CF LOGIN, enter user and password and select the space.
Build the MTA file with the command: java -jar mta.jar --build-target=CF build

11. After build completed then there would be a file generated into the HAA folder file in the local folder

12. Further deploy the same mtar file with command “cf deploy haa.mtar”.

13. Once deployment is completed successfully then two application “HAA” and “HAA-JAVA” would appear in SAP CF
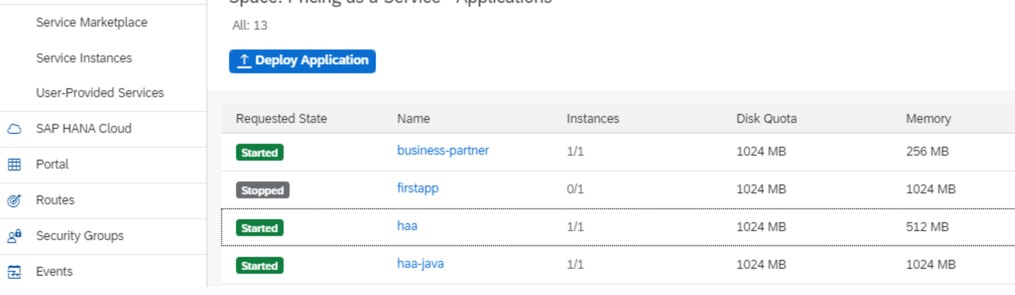
14. Click on the application HAA then application overview would be shown along with its route’s details

15. When click on the Application route then HANA Analytic Adapter should be displayed that means HANA Analytic Adapter is successfully done

Step10: Setup Trust between XSUAA and HANA Database Container – SAP CP
1. Setup Trust between XSUAA and HANA Database Container. Go to SAP Cloud foundry account click on Role Collections under security in left.

2. Click on New Role Collection
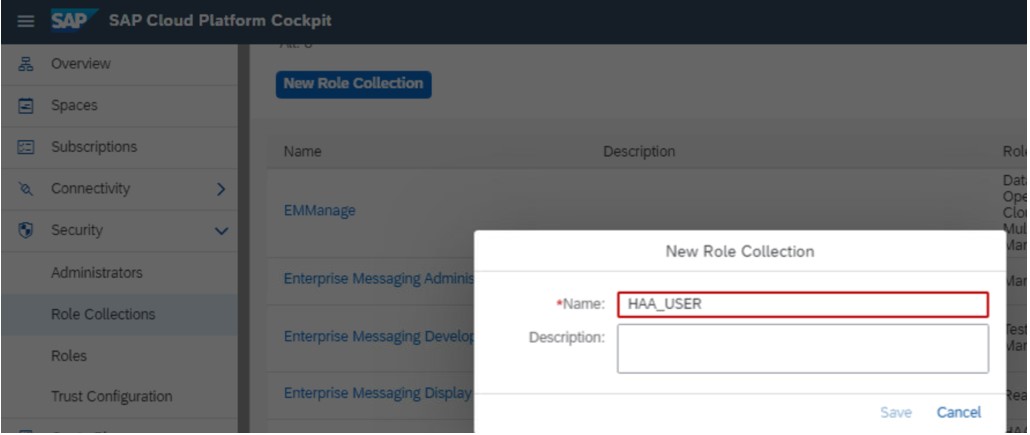
3. Add name a name to it and then click to Add Role created by HAA application in new created role collection. An Application identifier created when HAA app is deployed. Click on Save to add the changes.

4. Click on Trust Configuration under Security

5. Click on Role Collection Assignment and add email ID which were added into the SAC and click on Show assignment

6. Add Role Collection HAA_USER created in previous step and click on Assign Role Collection

Step11: Grant Permissions and Setup Roles – HANA DB
1. Now settings in SAP Cloud Foundry is completed and move to HANA Service on SAP CF. Go to HANA Cockpit and click on Role Management

2. Role Management screen would be open and click on Create Role “+” button

3. Give a name to role HAA_USER

4. Click on Add Object

5. Search for object EXECUTE_MDS of object type PROCEDURE and click on it to navigate to another screen

6. Click on EXECUTE and then on OK

7. Click on Save

8. Go to SAP CF CLI to view VCAP_SERVICES”. VCAP_SERVICES could be opened into the SAP CF account under application as well.

9. Find Schema under "VCAP_SERVICES" and copy it.

10. Come back to HANA DB Role management tab and search for Schema copied from previous screen and add it.

11. Click on Role Management and navigate to User Management screen

12. Search for the user SHA created in previous steps and add role HAA_USER to it


Click on Ok then Save the changes

Step12: Create Connection in SAP Analytics Cloud – SAC Hana Live Data
1. Now go to SAP Analytic Cloud tenant and click on Connection

2. Click on “+” to add new connection

3. Select connect to Live Data and select SAP HANA

4. Add the host details in Live connection of HAA app routes URL from SAP Cloud foundry application overview screen. HTTPS port would 443.

5. Below screen is from SAP CF deployed SAP Analytic Adapter

6. Select authentication method SAML Single Sign On

7. A pop up would appear displaying the authenticating the SSO

8. Click of create under Home and then chose model

9. Select Get data from a data source and connect to Live Data Connection and select the live connection created in previous step

10. Select the calculation view created in the HDI Container deployed by SAP WebIDE in previous steps and save it. A new model would get geneared that can be used into the creating the story.

11. Create story from the model created from previous steps
- SAP Managed Tags:
- SAP S/4HANA Public Cloud
Labels:
4 Comments
You must be a registered user to add a comment. If you've already registered, sign in. Otherwise, register and sign in.
Labels in this area
-
Artificial Intelligence (AI)
1 -
Business Trends
363 -
Business Trends
21 -
Customer COE Basics and Fundamentals
1 -
Digital Transformation with Cloud ERP (DT)
1 -
Event Information
461 -
Event Information
24 -
Expert Insights
114 -
Expert Insights
154 -
General
1 -
Governance and Organization
1 -
Introduction
1 -
Life at SAP
415 -
Life at SAP
2 -
Product Updates
4,685 -
Product Updates
215 -
Roadmap and Strategy
1 -
Technology Updates
1,502 -
Technology Updates
89
Related Content
- [Feature]Side-by-side extensiblity to adjust the received transmission(Java) in Enterprise Resource Planning Blogs by SAP
- Getting error in Sap Analytics cloud while creating a live connection to sap datasphere in Enterprise Resource Planning Q&A
- SAP Fiori Elements : CDS And Overview Page-Part 2 in Enterprise Resource Planning Blogs by Members
- SAP S/4HANA Data Management and Analytics empowered by SAP HANA Cloud in Enterprise Resource Planning Blogs by SAP
- How to connect a Fiori Elements application with SAP S/4HANA Cloud for projects, collaborative project management in Enterprise Resource Planning Blogs by SAP
Top kudoed authors
| User | Count |
|---|---|
| 12 | |
| 11 | |
| 7 | |
| 6 | |
| 6 | |
| 4 | |
| 4 | |
| 4 | |
| 4 | |
| 3 |