


- SAP Community
- Products and Technology
- Technology
- Technology Blogs by SAP
- Cycle Controls (Paging)
Technology Blogs by SAP
Learn how to extend and personalize SAP applications. Follow the SAP technology blog for insights into SAP BTP, ABAP, SAP Analytics Cloud, SAP HANA, and more.
Turn on suggestions
Auto-suggest helps you quickly narrow down your search results by suggesting possible matches as you type.
Showing results for
Advisor
Options
- Subscribe to RSS Feed
- Mark as New
- Mark as Read
- Bookmark
- Subscribe
- Printer Friendly Page
- Report Inappropriate Content
02-24-2020
9:50 PM
Many times in dashboards, our designs are greatly limited by the available space that we have to design in. For example, if we wanted to use three charts for user input, then much of the real estate on the canvas will be consumed by these three input controls. Recently, I built just an application with such input controls, and I want to share how I managed the real estate by cycling through panels of input controls.
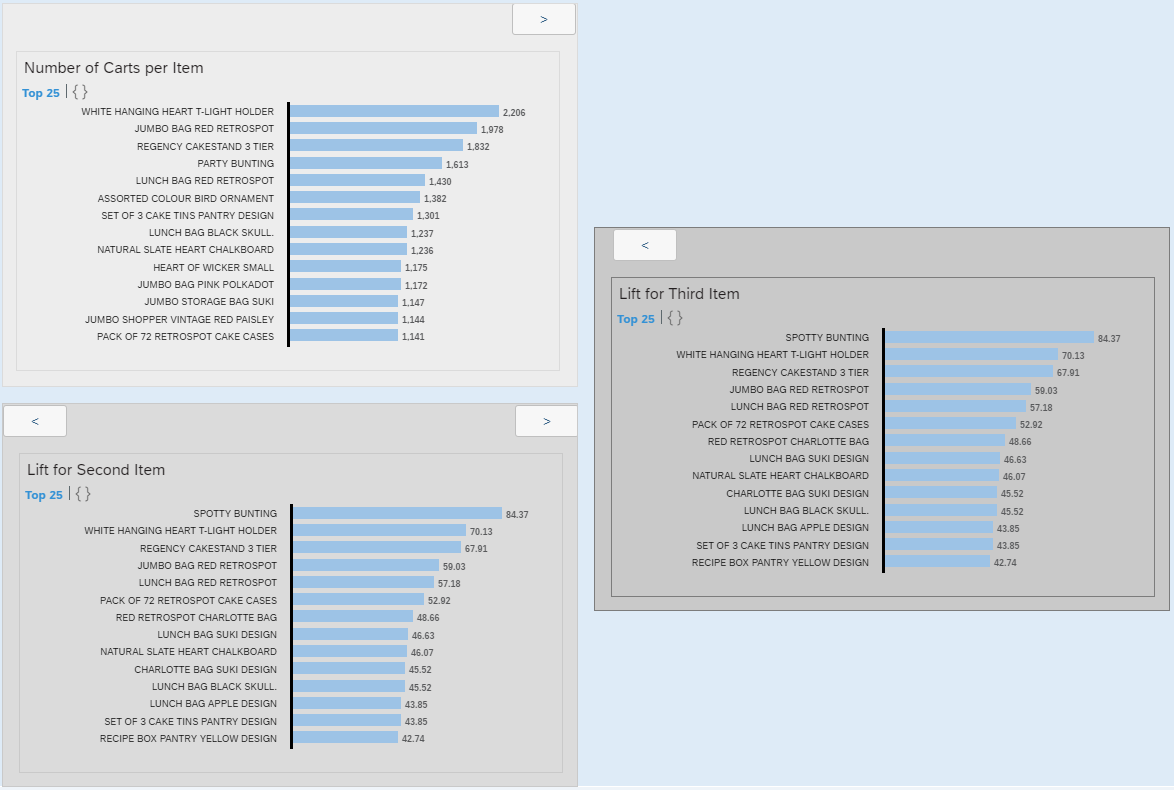
In the application description, it is mentioned that we need two to three items selected. This means that I need three charts from which to select items. However, only one is visible in the application, in the screenshot. The three charts are shown below:
We only see one input chart in the application, because the charts are superimposed upon one another. Since we only interact with one input chart at a time, then only one chart at a time needs to be visible. The three text fields, placed above the charts, will keep track of the selected items.
Each chart control in encapsulated within a panel widget and accompanied by one or two navigation buttons.
We place the input charts and navigation buttons in a panel for two reasons:
This is how the application will work.
First, we need to superimpose the selection panels. I find that the best way to do this is to hide all the panels, save for one panel, and then place the one visible panel in the correct location.
With only one of the selection panels visible, move the visible selection panel into position. Then, in the Designer note the size and position of the newly placed selection panel.
Next, make another panel visible, while hiding the previous selection panel, and then place it at the same position and same size as the previous selection panel.
Now that we have the three panels superimposed, let's look at the code for the navigation buttons.
Since the panels are superimposed and the buttons are in the same locations on all of the panels, when we click forward or backwards, the only element on the panel that is seemingly changing is the selection chart itself. So, the appearance is that we are simply cycling through the selection charts.
The remaining code is what we should do after a selection is made. I will list the code below with notes:
From the code, we can see that as we make selections, we are automatically directed to the next selection panel. Anytime that we want to go back, we use the navigation buttons. If we go back, and then decide everything is okay, then we simply use the navigation buttons to go forward without making selections.
I hope that this is clear how the controls work. Please leave comments if you have questions, or it is not clear. Also leave comments if you want me to write about something in this article that may help with your development applications. In the title, I call this Control Cycling, because I do not know what this is actually called. If you know what to call such behavior I would greatly appreciate you leaving a comment to let me know. Thanks.
Note: In this application, there will be a geo-map, which I will not explain how to code. If interested in how to apply filters to geo-maps, then please see my blog: Filtering Geo Maps ( https://blogs.sap.com/?p=1053842 ).
Below is a screenshot of the application that I am building:
Note: In upper-left there are three text fields that will hold item descriptions that I will select from the chart below the fields. When there are at least two items in the fields, then the geo-map will be displayed, as there has to be at least two items to perform the calculations for the bubble measures.
Video:
In the application description, it is mentioned that we need two to three items selected. This means that I need three charts from which to select items. However, only one is visible in the application, in the screenshot. The three charts are shown below:
Note: Notice that each panel has slightly different navigation buttons.
We only see one input chart in the application, because the charts are superimposed upon one another. Since we only interact with one input chart at a time, then only one chart at a time needs to be visible. The three text fields, placed above the charts, will keep track of the selected items.
Each chart control in encapsulated within a panel widget and accompanied by one or two navigation buttons.
Note: This is the panel for the second input chart that will select the second item. It has two navigation buttons that will allow navigation to the next or previous input panel.
We place the input charts and navigation buttons in a panel for two reasons:
- It is easier to manage panel visibility, then each control individually.
- Some widgets cannot be hidden. For example, the chart cannot be entirely hidden.
This is how the application will work.
- An item in the first panel will be selected
- The selected value will be placed in the first text field above the selection panel.
- The first panel will be hidden
- The next panel will become visible.
- The second item will be selected:
- The selected item will be placed in the second selection text field.
- The geo-map will now be visible.
- The second selection panel will be hidden.
- The third selection panel will become visible.
- The third item will be selected
- The selected item will be placed in the third selection text field.
- The geo-map will be updated with the new addition.
At any time, we can navigate backwards of forwards using the navigation buttons located in each selection panel.
First, we need to superimpose the selection panels. I find that the best way to do this is to hide all the panels, save for one panel, and then place the one visible panel in the correct location.
With only one of the selection panels visible, move the visible selection panel into position. Then, in the Designer note the size and position of the newly placed selection panel.
Next, make another panel visible, while hiding the previous selection panel, and then place it at the same position and same size as the previous selection panel.
Finally, place the final panel in the same manner.
Note: Be sure to hide the panels that you are not placing, because if the panels are visible, then they may become the owner for the newly placed panel. Then, when one panel is hidden, then both panels will become hidden.
Note: In this screenshot I show the Hide/Show menu item that allows controlling the viability of a panel on the canvas.
Now that we have the three panels superimposed, let's look at the code for the navigation buttons.
Panel: First Item
- Name: btnRight_01
Code: pnlFirstItem.setVisible(false);
pnlSecondItem.setVisible(true);
Note: Since this is the selection panel for the first item, we only need a navigation button to go to the next panel. The code hides the first panel, and then shows the second panel.
Panel: Second Item
- Name: btnRight_02
Code: pnlSecondItem.setVisible(false);
pnlThirdItem.setVisible(true);
Note: The code hides the second panel, and then shows the third panel.
- Name: btnLeft_02
Code: pnlSecondItem.setVisible(false);
pnlFirstItem.setVisible(true);
Note: The code hides the second panel, and then shows the first panel.
Panel: Third Item
- Name: btnLeft_03
Code: pnlThirdItem.setVisible(false);
pnlSecondItem.setVisible(true);
Note: Since this is the last selection panel, then we only need a button to the previous selection panel. The code hides the third panel, and then shows the second panel.
Since the panels are superimposed and the buttons are in the same locations on all of the panels, when we click forward or backwards, the only element on the panel that is seemingly changing is the selection chart itself. So, the appearance is that we are simply cycling through the selection charts.
The remaining code is what we should do after a selection is made. I will list the code below with notes:
Panel First Item:
Code:
// Code for the first selection chart onSelect method.
// This code places the selection text from the chart in the first selection text field. var selArray = chrtSICart.getSelections();
strSVDescriptionA = selArray[0]["DESCRIPTION"];
txtSelectedItemA.applyText(strSVDescriptionA);
// This code manages the visibility of the selection panels and the geo-map.
// Hide First selection panel - show second selection panel.
// This cycles from first to second panel
// Hide geo-map since only one item is selected.
pnlFirstItem.setVisible(false);
pnlSecondItem.setVisible(true);
GeoMap_1.setVisible(false);
// Clear the second and third selection texts, as the entries are irrelevant
// because a new lead item has been selected.
txtSelectedItemAB.applyText(' ');
txtSelectedItemABC.applyText(' ');
Panel Second Item:
Code:
// Code for the second selection chart onSelect method.
// This code places the selection text from the chart in the second selection text field. selArray = chrt2NIChart.getSelections();
strSVDescriptionAB = selArray[0]["DESCRIPTION"];
txtSelectedItemAB.applyText(strSVDescriptionAB);
// This code manages the visibility of the selection panels and the geo-map.
// Hide the second selection panel - show the third selection panel.
// This cycles from second to third panel
// Show geo-map since now there are two items selected.
pnlSecondItem.setVisible(false);
pnlThirdItem.setVisible(true);
GeoMap_1.setVisible(true);
// Clear the text in the thrid selection text, as there is now a new second selection made.
txtSelectedItemABC.applyText(' ');
// This code manages the filters for the geo-map
// See blog Filtering Geo Maps ( https://blogs.sap.com/?p=1053842 ).
// For details
chrtLift.getDataSource().setVariableValue("IP_SELECTED_ITEM_1", strSVDescriptionA);
chrtLift.getDataSource().setVariableValue("IP_SELECTED_ITEM_2", strSVDescriptionAB);
chrtLift.getDataSource().setVariableValue("IP_SELECTED_ITEM_3", strSVDescriptionAB);
Panel Third Item:
Code:
// Code for the third selection chart onSelect method.
// This code places the selection text from the chart in the third selection text field.var selArray = chrt3NIChart.getSelections();
strSVDescriptionABC = selArray[0]["DESCRIPTION"];
txtSelectedItemABC.applyText(strSVDescriptionABC);
// This code manages the filters for the geo-map
// See blog Filtering Geo Maps ( https://blogs.sap.com/?p=1053842 ).
// For details
chrtLift.getDataSource().setVariableValue("IP_SELECTED_ITEM_1", strSVDescriptionA);
chrtLift.getDataSource().setVariableValue("IP_SELECTED_ITEM_2", strSVDescriptionAB);
chrtLift.getDataSource().setVariableValue("IP_SELECTED_ITEM_3", strSVDescriptionABC);
// Note: We do not have to manage the visibility of the panels in this code, as it is the last selection panel. If we wanted to return to a previous selection dialog, then we would use the navigation buttons.
From the code, we can see that as we make selections, we are automatically directed to the next selection panel. Anytime that we want to go back, we use the navigation buttons. If we go back, and then decide everything is okay, then we simply use the navigation buttons to go forward without making selections.
Fully populated screenshot with all three selections made, To modify selections, we simply use the back navigation buttons and change previous selections.
I hope that this is clear how the controls work. Please leave comments if you have questions, or it is not clear. Also leave comments if you want me to write about something in this article that may help with your development applications. In the title, I call this Control Cycling, because I do not know what this is actually called. If you know what to call such behavior I would greatly appreciate you leaving a comment to let me know. Thanks.
- SAP Managed Tags:
- SAP Analytics Cloud, analytics designer
Labels:
You must be a registered user to add a comment. If you've already registered, sign in. Otherwise, register and sign in.
Labels in this area
-
ABAP CDS Views - CDC (Change Data Capture)
2 -
AI
1 -
Analyze Workload Data
1 -
BTP
1 -
Business and IT Integration
2 -
Business application stu
1 -
Business Technology Platform
1 -
Business Trends
1,661 -
Business Trends
87 -
CAP
1 -
cf
1 -
Cloud Foundry
1 -
Confluent
1 -
Customer COE Basics and Fundamentals
1 -
Customer COE Latest and Greatest
3 -
Customer Data Browser app
1 -
Data Analysis Tool
1 -
data migration
1 -
data transfer
1 -
Datasphere
2 -
Event Information
1,400 -
Event Information
64 -
Expert
1 -
Expert Insights
178 -
Expert Insights
273 -
General
1 -
Google cloud
1 -
Google Next'24
1 -
Kafka
1 -
Life at SAP
784 -
Life at SAP
11 -
Migrate your Data App
1 -
MTA
1 -
Network Performance Analysis
1 -
NodeJS
1 -
PDF
1 -
POC
1 -
Product Updates
4,577 -
Product Updates
326 -
Replication Flow
1 -
RisewithSAP
1 -
SAP BTP
1 -
SAP BTP Cloud Foundry
1 -
SAP Cloud ALM
1 -
SAP Cloud Application Programming Model
1 -
SAP Datasphere
2 -
SAP S4HANA Cloud
1 -
SAP S4HANA Migration Cockpit
1 -
Technology Updates
6,886 -
Technology Updates
403 -
Workload Fluctuations
1
Related Content
- Comprehensive Guideline to SAP VMS in Technology Blogs by Members
- How to control quote page via keyboard on the CPQ application? in Technology Blogs by SAP
- Replace a Model in the Optimized (Unified) Experience in Technology Blogs by SAP
- Recap — SAP Data Unleashed 2024 in Technology Blogs by Members
- An Introduction to SAP Grants Management for Grantee in Technology Blogs by Members
Top kudoed authors
| User | Count |
|---|---|
| 12 | |
| 10 | |
| 9 | |
| 7 | |
| 7 | |
| 7 | |
| 6 | |
| 6 | |
| 5 | |
| 4 |